How to Fix iPhone Flash Is Disabled Issues [iOS 26]
Facing the “iPhone flash is disabled” error? This guide explains why it happens and provides six clear methods to fix it on iPhone, ranging from cooling your device to repairing system-level bugs. Available to use on the latest iOS 26 and iPhone 17.
The iPhone’s camera flash is more than just a tool for low-light photography; it’s also the go-to flashlight, a notification alert, and a key part of the camera system. When you try to take a photo or light up a dark room but end up with the “iPhone flash is disabled” message, it can be incredibly frustrating. This issue can pop up on any model. It is often related to software, temperature, or battery settings.
Why does my iPhone show “iPhone flash is disabled”, and how can I fix this issue? This article will walk you through exactly what this error means and provide 6 step-by-step methods to resolve the “iPhone flash is disabled” issue, getting your camera and flashlight working again.
You may also like: How to fix iPhone flashlight not working
What Does “Flash Is Disabled” Mean on iPhone?
The “Flash is Disabled” message is a specific, temporary notification that appears within the Camera app or affects the flashlight toggle. It means that your current iOS version has intentionally turned off the LED flash to protect the device’s hardware. This isn’t a random bug; it’s a built-in safety feature. The notification is almost always accompanied by a reason, which tells you exactly what the problem is. There are 2 cases under this problem.
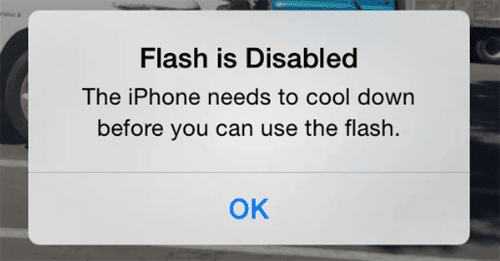
Case 1. “Flash is disabled. The iPhone needs to cool down before you can use the flash.”
This is the most common cause. The iPhone’s LED flash generates a significant amount of heat. If your device is already hot from activities like gaming, streaming 4K video, using GPS navigation in a hot car, or simply being left in direct sunlight, the system will disable the flash to prevent overheating and potential damage to the battery and internal components.
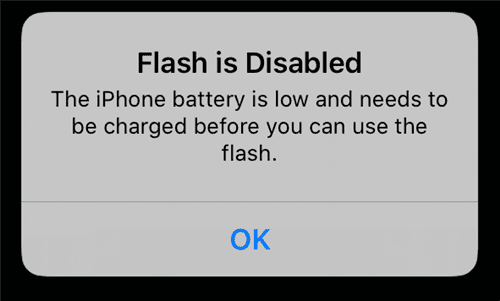
Case 2. “Flash is disabled. The iPhone battery is low and needs to be charged…”
The flash also requires a burst of power that a very low battery cannot safely provide. To conserve the remaining power for essential functions and to protect the battery’s health, iOS will disable the flash when the charge is critically low. This often happens in conjunction with Low Power Mode.
In rarer cases, this message can appear without a specific reason, indicating a software glitch or a system-level bug that is incorrectly reporting a temperature or power issue.
How to Fix When Flash Is Disabled on iPhone 17/16/15
Since the flash being disabled issue can be caused by improper settings to system-related errors, you can check the following 6 methods to troubleshoot and fix it on your iPhone or iPad.
Method 1. Force Restart Your iPhone
A force restart is often the most effective fix for temporary software glitches. It doesn’t erase any data but clears your iPhone’s temporary memory and can resolve underlying processes that may be causing the problem. Here’s how to force restart your iPhone:
- Press and quickly release the Volume Up button.
- Press and quickly release the Volume Down button.
- Press and hold the Side button until you see the Apple logo appear on the screen.
- Release the button and let the iPhone reboot.
Once your iPhone has restarted, open the Camera app or swipe down to the Control Center and check if the flash and flashlight are working again. You can also check what to do when iPhone force restart not working.
Method 2. Cool Down Your iPhone
If your flash is disabled due to overheating, the only solution is to lower the device’s temperature. Do not put it in a refrigerator or freezer, as the rapid temperature change can cause condensation and permanent water damage.
Here is the safe way to cool down your iPhone:
- Stop all activity: Close all apps, especially the Camera, games, or GPS apps.
- Remove the case: A case can trap heat, so taking it off will help the iPhone dissipate heat faster.
- Unplug it: If the iPhone is charging, unplug it. Charging generates its own heat.
- Move it: Take the iPhone out of direct sunlight and move it to a cooler, shaded, or air-conditioned environment.
- Turn it off (optional): For the fastest results, you can power down the iPhone completely and let it sit for 10-15 minutes.
Once the phone feels cool to the touch, turn it back on. The “flash is disabled” message should be gone.
Method 3. Disable Battery Charging Optimization
Optimized Battery Charging is a feature designed to reduce battery aging by learning your charging habits. It can sometimes hold your phone at an 80% charge. While it’s not a direct cause, some users have reported that toggling this feature off and on can help reset a confused battery-related software glitch.
- Go to Settings > Battery.
- Tap on Battery Health & Charging.
- Tap on Charging Optimization.
- If it’s set to “Optimized Battery Charging,” toggle off the button and confirm.
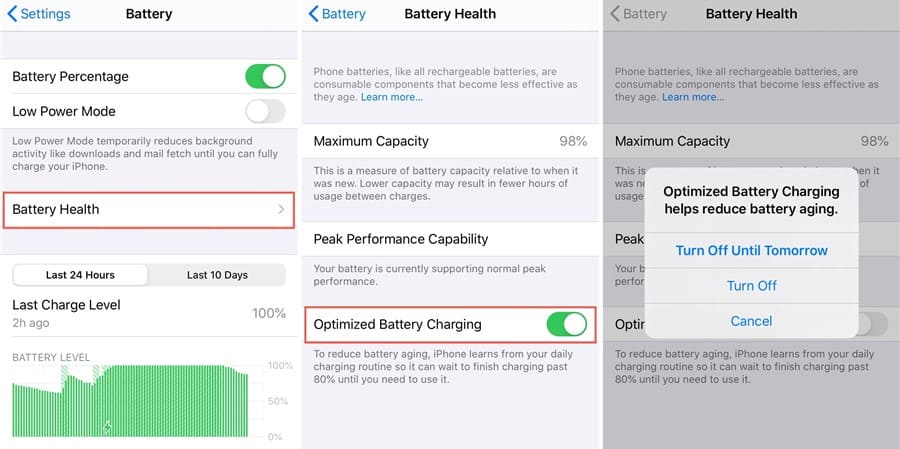
- Restart your iPhone and check the flash.
Whether this works or not, it’s generally recommended to turn Optimized Battery Charging back on afterward to protect your battery’s long-term health.
Method 4. Turn Off Low Power Mode
Low Power Mode can sometimes cause problems, not just the disabled flash. This mode automatically reduces or disables certain background activities and features to extend your battery life, and the flashlight is often one of them, especially when the battery level is very low.
You can easily check and disable it from your Control Center or Settings.
From Control Center:
- Swipe down from the top-right corner of your screen.
- Look for the battery icon. If it’s yellow, Low Power Mode is on.
- Tap the battery icon to turn it off. It will turn white or black (depending on Dark/Light mode).
From Settings:
- Go to Settings > Battery.
- Tap the toggle for Low Power Mode to turn it off.
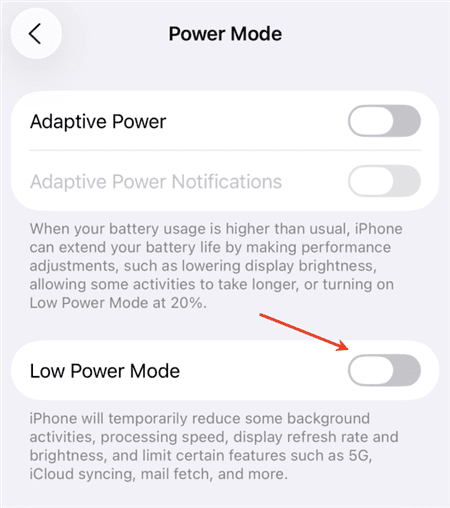
You should note that if your battery is critically low, the flash may remain disabled even with Low Power Mode off. The best solution is to charge your iPhone. Once it’s charged above 20-30%, the flash should be automatically re-enabled.
Method 5. Update iOS
If the problem persists and isn’t related to heat or battery, it could be a software bug in your current version of iOS. Apple frequently releases updates to patch bugs that affect hardware components like the camera and flash. You can check for update and get the latest iOS version.
- Plug your iPhone into a charger and connect to Wi-Fi.
- Go to Settings > General > Software Update.
- Your iPhone will check for a new update.
- If an update is available, tap “Download and Install”.
- After downloading, you can tap on the Update Now button to make the upgrade directly.
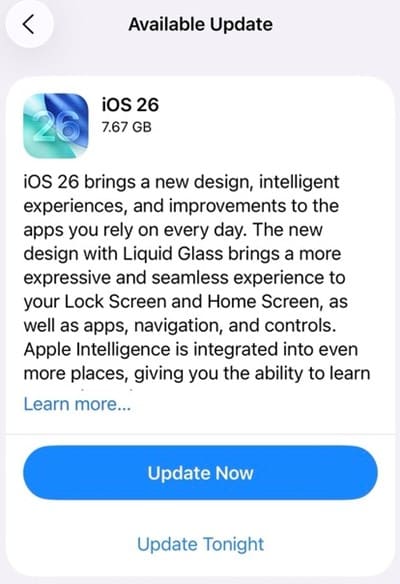
Let your iPhone complete the update and restart. This often resolves persistent, unexplainable software glitches.
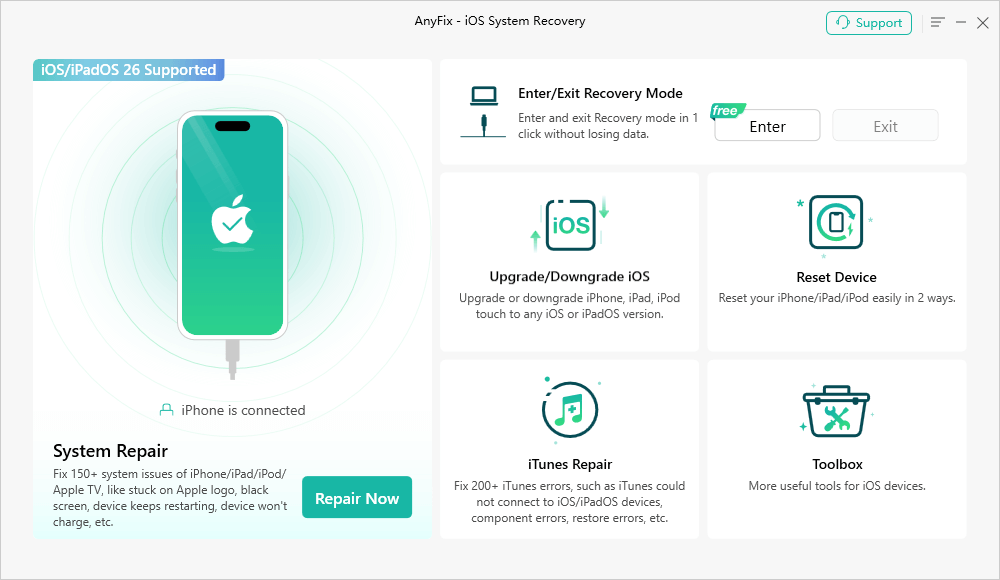
Method 6. Repair iPhone System
If you’ve tried all the methods above but the flash is still disabled, you may be facing a deeper iOS system corruption. This can happen after a failed update or from a rogue app. In this case, a more reliable way is to repair iOS with iMobie AnyFix. It’s a comprehensive desktop application designed to fix over 150 different iOS system issues, including the iPhone flash is disabled problem.
Key Features of AnyFix:
- Fixes most common system issues without any data loss.
- A high rate of success in repairing underlying system corruptions that a simple restart can’t fix.
- Provides clear and on-screen instructions. Easy to use for every user.
- Supports the latest iPhone 17 and iOS 26.
Steps to fix iPhone flash is disabled with AnyFix system repair function:
Step 1. Download and install AnyFix on your Windows or Mac computer.
Free Download * 100% Clean & Safe
Step 2. Open AnyFix and select the System Repair module. Connect your iPhone to the computer with a USB cable.
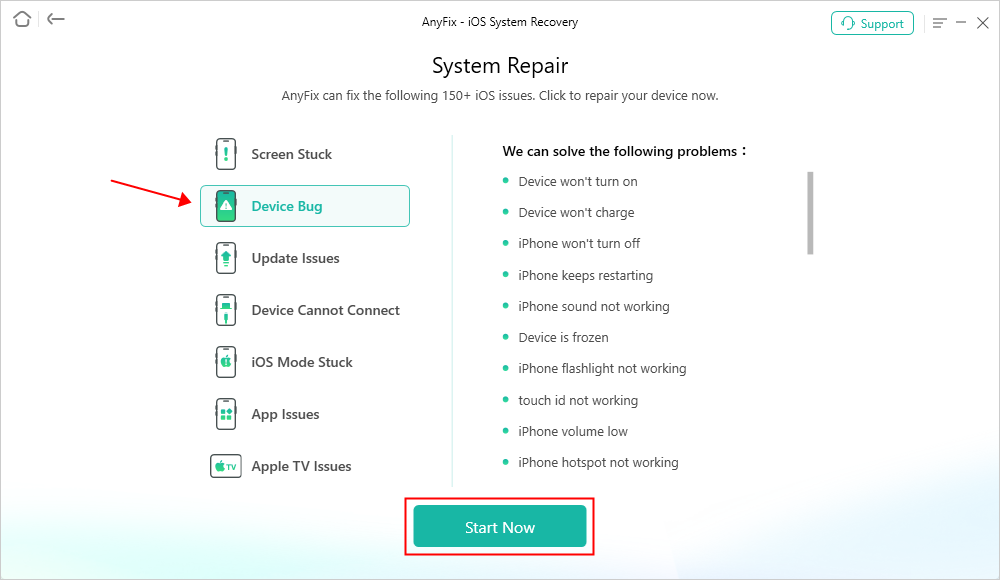
Step 3. Choose Device Bug and then click “Start Now”.
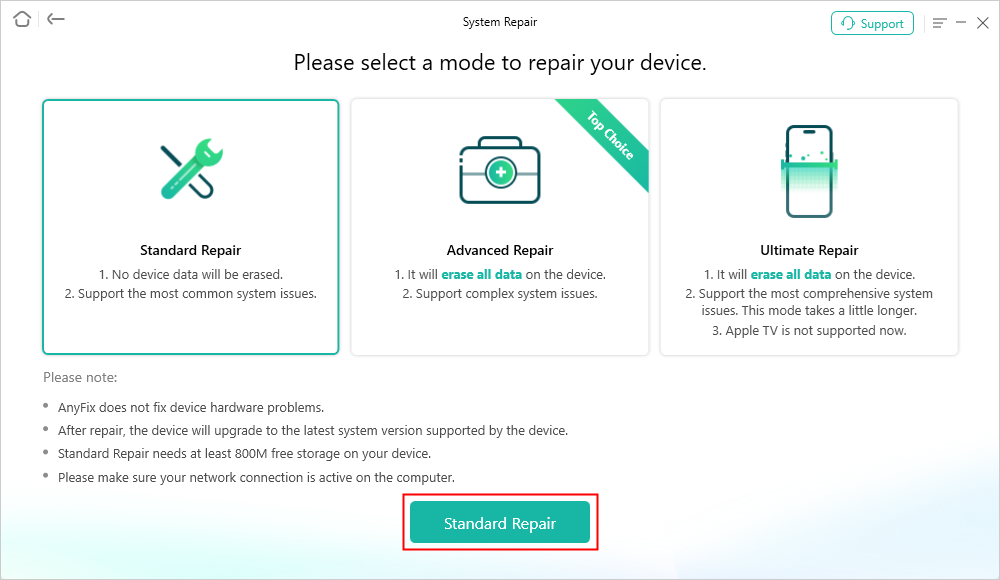
Step 4. Select “Standard Repair”. This mode is designed to fix problems without wiping your device.
Step 5. AnyFix will detect your iPhone status and prompt you to download the correct firmware package.
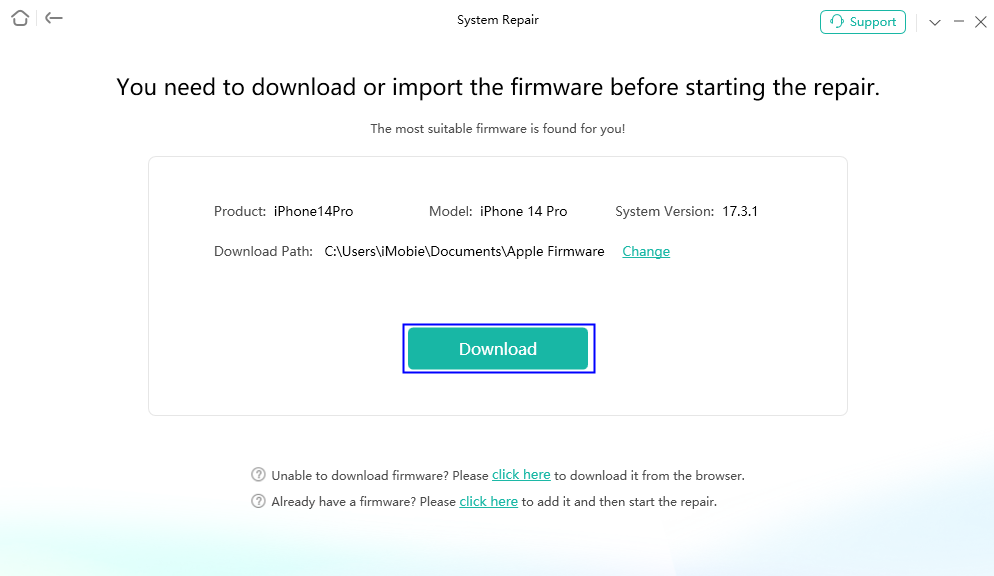
Step 6. Once the firmware is downloaded, click “Start Standard Repair”. AnyFix will then analyze your system and repair the corrupted files.
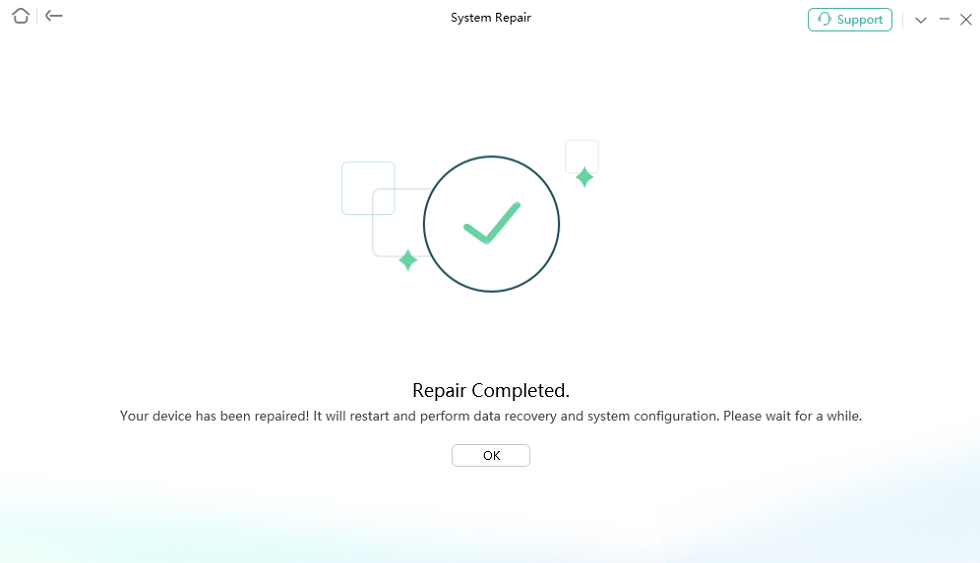
Your iPhone will restart automatically once the repair is finished, and the flash issue should be resolved.
FAQs About iPhone Flash Is Disabled
1. Why is my flash disabled on my iPhone?
There are three main reasons why your iPhone flash is disabled, including the iPhone is overheating, the battery is too low, or some software glitches. You can refer to the methods above to fix a disabled flash on your iPhone.
2. How do I reactivate the flashlight on my iPhone?
You can reactivate it by cooling down your iPhone for 10-15 minutes, charging the iPhone for a while, force restarting it, or fixing the system with an iOS system repair tool like AnyFix.
Conclusion
Encountering the iPhone flash is disabled message can be alarming, but it’s usually a protection mechanism on your iPhone. In most cases, the fix is as simple as cooling it down or charging its battery. For more stubborn software glitches, a force restart or an iOS update will typically solve the problem. And for those persistent system errors, AnyFix can get your flash working again without losing data. Quickly diagnose the cause and get your camera and flashlight back to normal with the methods in this article.
Free Download * 100% Clean & Safe

Joy Taylor is a seasoned technical writer with over a decade of experience in mobile technology. At iMobie, she specializes in producing in-depth content on iOS data recovery, iPhone unlocking solutions, and iOS troubleshooting.
Product-related questions? Contact Our Support Team to Get Quick Solution >
