How to Fix The iTunes Library.itl File Is Locked?
Is your iTunes library got locked due to any reason and you don’t know what to do now? This could be due to many reasons, whether your iTunes library got locked or the folder itunes is on a locked disk. Here are some of the ways that can assist you to get your iTunes library back.
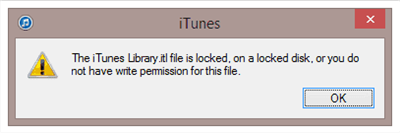
Did it ever happen with you that you opened your iTunes library and it a pop-up appears which says, ‘The iTunes Library file is locked, the folder iTunes is on a locked disk, or you do not have write permission for the file’. Ultimately, you will have to close iTunes and won’t be able to open it again.
Sometimes iTunes subscribers may be unable to enter iTunes due to the error ‘The iTunes library.itl file is locked’, leaving them unable to control their iOS devices. A complete re-install of iTunes will not assist in this case.
The Folder iTunes Is on a Locked Disk
There can be some different ways to resolve the folder iTunes is on a locked disk issue. Read it to the end as here we will explain to you, ‘How to Fix iTunes Library .itl File is Locked?’ and provide various solutions for it.
Further Reading: How to Access iTunes Library from iPhone/iPad >
Why Is iTunes Library Locked?
iTunes is the standard application for managing your music on iPhone, iPad, or iPod, and it can store your files like songs, playlists, movies, and ringtones. All the Apple devices can only be synced with one iTunes library. When a library is transferred between different computers or accessed by a separate account on the same computer, this can happen.
This can also cause the error message, ‘The iTunes Library file is locked, the folder iTunes is on a locked disk, or you do not have written permission for the file’. This issue could be solved correctly using the methods explained below.
The iTunes library is generally located at ‘C:\Users\<User>\Music\iTunes\iTunes Library.itl’. You can follow the above path to go to your iTunes library, and see why is the folder itunes is on a locked disk issue arose?
How to Fix The iTunes Library.itl File Is Locked?
There’s no need to be worried if the above issue the folder iTunes is on a locked disk has also happened with you. Many users are likely to have experienced the same issue. Alteration in the structure of the file or any other system feature can cause to lock down the iTunes folder. That’s when you will get the above-mentioned error message for the iTunes library.
Method 1. Check the Permission of the iTunes Folder
The above-mentioned error of the folder iTunes is on a locked disk could be raised because of the permissions that are granted to iTunes library. The files saved on the iTunes might be on read-only mode, or that your account lacks the necessary security rights.
Follow the given steps to check and edit the permission of the iTunes folder.
Step 1. Go to the iTunes Window and right-click on the screen.
Step 2. From the options thus appeared, tap on ‘Properties’ and then go to the ‘Security’ tab and click on ‘Advanced’.
Step 3. Like the other window for ‘Advanced Security Settings for iTunes’ open, you will automatically be on the ‘Permission’ tab. Now, click on the ‘Change Permission’ button given on your screen and tick mark the option ‘Replace Permission Entries’ which can help you to edit the permissions throughout the libraries. (Here, the Administration, SYSTEM, and Users group should have full control on iTunes).

Check the Permission of the iTunes Folder
Step 4. After you have edited the permissions, go to the ‘General’ tab of the iTunes properties. Uncheck the Read-only check box, and then hit the ‘Apply’ button to change the permissions.
Method 2. Prevent iTunes from Windows Defender
In rare circumstances, Windows Defender may be interfering with the user’s ability to use iTunes properly to resolve the issue of the folder itunes is on a locked disk. As a result, we will include it as an exception in this phase.
Step 1. To do so, you need to go to Settings. Click the ‘Windows + I’ key to open the Settings Window.
Step 2. From the given options, select ‘Update & Security’ and then from the list given in the left pane click on the ‘Windows Security’.
Step 3. Tap on ‘Virus and Threat Protection’ and on the right-hand side window that appears next, click on the ‘Manage Settings’ button.
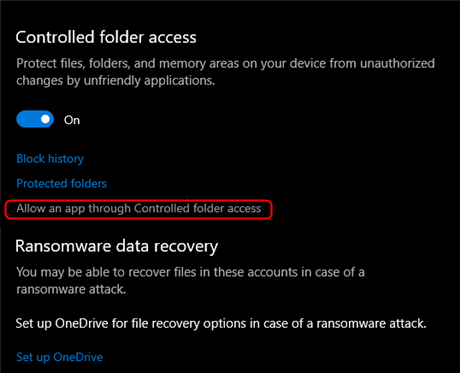
Allow iTunes through Controlled Folder Access
Step 4. On the next appeared window, you will see an option ‘Allow an App through Controlled Folder Access’, click on it and then go for the ‘Add an Allowed App’ option.
Step 5. There will be a list of multiple alternatives, choose ‘iTunes’.
Method 3. Copy the Library to a New One
If you are unable to solve the folder iTunes is on a locked disk issue with these two above-given methods, then you should use this one. Might it be possible that you can resolve this issue using this fix?
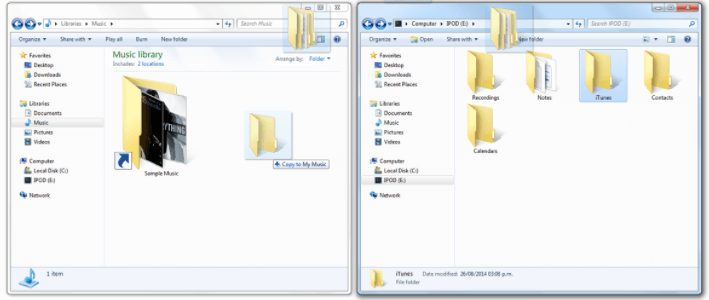
Copy the Library to a New One
Turn on the computer. Do not copy any other apps or directories when it boots. Copy the contents from the original iTunes folder. Return to the Music folder and create a New iTunes folder. Copy the content of the previous library and paste it into the New iTunes folder. To open the iTunes application, hold down the shift key and double-tap on iTunes to start the app. Even as the iTunes window begins to appear, keep holding down the shift key. You will be asked either to create or choose a library from the window that appears on your screen. Select ‘Choose’ from the drop-down menu. Go to the location of your library file in the browser and tap on it. This should be the New iTunes folder you established.
Method 4. Access and Transfer iTunes Library to Your Computer
If any of the above-mentioned fixes don’t work for you to resolve the folder iTunes is on a locked disk, try using AnyTrans. AnyTrans application will help you manage iTunes Library, exporting the iTunes music from your iTunes Music folder to any Flash/USB Drive. It is one of the easiest and fastest ways to access and transfer the iTunes Library to your computer.
Free Download * 100% Clean & Safe
There are some steps that you can follow to transfer your iTunes Library to your computer or USB/Flash Drives using AnyTrans.
Step 1. Free download and Install the AnyTrans on your computer. Run the AnyTrans app and connect your iPhone via a USB cable.
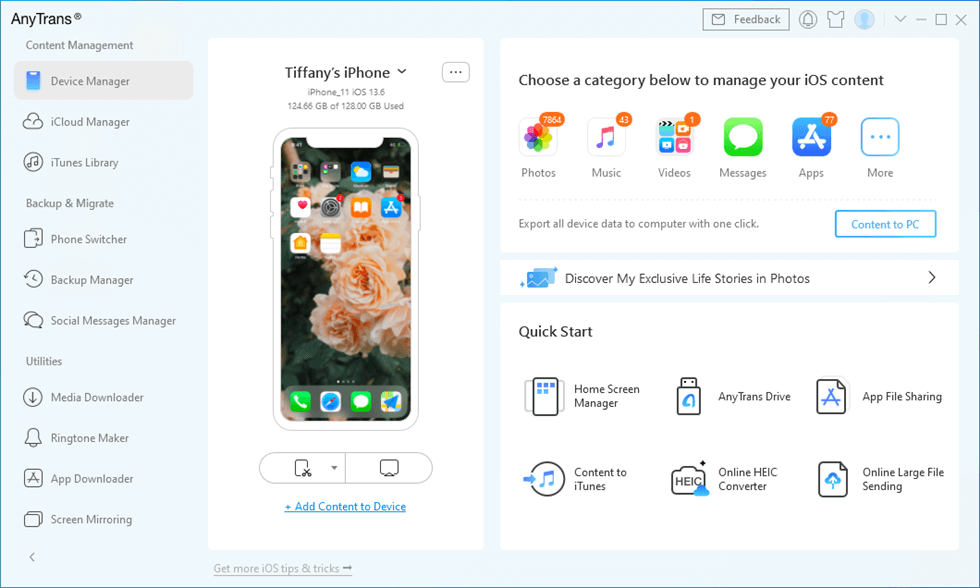
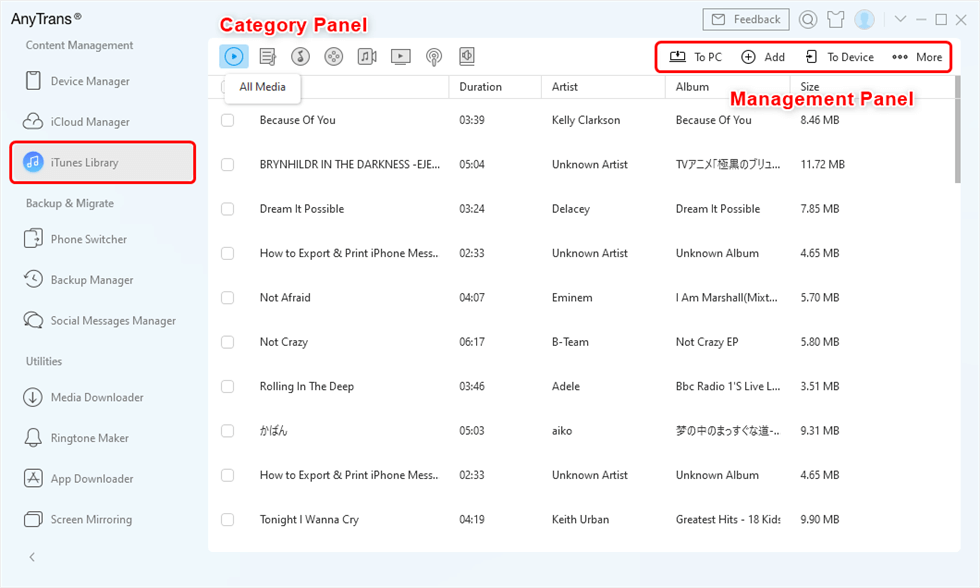
Access iTunes Library on Your Computer
Step 2. Tap on the iTunes Library. From the category panel, you can locate at the iTunes library. Click on Songs and you can transfer the selected music to the folder on your PC computer.
Manage iTunes Library with AnyTrans
The Bottom Line
The iTunes folder can be locked if you try using your apple device with a different iTunes account on them or trying to use your iTunes account on many apple devices. This issue of the folder iTunes is on a locked disk can be resolved using these 4 above-mentioned fixes. You can choose any of these methods according to your choice to fix your iTunes music library.

Member of iMobie team as well as an Apple fan, love to help more users solve various types of iOS & Android related issues.
Product-related questions? Contact Our Support Team to Get Quick Solution >
