Imagine building a food delivery app where showing nearby restaurants based on the user’s physical position is critical. You are testing at your desk, but the app remains completely frozen. You urgently need to simulate a GPS location in the iOS Simulator for testing, yet finding where to actually change the location inside Xcode feels unnecessarily hidden. When your simulated location isn’t updating in the app and Apple’s documentation feels vague, the frustration is incredibly real. You cannot realistically drive across the city just to verify a few lines of Core Location code.
Whether you want to test continuous movement along a delivery route, verify a geofence trigger, or simply understand how to use GPX files effectively without hand-coding XML, this guide provides the exact practical steps you need. By following these developer-tested techniques, you will resolve common location services errors and regain complete control over your testing workflow.
Table of ContentsHide
How to Set a Static Location in Xcode Simulator Quickly
When you need a fast solution to verify a specific geographic point—like checking if a localized map loads correctly or if a stationary user sees the right weather data—using the manual interface is your best starting point. You can bypass complex file setups and rely entirely on the built-in simulator menus.
Here is the step-by-step procedure to configure a custom static location:
- Run in iOS Simulator: Build and run your app in the iOS Simulator directly from Xcode.
- Access Location Menu: In the top menu bar of your Mac (with the simulator active), navigate to Features > Location.
- Choose Preset or Custom Location: Select a default option like Apple (Cupertino) or City Bicycle Ride, or pick “Custom Location…”.
- Enter Coordinates: If using “Custom Location…”, enter your target Latitude and Longitude numerically in the dialog box, then click OK.
Alternatively, you can manage this using the Debug area within Xcode itself. Look at the bottom console bar while your application is running. Click the small Location icon (represented by an arrow) to reveal a dropdown menu. From this menu, you can quickly select built-in presets or previously imported locations.
To verify this method worked, simply open the native Apple Maps app inside the simulator to confirm the blue dot is positioned at your specified coordinates. This basic technique is ideal for quick checks, ensuring your initial app load behaves correctly before you move on to more complex movement logic.
How to Simulate Movement and Routes with GPX Files
Let’s return to the scenario of building a food delivery app. During the testing phase, you might hit a wall: your list of nearby restaurants fails to update as the simulated driver supposedly moves across town. You set a static point, but the application remains stubbornly frozen in place.
Here is a critical expert insight that solves this exact problem: the simulator sends location updates to your app only when a new GPX event is triggered. If an app relies on continuous location updates, you must configure GPX routes with multiple points to simulate actual movement. A static coordinate fires once and stops, meaning location-dependent logic like geofencing or distance tracking will simply not trigger correctly over time.
To accurately simulate movement, you need a GPX (GPS Exchange Format) file. While a GPX file is just XML containing waypoints (<wpt>), you should never hand-code these files. Calculating and typing out 50 different latitude/longitude coordinates and timestamps for a 20-minute drive is a massive waste of developer time.
Learn More:Bladers Rebirth Codes: Your Guide to Free Rewards >
Here is the real-world workflow to simulate a continuous route:
1. Generate the GPX Route Automatically
Instead of typing XML, use a free web-based GPX generator (such as GMapToGPX, GPX Generator, or by exporting a route from mapping software).
- Enter Route Details: Enter your starting point and destination.
- Generate Route: Choose a walking, cycling, or driving route.
- Export GPX File: Export and download the .gpx file to your Mac.
2. Import the GPX File into Xcode
Once you have your downloaded GPX file, you need to bundle it with your app for the simulator to recognize it.
- Open Xcode Project: Open your project in Xcode.
- Import GPX File: Drag and drop the .gpx file from Finder into your Xcode Project Navigator (left sidebar).
- Confirm Target: When prompted, ensure your main app target is checked under “Add to targets” so the file is compiled with your build.
3. Trigger the Route in the Simulator
- Build and Run: Build and run your application.
- Access Location Menu: Click the Location arrow icon in the Xcode Debug area at the bottom of your screen.
- Select GPX File: Your newly imported GPX file will appear in the dropdown list. Select it.
- Simulate Movement: The simulator will iterate through the waypoints, feeding continuous location data to your app.
⚠️ Real-World Warning: Speed Interpolation and Timestamps
If you open your generated GPX file in a text editor, you will notice <time> tags inside each waypoint. Pay close attention to these. The simulator uses the time difference between <time> tags to calculate your movement speed.
If your GPX generator places two coordinates a mile apart but spaces their timestamps by only one second, the simulator will interpolate that data and make your device look like it’s traveling at Mach 3. This will trigger massive location jumps, which can easily break your app’s speed-limit filters, confuse distance calculations, or trigger anti-spoofing logic in production environments. Always ensure the timestamps in your GPX file reflect a realistic speed for your use case (e.g., walking vs. highway driving).
Learn More:If You Delete Life360 Does It Still Track You? The Real Answer >
Advanced Techniques for iOS App Location Testing
Moving beyond simple interface interactions requires a deeper integration with the Core Location framework. Highly effective testing means systematically verifying that your source code correctly interprets the simulated coordinate data behind the scenes.
When building software like ride-sharing systems, your most reliable tool is directly monitoring your CLLocationManager delegate methods. As your GPX route runs, carefully observe your Xcode console for the didUpdateLocations and didEnterRegion callbacks.
Here are the essential best practices for a seamless debugging procedure:
- Verify Authorization Status: Before testing, check
CLLocationManager.authorizationStatus(). The simulator mimics real iOS privacy settings and will block simulated data if your app hasn’t requested permission. - Monitor Accuracy Settings: Set
CLLocationManager.desiredAccuracyappropriately. The simulator enforces the accuracy constraints you request. Use lower accuracy settings to safely test efficiency without draining battery in production. - Test Background Execution: Ensure the app target has Location updates background mode enabled. Background tracking is stricter than foreground, often batching or pausing updates. The simulator is useful for testing region monitoring wake-ups.
- Log Delegate Triggers: Add console print statements inside location delegate methods. Triggering a virtual geofence should produce logs confirming the event, validating your logic independently of the UI.
Troubleshooting: Fixing Xcode Simulator GPS Location Not Updating
A common and frustrating obstacle during software development occurs when the simulator interface indicates a location is set, but your internal application logic receives absolutely no data. If your location refuses to update properly, methodically check these project configurations:
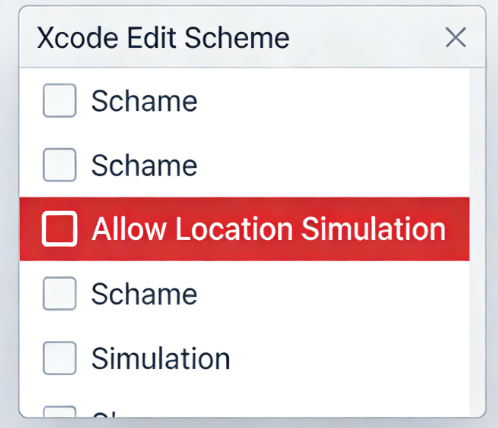
🚨 WARNING: The “Allow Location Simulation” Checkbox
This is the most frequent culprit for simulated data failure, and it is buried in a menu most developers rarely check. If your GPX routes are doing nothing, check this first:
- Edit Scheme: Go to Product > Scheme > Edit Scheme in the top Xcode menu.
- Select Run Phase: Choose the Run phase from the left side menu.
- Navigate to Options: Open the Options tab in the main window.
- Enable Location Simulation: Ensure the “Allow Location Simulation” checkbox is ticked. If disabled, Xcode will ignore GPX files and simulator location menus, silently failing to pass data to your app.
Verify Info.plist Privacy Permissions
Apple’s operating systems strictly enforce user privacy. Ensure your Info.plist file includes the correct permission keys. At a minimum, you need NSLocationWhenInUseUsageDescription. If you are testing background tracking, you also need NSLocationAlwaysAndWhenInUseUsageDescription. Without these exact string values, the system silently blocks requests, and your app will never even prompt the user for access.
Learn More:Meta Lock Codes: Your Verified Tool for Free Spins and Rewards >
Reset the Simulator State
If the scheme settings and Info.plist are perfectly correct but the location testing is still failing, the simulator’s internal state might be corrupted or holding onto an old privacy denial. Go to the active simulator menu bar and select Device > Erase All Content and Settings to perform a clean boot. This forces the virtual device to wipe its location caches and reset all privacy prompts.
Easier Alternative to Xcode Location Simulation
While Xcode is a powerful tool for testing GPS locations on iOS devices, some users may find the setup process complicated, especially if they only need to change their location occasionally.
FoneLora Location Changer offers a simpler solution for both iPhone and Android users. With just a few clicks, you can change your GPS location, simulate movement along custom routes, and test location-based apps without using Xcode or developer tools. This makes it a convenient option for users who want to manage virtual locations more efficiently.

Frequently Asked Questions About Simulator Location Testing
To round out your technical knowledge, here are clear answers to common questions developers ask when managing their geographic testing environments.
- Why is my simulated location not updating continuously in my app?
- If your location isn’t updating over time, you are likely using a static coordinate instead of a GPX route. Alternatively, your “Allow Location Simulation” setting might be unchecked in your Xcode project’s Scheme options, or you are missing privacy permission strings (NSLocationWhenInUseUsageDescription) in your Info.plist.
- Can I test geofencing in the iOS simulator?
- Yes. To test geofencing accurately, use a GPX route that begins outside of your defined geofence region and physically moves inside it. This guarantees that your didEnterRegion delegates fire exactly as they would in the real world.
- Does the Xcode simulator support custom GPS locations?
- Yes. You can input any custom latitude and longitude directly through the simulator’s Features > Location > Custom Location… menu.
Testing location-based logic should never leave you feeling stuck at your desk, guessing whether your code is broken or if the simulator is simply misconfigured. By applying the correct procedures—relying on static points for quick UI checks and properly interpolated GPX files for dynamic routes—you can test geofencing and continuous tracking without ever getting in your car. Now that you know how to avoid the “Allow Location Simulation” trap and how simulator speed interpolation works, you can solve these tracking problems in minutes and ship location-aware software with confidence.
If you are still struggling with tricky CoreLocation delegates, background execution limits, or other environmental bugs, download our free iOS debugging checklist to help systematically isolate and fix those remaining framework issues today.
Conclusion
Xcode Simulator is an effective way for developers to test location-based applications and simulate GPS coordinates in different regions. By following the steps in this guide, you can easily set and modify locations within the iOS development environment.
However, if you’re looking for a faster and more user-friendly way to change your device’s location without relying on Xcode, FoneLora Location Changer is worth considering. It provides flexible location simulation features for both iOS and Android devices, making GPS location changes simple and accessible for everyday users.


Hot Topics
