How to Fix Windows 10 Slow after Update
If your Windows 10 computer has become slow after an update, this guide has got some tips for you to improve the performance of your computer. It shows multiple ways of fixing the issue so your computer runs faster. Read on to learn more.
Windows PC Clean Tips
Fix Computer is Slow
Windows Cleanup Tips
While the purpose of any update you get for your Windows 10 system is to improve the performance and make the system more stable, sometimes the updates themselves cause issues on your computer. Some of the users complain that their Windows 10 PCs slowed down after they installed an update. There are some other reasons as well as to why your PC has slowed down.
Maybe you have not rebooted your computer for a long time. Or maybe your hard drive is corrupted. There could be a million other reasons causing your computer to slow down.
In this guide, though, we will be focusing on how you can fix the Windows 10 slow performance issue if it has been caused by a Windows update. The guide offers multiple fixes and you will likely be able to get rid of the issue from your computer using these methods.
Let’s check out the methods:
How to Fix Windows 10 Slow After Update
To make it easier for you to implement the methods to improve your computer’s performance, we have only listed a few easy to follow methods for you. Any user with a basic knowledge of computers should be able to use these methods and fix the slow performance issue on the computer.
Let’s get started:
Method 1. Scan Your Computer for Virus and Malware
The first thing you will want to verify is if your computer is free of any viruses. Nowadays it is very common for Windows PCs to get infected by various kind of viruses and these viruses are often the reason for your computer’s slow performance.
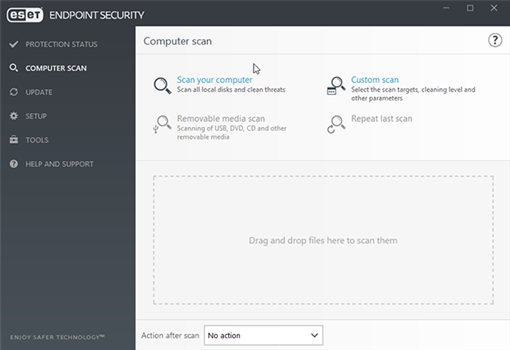
Scan and remove viruses from your PC
To detect and remove viruses and malware from your computer, what you can do is you can install a good antivirus software on your system. There are dozens of such free software available in the market and you can use any of them to clean up your machine of any viruses.
Method 2. Disable Apps Running in the Background
Many times it happens that you launch an app to do something, you get the task done, but you forget to close the app. The app continues to run in the background and constantly uses your resources. If you are not careful enough, you will have a number of apps running in the background eating up your resources.
So have a look at the apps running in your background and close the ones that you do not plan to use anytime soon. It will free-up your resources and your computer will work faster than before.
Method 3. Clean Your PC of Junk Files
If it has been a long time since you did a full format of your computer, your computer may have likely accumulated a large collection of junk files. Many of these files come from the apps you install, the websites you visit, and from other sources.
Since these junk files are not of any use, you should get rid of them from your computer as soon as you can. The question, though, is how do you do it? Since these files are scattered all over your computer, it is practically impossible for you to manually find and delete them from your machine.
Fortunately, you have an app called Ashampoo WinOptimizer that lets you find and delete junk files automatically from your machine. The app has built-in algorithms that help detect junk content and then you can press a button to delete all of these files at once from your PC.
The following is how you use the app to perform a clean up of your Windows 10 computer:
Step 1: Open the Ashampoo WinOptimizer app website in your browser and download and install the app on your PC.
* 100% Clean & Safe
Step 2: When the app is installed, launch it on your PC. Click on Maintain system in the left sidebar menu and then choose the Drive Cleaner option from the right panel.
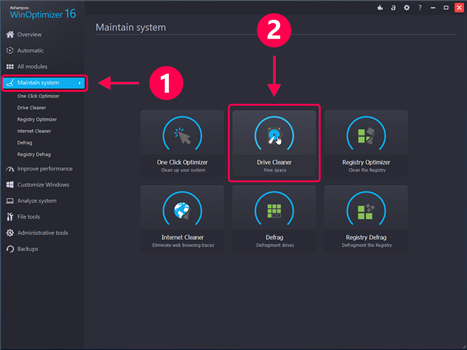
Access Drive Cleaner module in the app
Step 3: The app will let you know what type of files it is going to remove from your system. Review the list and then click on the Delete now button in the bottom-right corner of your screen.
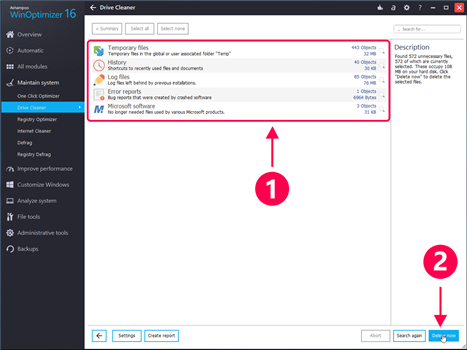
Review and delete files
Step 4: Wait while the app cleans your machine. When it’s done, you will see the following message on your screen.
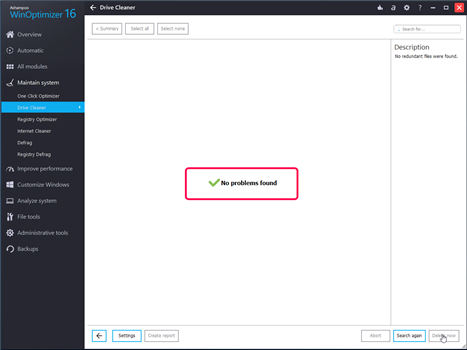
Junk files deleted from your computer
The app has successfully cleaned your PC of any junk and invalid files. You will see a significant improvement in the performance of your computer.
Conclusion
If your Windows 10 machine is not performing well, the above guide should teach you how you can improve the performance of your Windows 10 PC using various methods. We hope it helps you make your computer faster again.

Member of iMobie team as well as an Apple fan, love to help more users solve various types of iOS & Android related issues.
Product-related questions? Contact Our Support Team to Get Quick Solution >