How to Recover Pendrive Data in 2026: A Tested Guide
When a deadline is closing in and you suddenly realize the crucial files on your USB drive are missing, the wave of panic is all too familiar. If you’re staring at an empty or inaccessible flash drive right now, take a moment to breathe. The good news is that your data is often still there—and very likely recoverable.
The sinking feeling of a deadline looming and discovering your critical files have vanished from your pendrive is a uniquely stressful experience. If you’re staring at an empty or inaccessible USB drive right now, take a breath. The good news is that your data is often still there and recoverable.
Finding reliable, direct advice can be difficult when you’re in a panic. That’s why we created this guide based on hands-on testing with real-world data loss scenarios. Our goal is to give you a trustworthy, step-by-step method to get your data back, not just more research to do. We’ll walk you through the exact steps and recommend a specific, tested tool that works.
First Steps: What to Do Immediately When Your Pendrive Fails
Your actions in the first few minutes after discovering data loss are the most critical for a successful pendrive data recovery. The primary goal is to prevent the original data from being overwritten. As data recovery professionals explain, continued use of the pendrive dramatically increases the chance of permanently erasing recoverable data. To maximize your chances, you must stop using the drive immediately.
Follow these three steps without fail before attempting any recovery procedure:
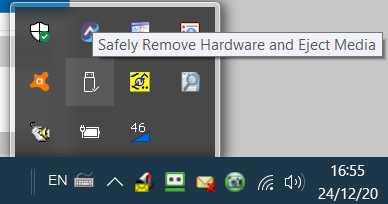
1. Stop All Activity and Safely Eject: If the pendrive is connected to a computer, stop any file transfers. Use the ‘Safely Remove Hardware and Eject Media’ option in your system tray to disconnect it properly. Do not simply pull it out, as this can cause further logical damage.
2. Do Not Write New Data or Format: Do not save, copy, or move any new files to the pendrive. If your operating system prompts you to format the disk, always click ‘Cancel.’ Formatting the drive now will make the recovery process more complex, although not always impossible.
3. Check Its Status on a Reliable Computer: Connect the pendrive to a trusted computer. On Windows, right-click the Start button and select “Disk Management.” Look for your drive in the list.
If it appears with a drive letter and correct capacity: The issue may be with the original computer. Proceed with the recovery steps below.
If it appears as “RAW” or “Unallocated”: This indicates a file system error. Do not panic. This is a common form of corruption. Data recovery software can often still scan the drive and find files even in this state. Do not format it.
The Most Effective Method: Using Pendrive Recovery Software
Using dedicated pendrive recovery software is the most reliable method for nearly every data loss scenario. These tools scan your drive for file signatures and data fragments that remain after deletion or formatting. A common user concern is safety; a reputable tool addresses this by performing read-only operations, meaning it won’t write anything to your pendrive and risk further data loss.
Based on our testing for ease of use and effectiveness, we recommend starting with a free tool called Recuva (by CCleaner). It’s an excellent choice for common scenarios like accidental deletion and formatting, and its simple interface is perfect for users who need a quick, no-fuss solution.
How to Recover Files Step-by-Step with Recuva
Here is the process to recover your data from a pendrive on a Windows 10 or 11 computer:
1. Download and Install Recuva: Download the free version from the official CCleaner website. Install it on your computer’s main hard drive, not on the pendrive you are trying to recover data from.
2. Connect Your Pendrive and Launch the Application: Connect your affected pendrive. When you open Recuva, it will start a wizard. Click ‘Cancel’ to exit the wizard and go directly to the advanced mode, which gives you more control.
3. Select the Pendrive for Scanning: In the main window, you’ll see a dropdown menu at the top left. Click it and select your pendrive from the list of available drives.
4. Start the Scan: Click the “Scan” button. Recuva will perform a quick scan first. If your files don’t appear, go to “Options,” select the “Actions” tab, and check the “Deep Scan” box. A deep scan is more thorough and essential for recovering from formatting or corruption, though it takes longer.
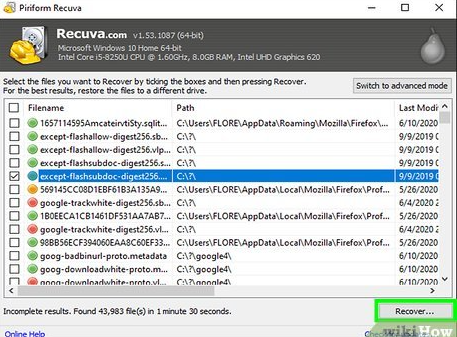
5. Preview and Recover Your Files: Once the scan is complete, Recuva will show a list of recoverable files. Use the preview pane on the right to check if your important documents or photos are intact. Select the checkboxes next to the files you want to restore.
6. Save to a Safe Location: Click the “Recover…” button. A dialog box will appear asking where to save the files. Choose a different, safe location, such as your computer’s Desktop or Documents folder.
Warning: Never save recovered files back to the same pendrive you are recovering from. Doing so can overwrite other data you still hope to restore and may lead to permanent loss.
Choosing Your Method: Software vs. Manual CMD Commands
You may find articles suggesting manual Command Prompt (CMD) commands like `chkdsk` and `attrib`. While these commands have specific uses, it’s critical to understand they are not true data recovery tools. They can sometimes fix minor file system errors or unhide files, but they are ineffective for recovering deleted or formatted data.
For most users, especially those dealing with an accidentally formatted USB, dedicated software is the safer and more effective choice. CMD commands, if used incorrectly, can alter the drive’s file structure and make your data permanently unrecoverable.
Comparison of Recovery Methods
| Factor | Dedicated Recovery Software (e.g., Recuva) | Manual CMD Commands (`chkdsk`, `attrib`) |
| Success Rate | High for deleted, formatted, and some corrupted files. | Low. Only effective for very minor file system errors or hidden files. |
| Time Cost | Low. The process is automated after starting the scan. | High. Requires manual entry and can be time-consuming. |
| Technical Skill | Low. Designed for non-technical users with a simple interface. | High. Requires precise knowledge of commands and syntax. |
| Data Safety Risk | Low. Reputable tools are read-only and non-destructive. | Moderate to High. Incorrect commands can cause further data loss. |
How to Recover Formatted Pendrive Data: Understanding Why It Works
Yes, it is often possible to recover formatted pendrive data. This success is based on how modern operating systems handle data. When you format a drive or delete a file, the data itself isn’t immediately erased. Instead, the operating system simply removes the file’s “pointer” from its index and marks the space as available for new data. The actual ones and zeros of your file remain on the drive until they are overwritten.
This is a form of logical damage, not physical damage. Think of it like removing a chapter title from a book’s table of contents. The pages of the chapter are still there; the book just no longer tells you where to find them. This is precisely why you must stop using the drive immediately. For Ananya Sharma, a postgraduate student who accidentally formatted her project drive, this principle was key. Because she did not save any new files, the underlying data remained intact, allowing recovery software to find and restore it.
After Recovery: How to Prevent Future Pendrive Data Loss
Successfully recovering your files is a relief, but the experience is an important lesson in data management. To avoid facing this stressful situation again, adopting a few best practices for handling your pendrives is essential. These simple habits can protect you from the most common causes of data loss.
- Always Use ‘Safe Eject’: Never unplug a pendrive while it’s in use. Always use the ‘Safely Remove Hardware’ or ‘Eject’ option in your operating system to ensure all write operations are complete.
- Maintain Regular Backups: Implement the 3-2-1 backup rule: keep three copies of your important data, on two different types of media, with one copy stored off-site. For students and professionals, this could be one copy on your laptop, one on an external hard drive, and one on a cloud service like Google Drive or OneDrive.
- Avoid Untrusted Computers: Be cautious about plugging your pendrive into public or untrusted computers, as they can be a source of malware that can corrupt your files.
- Scan for Viruses Regularly: Use antivirus software to periodically scan your pendrive for threats.
You may also like: How to Backup & Recover Data from Locked Android Phone>
Frequently Asked Questions About Pendrive Data Recovery
Here are direct answers to some of the most common questions about how to recover data from a pendrive.
How do I recover data from a corrupted pendrive?
First, check the drive in “Disk Management” on another computer to rule out port issues. If it appears as “RAW” or is unreadable, use data recovery software like Recuva. Its deep scan function can often bypass file system corruption and scan the drive’s raw data to find recoverable files. Do not format the drive when prompted by your operating system.
Which software is best to recover pendrive data?
For most common situations like accidental deletion on Windows, a free tool like Recuva is a great starting point. It’s easy to use and effective. For more complex cases like severe corruption or if the free tool doesn’t find your files, a more powerful paid tool like Disk Drill or EaseUS Data Recovery Wizard may offer a higher success rate. Always start with the simplest, safest option first.
Can I recover data from a physically broken pendrive?
This guide focuses on logical data loss (deletion, formatting, corruption). If your pendrive is physically broken—for example, if the connector is snapped or it’s been crushed—software will not work. In these cases, you would need to contact a professional data recovery lab with specialized hardware to physically repair the drive and extract the data. This service can be expensive.
Take Control of Your Data Recovery
Losing important files from a pendrive can feel disastrous. The uncertainty of whether your data is gone forever only adds to the stress. However, as this guide shows, your files are often still present and recoverable with the right procedure. By immediately stopping all use of the drive and employing a trusted pendrive recovery software, you shift from a position of panic to one of control. Don’t let a simple mistake lead to permanent data loss. Follow the clear, tested steps outlined above to safely restore your valuable files and regain your peace of mind.”

Joy Taylor is a seasoned technical writer with over a decade of experience in mobile technology. At iMobie, she specializes in producing in-depth content on iOS data recovery, iPhone unlocking solutions, and iOS troubleshooting.
Product-related questions? Contact Our Support Team to Get Quick Solution >
