5 Ways to Record Audio on Mac
Recording internal audio on MacBook might be a bit dicey since Apple didn’t integrate a built-in sound recorder into the majority of its devices. But fortunately, experts have devised a way to fix this, so you can always include internal audio to your recording. Ready to know? Then check our top 5 ways to record audio in Mac here in this post.
No doubt, audio has a significant role in every recording operation, as it gives life and understanding to the project you want to create. But in a scenario where your recording resource is Mac, you may experience difficulty adding audio to your recordings. The reason is that Apple Inc. failed to integrate/install a built-in audio recording system into its devices, whether iPhone, iPad, or Mac.
While the aforementioned dark side might pose a challenge to your recordings, it’s nothing to fret about, as our team of experts has devised how to record audio on Mac with lossless quality. In this post, we will explore the 5 simple yet professional ways to record audio on Mac. Let’s get started.
How to Use the Voice Memos Voice Recorder on a Mac
The Voice Memos voice recorder on Mac is a pre-installed program designed to help you record internal audio/sound. It’s one of the highly recommended tools for recording audio on Mac. It lets you capture voice conversations, ideas, and more on your Apple computer with minimal stress.
This program is completely free to use. Recording audio with the Voice Memos voice recorder is super simple and the resulting content is readily available in your local drive or iCloud where you can easily export or share with your favorite contacts.
In addition to the audio recording capability, you are also allowed to perform some basic editing on your recorded files. This is possible because of the built-in audio editor tucked into the program. Another amazing quality of the Voice Memos voice recorder is the unlimited recording timing.
Follow the detailed guide shared down here to record audio on your mac computer using the Voice Memos voice recorder:
- Hold down the keys Command + Spacebar on your Mac keyboard to launch Spotlight. Enter Voice Memo in the search bar, and click on the icon that corresponds with your search.
- Alternatively, launch the Launchpad app by clicking on the appropriate icon in the Dock section of your screen to access your system apps. Select Voice Memos from the apps displayed.
- When the corresponding app comes up, click on the red circular icon located at the bottom of the left sidebar.
- Next, start recording the audio/sound you want to record on Mac. While recording is on, you can click on the pause icon to stop recording, and then click resume to continue.
- After completing the recording, hit the Done button to finish the process. You can always find your recordings on the left sidebar each time to launch the Voice Memos voice recorder on your Mac.
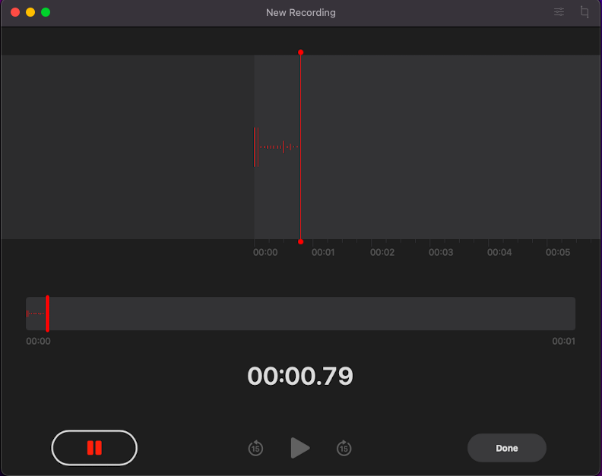
Mac Voice Memos Voice Recorder
How to Record Voice on Mac with Screenify
Another pretty simple yet professional way to record audio on Mac with lossless quality is via Screenify. This all-in-one recording suite lets you record internal audio on Mac with minimal stress and no cost-fee. You can also use it to capture sound via external devices like Microphone.
Gemoo Recorder Lite is the best fit for both amateurs and professionals in the industry because of the flexible recording services it offers. With this software, you have full control over recording parameters like bitrate, output format, and more. You can easily customize and modify your recordings to suit your project requirements when you use this audio recording suite to capture voice on Mac.
Additionally, Gemoo Recorder Lite offers mind-blowing video recording services. The software lets you capture high-end videos on your Mac computer without issues. Tutors, marketers, students, and more find this software helpful because of the capability to record webcam videos and audio simultaneously. It’s a great option for capturing on-screen activities, like livestreams, how-to videos, video conference calls, podcasts, and more.
Step 1: Free download Screenify from the official website. Launch the app and select the desired mode. And hit the Audio Only.
Free Download* 100% Clean & Safe
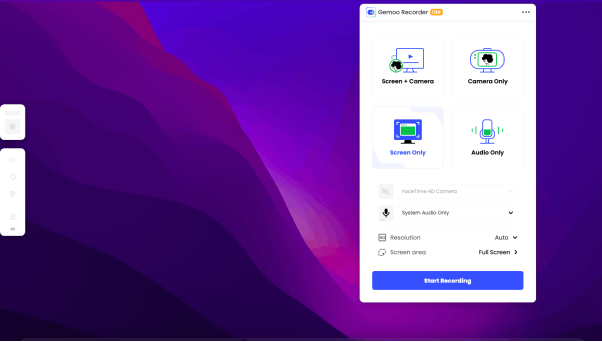
Choose Audio Only Option
Step 2: Navigate to where you have the System Audio Only icon, and click the drop-down menu so you can select your preferred audio source. After that, click on Audio Settings to make necessary adjustments, then click the appropriate buttons to proceed.
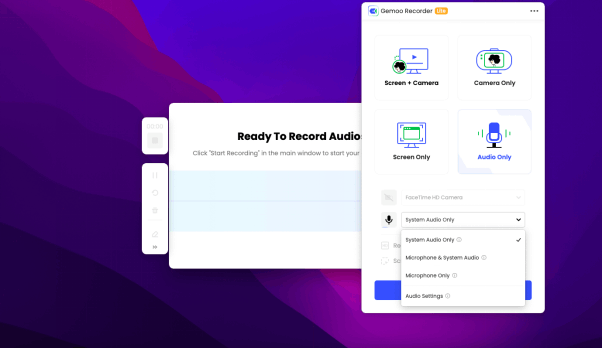
Choose System Audio Only Option
Step 3: Tap the blue Start Recording button to commence audio recording on your Mac. Wait patiently for the 3 seconds timer to finish counting, then start recording the audio.
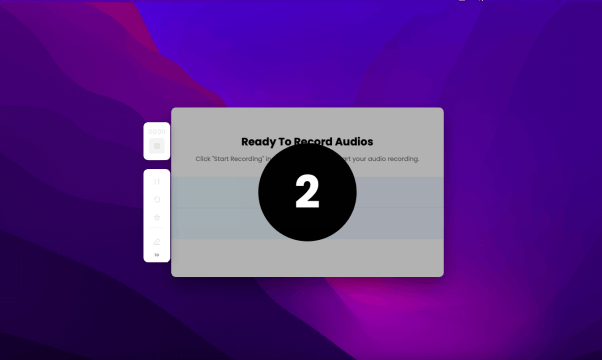
Start Recording Audio
How to Use the QuickTime Player Audio Recorder on a Mac
Although recognized as a media play for streaming video files, the QuickTime Player app functionality extends beyond this. You can also use it for audio recording operations. This pre-installed program lets you record internal audio on your Mac computer without difficulty. However, you need the Soundflower software for you to successfully accomplish this.
Furthermore, on the services rendered, QuickTime Player comes in handy for video recordings, as it allows you to record webcam clips, and also capture on-screen activities. On top of this, you also enjoy seamless video conversion services. This program permits you to switch between media formats, like mOV to MP4, and vice versa.
With the guide below, you can record audio on Mac using the QuickTime Player program:
Step 1: Use the Command + Spacebar buttons to open Spotlight, then enter QuickTime Player in the search field. Click the icon that corresponds with your search to activate QuickTime Player on your Mac.
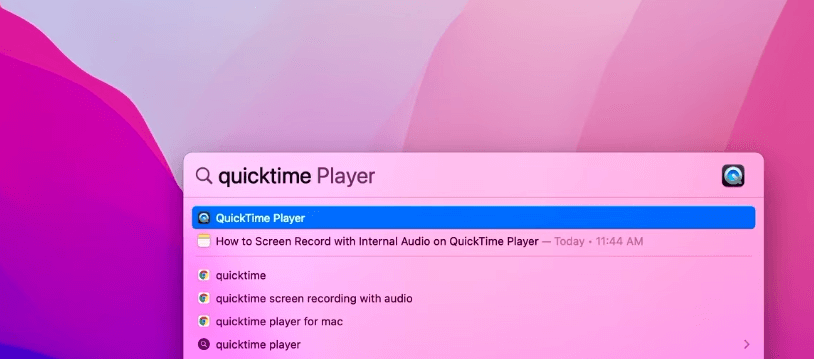
Launch QuickTime
Step 2: Next, choose New Audio Recording from the flyout menu options. Without further ado, QuickTime Player will display the corresponding audio recording tab on your screen. Click on the drop-down menu beside the red circular icon to select your preferred audio source.
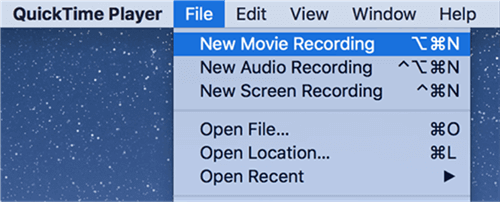
Start New Recording in QuickTime Player
Step 3: After selecting your audio source, proceed to click on the red circular icon to start recording audio. Be patient till the recording is finished, then click the Stop button to end recording. Save the recorded file using the Command + S buttons.
How to Do Voice Recording with Audacity
Another wonderful way to record voice on your Mac is to use a third-party tool like Audacity. This user-friendly audio recording suite is a very popular one because of the satisfying results it has always given over time. It helps you to record your internal audio on your Mac in high quality.
Audacity isn’t limited to recording internal audio on Mac. It’s also capable of recording live audio via a plethora of tools such as the microphone, and other external sources. It powers nice editing tools that you might require to manipulate your audio files after recording them. Some of the tools supported include cutter, trimmer, copying and pasting, etc. This program allows you to save your recordings in numerous formats such as MP3.
Record your audio on Mac with Audacity by following the stepwise guide shared below:
Step 1: Install Audacity on your Mac. After that, proceed to download and install the Soundflower software.
Step 2: Next, move your cursor to the upper left corner of your Home Screen, and click on the Apple logo. Hit the System Preference button to proceed to settings menu screen so you can configure your Mac to record audio from Soundflower.
- Select Sound, and hit the Output button at the top of the screen displayed.
- Choose Soundflower (2ch) from the sound output displayed, then close the page.
Step 3: Now launch the Audacity software, and click Preferences. Hit the Devices icon on the next screen and choose Soundflower (2ch) as your preferred sound source. After finishing the step above, head to Audacity quick start page, and click on File to start a new audio recording project. Locate and hit the Record icon at the top toolbar to commence audio recording.
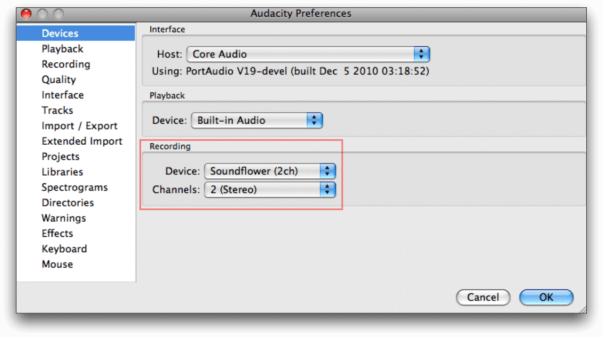
Voice Recording with Audacity
Step 4: Once the recording is over, click the Stop icon so Audacity can finish recording audio on Mac. Adjust the recorded file using the editing tool on Audacity, preview your file, and save to your local drive.
How to Record Computer Audio on a Mac with GarageBand
GarageBand is another system app tucked into Mac to perform audio recording and editing services. It’s highly recommended for audio recording because of the high-quality results it offers to both beginners and professionals looking to record podcasts, voiceovers, and more. This app helps you record internal audio on Mac for free.
Here’s the quick how-to guide to record sound from your Mac using GarageBand:
- Press down the hotkeys: Command + Spacebar and type GarageBand in the field provided. Click the app icon to launch it for audio recording.
- Next, you have to select the track type. Click Audio to proceed.
- After that, navigate to your Home Screen, and click System Preferences, then choose Sounds from the displayed options.
- Click on the Input button to launch the corresponding icons underneath. Choose Microphone as your preferred built-in audio source.
- Now head back to the GarageBand app page, and hit the Create New Music Project button.
- Go to the Save As section and enter a name for your file, then click Create.
- Now tap on the track header to choose the first track. Hit the Track button and select Delete. Once done, click Track > New Track.
- A new screen should pop up. Choose Real Instrument Track and hit the Create icon to continue.
- Now, in the Track Info section, hit the Vocal button, then choose No effects.
- Confirm your audio input source, then click the Record button to commence the audio recording.
- End the recording by clicking on the appropriate icon, the save and share the resulting file with your friends.
Tools to Record Audio on Mac
1. REAPER
REAPER is a versatile audio recording program that has always delivered its promises over time. With this program, you can get professional audio recording services without stress. This tool helps you record internal audio on Mac at a fraction price.
2. Ardour
Ardour is a great audio recording solution suitable for recording, editing, and mixing sounds on multiple platforms such as macOS, Linux, and Windows computer systems. This program comes witb a nice audio recording interface that allows users to capture internal audio with minimal stress.
Whether you are an artist, musician, or audio engineer, Ardour is a top-choice to invest in. With this program at your disposal, you can be sure of seamless audio recording services and great productivity.
3. Ableton Live 11
For folks looking for a professional audio recording solution to record audio on Mac, Ableton Live 11 is an ideal option to invest in. This program is loaded with a host of creative tools that you need to capture high quality audio recordings on Mac. It has audio editing functionality tucked into it so end-users don’t go through the stress of sourcing the internet for editing tool fix/manipulate their recordings.
4. MuLab Music Production Studio
Mulab Music Production Studio is a lightweight audio recording tool nicely built with an interactive interface to ease and hasten audio recording operations. It helps you record audio on Mac with the best quality you could ever think of. You can also employ the services of rhtis program on Windows if you need to record internal audio too.
5. Piezo
Piezo is another nice audio recording utility that you can use to record your voice and internal audio Mac without experiencing any difficulty. It records audio with high quality and at no cost fee. The best thing about this program is the capability to record from multiple audio sources , as it permits you to record audio from a microphone, or any digital apps.
6. Macsome Audio Recorder
Here is another awesome audio recording solution to choose if you need a sleek program to capture internal audio/sounds on your Mac computer system. Macsome Audio Recorder is committed to top-end audio content in popular formats like MP3, and AAC.
This tool is capable of recording audio from a plethora of applications such as Skype, iTunes, and sometimes DVD players. Your microphones aren’t left out, as Macsome Audio Recorder can capture internal sounds from it.
7. Audio Hijack
Although its the last on this list, Audio Hijack is the real deal when you need a professional grade audio recording utility for your Mac computer. This program make audio recording simple and fun, as it offers a smooth interface for easy navigate and also packs all the necessary features you need to capture internal audio on Mac.
Besides audio recording, Audio Hijack also offers other interesting services. From live streaming to internet broadcasting, audio adjustments, and more. This program has all it takes to record great audio on Mac without compromising your system.
Final Words
Now you should know how to record audio on Mac with lossless quality. There are 5 techniques introduced in the article. Choose anyone that suits your project demand. Our best option is the Gemoo Recorder Lite. The software offers outstanding results. It’s the best audio recorder and second to none. You can try it now!

Senior writer of the iMobie team as well as an Apple fan, love to help more users solve various types of iOS & Android-related issues.
Product-related questions? Contact Our Support Team to Get Quick Solution >
