How to Record Screen Using VLC
Though VLC Media Player is a streaming platform, it’s also responsible for other operations, and screen recording is a common one. In case you need to capture your screen using VLC but don’t know how to, this post will expose you to the top 9 ways to record screen with VLC.
VLC Media Player is a well-known video streaming platform for watching your desired video clip. This cross-platform software is also responsible for video conversion operations as it allows you to switch between media formats from the comfort of your home. Another astonishing feature tucked into this tool is the screen recorder.
With VLC you can capture your computer screen effortlessly. However, many folks find it challenging, as it is an uncommon functionality. In case you are struggling to record your screen via VLC, this post is structured to enlighten you on how to.
We will explain in detail the 9 different ways to capture your computer screen with or without audio using VLC Media Player. Keep reading, as we commence our guide.
How to Enable the VLC Record Button
VLC Media Player comes with a screen recording button which must be activated prior to capturing whatever on-screen event you have on your computer screen. This button is readily available in the advanced settings section of the app.
Here’s a simple guide to follow for you to enable the VLC record button:
- Get started by installing the latest version of VLC Media Player on your computer system. After that, open it for screen recording purposes.
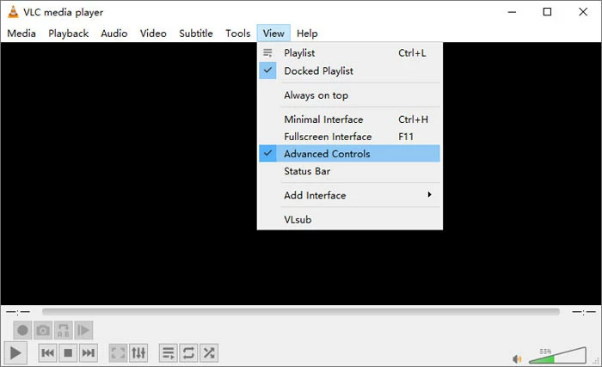
- At the top of the interface, you will discover several options. Please click on the View to expand the flyout menu underneath. Check the Advanced Control icon to proceed.
- Now, without further ado, several control buttons will appear on the VLC Media Player screen. One of the buttons stands for Start Recording and Stop Recording.
How to Enable the VLC Record
How to Use VLC to Record Screen on Windows
Once you’ve enabled the screen recording button on VLC Media Player, screencasting is no longer a big deal. In case you are using a Windows computer and need to record your screen using this media streaming app, follow any of the detailed guide shared below:
How to Use VLC to Record a Video
- Launch VLC and ensure the screen recording button is active. If not, use the aforementioned guide to enable it.
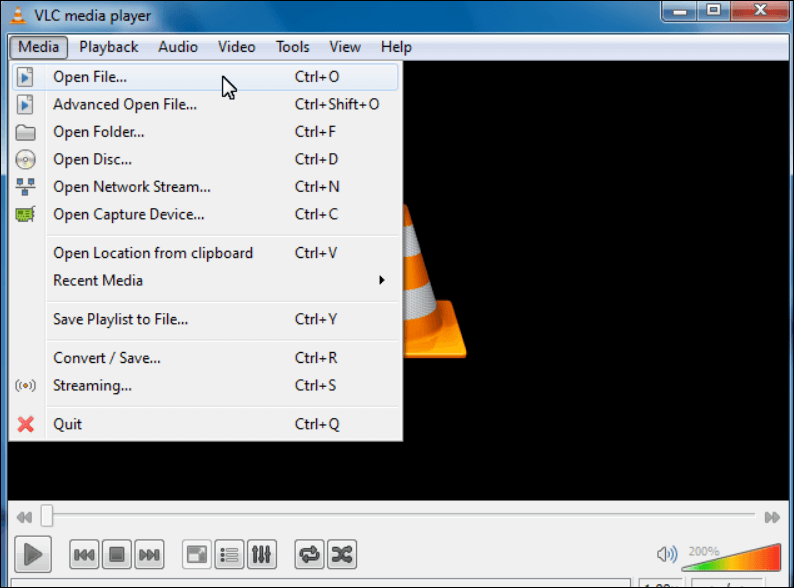
- At the upper left corner of your screen, click the Media button and a drop down menu will roll down. Select Convert/Save from the options to launch the Open Media Panel. Alternatively, you can press down the Ctrl + R button simultaneously to access the same page.
Head to Convert/Save
- When the Open Media Panel appears, head to where you have Capture Device, and choose Desktop from the drop-down menu list. Once done, proceed to select your preferred frame rate, then click Convert/Save to continue.
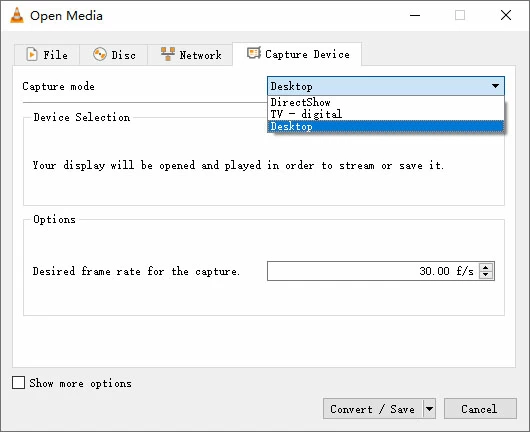
Choose Desktop as Capture Device
- A new interface labeled Convert will pop up. Kindly navigate to the Profile section to choose your desired recording format you want the resulting content to be stored.
- After that, head to the Destination file section and click Browse to choose the storage path for the recorded file. Now, click Save to confirm your settings.
- Finally, tap the Start button to initiate screen recording on VLC. Wait until the app finishes with the recording, then click the Stop button to terminate the process.
How to Use VLC to Record Screen with Audio
Recording your screen with audio via VLC Media Player is very much possible, however, you must have enabled the feature in the past for this to work. That is, you must have chosen your preferred audio source while enabling the screen recording button.
If you haven’t done that or don’t know how to, here’s the simple instructional guide you have to apply:
- Run the VLC Media Player on your computer and hit the View icon at the top menu bar.
- Tick the Advanced Control button.
- Next, head to where you have Media, click on it and navigate to the Open Capture Device panel. Choose your desired audio source from the list displayed, and click the appropriate buttons to validate your selection.
- Tap the record button to initiate recording and VLC will capture your audio immediately. You can always check the Music folder for your audio content.
How to Use VLC for Video Capture from a Disc
Do you have a video you’ve recorded on a DVD or Blu-Ray Disc that you would like to rip using VLC Media Player? If so, but you don’t know how it’s done, we have the appropriate guide here in this section. Follow the simple procedures below to extract the content of your DVD or Blu-Ray Disc to VLC:
- Firstly, ensure that you’ve enabled the screen recording button on VLC Media Player and the Advanced Control icon is ticked.
- Next, insert the Blu-Ray disc or DVD into your computer system, and launch VLC to stream the content.
- Once recording starts, click the Start Recording button to commence screen recording.
- Tap the appropriate icon to end recording and the resulting content will be stored in your preferred storage on your local drive.
How to Record Network Stream with VLC
VLC Media Player isn’t limited to capturing on screen events or discs, you can also use it to record network streams, also known as live streams. This app helps you capture those fascinating moments in any live stream of your choice.
Here’s how to record your favorite network stream via VLC:
- Copy the URL link to the network stream from your browser.
- Next, launch VLC and click on Media > Open Network Stream.
- Enter the URL link you copied in the field provided underneath the Network section and hit the Play button to commence streaming.
- Once the live stream commences, tap the Record button to start recording it.
Limitations
- Streaming live clips with VLC can be challenging, as it takes a lot of time to load the corresponding video.
- Not all online clips are compatible with VLC Media Player.
How to Record a Part of a Video with VLC
Need to capture specfic part of a video clip with VLC? It’s very possible! You can conveniently record a part of any livestream on your computer using VLC without difficulty. But you must have the right guide at your disposal.
Follow these streps to record a part of any video clip using VLC Media Player:
- Stream your favorite video using VLC Media Player.
- Pause the video, then drag the timeline slider to the part you want to record.
- Next, click the Play icon and hit the screen recording button to start capturing the part of the video you want.
- Stop the recording once you are done and the resulting content will be stored in your preferred storage path.
How to Record a Webcam with VLC
VLC also has the capability to record webcam. This media streaming app helps you capture your webcam with minimal effort. Here’s the guide to follow if you want to record webcam using VLC:
- Open VLC and click Media at the top menu bar.
- Choose Open Capture Device from the flyout menu. Or better yet, you can hold down Ctrl + C simultaneously.
- Underneath the Capture Device tab, click DirectShow to proceed.
- Next, navigate to Video Device name and select your webcam as your preferred recording source.
- Head to where you have Audio Device name and select the microphone icon. Once done, click the appropriate button to start recording webcam and audio simultaneously.
How to Use VLC to Record Screen on Mac
Instead of using VLC for your screen recording operations on Mac, you can try out the VLC Screen Recorder Alternative – Screenify. This software comes with robust screen recording functionality that lets you capture your screen in your desired dimension conveniently. It permits you to record full-screen, partial-screen, and specific windows.
With this screen recording suite, you can record your screen, audio, plus webcam. Screenify has one of the simplest UIs, which makes screen recording quick and stress-free. Compared to VLC, this screen recorder is a better option. It hosts several editing tools that you can choose from to polish your recordings.
Key Features
- Supports a range of video editing/enhancing tools like annotators, voice-overs, arrows, cropping, shapes, and many others.
- Offers multiple recording modes, such as screen, camera, audio, and locked window.
- Fully compatible with Windows, Mac, and browsers like Firefox and Chrome.
- Enjoy 4K resolution video recording service at zero cost-fee.
- No watermark and no time limit.
Steps to Record Mac Screen with VLC Screen Recorder Alternative
Step 1. Download and Install Screenify on Computer.
Step 2. Launch Screenify on your computer, and select Record screen mode.
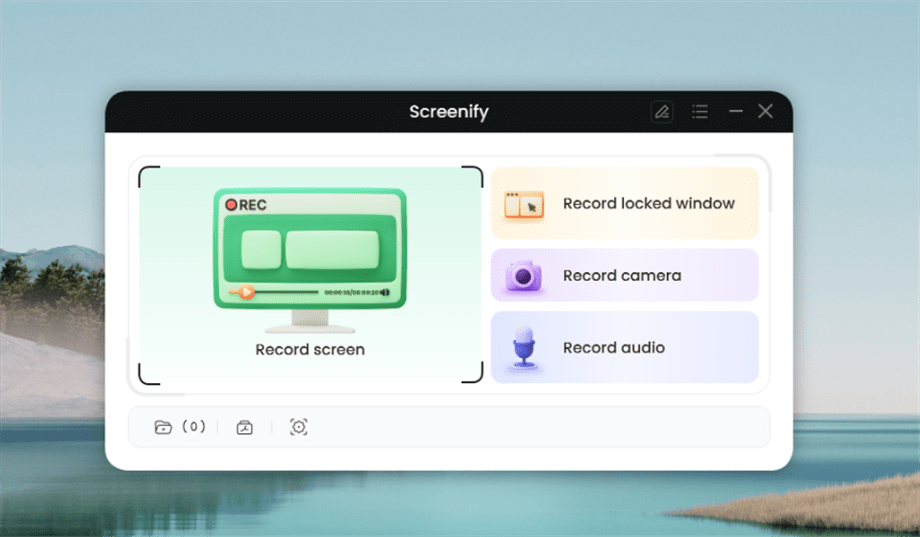
Select Record Screen Mode
Step 3. Configure Recording Settings aims to configure settings like system audio before recording.
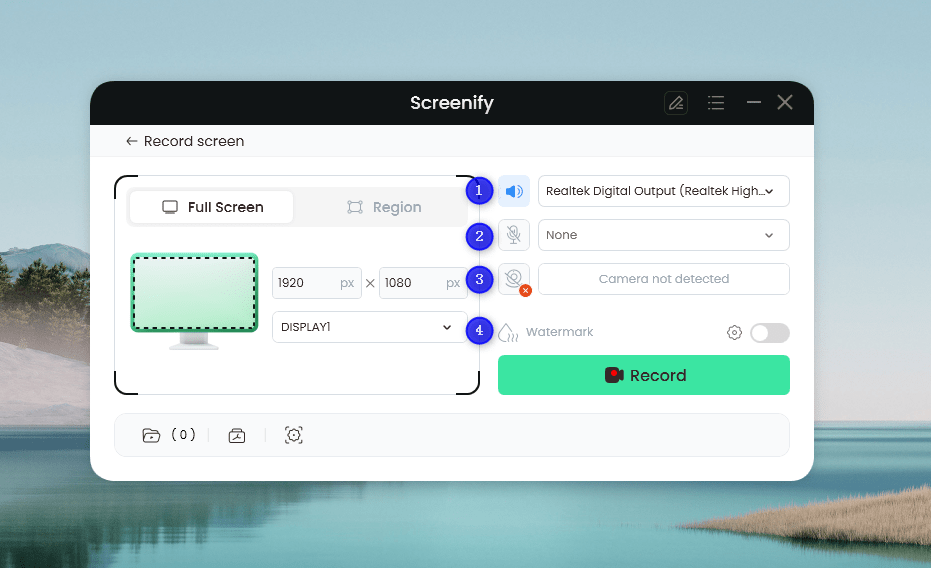
Set Configure Recording Settings
In this setting menu, you can:
1 Choose the System audio.
2 Choose the Microphone you want to record.
3 Choose the Camera you want to use.
4 Choose whether to add a watermark.
Step 4. Select Recording Screen.
Option 1. Full Screen Record
Please select Full Screen mode and choose the display you need to record. Hit Record button to initiate recording.
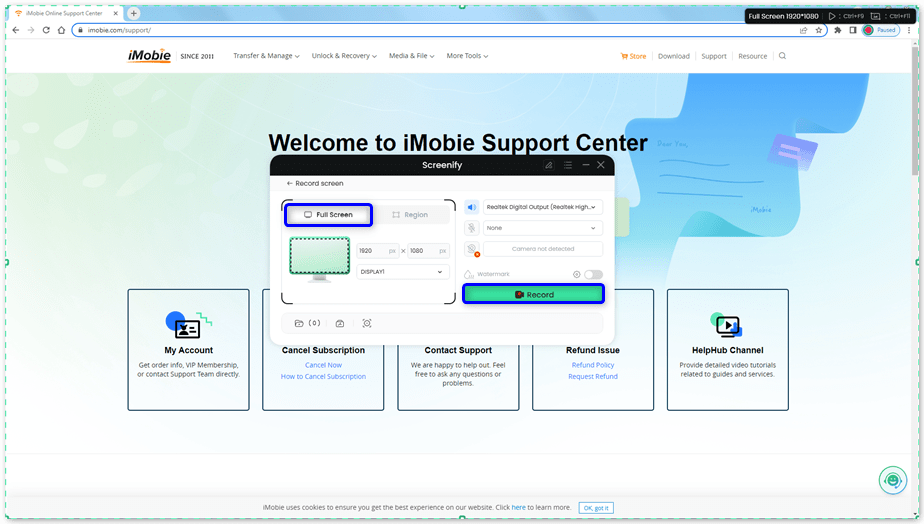
Select Full Screen
Option 2. Region Record
To record region, you need to manually select the recording area. After selection, you can still adjust the selected area. It supports customize selection, full screen, and proportional selection based on common social media dimensions.
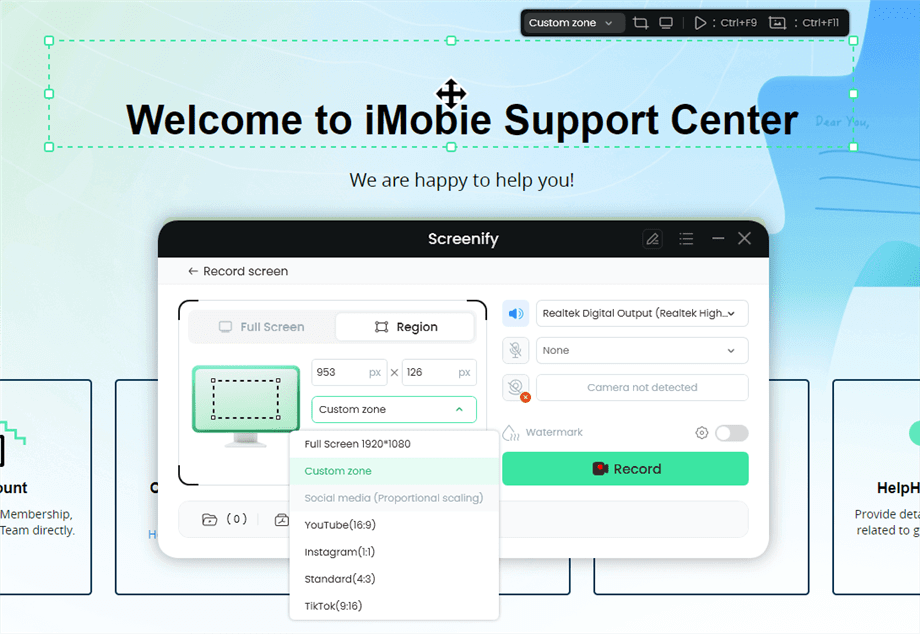
Record Region
Step 5. Wait for the Recording Countdown.
There is a 3-second countdown to help you prepare the recording after you are ready to start recording.
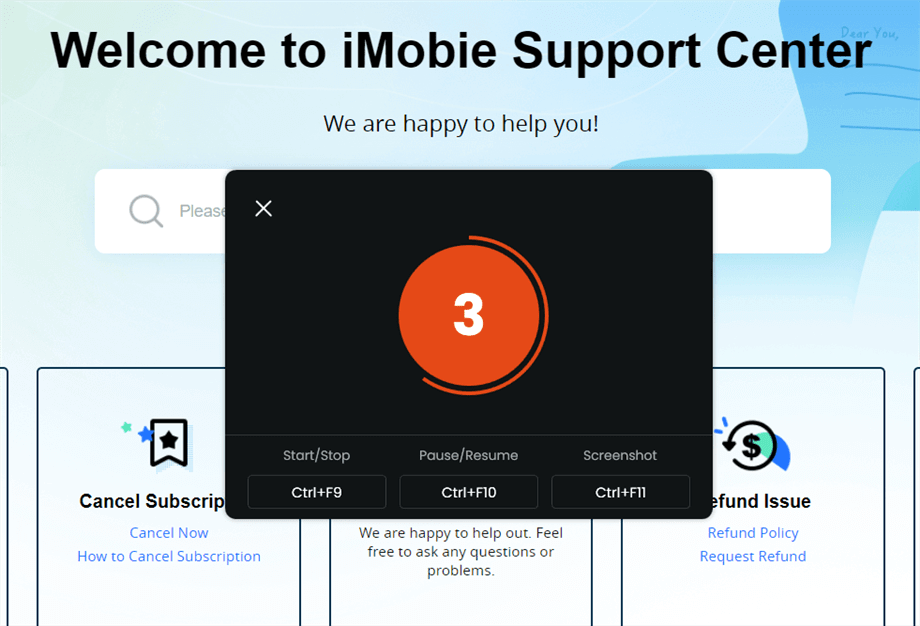
Wait for the Recording Countdown
If you would like to see a recording countdown before your recording starts, you can enable the countdown option. Or you can tap it off. View this post to know how to set the countdown option.
Step 6. Start Recording.
The recording will begin after a 3-second countdown. You can make annotations on the recording interface during the recording.
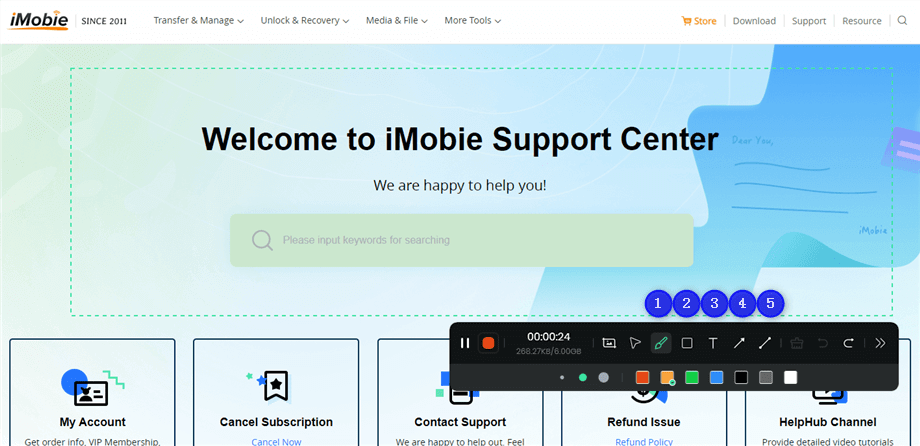
Annotate the Screen during Recording
With the toolbar, you can add the annotation in the screen:
1 Brush: Draw freehand on the screen recording interface to highlight or illustrate specific areas during the recording.
2 Rectangle: Draw rectangular shapes on the screen recording interface.
3 Text: Add written notes or labels directly onto the screen recording interface.
4 Arrow: Draw arrows on the screen recording interface to point out and emphasize specific areas.
5 Line: Draw straight lines on the screen recording interface to underline or connect specific points.
Step 7. Record Screen Process Completed.
When the recording is completed, you can click the red Stop button to end the recording. Your recorded files will be displayed. From here, you can preview and manage the recorded content as needed.
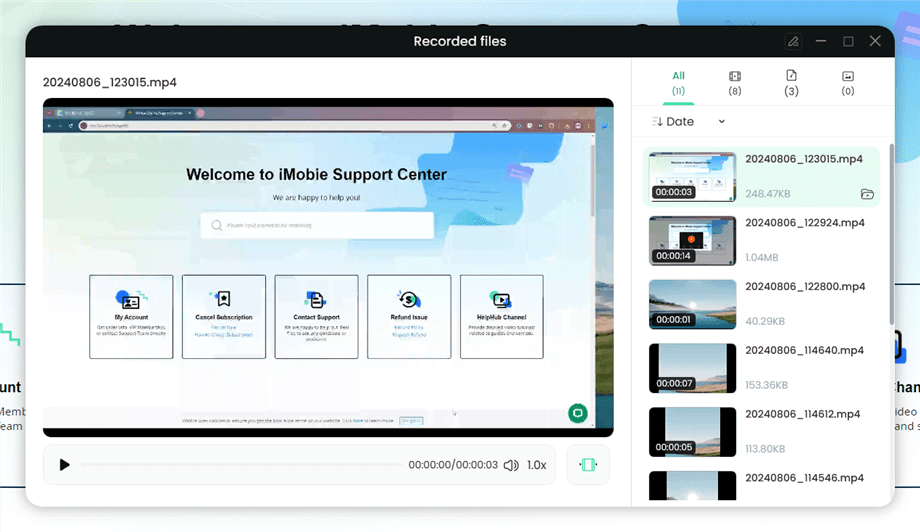
Preview the Recording
You may also want to know: How to screen record protected videos
FAQs
Is it possible to record screen and audio with VLC?
No! The screen recording function on VLC Media Player does not allow end-users to capture their screen plus audio simultaneously. If you need to record your screen and audio together, then you should try Screenify. The software records Mac and Windows screens in high quality without limitations.
Can I convert videos with VLC Media Player?
VLC Media Player does not only support screen recording and video streaming but it also extends its function to video conversion. This app allows you to switch between media formats conveniently without spending a dime. It supports over 10+ media formats that you can select from to convert your video files. You can also use it for audio conversion.
Final Words
Screen recording with VLC isn’t a difficult task anymore now that you have the guide above at your fingertip. We’ve demonstrated the 8 simple ways to capture your Windows screen using VLC Media Player. Follow and apply the procedure that suits you.
For Mac users, Screenify is the complete video recording package to record your screen. The software offers a flexible way to capture your screen and it offers several recording dimensions plus customizable features that you can select from to polish your recordings. It’s worth trying out!
Free Download * 100% Clean & Safe

Senior writer of the iMobie team as well as an Apple fan, love to help more users solve various types of iOS & Android-related issues.
Product-related questions? Contact Our Support Team to Get Quick Solution >
