How to Transfer Photos From iPhone to Computer [Windows & Mac]
“I cannot figure out how to import my photos from my iPhone to a folder on my Windows PC. This is my first iPhone and I am not used to iTunes or the sync features. So far I can get it to sync photos from the photo folder on my pc, but not take them from the iPhone and put them on my PC!” – An iPhone user posted in the forum.
Quick Answer: How to Transfer Photos from iPhone to PC
For most Windows users, the simplest official method is to connect the iPhone with a USB cable, unlock it, tap Trust or Allow when prompted, and import photos with the Microsoft Photos app. Apple currently recommends installing the Apple Devices app on Windows before importing from an iPhone.
If your photos are stored in iCloud Photos with Optimize iPhone Storage enabled, some full-resolution originals may be stored in iCloud rather than locally on the phone. In that case, iCloud Photos for Windows or iCloud.com may be easier than relying only on USB import.
Which Photo Transfer Method Should You Use?
| Method | Best For | USB Required? | Main Limitation |
| AnyTrans | Selective album/photo export and supported format-management workflows | Usually yes | Confirm current device and feature support first |
| File Explorer | Direct DCIM file copy on Windows | Yes | Does not preserve the iPhone Photos app album structure |
| Windows Photos | Most Windows 10/11 users | Yes | iPhone must be unlocked and trusted |
| Windows 7 AutoPlay | Legacy Windows 7 computers | Yes | Old workflow; not recommended for current Windows PCs |
| iCloud Photos | Photos already synced to iCloud | No | Requires internet access and available iCloud storage |
| Mac Photos | Importing photos into a Mac Photos library | Usually yes | Imports into the Photos library rather than a normal folder |
Before You Transfer Photos
- Unlock the iPhone first. A computer may not be able to access photo content while the iPhone remains locked.
- Tap Trust or Allow when prompted. This gives the connected computer permission to access supported content.
- Check whether iCloud Photos is enabled. If Optimize iPhone Storage is on, some full-resolution originals may exist only in iCloud.
- Make sure the computer has enough free space. Large photo and video libraries can require substantial disk space.
- Decide whether you need files or album organization. File Explorer is useful for DCIM files, while Photos or a photo-management tool is better for a managed library.
- Do not delete photos from the iPhone until you verify the computer copy.
Transfer Photos from iPhone to Computer with AnyTrans
Best for: Users who want to preview albums, select specific photos, and export supported iPhone photos to a Windows PC or Mac through a graphical interface.
AnyTrans provides a photo-management workflow for browsing supported photo categories on a connected iPhone and exporting selected items to a computer. It can be useful when you want more control than a basic DCIM copy.
- Preview supported photo categories before export.
- Select individual photos or albums instead of copying everything.
- Export supported photos to Windows or Mac.
- Use available export-format options when supported by the current version.
Step 1. Install and launch AnyTrans on the Windows PC or Mac.
Step 2. Connect the iPhone with a USB cable. After the device is recognized, open Device Manager > Photos.
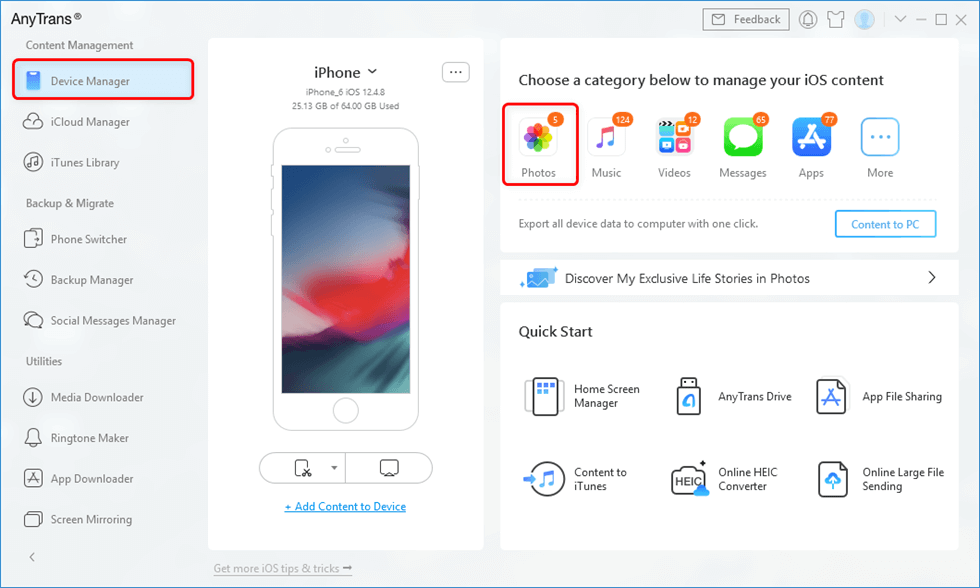
Open Photos in Device Manager
Step 3. Open the available photo category or album and preview the photos you want to export.
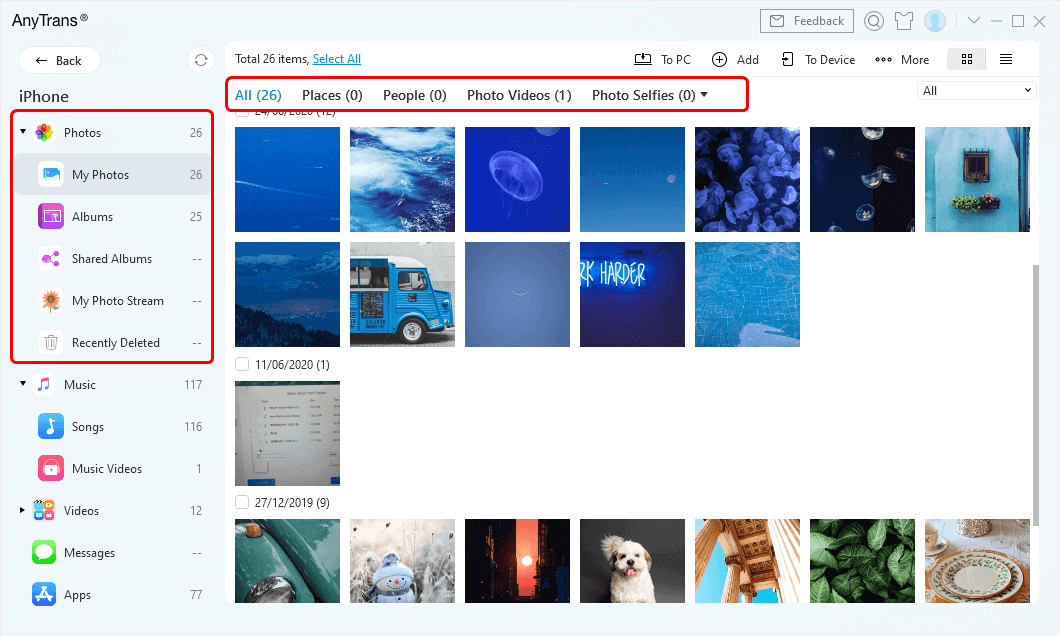
Preview the available iPhone photos
Step 4. Select the photos you want and choose Send to PC or the corresponding Mac export option.
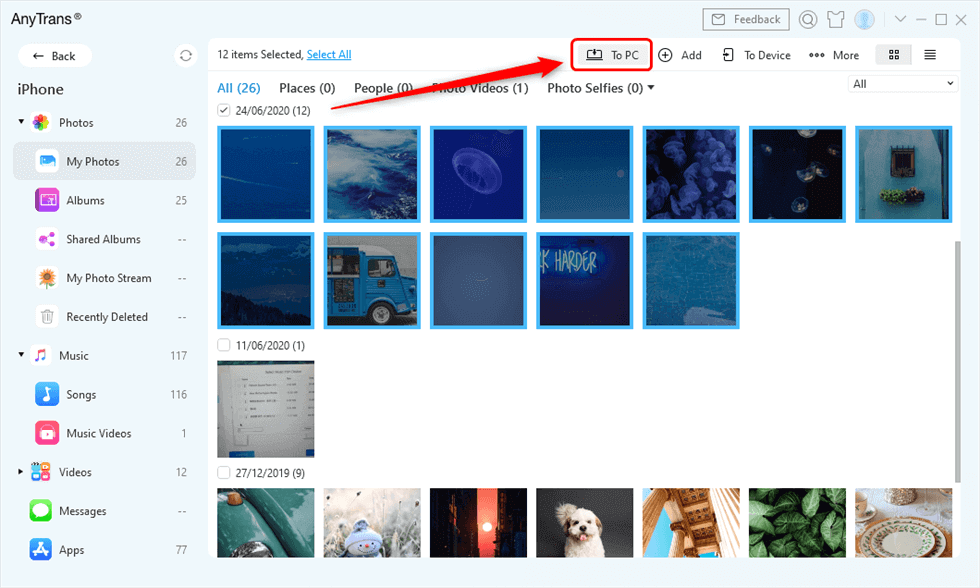
Select photos and export them to the computer
Step 5. After the transfer finishes, open the destination folder and verify that the exported photos are available before deleting anything from the iPhone.
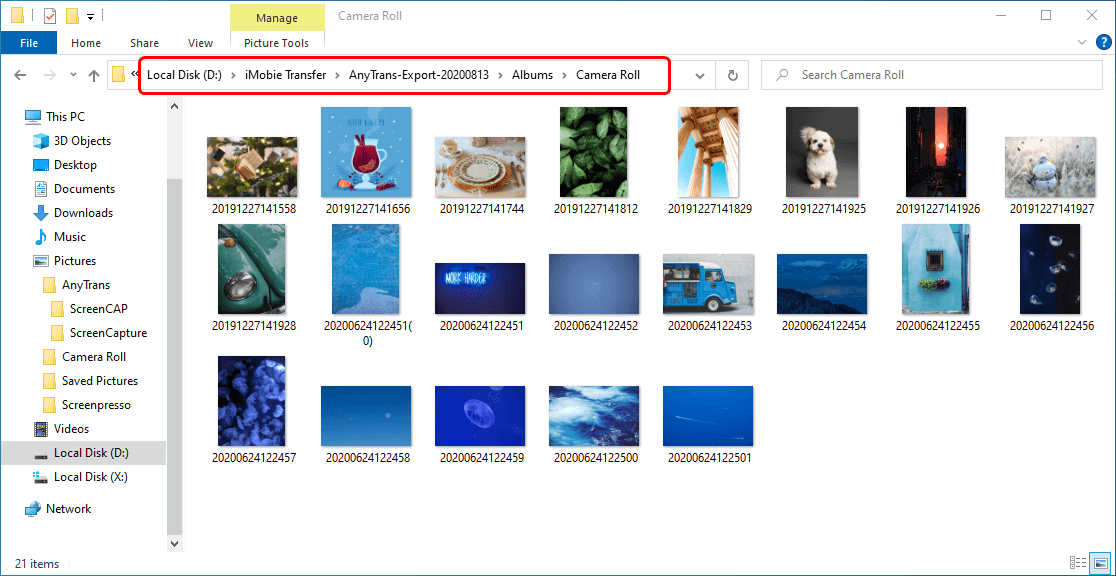
Check the exported photos on the computer
Import Photos from iPhone to PC with File Explorer
Best for: Copying photos and videos directly from the iPhone’s DCIM storage to a normal Windows folder.
File Explorer can be useful when you want image files rather than a managed Photos library. Before opening the iPhone storage, unlock the device and accept the Trust or Allow prompt if it appears.
- Connect the iPhone to the Windows PC with a compatible USB cable.
- Unlock the iPhone and tap Trust or Allow if prompted.
- Open File Explorer and select This PC.
- Open the connected iPhone, then open Internal Storage > DCIM.
- Select the photos or videos you want.
- Copy them to a folder on the PC.
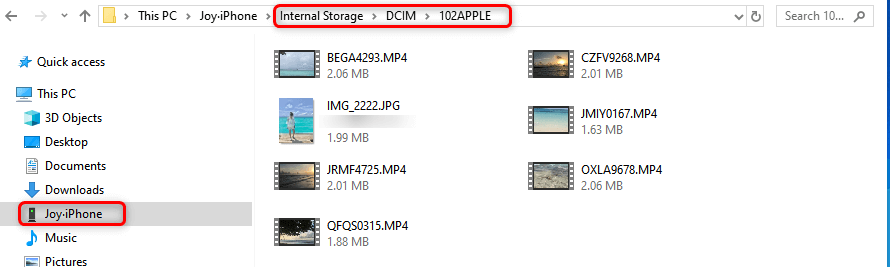
Open the iPhone DCIM folder in File Explorer
Note: File Explorer exposes DCIM folders, not the same album structure you see in the iPhone Photos app. If you need album-based selection or library management, use Windows Photos, Mac Photos, or a photo-management tool instead.
Transfer Photos from iPhone to Windows 10 Computer
This method also reflects the current Photos-app import concept used on newer Windows PCs. On current Windows systems, the Microsoft Photos app provides the standard photo-import workflow.
- Install or open the current Apple Devices app if required by your Windows setup, then connect the iPhone with USB.
- Unlock the iPhone and tap Trust or Allow if prompted.
- Open the Photos app from the Start menu.
- Select Import and choose the connected iPhone.
- Wait while Windows searches the connected device for available photos and videos.
- Select the items you want to import.
- Choose the destination and complete the import.
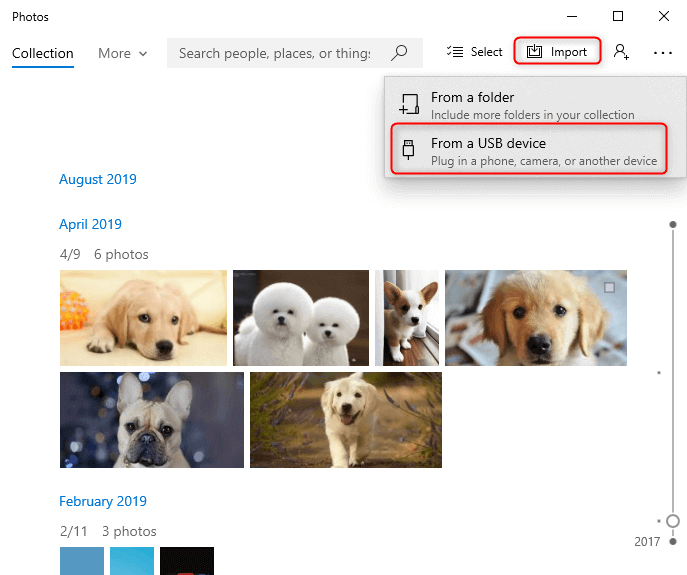
Import iPhone photos with Windows Photos
Transfer Photos from iPhone to Windows 7 Computer
Legacy Windows 7 method: The steps below are kept for users who still maintain a Windows 7 environment. This is not the current Windows workflow. Modern Windows PCs should use the Microsoft Photos app and current Apple device software instead.
On Windows 7, AutoPlay may provide a legacy photo-import option when a recognized iPhone is connected.
- Connect the iPhone to the Windows 7 PC.
- Unlock the iPhone and trust the PC when prompted.
- If AutoPlay appears, choose Import Pictures and Videos using Windows.
- Open the import settings if you want to change the destination folder.
- Choose the available options and start the import.
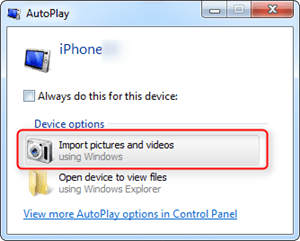
Legacy Windows 7 photo import
What If the Photos Transfer but Windows Can’t Open Them?
This may be a format-compatibility issue rather than a failed transfer. iPhone photos can use HEIF/HEIC, while some videos may use HEVC. If the files already exist on the PC but do not open normally, check the file format before repeating the transfer.
If you want to preserve the originals, keep the original files and convert copies afterward only when necessary. If you use a third-party photo manager, check its current export-format settings before relying on automatic conversion.
Sync iPhone Photos to Computer with iCloud
Best for: Users who already use iCloud Photos and want to access the photo library on Windows without relying on a USB import.
Step 1. Make Sure iCloud Photos Is Enabled on iPhone
- Open Settings.
- Tap your name > iCloud > Photos.
- Turn on Sync this iPhone.
If Optimize iPhone Storage is enabled, full-resolution originals are stored in iCloud while smaller storage-saving versions may remain on the iPhone.
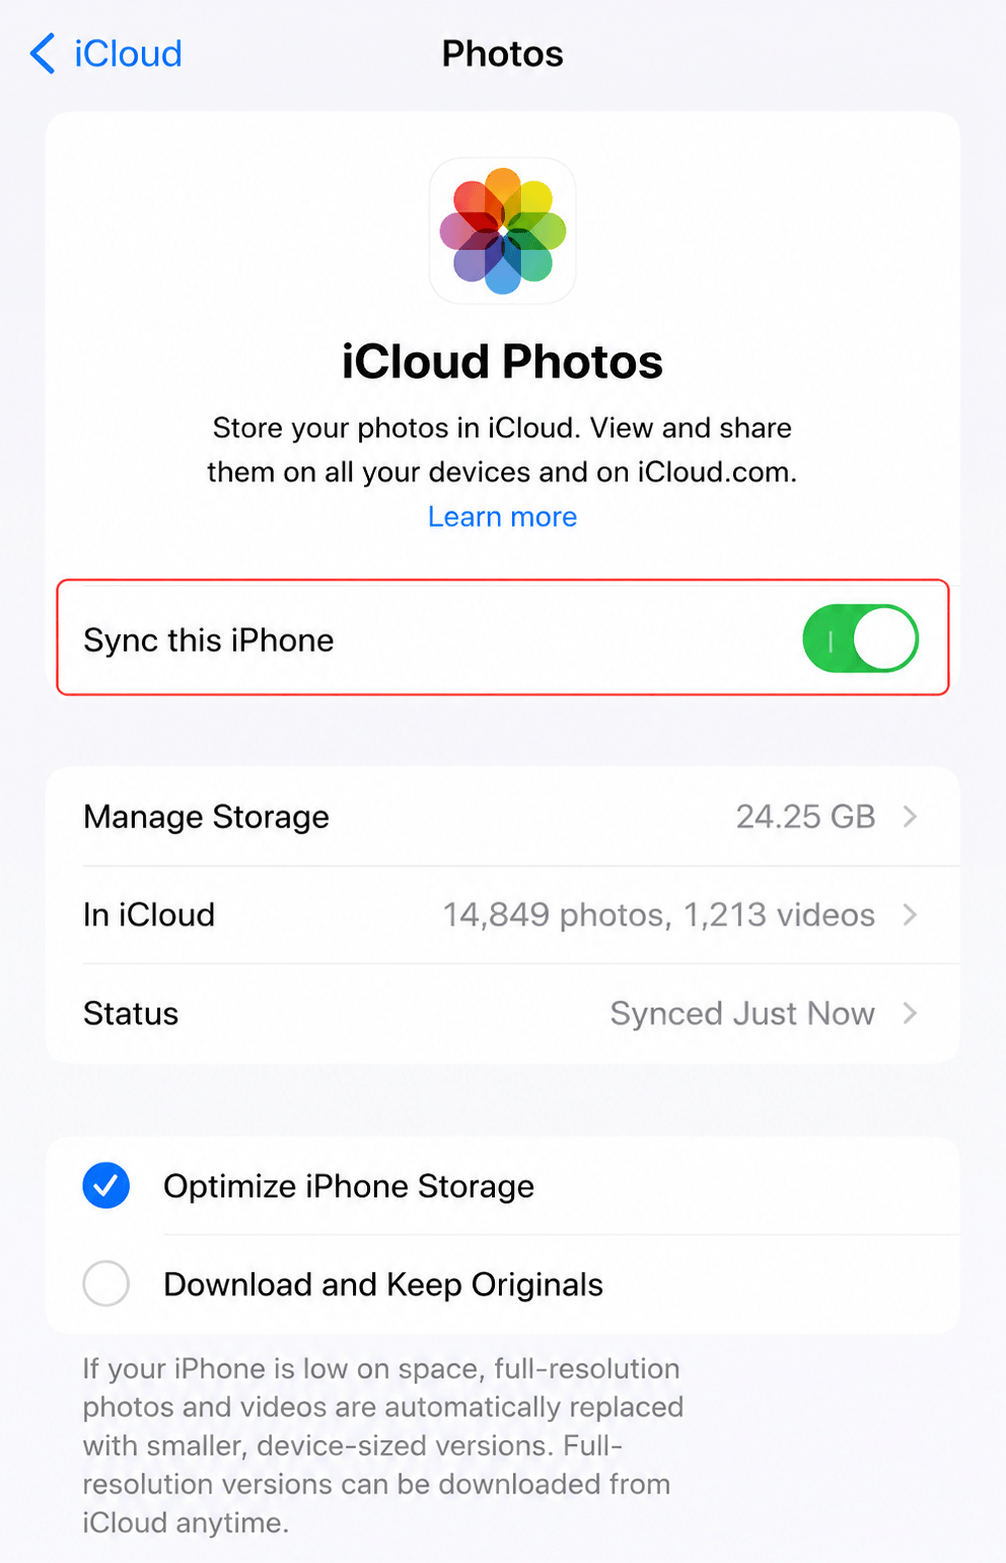
Step 2. Open iCloud Photos on Windows
- Install and sign in to iCloud for Windows with the same Apple Account.
- Enable iCloud Photos.
- Open File Explorer.
- Select iCloud Photos in the navigation pane.
- Double-click a thumbnail when you want to download and view the full file locally.
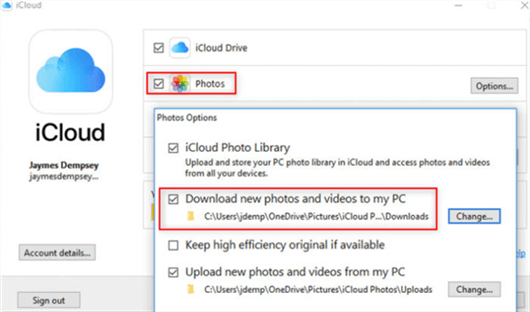
Access iCloud Photos on Windows
Screenshot update recommended: The current iCloud for Windows workflow uses iCloud Photos in File Explorer. Replace older screenshots that show the legacy “Download new photos and videos to my PC” interface when possible.
Transfer iPhone Photos to Mac Computer
Best for: Mac users who want to import iPhone photos into the Photos library.
- Connect the iPhone to the Mac with a USB cable.
- Unlock the iPhone. If prompted, tap Trust on the iPhone and allow the accessory connection on the Mac.
- Open the Photos app.
- Select the iPhone in the Photos sidebar if the Import screen does not open automatically.
- Choose the photos you want to import.
- Click Import Selected or Import All New Photos.

Import iPhone photos with the Mac Photos app
Alternative: If you want to save image files directly into a normal folder instead of importing them into the Photos library, use Image Capture on Mac.
For more Mac-specific options such as Image Capture and AirDrop, see the dedicated iPhone-to-Mac photo transfer guide.
Why Can’t I Transfer Photos from iPhone to PC?
| Problem | Likely Cause | First Check |
| iPhone doesn’t appear on PC | USB connection, trust status, Apple device software | Unlock the iPhone, reconnect it, tap Trust, and try another cable or USB port |
| DCIM folder is empty | Device not unlocked/trusted or originals not stored locally | Unlock the device and check whether iCloud Photos / Optimize Storage is enabled |
| Some photos are missing | Optimize iPhone Storage or iCloud-only originals | Check iCloud Photos or download originals before relying only on USB transfer |
| Photos transferred but won’t open | HEIC/HEIF compatibility | Check the file format instead of repeating the transfer |
| Large transfer freezes | USB interruption, insufficient disk space, very large videos | Transfer in smaller batches and check available PC storage |
| Trust prompt doesn’t appear | Previous trust decision | Reset Location & Privacy if needed, then reconnect the iPhone |
1. iPhone or DCIM Folder Is Empty
First unlock the iPhone and confirm that the connected computer is trusted. If iCloud Photos and Optimize iPhone Storage are enabled, some full-resolution originals may not be stored locally on the iPhone, so check iCloud Photos as well.
2. The Computer Says the Device Is Unreachable
Reconnect the iPhone, try another compatible USB cable or port, and restart both devices if necessary. If the problem happens during photo conversion or transfer, test a smaller batch and check whether transferring the original format changes the result.
3. The iPhone Is Not Recognized
- Unlock the iPhone.
- Reconnect the USB cable.
- Tap Trust if the prompt appears.
- Try another USB cable or port.
- Open the current Apple Devices app on Windows and confirm that the iPhone is recognized.
4. Photos Are Missing Because of iCloud Optimization
If Optimize iPhone Storage is enabled, the device may keep storage-saving versions locally while the full-resolution originals remain in iCloud. Use iCloud Photos on the PC or temporarily choose the appropriate original-download setting if you specifically need originals stored locally.
5. Large Transfers Freeze
Large photo libraries and 4K videos can take longer and are more sensitive to cable interruptions. Make sure the PC has enough free disk space, use a stable USB connection, and transfer smaller batches if the import repeatedly stops.
FAQs About Transferring Photos from iPhone to PC
1. Can I transfer photos from iPhone to PC without iTunes?
Yes. Current Windows users can import with the Microsoft Photos app, copy supported DCIM files through File Explorer, or use iCloud Photos. iTunes is not required for the basic photo-import workflow on current Windows systems.
2. How do I transfer all photos from iPhone to PC?
Use Windows Photos if you want a managed import, File Explorer if you want to copy the available DCIM files directly, or iCloud Photos if the full library is already synced to iCloud. Before deleting photos from the iPhone, verify that the full computer copy is complete.
3. Why are some iPhone photos missing when I connect to PC?
If iCloud Photos and Optimize iPhone Storage are enabled, some original files may be stored in iCloud rather than fully downloaded to the iPhone. Check iCloud Photos before assuming the files are missing.
4. Can I transfer HEIC photos from iPhone to PC?
Yes. HEIC is a file format, not an indication that the transfer failed. If the file transfers successfully but Windows cannot open it, check HEIC/HEIF compatibility or convert a copy to another format when needed.
5. Should I use File Explorer or Windows Photos?
Use File Explorer when you mainly want to copy available DCIM files into folders. Use Windows Photos when you prefer a photo-import interface that scans the connected device and lets you select items for import.
6. Can I transfer photos from iPhone to a laptop?
Yes. A Windows laptop can use the same Photos, File Explorer, or iCloud Photos workflows as a desktop PC. A Mac laptop can use Photos or Image Capture.
The Bottom Line
There are several reliable ways to transfer photos from iPhone to PC or Mac. On current Windows PCs, start with the Microsoft Photos app or File Explorer if the photos are stored locally on the iPhone. If you use iCloud Photos with Optimize iPhone Storage, accessing the originals through iCloud may be more reliable than relying only on USB.
On Mac, use the Photos app when you want to import images into the Photos library, or Image Capture when you prefer to save files directly to a folder.
If you want more control over photo categories, selective export, and supported format options, AnyTrans provides another workflow for compatible devices. Whichever method you choose, unlock and trust the iPhone first, check where the originals are stored, and verify the computer copy before deleting photos from the device.



Joy Taylor is a seasoned technical writer with over a decade of experience in mobile technology. At iMobie, she specializes in producing in-depth content on iOS data recovery, iPhone unlocking solutions, and iOS troubleshooting.
Product-related questions? Contact Our Support Team to Get Quick Solution >
