A Complete Guide to Stop Auto Download in WhatsApp
Are you trying to find out how to stop auto download on WhatsApp? If Yes, check out these foolproof methods to stop WhatsApp from saving photos and videos.
Are you annoyed by WhatsApp automatically saving media files on your phone and taking up space, slowing down your device? If yes, then you’ve come to the right place.
WhatsApp has an inbuilt feature of automatically saving all received media locally onto the device. While many users are fine with this feature, it can be quite frustrating for others, especially if you’re in a group.
The best solution is to turn off auto download in WhatsApp. This enables you to choose the media you want to download and save.
In this article, we will go over the steps on how to turn on, turn off, and fix WhatsApp auto download on Android, iPhone, Windows, and Mac.
Why Should You Turn Off Auto-Download in WhatsApp?
In case you’re wondering why someone would want to turn off the auto-download feature in WhatsApp, let us give you a rundown:
- The media can accumulate and overload the phone’s internal memory.
- Some media is important, but other unimportant photos and videos are not worth keeping.
- Users may not want to save media from a specific chat.
- Users may not want to use their mobile data connection for downloads.
However, for many people, the auto-download feature is quite convenient. So, before we get into the details of how to turn off this feature, let us tell you how to turn it on.
Part 1: How to Automatically Save WhatsApp Photos and Videos
The auto download feature in WhatsApp is usually set to on by default. All photos and videos received are automatically saved on the phone’s internal storage in a “WhatsApp” folder created by the app. Users can view the media in the chat, a file manager, or image viewing apps.
The users can also choose how to auto-download. For instance:
- iPhone users can choose to auto-download with only Wi-Fi or Wi-Fi and cellular data.
- Android users have a little more freedom as they can select the type of media to download while using Wi-Fi, mobile data, or a roaming connection.
So, how to turn on this feature? Let’s have a look.
For Android
For an android device, follow these steps to turn on auto-download:
- Click on the 3 dots on the top-right corner of WhatsApp, and go to “Settings.”
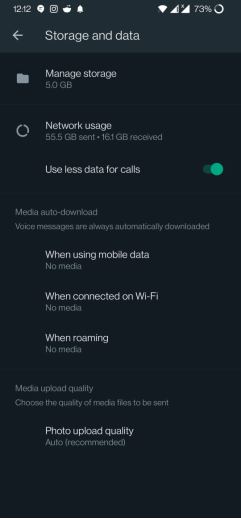
- Now, go to “Storage and data > Media Auto Download.”
- Here you will find 3 options: When using Mobile Data, When connected on Wi-Fi, and When roaming.
- Select “When using mobile data.” You will see 4 options for the type of media you want to download using mobile data. Check the ones you want, based on your preference.
- Now, select “When connected on Wi-Fi” and select the media you want to download when your device is connected to the internet using a Wi-Fi connection.
- Follow the same procedure for “When roaming.”
Turn on Auto Download on Android WhatsApp
These were the steps to enable auto download on WhatsApp on an Android device. Now, let’s turn on the same settings on an iPhone.
For iPhone
To turn on auto download on an iPhone:
- Open WhatsApp, and on the bottom-right corner, click on “Settings > Storage and Data.”
- Here, under the “Media Auto-Download” section, you will see a list of 4 types of media: Photos, audio, video, and documents.
- Tap on “Photos” and select whether you want to auto download them using Wi-Fi or Wi-Fi and Cellular.
- Do the same for audio, video, and documents.
Turn on Auto Download on iPhone
Now that you know how to turn on auto-download let’s get to the main topic of concern: How to stop auto-download in WhatsApp on Android, iPhone, and PC.
Part 2: How to Turn Off Auto-download in WhatsApp
If you’re sick of WhatsApp media taking up all the storage space, it’s time to turn off the auto download.
For Android
Here’s how to do so for an Android device:
- Open WhatsApp and click on the 3 dots in the screen’s upper right corner.
- Now go to “Settings > Storage and Media.”
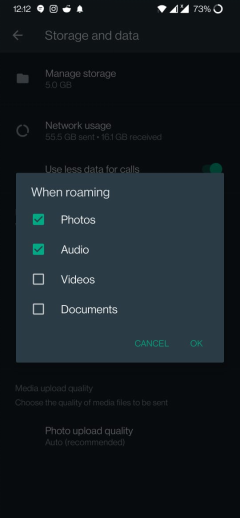
- Under the “Media auto-download” tab, click “When using Mobile Data” and uncheck all the boxes. Click “Ok” to come out of the menu.
- Repeat the same steps for “When connected on Wi-Fi” and “When Roaming” to turn off auto download.
Turn off Auto Download on Android WhatsApp
For iPhone
Turning off auto download in WhatsApp on an iOS device is more or less the same as on Android devices. The user can choose whether to auto download using cellular data or Wi-Fi. The user can also select the downloading option for each media type separately.
So, follow these steps to turn off auto download on an iPhone:
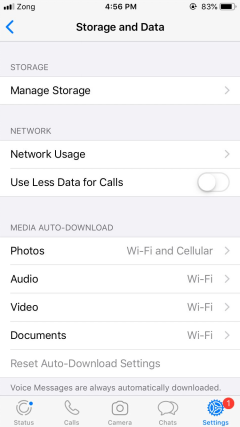
- Launch WhatsApp, and on the bottom right corner, go to “Settings > Storage and Data.”
- Under the “Media Auto-Download” section, you will see 4 types of media files: Photos, audio, video, and documents.
- Tap on “Photos” and select “Never.”
- Do the same for audio, video, and documents.
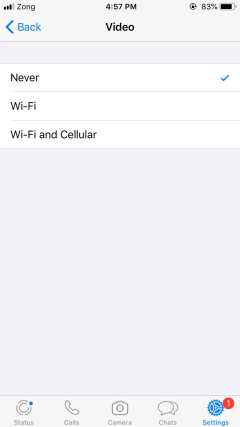
Turn off Auto Download on iPhone WhatsApp
For Mac/Windows
It may come as a surprise, but there’s no option to turn off auto download on WhatsApp Web or the WhatsApp desktop app!
WhatsApp Web and the Whatsapp Desktop app will automatically download media received from all saved contacts. The only way to stop WhatsApp from auto-downloading media is to:
- Delete your contacts.
- Cancel the download as soon as you receive the message.
But honestly, neither of these methods is feasible.
However, WhatsApp auto-downloading doesn’t actually save media files on the PC, so it’s not really an issue. The media shown in the app is hosted by the WhatsApp server.
To save the media locally onto the PC, select the media, then press the download icon on the top right.
Part 3: How to Fix WhatsApp Media Auto-Download Not Working
Sometimes users face problems with auto download after turning it on, like getting a “Download Failed” or “Download was unable to complete” error.
More often, it’s a simple issue. However, the problem can be critical as well.
Regardless of why the WhatsApp auto-download is not working, here’s a list of quick fixes to solve the issue on the WhatsApp Web/WhatsApp Desktop app, Android, and iOS.
Let’s get started!
For WhatsApp Web
If you cannot manually save media on Whatsapp Web, then follow these steps to fix your problem.
1. Check Internet Connection
Most of the time, an unstable or disconnected internet connection can cause the auto download on WhatsApp Web to not work properly.
To check whether your PC is connected to the internet:
- Click the wireless internet access icon in the right corner of your taskbar.
- Here you can see whether your PC has an active internet connection.
2. Check Device Storage
Possibly, your PC’s storage has run out of space, causing the auto-download on WhatsApp Web not to download media files.
To check the storage on Windows:
- Open File Explorer and go to “This PC.”
- It will show the available space under the “Devices and Driver” section.
For macOS:
- Open the Apple menu, and select “About This Mac.”
- Click the storage tab on the toolbar to view your storage.
3. Clear Browser Data
Clearing your browser data can also fix this issue. Here’s how:
To clear browsing data on Chrome:
- Open the 3-dot menu on the top right.
- Go to “History > Clear Browsing Data.”
- Set the time range to “All Time” and select “Cookies and other Site Data” and “Cached Images and Files.”
- Click on “Clear Data.”
For Safari:
- Open a Safari tab and click the Safari menu on the top left.
- Go to “Preferences > Privacy > Manage Website Data.
- Find and select Whatapp.com on the list. Click “Remove > Done.”
- Try signing out of WhatsApp and back in again with the help of your phone.
WhatsApp Android
If the WhatsApp auto-download is not working on your Android device, here’s what to do:
1. Check Internet Connection
As we said earlier, an unstable or disconnected internet connection can cause the auto-download to stop working. To check the internet connection on your Android:
- Go to “Settings > Wi-Fi & Network” and see whether the toggle is on.
- If you want to use mobile data, go to “Settings > Wi-Fi & Network > SIM & Network” and turn the toggle on for Mobile Data.
2. Turn off Data Server
If the issue persists, try turning off the data server. Here’s how:
- Go to “Settings > Wi-Fi & Network > SIM & Network > Data Server.”
- Now turn off the toggle for “Use Data Server.”
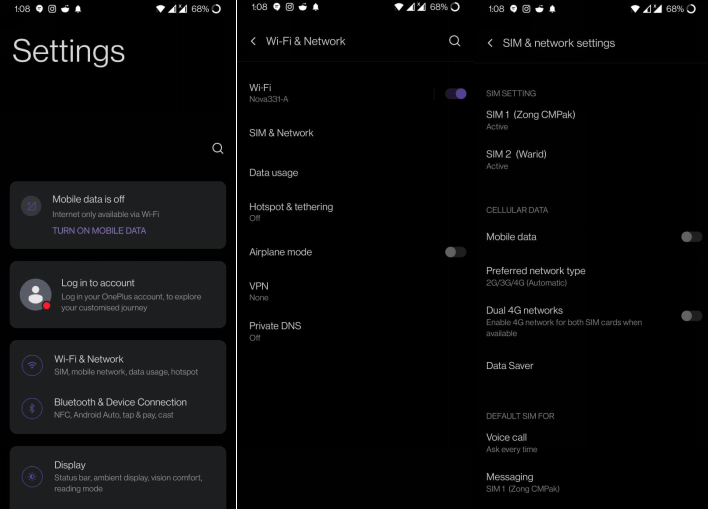
Turn off Data Server
3. Check Storage on Android Device
It could be that your Android device is low on storage space making the WhatsApp auto-download feature unable to download media files. To check the storage:
- Go to “Settings > Storage” and see how much space you have left.
- You can clear up space by deleting some apps or media files you no longer need.
4. Check WhatsApp Storage/Media Permission
Make sure your WhatsApp has storage/media permission on your device.
- Go to “Settings > Apps > WhatsApp.”
- Now click on “Permissions > Files and Media > Allow Access.”
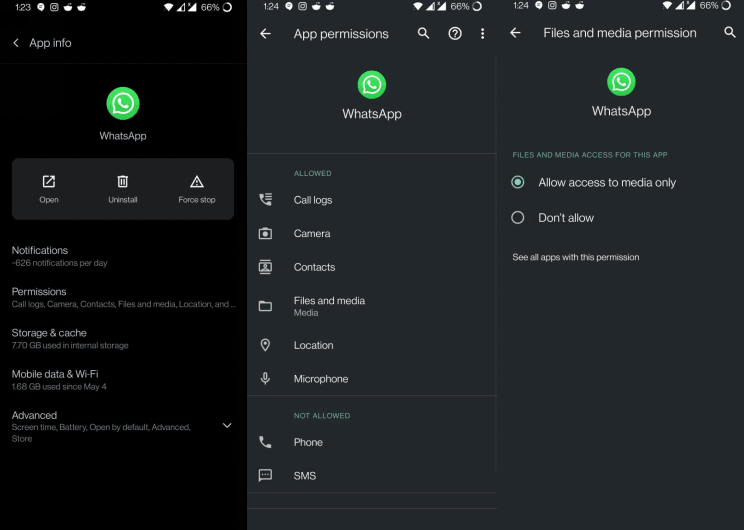
Check WhatsApp Storage/Media Permission
5. Clear WhatsApp Cache
If the above methods don’t work, try clearing your WhatsApp cache. Here’s how:
- Go to “Settings > Apps > WhatsApp.”
- Now click on “Storage & Cache > Clear Cache.”
6. Set Date and Time
Make sure that the time/date on your device is correct. Having an incorrect date or time can affect WhatsApp sync. To check whether the date and time are correctly set:
- Go to “Settings > System > Date & Time.”
- Turn the toggle on for “Use Network-Provided Time.”
7. Reset Network Settings
Sometimes resetting network settings can fix certain big and small glitches. To do so:
- Go to “Settings > System > Reset Options > Reset Wi-Fi, Mobile & Bluetooth.”
8. Force Stop WhatsApp
Force stopping WhatsApp and then launching it again might also fix the auto-download issue:
- Go to “Settings > Apps > WhatsApp > Force Stop.”
9. Reset your App Preferences for WhatsApp
If nothing else works and you can’t figure out what’s causing the issue, resetting your app preferences for WhatsApp might just do the trick:
- Go to “Settings > System > Reset Options > Reset App Preferences.”
- Now click on “Reset Apps” to confirm your selection.
If none of the above quick fixes work to fix the WhatsApp auto-download issue, you can try restarting your phone or reinstalling WhatsApp.
WhatsApp iOS
If the WhatsApp auto-download is not working on iOS, here are a few hacks you can try:
1. Check Internet Connection
To make sure you have a proper network connection on your iPhone, follow these steps:
For Wi-Fi
- Go to “Settings > Wi-Fi” and see if the toggle is on.
For Mobile Data:
- Go to “Settings > Mobile data” and turn the toggle on.
Also, make sure you have mobile data enabled for WhatsApp:
- Go to “Settings > WhatsApp” and turn the toggle on for WhatsApp.
2. Turn off the Data Saver
Sometimes, if you have your Data Saver settings on, it can also cause the WhatsApp auto download feature not to work properly. To turn it off:
- Go to “Settings > Mobile Data > Mobile Data Options” and turn off the toggle for “Low Data Mode.”
3. Enable “Save to Camera Roll”
You may have disabled the option to save media to camera roll in your WhatsApp settings. To enable it:
- Open WhatsApp and go to “Settings > Chats,” and turn the toggle on for “Save to Camera Roll.”
4. Check Storage Space
Low storage space can also cause the WhatsApp auto download feature to stop working. So, make sure you have enough storage on your IOS device.
- Go to “Settings > General > iPhone Storage.”
- If you’re running low on storage, delete some media and apps to make space for WhatsApp media.
5. Check WhatsApp Storage/Media Permission on the Device
Make sure your WhatsApp has storage/media permission on your device.
Follow the steps to enable access:
- Go to “Settings > Privacy > Photos.”
- Tap “WhatsApp” and select “All Photos.”
6. Set Time/Date
If you changed your time/date settings recently. It can also result in WhatsApp auto download not working. Make sure that the time/date on your device is correct, so WhatsApp sync is not affected.
- Go to “Settings > General > Date & Time.”
- Turn the toggle on for “Set Automatically.”
7. Reset Network Settings
Sometimes there is a network glitch or connectivity issue that can be fixed by resetting your network settings:
- Go to “Settings > General > Reset > Reset Network Settings.”
Most of the time, the quick fixes we have discussed solve the issue. However, if they don’t work and your WhatsApp auto download is still not working, try restarting your iPhone or reinstalling WhatsApp.
Bonus Tip: Protect Photos by Transferring WhatsApp Data to Computer
How do you make sure you don’t accidentally lose your WhatsApp data after you stop the automatic download of WhatsApp? In this case, you can use AnyTrans to backup or transfer your WhatsApp data to your computer regularly to save it. This will not only prevent you from losing your data, but will also allow you to view your previously backed-up WhatsApp data at any time.
AnyTrans is a professional data management tool, which provides an easy and safe way to manage your files on iOS devices and allows you to transfer WhatsApp Messages from your iOS device to your computer.
AnyTrans – Professional iOS Manager
- Transfer WhatsApp images, messages, attachment to computer easily.
- Backup your WhatsApp data in minutes.
- No data will be erased when transferring WhatsApp.
- Work well with all iPhone, iOS versions as well as Mac/Windows.
Free Download100% Clean & Safe
Free Download100% Clean & Safe
Free Download * 100% Clean & Safe
Here are steps to transfer your WhatsApp from iPhone to PC:
Step 1. Download AnyTrans and run it on your computer > connect your iPhone to the computer > choose the Social Messages Manager on the left side > select the Back Up WhatsApp option.
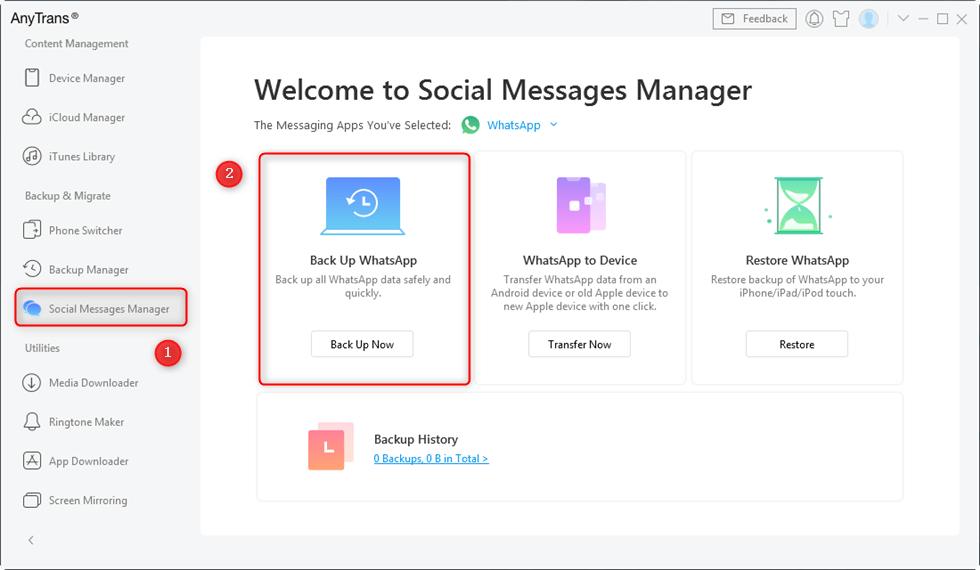
Back up WhatsApp Files with AnyTrans
Step 2. Then you can click Back Up Now to save your WhatsApp message to your computer. At the same time, you can click on the Enable Backup Encryption button to encrypt the backup, or click on the Change Backup Path button to change the transfer path.
Click Back Up Now
The Bottom Line
It is quite frustrating to see your device’s memory being taken over by automatically downloaded WhatsApp media. But, there’s no need to worry anymore, as you can turn off the WhatsApp auto download feature from the settings.
In this article, we have taken you through the basic steps to turn on auto download on your Android, iOS, and PC. We have also discussed the steps to turn off WhatsApp auto download and various quick solutions to fix auto download in case it’s not working. Finally, to protect your data, we recommend that you use AnyTrans to back up WhatsApp to your computer.

Senior writer of the iMobie team as well as an Apple fan, love to help more users solve various types of iOS & Android-related issues.
Product-related questions? Contact Our Support Team to Get Quick Solution >
