How to Fix ‘Phone Not Allowed for Voice’ Issue on Android [11 Ways]
The ‘Phone not allowed for voice’ message means your SIM card is inactive, not registered for voice calls on your network, or your phone is locked to another carrier. To fix it, get in touch with your carrier to activate the SIM or lift any restrictions, review your phone’s SIM settings, reset the network settings on your device, or test the SIM card in a different phone to pinpoint the issue. Or try DroidKit to fix this issue with only a few clicks.
Many users report that the “phone not allowed for voice” error on Android, sharing concerns online. For instance, one Reddit user explained constantly encountering this message when dialing USSD codes. This issue leaves the phone nearly unusable for essential communication tasks every day. If you encounter the same question, don’t worry. Here in this post, we will explore reaosons for “phone not allowed for voice” error, and also provide 11 easy solutions to help you fix this error.
Table of ContentsHide
Why ‘Phone Not Allowed for Voice’ Message Appear?
How to Fix ‘Phone Not Allowed for Voice’ Issue
- 1. Restart Your Device
- 2. Check Network Connection
- 3. Check Network Operator Settings
- 4. Reset Network Settings
- 5. Reinsert SIM Card
- 6. Try a Different SIM Card
- 7. Check Account Status with Carrier
- 8. Confirm Device Compatibility with the Carrier’s Network
- 9. Check for Device Locks
- 10. Check for Software Updates
- 11. Repair Android System Issues via DroidKit [Easy & Safe]
FAQs about Phone Not Allowed for Voice
Why ‘Phone Not Allowed for Voice’ Message Appear?
The “phone not allowed for voice” error often leaves users frustrated, especially since it’s not immediately clear whether the problem comes from the device, SIM card, or carrier. To better understand how to fix the issue, it’s important to first look at the most common reasons behind this error. Below are a few possible reasons:
- Carrier Restriction: Your carrier may block services due to unpaid bills or account suspensions.
- SIM Issue: A damaged or expired SIM can also stop proper call network registration.
- Network Error: Weak or unstable signal causes interruptions and prevents voice connectivity.
- Device Lock: Phones locked to carriers block other SIM cards, restricting consistent voice connections.
- Software Bug: Outdated system software can trigger errors and disrupt calling features and reliability.
How to Fix ‘Phone Not Allowed for Voice’ Issue
Fixing the “phone not allowed for voice” error requires applying targeted methods carefully. The following section covers the top 11 ways to help you address and resolve this problem:
1. Restart Your Device
The first and quickest solution is to restart your phone to resolve the “phone not allowed for voice” issue. This method clears small glitches and refreshes the system to restore the normal working of features like calling. Review the quick instructions below to find out how you can perform this solution:
Step 1. Keep pressing the “Power” button for a few seconds and tap “Reboot” to restart your phone.
Step 2. Once your phone is restarted, your problem will be resolved successfully.
2. Check Network Connection
The “phone not allowed for voice” problem is also caused by your signal being weak or irregular. At this particular point, look at the signal bars icon at the top of your screen. A single or two bars are either an indication of having poor coverage or No Service. Relocate to a place that has a stronger signal, like outside or beside a window.
3. Check Network Operator Settings
This solution focuses on altering your network settings and ensuring smooth connectivity for calls. It helps users reduce dropped calls to improve clarity and keep voice services working without interruption. By switching to stronger coverage areas or enabling automatic network selection, users can restore proper communication. Adhere to the given steps to alter the network operator settings when facing “phone not allowed for voice.”
Step 1. When you access your phone’s settings, head to the “Connections” section to choose “Mobile Network.”
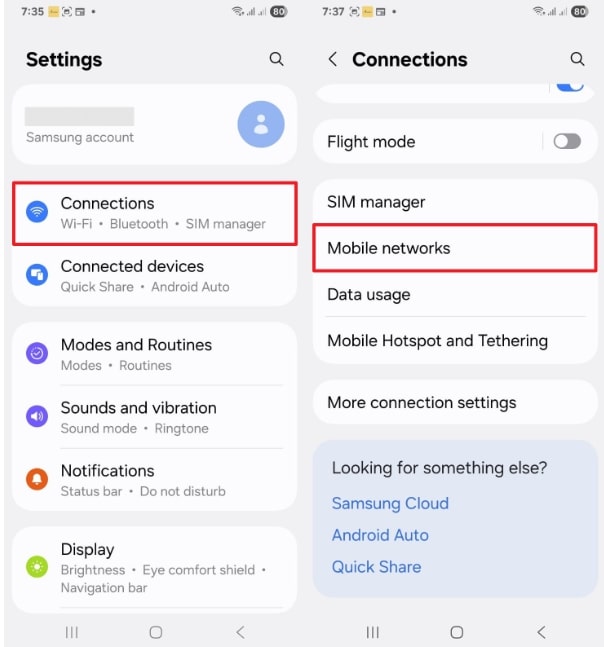
Choose Mobile Networks
Step 2. After choosing a mobile network, select “Network Operator” and turn on the “Select Automatically” toggle.
4. Reset Network Settings
When you face the “phone not allowed for voice” issue, you can also try resetting the network settings. This clears all saved mobile data and Bluetooth settings to help you fix any connection problems. It also allows your phone to reconnect properly to the network and improve call quality or stability. Take guidance from the given steps to reset the network settings on your device:
Step 1. After accessing the “Settings,” tap the “General Management” option to choose “Reset.”
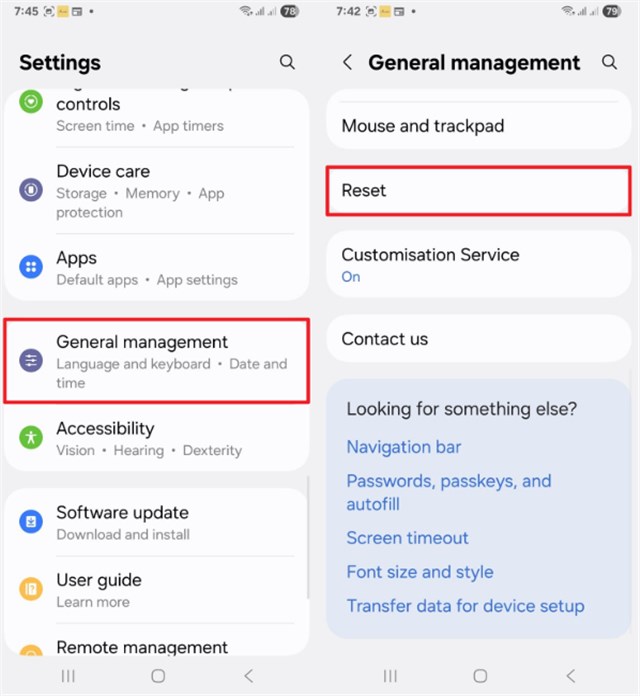
Click Reset
Step 2. In the Reset section, tap “Reset Network Settings”, and then hit the “Reset Settings” button to confirm.
5. Reinsert SIM Card
Sometimes “phone not allowed for voice” issues occur because the SIM card is not properly connected. You can refresh the connection between your phone and the network each time you turn your phone on and take it off. Moreover, this will help in getting the SIM right, and the phone will feel the network right. In addition, it restores normal voice functions without complicated troubleshooting.
6. Try a Different SIM Card
Apart from reinserting, you can also try to insert a different SIM card when facing the “phone not allowed for voice” problem. It assists in finding out whether the issue is with the existing SIM card, such as becoming damaged or having problems with the network. In addition, a voice service can be restored to use with a different SIM in case the initial one is invalid or expired.
7. Check Account Status with Carrier
You also need to check your account status with your carrier when facing the “phone not allowed for voice” issue. Carriers sometimes block calling services because of unpaid bills or even account suspensions. Verizon, AT&T, and T‑Mobile users can check balances using apps like MyVerizon, myAT&T, or T‑Mobile. Additionally, try carrier codes such as *777# for balance, or *#06# for verifying device IMEI status immediately.
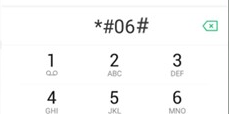
Verifying IMEI Status
8. Confirm Device Compatibility with the Carrier’s Network
Device compatibility is vital because not all phones support every carrier’s required network bands. If unsupported, your phone may show the “phone not allowed for voice” error during calls. Some phones, especially those purchased abroad, may not support local carrier frequency bands properly. Take guidance from the given instructions to know how to check device compatibility:
Step 1. Navigate to the “Settings” to access “About Phone” and tap the “All Specs” option.
Step 2. Choose the “Status” option and put your “IMEI” number in any Compatibility Checker online.
9. Check for Device Locks
Many phones are restricted, meaning they function only with the carrier that originally sold them. If locked, using another SIM may trigger the “phone not allowed for voice” message quickly. You can test this by inserting a SIM card from a different provider. If it shows “SIM not supported” or “network locked,” your device needs unlocking to restore proper calling access smoothly.
10. Check for Software Updates
As a final basic solution, you can now check and update your software version to resolve”phone not allowed for voice”. Network issues may occur if your phone is not updated, causing dropped calls or no voice service. Along with that, updates fix other bugs that affect network or voice services and improve stability. Adhere to the steps below to understand how to update the software of your phone through settings:
Step 1. Head to your device’s settings to access “Software Update” and tap the “Download and Install” option.
Step 2. If there is any update available on your phone, press the “Install Now” button.
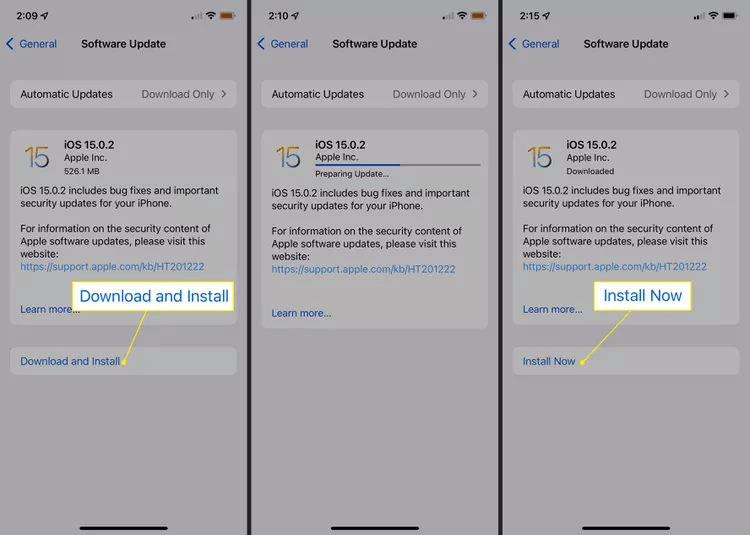
Install Now
11. Repair Android System Issues via DroidKit [Easy & Safe]
When the “phone not allowed for voice” error is caused by deeper system glitches, basic fixes may not be enough. In this case, DroidKit proves especially useful. It can help you fix the “phone not allowed for voice” issue with just a few clicks. As a professional Android repair tool, DroidKit can also resolve other Android system problems, such as black screens, frozen devices, and endless boot loops. Unlike risky manual methods, it doesn’t require rooting, which means your personal data remains fully protected. With wide device compatibility and an intuitive process, you can fix stubborn Android errors on your own, saving both time and costly visits to repair shops.
Key Features of DroidKit:
- Recover 50+ Android system issues such as device restarts, frozen screen, etc.
- Fix “phone not allowed for voice” error without root or technical skills.
- Support fixing system issues on devices with Android OS 6 – 15.
- User-friendly interface & easy steps, more suitable for beginners.
Free Download * 100% Clean & Safe
Detailed Steps to Resolve “Phone Not Allowed for Voice” Issue Using DroidKit:
Step 1. Free download and install DroidKit on your computer. Connect your phone via USB and open the Fix System Issues panel.
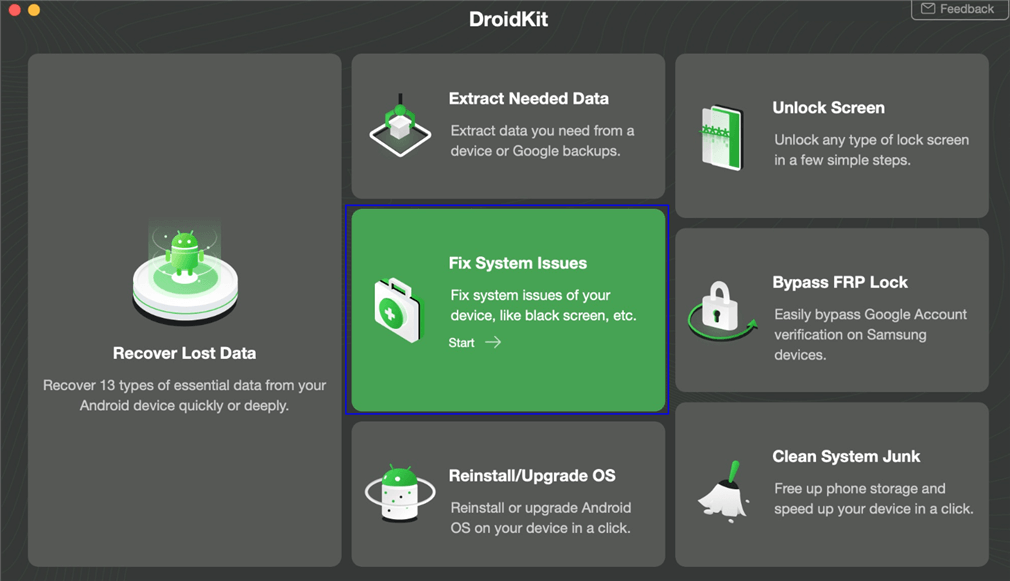
Click Fix System Issues
Step 2. Get the matching code for your device and tap Download Now to install the required firmware.

Start to Download Firmware Package
Step 3. Once the firmware downloads, click Fix Now. Follow the on-screen instructions to enter Download Mode, then tap Next.
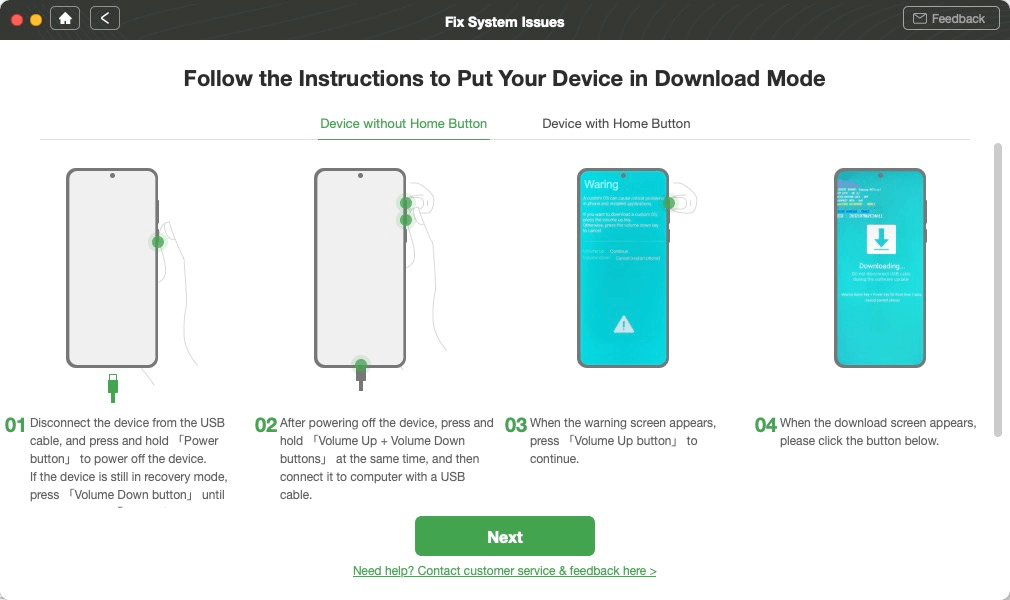
Get Your Phone into Download Mode
Step 4. Wait a few minutes, and you’ll see a confirmation screen when the process is complete. Now you resolve the ‘phone not allowed for voice’ error successfully.
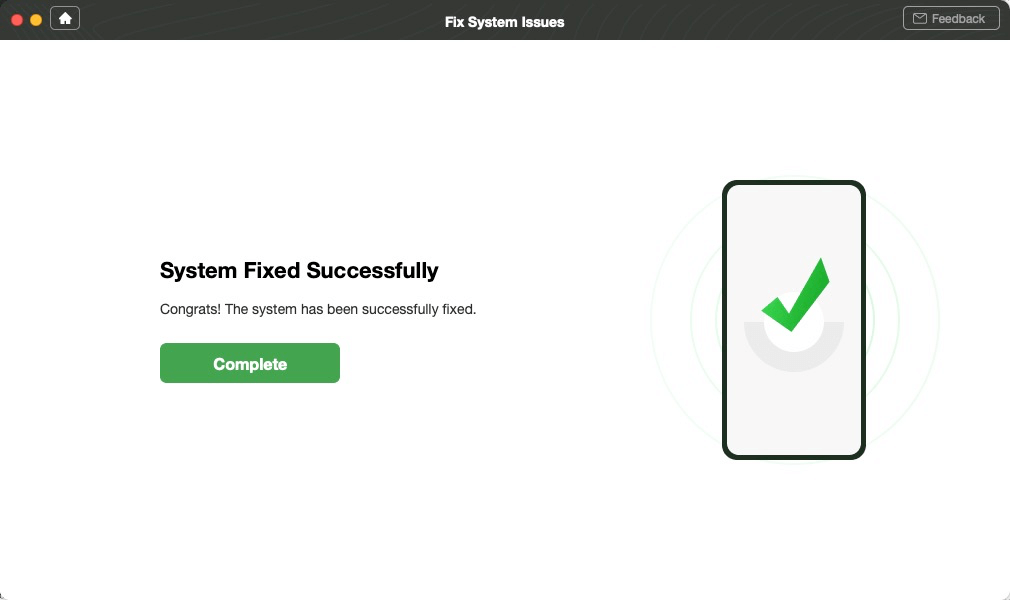
System Fixed Successfully
FAQs about Phone Not Allowed for Voice
Q1. What does it mean when it says phone not allowed?
When saying phone not allowed, it means your device cannot connect to the carrier’s voice network. This may be due to a SIM incompatibility, carrier lock, blacklist status, or incorrect network settings.
Q2. How to fix “Phone not allowed for Voice” on Samsung Galaxy S9?
To fix “Phone not allowed for Voice” on Samsung Galaxy S9, go to Settings > General Management > Reset > Reset Network Settings to refresh the connection. If the error persists, consider a system repair tool like DroidKit.
Q3. Why does my phone say call not allowed?
Phone saying call not allowed usually indicates a SIM or network issue, a carrier lock, or suspended service. Incorrect network settings can also trigger the error.
Conclusion
In conclusion, the “phone not allowed for voice” problem often stems from carrier restrictions, SIM issues, or software glitches. This article has outlined 11 practical fixes you can try on your own. However, if the error persists and is linked to deeper system faults, DroidKit provides a more reliable solution. With official firmware, data-safe repairs, and support for thousands of Android devices, DroidKit can fix Android issues to resolve stubborn calling issues quickly and securely. Download and use DroidKit today to restore stable voice services without complicated steps!
Free Download * 100% Clean & Safe

Roger Smith is a senior technical writer with years of experience in providing Android solutions. He loves to help users solve various problems such as Android unlock, Android data recovery, and Android system repair.
Product-related questions? Contact Our Support Team to Get Quick Solution >
