4 Ways to Backup iPhone/iPad Photos in 2026
How to backup precious iPhone photos? Here offers 4 efficient ways for you. You can enable iCloud backup, Google backup, AnyTrans or backup manually.
AnyTrans – Backup iPhone Photos without iCloud
Free download AnyTrans to backup your iPhone/iPad photos without iCloud. It also supports backing up contacts, messages, etc.
Losing your memories can be just one accidental drop away. That’s why it is necessary to have an iPhone photo backup now more than ever before. Since iCloud storage is limited and data can be lost unexpectedly, it is challenging to find a suitable way to store pictures.
Luckily, you’ve got more than one option to protect them. In this blog, we are going to guide you to four simple and reliable methods of backing up photos on iPhone and iPad, including cloud services, third-party apps, and manual backup.
You do not have to be a tech expert. Continue reading to discover efficient methods for backing up your photos on your iPhone.
Part1. Is It Necessary to Backup iPhone Photos?
Yes! Backing up iPhone photos is quite necessary. Photos are often invaluable, and one of the most effective methods to save them is to perform a backup. iCloud Photos and other cloud-based services, along with the local backups on your computers, offer you handy options to save your precious memories.
Here’s why iPhone photo backup is important:
1. Data Loss Prevention: Accidents occur: iPhones may be lost, stolen, or broken, and as a result, photos may be lost forever unless they have been backed up.
2. Peace of Mind: You can use your device without fearing that you might lose your memories because of the assurance that your photos are safely stored in backup.
3. Storage Management: You can also save your iPhone on the cloud or a computer, and increase storage on your iPhone to save more photos and videos.
4. Convenience: With cloud-based applications such as iCloud Photos, the backup is automatic, hence, easy and seamless.
5. Transferring to New Devices: Backups allow you to transfer your photos and other data easily to a different iPhone or any other device.
Part 2. How Do I Backup My Entire iPhone Photos?
There’s more than one way to back up iPhone photos. Below are four simple and reliable methods for backing up iPhone photos.
Method 1. Backup iPhone Photos via iCloud Photos
iCloud Photos will enable us to save new images automatically to iCloud and download them to iPhone, iPad, and Mac. These photos can be viewed on any of your Apple devices, web browser, or Windows-based computer.
iCloud Photos is awesome and simple. But each Apple Account can only have 5 GB of free storage, and iCloud Photos fills it up very fast. Hence, your device backups will not work, the notes will not save, and you will experience irritating iCloud pop-ups until you free up iCloud storage.
Thus, to reasonably use iCloud Photos, you need to switch to a paid iCloud+ plan or become an Apple One subscriber and receive 50 GB or more of cloud storage.
After getting enough space, here is how you can backup iPhone photos via iCloud Photos:
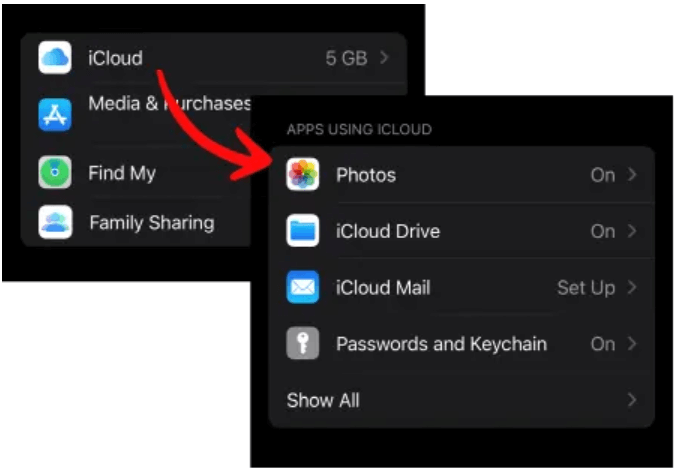
Step 1. To begin with, launch Settings on your iPhone. Then click on your name at the top of the screen.
Step 2. Select “iCloud” and then “Photos.”
Choose iCloud Photos
Step 3. Toggle on the “Sync this iPhone” option.
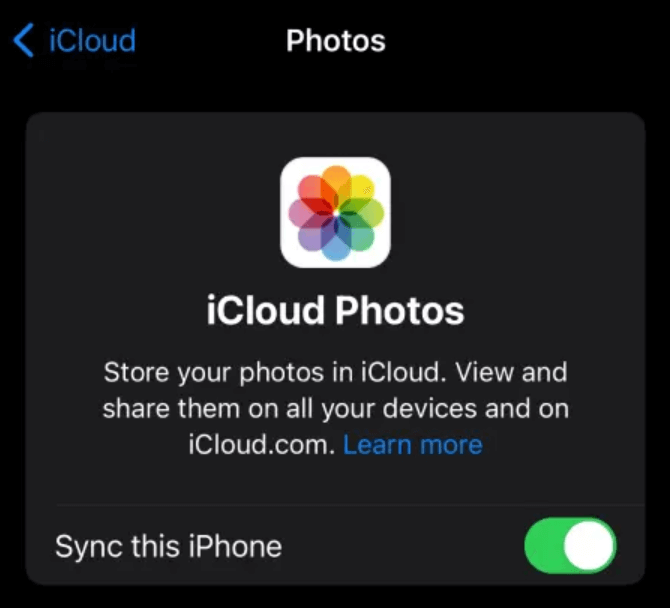
Choose Sync This iPhone Option
When set, the iPhone will automatically back up your photographs in iCloud.
Method 2. Backup iPhone Photos via Google Photos
Google Photos offers 15 GB of free storage, compared to 5 GB provided by iCloud. Moreover, Google Photos can be found as an app on an Android phone.
Therefore, in case you are thrilled by the idea of having an additional 10 GB and being able to retrieve your iPhone photos on Android easily, look no further. You can use Google Photos to back up all your images and videos on your iPhone.
Here are the steps to backup iPhone photos via Google Photos.
Step 1. Download the Google Photos App on your iPhone. Install the app in the App Store. Then open it and log in to your Google Account.
Step 2. Log in and go to the settings of the app, and check whether the option of Backup and sync is turned on. This will automatically store your photos to the cloud when you are on Wi-Fi.
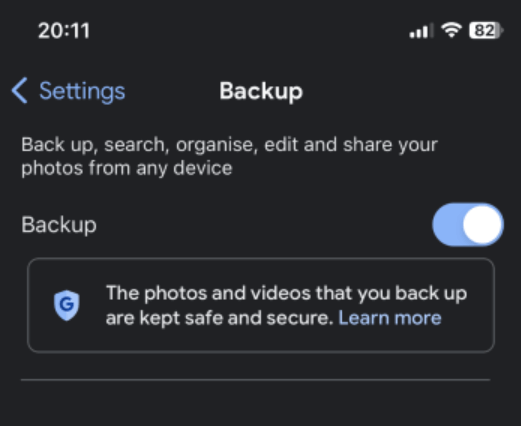
Enable Backup Option
Step 3. Google Photos will start backing up all your existing photos and photos you take going forward once you have made backup preference settings.
Step 4. Once you have uploaded your pictures to Google Photos, you can then access and view them on any device with the Google Photos application. You can also access them through a web browser with your Google account authenticated.
You can also make albums, share photos with friends and relatives, and even make joint photo libraries about some special events or trips.
Method 3. Backup iPhone Photos via Third-party Software – AnyTrans
If you’re running out of iCloud space or find Google Photos less flexible, AnyTrans offers a better and more convenient way to back up your iPhone photos. It’s a smart desktop tool that gives you full control over your data.
Using AnyTrans, you can either backup the entire library of photos or specific albums with a single click. It has no storage limit issue, and it does not require an internet connection. It allows you to preview pictures before backing them up and stores them on your hard disk or an external disk.
AnyTrans is also fully compatible with all iOS devices and versions, making it a convenient way to keep your memories safe and sound with minimal effort.
Additionally, AnyTrans also supports printing phone texts, and Android to iPhone/ iPhone to iPhone data transfer.
Steps for iPhone Photo Backup Using AnyTrans:
Step 1: First, download and install AnyTrans on your computer.
Free Download * 100% Clean & Safe
Step 2: At this point, you need to connect your iOS device to your computer. After AnyTrans recognizes it, you will find the interface as shown below.
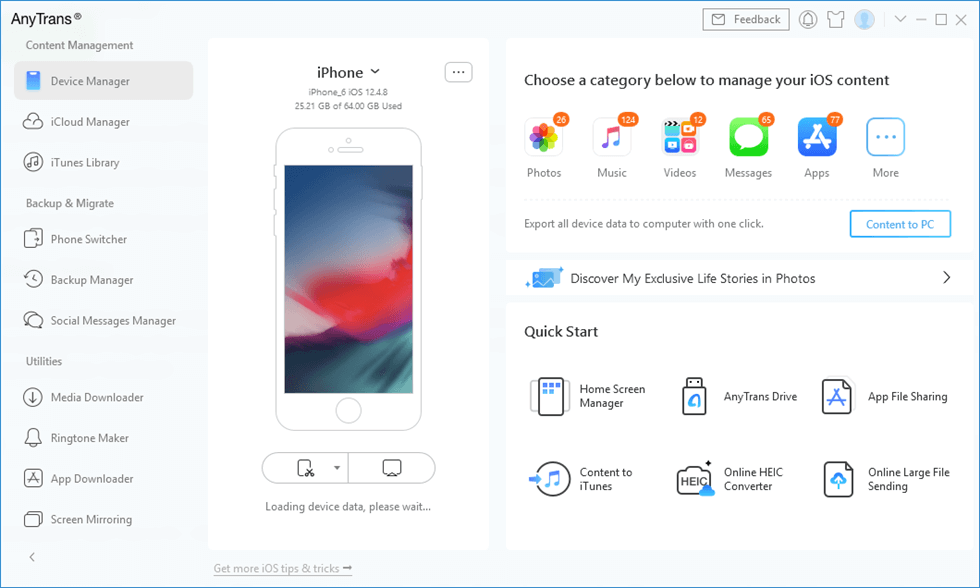
AnyTrans Main Interface
Step 3: Click the Backup Manager option. Then, click the Back Up option.
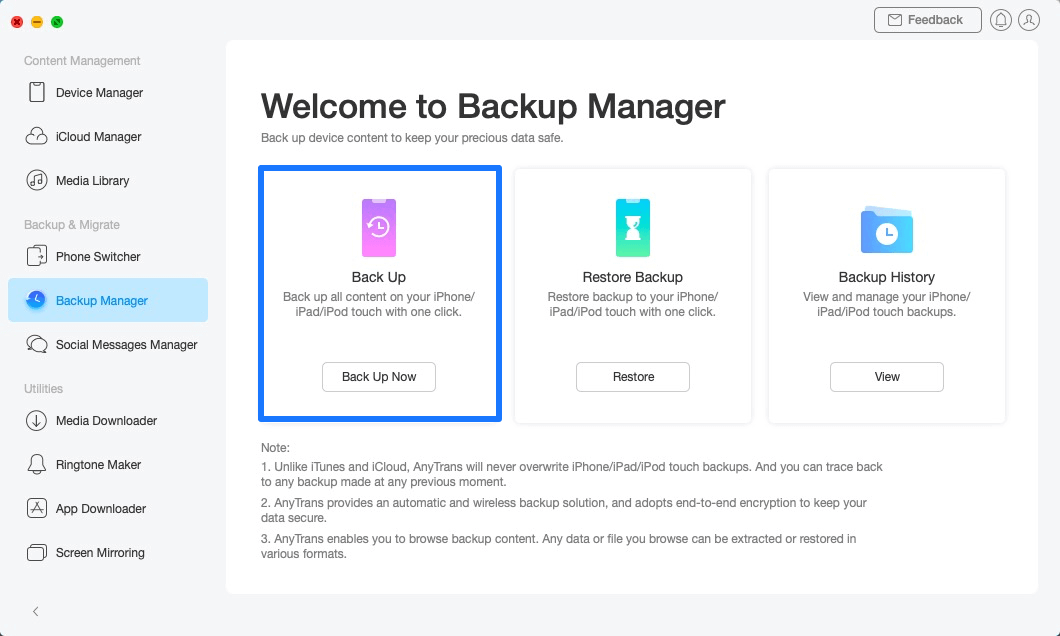
Go to Backup Manager and Back Up Now
Step 4: To keep your data backed up safely and privately, enable the Backup encryption option and enter the password. You may skip this option and click the Back Up Now button directly if you do not want to enable it. It will begin to back up your information automatically.
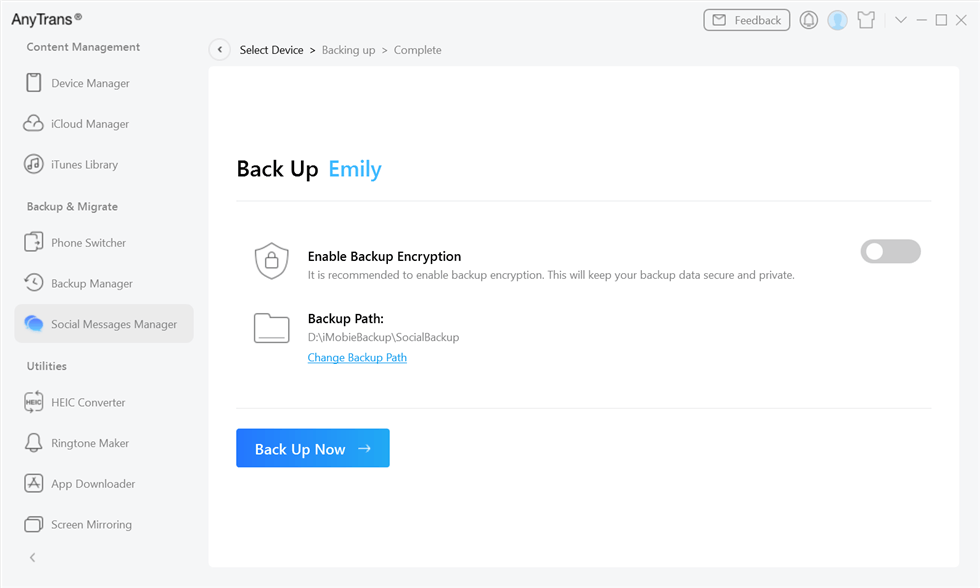
Click Back Up Now
Step 5: As the backup process completes, you will see the interface “Backup Completed.” Click the View option to check the details.
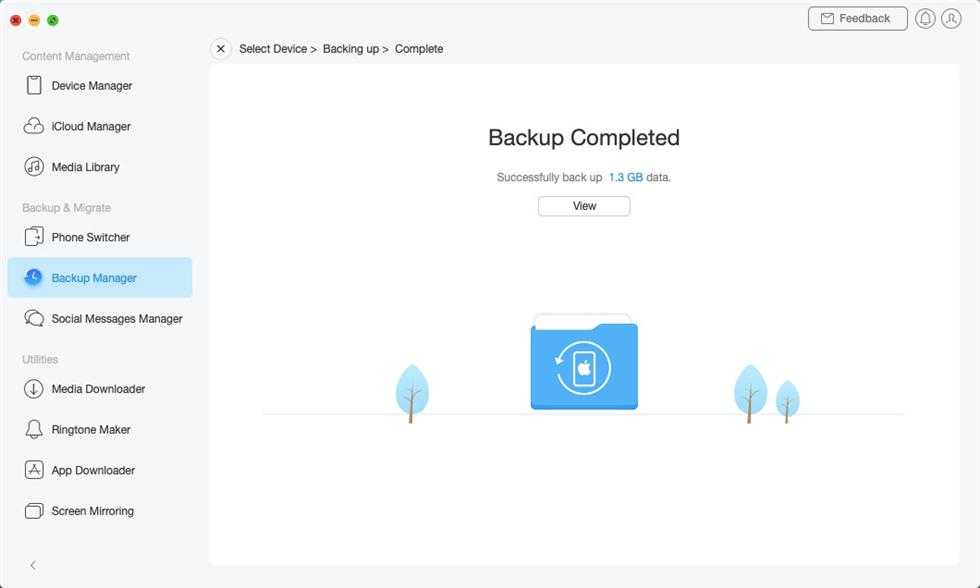
Backup Completed
Method 4. Manual Backup iPhone Photos to a Computer
Alternatively, if you do not want to use cloud storage or some third-party apps, you can do it manually by backing up your photos on your iPhone to your computer with the help of your Finder on Mac. This will give you the freedom of information, and you will be able to put all things offline.
To apply this method, you will need a Mac with macOS 10.15 (Catalina) or the latest one. Alternatively, you can make use of the older versions of macOS to access iTunes.
Below are the steps for iPhone photo backup with Finder:
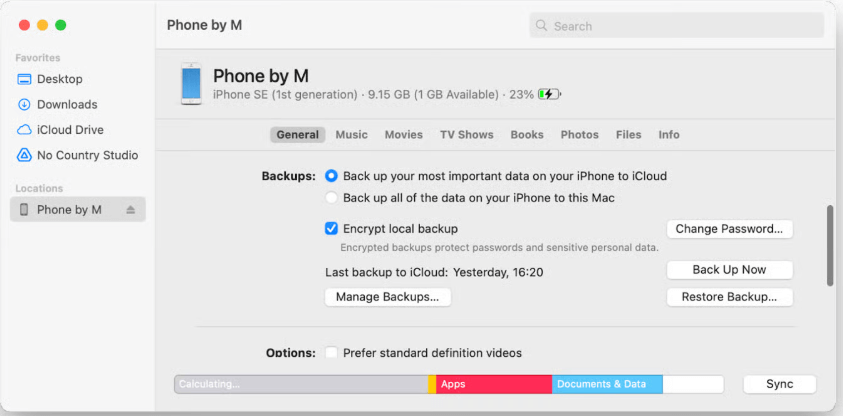
Step 1. To start with, you need to connect your Mac to your iPhone through a USB cable.
Step 2. After connecting it, open Finder and choose your iPhone on the sidebar.
Step 3. Click the General tab on the top part of the Finder window.
Step 4. Choose the option that reads as: “Back up all the data in your iPhone to this Mac.”
Step 5. To back up an extra layer of security, you can select an option to encrypt local backup and provide a password.
Step 6. And click on Back Up Now to begin.
Click Backup Now
Part 3. Conclusion
iPhone photo backup is one of the smartest options to preserve your pictures on an iPhone. It does not matter whether you use iCloud, Google Photos, or a computer; each of them will help to secure your data.
However, when you need an easy yet versatile service with no storage restrictions, AnyTrans is a great option. It puts you in control, and backing up iPhone photos is safe and straightforward.

Wanda Norris is a junior author in iMobie specializing in iOS tips and solutions. She keeps a close eye on every iOS update to provide practical, easy-to-understand guides that help users solve problems and master their Apple devices.
Product-related questions? Contact Our Support Team to Get Quick Solution >
