How to Add Location on Snapchat
Missing Snapchat location stickers can be frustrating. This guide shows how to fix settings, restore the feature, and even change your location so you can share moments seamlessly again.
Wanting to share your travel moments but finding the location sticker completely missing from Snapchat is incredibly frustrating. You capture the perfect scenery, open the sticker menu to tag the city, and the option just isn’t there. This common obstacle—often caused by simple app permissions or a weak GPS signal—can make sharing memories feel impossible.

If you are wondering how to add a location to your Snapchat photos and videos reliably, you need straightforward, tested methods. This guide provides clear, practical steps to fix missing location options and restore your camera interface. Whether you need to adjust your app settings, want to learn creative ways to use location tags, or are looking for advanced software to change your region globally, we have you covered. Let’s solve this problem so you can get back to sharing your world.
How to Add a Location to Your Snapchat Story Natively
If you are looking to tag your current physical surroundings, the standard procedure involves a few simple taps within the application. Nailing down this basic workflow is the first step to making your stories more engaging.
Here is the exact method to attach your current location natively:
- Capture Your Content: Open the Snapchat app and capture a photo or video using the main camera button.
- Access the Sticker Menu: Once you capture your media, look at the right side of your screen and tap the icon that looks like a peeling sticky note to open the sticker drawer.
- Select the Tag: Tap the “Location” button. If you do not see it immediately, tap the search bar at the top of the sticker menu and type “Location” to pull it up.
- Choose Your Venue: A list of nearby places will appear based on your current physical coordinates. Scroll through the generated list and tap the specific venue, city, neighborhood, or landmark you want to tag.
- Adjust and Post: Drag, rotate, and resize the new location overlay on your media. Once you are satisfied with the placement, tap the send button to post it to your story or send it directly to friends.
This standard approach relies entirely on your device accurately reading your current physical coordinates.
Practical Examples: Using Location Creatively
Many users know how to place a basic tag on an image, but there is a distinct lack of practical examples showing how to use location creatively to elevate your stories. Rather than just dropping a standard tag in the middle of your photo, try these aesthetic approaches:
The Minimalist Travel Diary
When you select a location sticker, it typically defaults to a bright, colorful banner. If you tap the sticker after placing it on your screen, it will cycle through several different visual styles. You can change it to a sleek, semi-transparent black-and-white text tag. Shrink this down and place it in the bottom corner of a scenic landscape photo to give your snap a sophisticated, cinematic travel diary feel.
Pinning Tags to Moving Objects
If you are taking a video—perhaps of a coffee cup on a train table or a friend walking ahead of you—you can pin your location tag to that specific object. Press and hold the location sticker over the object while the video plays. Snapchat will anchor the tag to that item, making it move naturally with the object as the video plays.
Layered Context
You do not have to rely on the location sticker alone to tell the story. Try using a transparent location tag to establish the city, and then use Snapchat’s custom text tool to layer a personal caption or a specific timestamp directly over it. This provides context without cluttering the screen with multiple bulky stickers.
Troubleshooting: Why is My Snapchat Location Filter Not Showing?
When dealing with a missing location filter, the solution usually lies in your device parameters or your physical environment.
Take Liam’s situation as a perfect example of this common issue: Liam wanted to share his travel moments with location tags but couldn’t find the option in Snapchat. It was incredibly frustrating to be standing right in front of a monument with a completely blank sticker menu. After checking his phone settings, he realized location permissions were turned off for the app itself. Once enabled, the location sticker appeared immediately, allowing him to tag places in his stories and make his content more engaging for friends.
Resolving Liam’s issue informed much of our testing for this guide. Adding a location on Snapchat depends on both app features and device permissions. Experts highlight that location stickers and geo-filters rely heavily on GPS accuracy and regional availability. If location options are missing, it is almost always due to permissions, a blocked signal, or limited feature rollouts in certain areas.
Here are the most effective, real-world fixes if your location stickers are missing:
1. Fix Your App Permissions
If you are facing permissions that are not properly enabled, follow these steps to restore access:
For iPhone (iOS) Users:
1. Open your iPhone’s main Settings app.
2. Scroll down and select Snapchat from your app list.
3. Tap Location.
4. Change the setting to While Using the App.
5. Toggle the switch for Precise Location so that it shows green. (Without precise location, Snapchat can only see your general city, which often causes specific venue tags to fail).
For Android Users:
1. Open your Android Settings.
2. Navigate to Apps or App Management.
3. Find and select Snapchat within your app list.
4. Tap on Permissions, then select Location.
5. Choose Allow only while using the app and ensure the Use precise location toggle is turned on.
2. Overcome Environmental Blockers
Sometimes your phone’s settings are perfect, but physics gets in the way. If you are trying to tag a venue while inside a thick concrete building, an underground subway station, or an area with a weak 5G signal, the venue list often shows up completely blank.
The Fix: Step near a window or walk outside to establish a clear line of sight to GPS satellites. Wait about 15 to 30 seconds for your phone’s GPS to “catch up” and recalibrate before opening the sticker menu again.
3. Clear the App Cache
Over time, Snapchat stores temporary data that can become corrupted and cause the location features to glitch.
The Fix: Open Snapchat, tap your Bitmoji profile icon in the top left, then tap the Settings gear in the top right. Scroll down to “Account Actions” and tap Clear Cache. Confirm the action. This will restart the app and force it to reload your local geographic data.
4. Toggle Airplane Mode
If your phone is struggling to find its place on the map, a quick network reset works wonders.
The Fix: Swipe down to open your phone’s control center, turn on Airplane Mode for 10 seconds, and then turn it back off. This forces your device to reconnect to the nearest cell towers and Wi-Fi networks, instantly refreshing your location data.
Keeping the app updated through the App Store or Google Play Store can also significantly improve access to these features, ensuring you never miss newly released tags in your area.
Understanding Snap Map Integration vs. Location Overlay
Many users experience confusion between the Snap Map and location stickers, specifically regarding privacy settings and how live broadcasting differs from an overlay on a post. It is crucial to separate live location sharing from individual content tagging to protect your privacy.
Location Stickers (Content Tagging)
A location overlay is a static graphic attached to a specific photo or video. It only appears when someone views that specific post in your story or messages. Your coordinates are not continuously tracked after the post goes live, meaning your privacy is maintained once the snap disappears after 24 hours.
Snap Map (Live Broadcasting)
Conversely, Snap Map integration involves sharing your real-time physical position on a digital map, which is continuously visible to friends or specific contacts while the app is open in the background.
To adjust these map visibility settings:
1. Open your camera screen and swipe down (or tap the map pin icon) to view the Snap Map.
2. Tap the gear icon in the top right corner to access settings.
3. Configure who can see your avatar. Selecting Ghost Mode hides your real-time coordinates from everyone.
Alternative: How to Add Custom Global Locations
If you are standing at a famous landmark, using the native application features to document your presence is the easiest approach. However, there are times when local filters fail to load because you are in a remote area, or perhaps you want to simulate visiting a city halfway across the world to access regional creative tags.
Native tagging limits you entirely to your physical GPS radius. If you want to expand your reach beyond your current city, you will need to use professional software to safely change your device’s coordinates.
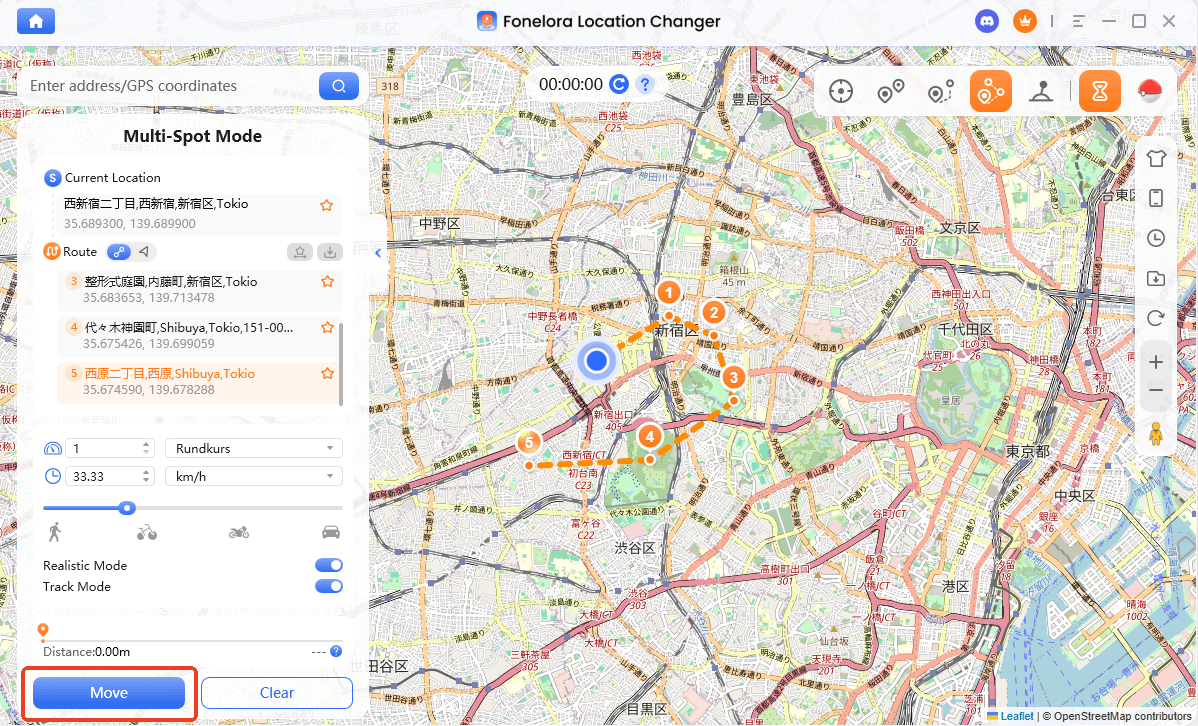
For users who want to manually control their location, tools like Fonelora Location Changer offer a reliable alternative to native tagging. Fonelora is a premium desktop software that allows you to change your phone’s GPS coordinates without requiring you to jailbreak or root your device, making it a safer option for global tagging.
Here is how you can use it to mock your location:
- Connect Your Device: Download and install the Fonelora software on your Windows or Mac computer. Connect your iOS or Android smartphone via USB or Wi-Fi.
- Choose a Location Mode: Fonelora offers several movement modes. Select the Teleport Mode for instant adjustments across the globe. (For apps like Pokémon GO, they also offer a Joystick mode, but for Snapchat, Teleport is all you need).
- Change Your GPS Location: Enter your target destination into the search bar (e.g., “Eiffel Tower, Paris”) and click “Move”.
- Open Snapchat: Your device will instantly read this new location across all applications. When you open Snapchat and go to the sticker menu, you will be able to select from Parisian tags as if you were standing right there.
This method is strictly an alternative for those who need flexibility beyond their physical location, bypassing regional restrictions entirely.
Alternative Solutions: Fonelora Location Changer
As mentioned earlier, desktop-based tools are generally the most dependable option for modifying GPS location on Uber. Compared to mobile apps that rely on easily detectable “Mock Location” settings, desktop solutions tend to deliver a more stable and consistent signal.
If you’re looking for a simpler and more reliable alternative, Fonelora Location Changer is a solid option to consider.
Instead of relying on basic spoofing techniques, Fonelora changes your device’s GPS location through a computer connection. This approach helps minimize common problems like location jumping (rubber-banding) and reduces the likelihood of immediate detection.
Why Choose Fonelora Location Changer?
Fonelora focuses on stability and realistic movement—two key factors when modifying location-based apps like Uber:
- Change GPS location instantly with one click
- Compatible with both iOS and Android devices
- No need to root or jailbreak your phone
- Built-in movement simulation for more natural behavior
- Adjustable speed and customizable routes
- Helps reduce sudden location resets or “snapping”
It’s especially useful for:
- Drivers aiming to position themselves in high-demand areas
- Users testing location-based features or scenarios
- Anyone seeking a smoother alternative to mobile spoofing apps
How to Use Fonelora to Change GPS Location
Follow these simple steps to get started:
Step 1: Download and Install
Download Fonelora Location Changer from the official website and install it on your computer.

Step 2: Connect Your Device
Connect your iPhone or Android device using a USB cable.
- On iOS: Tap “Trust This Computer” when prompted
- On Android: Enable USB Debugging

Step 3: Choose a Location
Open the map interface in the software:
- Enter a specific location (such as an airport or busy area)
- Or select a point directly on the map
Frequently Asked Questions About Snapchat Locations
To ensure you have all the necessary information, here are direct answers to common queries regarding these features.
How do I add a location to my Snapchat story?
Capture a photo or video, tap the peeling sticky note icon on the right-hand menu, select the “Location” button, and choose the correct place from the generated list before posting your story.
Why can’t I find the location sticker on Snapchat?
If the location option is missing, it is usually because your device’s GPS is turned off, you are inside a building blocking the signal, or the app lacks the “Precise Location” permission required to read your physical coordinates.
Do I need to enable location services for Snapchat?
Yes. To use geo-filters or location tags, you must turn on device-level location services and grant the app specific access in your phone’s system settings.
Conclusion
A missing location sticker shouldn’t stop you from sharing your experiences. By correctly configuring your app permission settings, stepping outside for a clearer GPS signal, and understanding how to clear your app cache, you can easily resolve most tagging issues. Whether you are using minimalist location tags for an aesthetic travel diary, or exploring software like Fonelora to tag places globally, you now have the tools to manage your coordinates effectively. Take a moment to check your app permissions today, so your camera is always ready to capture and share exactly where you are.

Joy Taylor is a seasoned technical writer with over a decade of experience in mobile technology. At iMobie, she specializes in producing in-depth content on iOS data recovery, iPhone unlocking solutions, and iOS troubleshooting.
Product-related questions? Contact Our Support Team to Get Quick Solution >
