How to Change Location in Facebook: The Complete Guide to Profile, Posts, and Marketplace (2026)
How to fake your IP adress in Facebook? Now in this guide, you will learn how to change location to other country or region. Additionally, you will know how to protect your private ip via this post.
Imagine wanting to share excitement about a public event without broadcasting that you are currently sitting alone in your living room. For privacy-conscious users, this is a genuine dilemma. You want to engage with your community, but the idea of friends, strangers, or advertisers knowing your precise real-time coordinates creates a significant barrier.
Facing a locked device or a stubborn app when you need to mask your whereabouts is a major obstacle to your digital comfort. Whether you are trying to update your location on Facebook profile details after a move, or you need to manually tag a venue to protect your privacy, the process is often obscured by changing menus and complex privacy policies.
We understand that Facebook auto-detecting current location data feels intrusive. This guide clarifies the process. To ensure reliability, we have rigorously tested every method described below. By following these verified procedures, you can take control of your digital footprint, stop unwanted tracking, and ensure your location data serves you, not the algorithm.
How to Update Location on Facebook Profile (Current City)
The first step in managing your digital presence is ensuring your public profile reflects your desired persona, not necessarily your physical coordinates. The most common task users face is needing to edit the current city information.
It is important to note that this is a cosmetic change. This procedure changes what friends see on your bio ( “Lives in… “) but does not alter your device’s internal Facebook GPS location tracking for ads or security.
1. Update Current City on Mobile (iOS & Android)
The interface for iOS and Android is largely unified in the latest app versions.
1. Open the Facebook app and tap your Profile Picture in the top left corner (or the Menu tab in the bottom right, then your name).
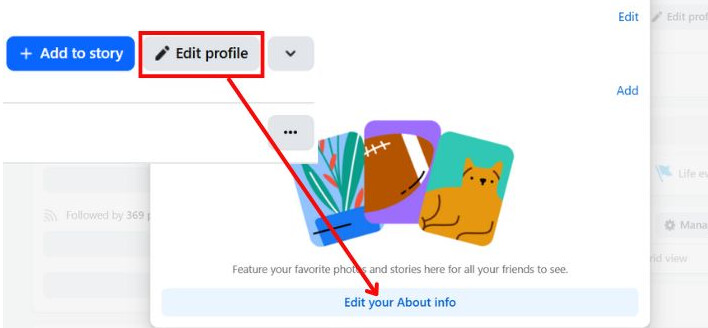
2. Select the Edit Profile button located directly below your bio and profile picture.
3. Scroll down to the very bottom of the page and tap Edit Your About Info.
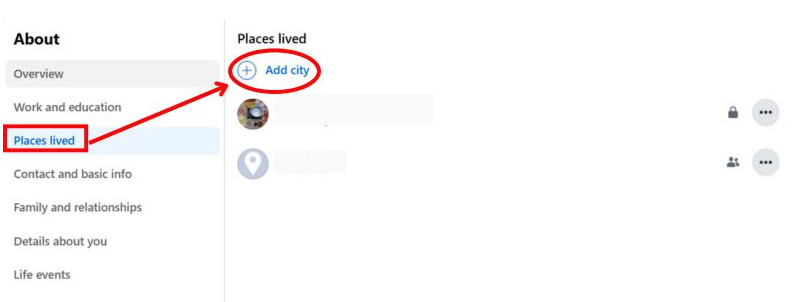
4. Locate the section labeled Places Lived.
5. To change your city, tap the pencil icon next to “Current City. ” If you have never set one, tap Add current city.
6. Type the name of your new city in the search box.
7. Select the correct location from the dropdown list.
8. Crucial Step: Check the audience selector (the icon next to the save button). Ensure it is set to your preferred privacy level (e.g., Public, Friends, or Only Me).
9. Tap Save.
2. Update Current City on Desktop
If you prefer using a computer to change facebook location details, the layout differs slightly.
1. Navigate to your main profile page.
2. Click the About tab in the menu bar located immediately under your cover photo.
3. Select Places Lived from the left-hand side menu.
4. Click the three dots (…) next to your existing current city to select “Edit, ” or click Add current city.
5. Type the new location.
5. Verify the privacy setting (Public, Friends, etc.) using the audience icon.
6. Click Save.
Facebook often asks if you want to update your “Hometown ” simultaneously. Be careful not to confuse “Current City ” (where you are now) with “Hometown ” (where you are from), as these appear differently on your timeline.
Comparison: Profile City vs. Post Check-Ins vs. Real GPS
A common misconception is that changing your profile city resets your location data across the platform. This is incorrect. It is vital to distinguish between cosmetic text changes and technical facebook location settings.
Here is a critical insight: Facebook relies on both device GPS and IP (Internet Protocol) addresses for geolocation. Changing your profile city is merely a text update; it does not fool the algorithm regarding your physical location for ads or “Nearby Friends ” features.
Location Method Comparison Matrix
Use this table to decide which method suits your immediate goal.
| Feature | Visibility to Friends | Effect on Marketplace | Privacy Level | Technical Difficulty |
| Profile City | High (Bio Info) | Low (Visual only) | Low (Cosmetic) | Beginner |
| Post Check-In | High (Per Post) | None | Medium (Contextual) | Beginner |
| Device GPS/IP | Hidden (Backend) | High (Algorithm) | High (Data Security) | Advanced (Requires VPN) |
If you simply edit your current city, you might still see ads for your actual physical location. This occurs because the app still has access to your phone’s GPS or detects your Wi-Fi’s IP address. For total privacy, you must manage permissions at the system level, which we will cover in the privacy settings section.
How to Set Different Locations on Facebook Posts and Check-Ins
This section addresses the strategy used to maintain privacy while staying social. You may need to post about an event to show support, but you do not want to reveal you are home. To fake location on Facebook posts or check-ins, you do not need to be physically present at the venue. You can manually override the automatic suggestion provided by the app.
This technique is useful for privacy, but also for “Latergrams “—posting photos from a vacation after you have already returned home for safety reasons.
The “Map Pin ” Warning (Crucial for Privacy)
Before you start a manual check-in, realize that Facebook may still attach a map pin of your REAL location if your GPS permissions are active. Even if the text says “Paris, ” clicking the map might show a pin dropping on your actual living room.
To prevent this leak: You must disable Location Services for the Facebook app before making the post (see the “Privacy Location Settings ” section below).
Steps to Manually Set Post Location
1. Start a Post: Tap “What’s on your mind? ” to begin a new status update.
2. Select Check-In: Tap the red Check in icon (it looks like a location pin).
3. Override Auto-Detection: Facebook will immediately suggest nearby places based on your GPS (e.g., “Near [Your City] “). Ignore these.
4. Search and Select: Tap the search bar at the top of the screen. Type the specific city, venue, or event location you want to display (e.g., “Paris, France ” or “Central Park “).
5. Select the Target: Choose the correct location from the list.
6. Post: Finish writing your status. The post will now say “— is in [Selected Location] ” regardless of your true coordinates.
Removing an Unwanted Location Tag
Sometimes, Facebook automatically appends a location (like “at Home ” or your city) because your GPS is on. To fix this:
1. Tap the location tag inside the post editor (it will usually be blue).
2. Tap the “X “ next to the location name to remove it.
3. Alternatively, select a different location to overwrite it.
Facebook Marketplace: How to Change Location to Another Country
Users frequently ask Facebook Marketplace how to change location to browse items in a different region or create a listing for a property they own elsewhere. While you can adjust the search radius manually, the results are often influenced by your actual connection data.
Manually Changing Marketplace Location
1. Open the Marketplace tab in the Facebook app or desktop site.
2. Tap the location/radius text (usually displayed in blue in the top right or left corner).
3. Search: Enter a new zip code or city in the search bar.
4. Radius: Adjust the slider to widen or narrow the search area (Custom radius).
5. Tap Apply.
The Cache Problem (Why Manual Changes Fail)
While the method above updates the search results, it often fails when you try to post items or if the app “remembers ” your old location. Facebook utilizes complex geolocation matching. If your IP address places you in New York, but you try to post an item for sale in London, the algorithm may flag the activity as suspicious.
Expert Insight: To change facebook location to another country effectively for selling purposes, you generally need a VPN (Virtual Private Network). However, simply turning on a VPN is not enough because the app caches your location data.
The Correct Workflow for “Digital Relocation “
1. Force Close Facebook: Swipe the app away completely so it is not running in the background.
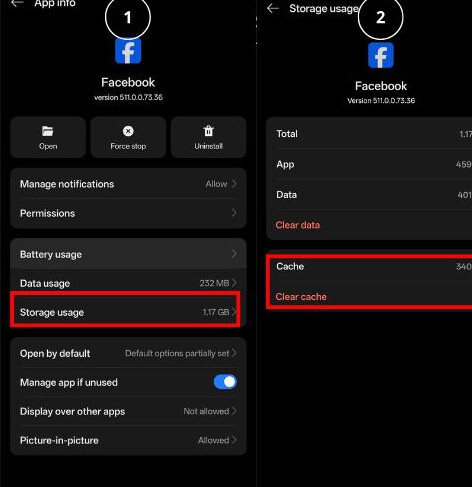
2. Clear App Cache:
- Android: Settings > Apps > Facebook > Storage & Cache > Clear Cache.
- iOS: You may need to offload or reinstall the app if the cache is stubborn, as iOS handles caching differently.
3. Enable VPN: Connect your VPN to the target country or city.
4. Open Facebook: Now, the app detects your IP coming from the new location fresh, without conflicting cached data.
Optional Advanced Privacy Control: Using Fonelora Location Changer (Recommended)
If you need to securely browse and list items on Facebook Marketplace in another country, or if you want to perform a post check-in without accidentally leaking your true address via background metadata, manual text entry will fail. Facebook aggressively tracks the phone’s hardware GPS array.
The ultimate solution is Fonelora Location Changer. It acts as a secure, non-invasive desktop bridge that overrides your phone’s system-level GPS variables using official mobile developer protocols. No jailbreaking (iOS) or rooting (Android) is required, meaning your device security remains perfectly intact while Facebook is successfully fed your target coordinates.
How to Use Fonelora Location Changer (Step-by-Step)
Step 1: Install Fonelora Location Changer
Download Fonelora Location Changer from the official website and install it on your desktop.

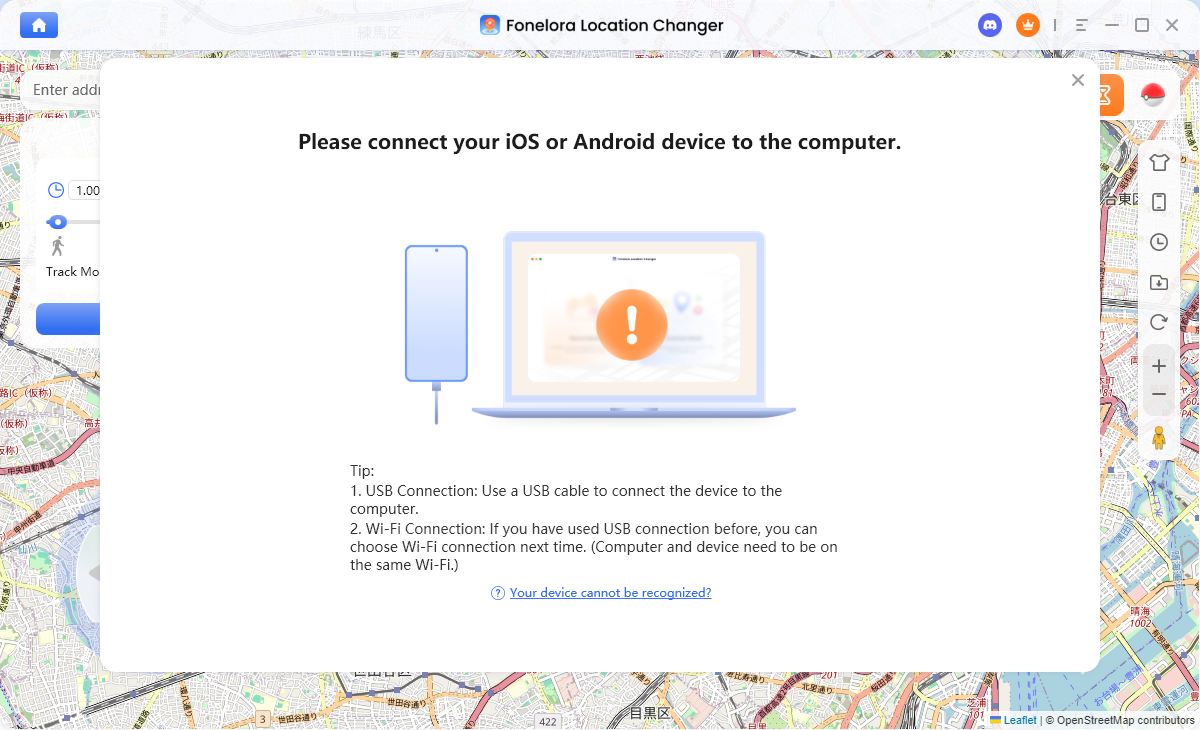
Step 2: Connect Your Device
Launch the tool and connect your phone via USB or wireless pairing. Once connected, allow the necessary debugging or trust permissions when prompted.
Step 3: Choose a Target Location
Open the map interface and select the city or region you want Facebook to recognize (for example, a different country for Marketplace testing or post previews).
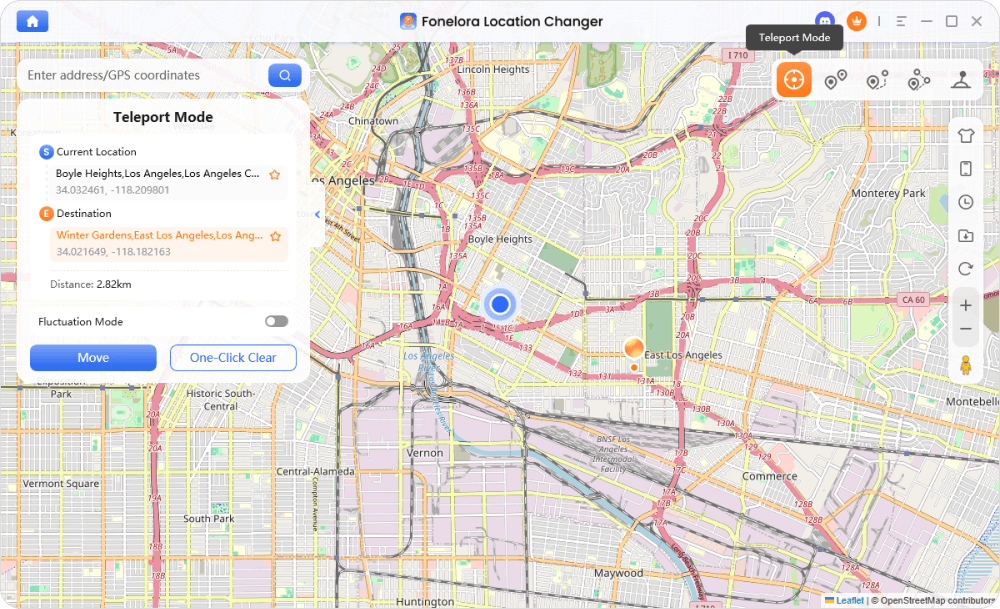
Step 4: Activate Location Simulation
Click “Move” or “Apply Location” to override the device’s current GPS signal. Your system will now reflect the selected region.
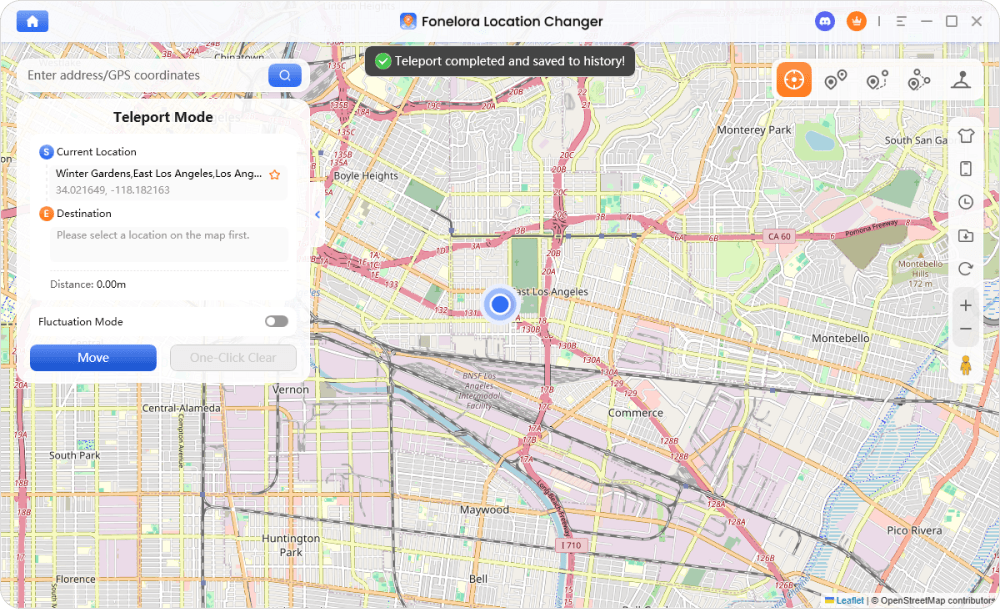
Step 5: Open Facebook and Test
Launch Facebook and check how:
- Check-ins are suggested
- Marketplace listings are displayed
- Ads and nearby events are localized
This helps you verify how Facebook interprets location without exposing your actual coordinates.
Facebook Privacy Location Settings: Stopping Auto-Detection
For genuine privacy, managing facebook privacy location settings is the most critical step. If you are concerned about friends seeing your real-time location via “Nearby Friends ” or Facebook building a history of your movements, you must revoke the app’s permissions at the operating system level. This stops the app from querying your GPS chip entirely.
Disable Location Services on iOS (iPhone)
1. Open your iPhone’s main Settings app (silver gear icon).
2. Scroll down the list of apps and tap Facebook.
3. Tap Location.
4. You will see options: Never, Ask Next Time, While Using the App, and Always.
Recommendation: Select Never to completely block access.
Alternative:
If you want to use check-ins occasionally, select While Using the App and turn OFF the “Precise Location ” toggle. This gives Facebook a general idea of your city but not your exact street address.
Disable Location Permissions on Android
1. Open Android Settings.
2. Tap Apps (or Apps & notifications > See all apps).
3. Find and tap Facebook.
4. Tap Permissions.
5. Select Location.
6. Select Don’t allow.
By selecting “Don’t allow ” or “Never, ” you ensure that even if you accidentally tap a check-in button, the app physically cannot access your coordinates. This provides the highest level of security against unwanted tracking.
Troubleshooting: Why Does Facebook Still Know Where I Am?
Even after following the steps above, some users find that Facebook still recommends local events or ads. This is usually due to “Location History ” or cached data stored in your Meta account profile.
Clear Location History (Meta Accounts Center)
Facebook recently moved these settings. The old “Settings & Privacy ” path is often a dead end. Here is the updated path for 2025:
1. Open Facebook and go to Settings & Privacy > Settings.
2. Tap on Accounts Center (usually at the very top of the menu).
3. Navigate to Your information and permissions.
4. Select Your activity off Meta technologies or look for Location. (Note: Meta frequently A/B tests menu names; if you do not see Location here, check under “Device Permissions ” within the Accounts Center).
5. If you see a history log, select Clear History.
Check Browser Geolocation
If you use Facebook on Chrome or Safari, the browser itself has location permissions that override the app settings.
- Chrome: Settings > Privacy and security > Site settings > Location. Ensure Facebook is blocked.
Frequently Asked Questions About Facebook Location
Q1. Can I set a fake location on Facebook posts?
Yes. When creating a post, you can use the “Check in ” feature to search for and select any location in the world. However, for maximum privacy, ensure you disable GPS permissions first so a “real ” map pin isn’t attached to your fake text tag.
Q2. Why does Facebook show my real location despite changing my city?
Facebook uses your device’s GPS, Wi-Fi signals, and IP address to determine your location for security and ads. Changing your profile city is a cosmetic text change and does not stop this background tracking. You must disable location permissions in your phone settings (iOS or Android) to stop the app from accessing your GPS.
Q3. How do I hide my location from certain friends?
When creating a post with a location tag, you can adjust the privacy audience for that specific post. Click the audience selector (usually says “Public ” or “Friends “) and choose “Friends except… ” Select the specific people you want to exclude. They will see the post (if allowed) but may not see the specific location tag depending on your configuration.
Q4. Is it safe to fake my location on Facebook?
Generally, yes, for privacy purposes on your profile or posts. It is a good safety practice to avoid posting your real-time location. However, using a fake location on Marketplace to sell items in regions where you are not located can trigger fraud alerts, shadow-banning, or lead to account restrictions.
Q5. How do I change my current city on Facebook if it won’t save?
If you cannot save your new city, ensure you have a stable internet connection. If the issue persists, try clearing the app cache (on Android) or reinstalling the app (on iOS). Also, check that you aren’t trying to set a city name that violates Facebook’s naming policies (e.g., offensive terms).
Conclusion
Reclaiming authority over your location parameters is not about hiding in the dark; it is about choosing exactly how you present your digital identity to the network.
For quick aesthetic profiles or casual updates, simple in-app toggles and manual check-ins are completely sufficient. However, if you are looking to secure true digital privacy, circumvent targeted data profiling, or actively run a cross-border business via Facebook Marketplace, utilizing a dedicated system tool like Fonelora Location Changer is the most technically definitive way to establish firm geographic boundaries. Your location data belongs to you—make sure it behaves that way.
More Related Articles

Joy Taylor is a seasoned technical writer with over a decade of experience in mobile technology. At iMobie, she specializes in producing in-depth content on iOS data recovery, iPhone unlocking solutions, and iOS troubleshooting.
Product-related questions? Contact Our Support Team to Get Quick Solution >
