iMoveGo: The Ultimate Guide for iOS 17 & Android 14
Is iMoveGo not working after your iOS 17 update? Our guide provides the proven fix for location not changing issues. Get back in control in minutes.
It’s a uniquely frustrating moment: you update your iPhone to the latest iOS, and suddenly your trusted iMoveGo virtual location tool stops working. The software seems fine on your computer, but your phone’s GPS is stuck in reality. This is the exact scenario our tester, Ryan, faced after updating to iOS 17, leaving him to wonder if his go-to tool was now broken or obsolete. The uncertainty around compatibility, device detection, and confusing permissions can be a major roadblock.
This guide is the solution. We’ve experienced these exact problems firsthand and documented the precise, tested procedures to fix them. Based on hands-on work with an iPhone 15 (iOS 17.2) and a Samsung Galaxy S23 (Android 14) on both Mac and Windows, we will show you exactly how to restore full functionality. For the record, the core iMoveGo software and the solutions in this guide are virtually identical across both Mac and Windows.
Prevent Connection Errors: Your Pre-Launch Checklist
Before you even launch iMoveGo, running through this checklist can prevent over 90% of common connection failures. Most issues users blame on the software are actually rooted in a fundamental permission or hardware problem. Following the correct procedure for your device ensures everything is configured to communicate, saving you significant time and frustration.
For iOS Users (iPhone/iPad)
- Use an Official or MFi-Certified USB Cable.
This is the single most common point of failure. Many third-party cables are designed for charging only and lack the data transfer wires needed for a stable connection. Using the cable that came with your iPhone or one with an MFi (“Made for iPhone”) certification is non-negotiable for GPS simulation.
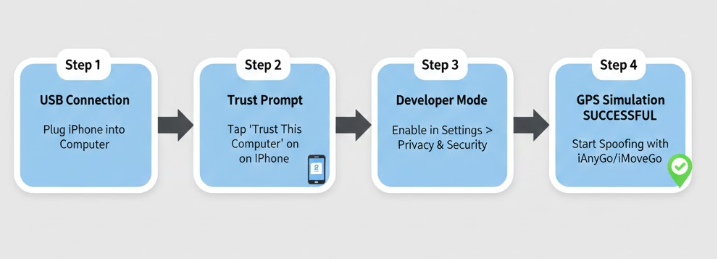
- Enable Developer Mode (iOS 16 and newer). This is a mandatory step. Navigate to Settings > Privacy & Security, scroll to the bottom, and tap Developer Mode. Toggle it on and follow the prompt to restart your device.
- Prepare to ‘Trust This Computer’. The first time you connect your iPhone to a computer, a pop-up will appear on your phone. Be ready to tap ‘Trust’ and enter your device passcode to establish a secure, encrypted connection.
For Android Users
- Use Your Phone’s Official USB Cable. Just like with iOS, a high-quality data transfer cable is essential for maintaining a stable link for mock location data.
- Enable USB Debugging. First, you must unlock Developer Options. Go to Settings > About phone > Software information and tap the ‘Build number’ seven times. A message will confirm you are a developer. Next, go back to Settings > Developer options and enable ‘USB debugging‘.
- Set the Mock Location App. Inside the same Developer options menu, find and tap ‘Select mock location app’. From the list that appears, choose iMoveGo. This explicitly grants the software permission to provide mock location Android tool data to your system.
What to Do When iMoveGo is Not Working (iOS 17 Fix)
If you’ve found that iMoveGo is not working, especially after an iOS update, you’re facing our exact test scenario. The map loaded perfectly in the desktop app, and we could select a new destination, but our iPhone 15’s actual GPS position refused to change. This makes it seem like the software is broken, but the root cause is almost always a lapsed security permission on the phone itself.
Expert Insight: A system update on iOS often resets security permissions as a precaution. This can invalidate the “Trust” relationship with your computer and disable Developer Mode. Your computer can still see the phone for basic tasks like file transfers, but it silently blocks the more sensitive function of GPS simulation.
The Proven Solution: Re-establishing Permissions
Follow this two-step procedure to fix the “location not changing” issue on your iPhone.
- Re-Enable Developer Mode: Even if it appears to be on, you must reset it. Go to Settings > Privacy & Security > Developer Mode. Turn the toggle off, restart your phone, then turn it back on and restart a second time. This forces iOS to re-register the permission properly.
- Reset Location & Privacy Settings: This step is crucial for forcing a new, valid trust session with your computer. On your iPhone, navigate to Settings > General > Transfer or Reset iPhone > Reset. Tap on Reset Location & Privacy.
Is This Safe?
Yes. Let Us Reassure You. We know how alarming tapping any “Reset” button can be. When our team first tested this, we had the same hesitation: “Will this delete my Wi-Fi passwords, apps, or photos?”
We can confirm this action is safe and does not delete your personal data. It only does two things:
- It revokes location and privacy permissions for all your apps (they will simply ask for permission again the next time you open them).
- It erases all “Trust” certificates for previously connected computers.
This is exactly what we need. The next time you connect your iPhone, you will receive a fresh ‘Trust This Computer’ prompt. Tapping ‘Trust‘ creates a new, valid session, completing the fix.
Still Not Working? Try Fonelora Location Changer
If iMoveGo still fails to detect your device or change your GPS location after resetting Developer Mode and trust permissions, you may need a more stable alternative. Fonelora Location Changer is a desktop-based GPS location changer for iPhone and Android that works on Windows and Mac without jailbreak or root.
- Install Fonelora Location Changer on your Windows PC or Mac.
- Connect your iPhone or Android device to the computer with a USB cable.
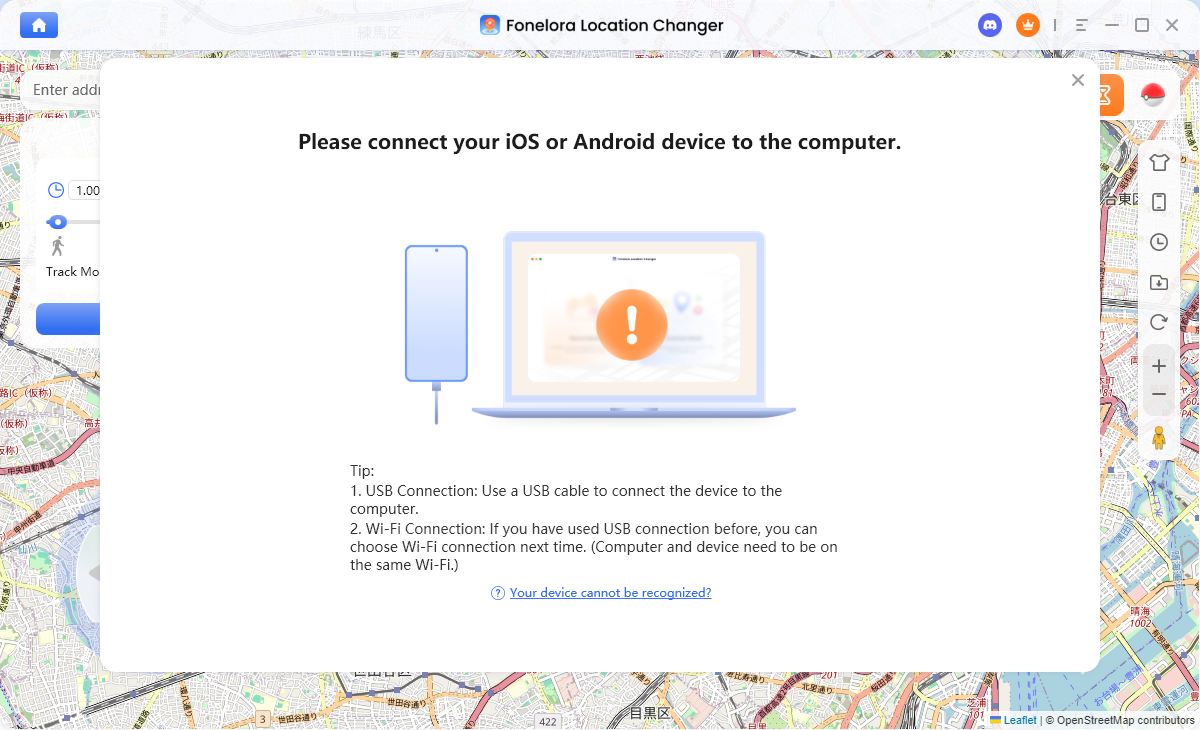
- Follow the on-screen guide to complete device detection and required permissions.
- Select Teleport Mode if you want to change to a fixed location.
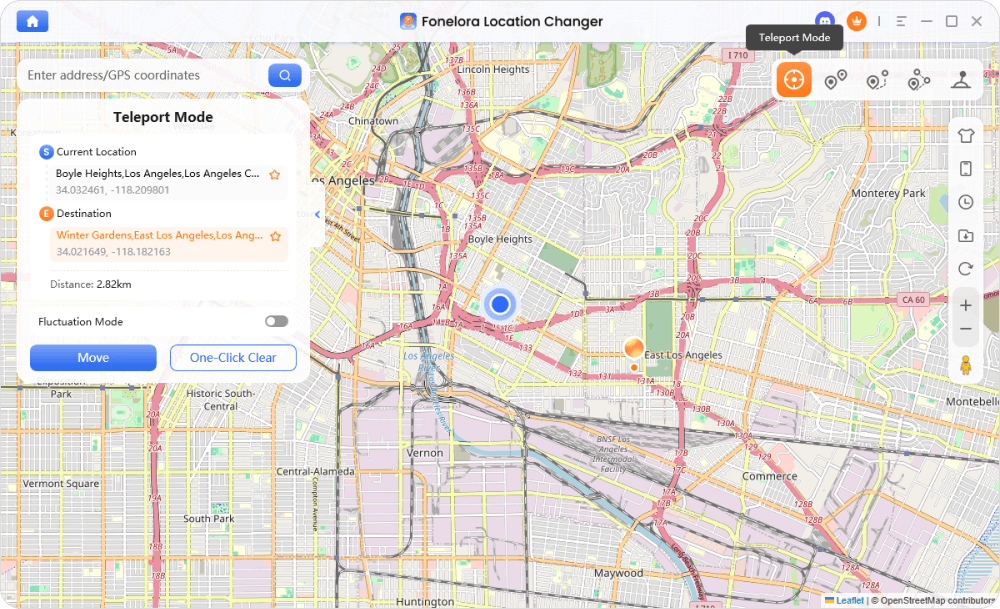
- Use Joystick Mode or route simulation if you need natural movement for location-based apps.
- Open the target app only after the virtual location has been successfully applied.
This makes Fonelora useful when iMoveGo keeps failing after an iOS update, when your device is not detected correctly, or when you want another desktop GPS tool for apps such as Pokémon Go, Snapchat, Tinder, Life360, and other location-based services.
Understanding Why This Fixes iMoveGo on iOS 17
Yes, iMoveGo is fully compatible with iOS 17, but its success hinges on clearing two key security gates Apple has implemented. For any GPS simulation iPhone computer tool to function, it must pass through this permission chain in order.
1. Developer Mode: The First Gate
Apple introduced Developer Mode as a mandatory opt-in for advanced functions like location simulation. When this mode is off, iOS operates in a hardened state, blocking external tools from manipulating core services like GPS. Activating Developer Mode is your explicit authorization for iMoveGo to interact with these services. System updates can disable this setting without warning, which is why re-enabling it is the primary troubleshooting step.
2. The ‘Trust’ Session: The Second Gate
Tapping ‘Trust’ on your iPhone does more than acknowledge the connection; it creates a cryptographic key pairing between your device and that specific computer. This secure channel is required for sensitive data exchange. However, this trust session is not permanent. It can be invalidated by an iOS update or a long period of inactivity. When the session expires, the authorization for location simulation is revoked. Resetting your Location & Privacy settings forces a new ‘Trust’ prompt, creating a fresh session and completing the permission chain.
Best Practices for Pokémon Go and Other Apps
Using iMoveGo as a Pokémon Go location changer is a popular use case, but it requires a smart approach to avoid triggering in-game warnings. The key is to simulate realistic movement and respect the game’s cooldown rules.
The Joystick Mode is the safest feature for gaming. It provides on-screen controls that let you navigate the map at simulated walking or jogging speeds, mimicking natural movement far better than instant teleportation.
Tips for a Safe Gaming Experience
- Respect Cooldown Timers: After performing an in-game action (like catching a Pokémon), you must wait a certain amount of time before performing another action thousands of miles away. Use an online cooldown chart to calculate the proper wait time based on the distance you “traveled.”
- Create Realistic Routes: For hatching eggs, use the ‘Multi-Spot Mode’ to plot a route that follows actual roads and paths at a plausible walking speed.
- Start and Stop Naturally: When you finish, click ‘Stop’ in iMoveGo and let your avatar remain still for a few minutes before closing the game.
Beyond gaming, iMoveGo is a valuable virtual location software for iOS and Android developers testing regional app features, social media managers handling geo-tagged content, and privacy-conscious users masking their true location.
Learn More:How to Increase Shiny Odds in Pokémon GO: The Real Strategy>
Frequently Asked Questions
Here are direct answers to the most common questions about iMoveGo.
Q1: What is iMoveGo and how does it work?
iMoveGo is a desktop application for Mac and Windows that lets you change the GPS location on your connected iOS or Android device. It works by sending new coordinate data from the computer to the phone via a USB connection, which overrides the phone’s internal GPS sensor. This tricks all location-based apps into thinking you are in the new, selected location.
Q2: Does iMoveGo work on iOS 17?
Yes, iMoveGo is fully compatible with iOS 17. However, it requires you to enable ‘Developer Mode’ in your iPhone’s settings (Settings > Privacy & Security > Developer Mode). If your location isn’t changing after an update, you may need to reset this setting and your trust permissions.
Q3: What permissions are required for iMoveGo?
- For iOS: You must enable Developer Mode and grant ‘Trust’ permission to the connected computer.
- For Android: You must enable Developer Options, turn on ‘USB Debugging’, and set iMoveGo as the ‘mock location app’.
You’re Back in Control
Navigating the security complexities of a new OS does not have to be a dead end. When iMoveGo is connected but not changing your location, the cause is usually a permission issue rather than a completely broken tool. Resetting Developer Mode, refreshing Location & Privacy settings, and rebuilding the “Trust This Computer” session can often restore the connection in just a few minutes.
However, if iMoveGo still fails after these fixes, switching to a reliable alternative may save time. Fonelora Location Changer is a practical option for changing GPS location on iPhone or Android from a Windows PC or Mac, without jailbreak or root. It supports teleport mode, joystick movement, and route simulation for location-based apps.
For Pokémon Go and similar apps, use any GPS location changer carefully. Keep movement realistic, avoid frequent long-distance jumps, respect cooldown rules, and open the target app only after your virtual location has been successfully applied. With the right permissions and a stable desktop tool like Fonelora Location Changer, you can regain control over your device location more reliably.
More Related Articles

Joy Taylor is a seasoned technical writer with over a decade of experience in mobile technology. At iMobie, she specializes in producing in-depth content on iOS data recovery, iPhone unlocking solutions, and iOS troubleshooting.
Product-related questions? Contact Our Support Team to Get Quick Solution >
