Nintendo DS BIOS Setup Guide: Solve Blank Screen Errors
Emulators often fail without proper BIOS files; this guide explains legal sourcing, correct placement, and compatibility steps to fix startup errors and ensure smooth Nintendo DS gameplay.
You finally set aside some time to play your favorite retro games, launch your emulator, and stare blankly at a white display. The application refuses to boot, leaving you frustrated and confused. Often, this happens because the software requires original system files to run properly, but finding clear instructions on how to acquire and organize them can be incredibly confusing.
If you are struggling with an emulator not working without proper bios setup, you are not alone. Many guides skip the most important details, leaving beginners stuck with persistent startup errors. This guide provides a clear, tested solution. We will explain how to legally source these system files directly from your own hardware, eliminate uncertainty about compatibility across different applications, and show you exactly where to place them on modern operating systems. By the end of this guide, you will successfully organize your nintendo ds bios file and return to smooth, uninterrupted gameplay.
Sourcing and Preparing Your System Files
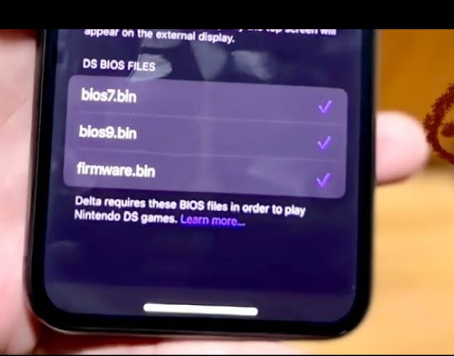
Before you can start configuring your software, you must secure the three necessary system files: bios7.bin, bios9.bin, and firmware.bin.
The most secure and legally compliant method to acquire a reliable nds bios download is to “dump” the files directly from your own physical Nintendo DS console. You can achieve this by using a compatible flashcart (such as an R4 card) loaded with a trusted dumping tool like dsbf_dump.nds. When you run this tool on your original hardware, it safely extracts the console’s operating instructions onto your flashcart’s SD card.
Once you have moved these files to your computer or phone, check their format. If they are packaged in a ZIP archive, extract them into a standard folder. Trying to load them while they are still compressed will cause the software to crash instantly.
Emulators are incredibly strict about how files are named. Your extracted files must be named exactly bios7.bin, bios9.bin, and firmware.bin using all lowercase letters. If your files are named BIOS7.BIN, have capital letters, or include extra characters (like bios7 (1).bin), the emulator will completely ignore them. This single oversight is the number one reason users remain stuck on a blank screen.
Quick NDS Firmware BIOS Setup: Step-by-Step Installation
With your cleanly extracted and correctly named files ready, implementing the correct nds firmware bios setup is your next priority. The primary hurdle most users face is finding the exact folder location on their specific device. Here is the exact procedure for a successful nintendo ds bios installation across standard file directories, bridging the gap between PC and mobile file management.
Exact Directory Locations for Windows and Android
Many tutorials vaguely tell you to place files in the “system folder,” which is not helpful for a beginner. You must locate your emulator’s exact system data directory .
For Windows Desktop Users (MelonDS):
Usually, you simply need to place your three system files directly into the same folder where the .exe application resides. However, if you installed MelonDS using a package manager or an installer, the default directory address is often:
C:\Users\[Your Username]\Documents\melonDS
For Android Users (MelonDS):
Modern Android updates introduced “Scoped Storage,” an environment that intentionally blocks standard file managers from accessing specific application folders. I wish I had known earlier that accidentally hiding system files or placing them in standard download folders prevents MelonDS from reading them. To ensure the emulator sees your files, use a robust file manager application to navigate to:
Internal Storage/Android/data/org.melonds.melonds/files/
The File Placement Procedure
- Open your device’s file manager and locate your freshly extracted system files.
- Highlight
bios7.bin,bios9.bin, andfirmware.bin. - Copy these specific files.
- Navigate to the exact directory addresses mentioned above for your specific operating system.
- Paste them directly into that specific folder.
Placing these files in the correct directory is essential for emulator recognition. Without exact placement, the application cannot read the hardware instructions.
By ensuring strict file placement, you resolve the primary obstacle of missing dependencies. After correctly placing the bios files, the emulator runs successfully, allowing you to finally launch your games.
Troubleshooting Missing DS BIOS for Emulator Errors
Even with a careful approach, you might encounter ongoing issues related to your ds bios for emulator configuration. Sometimes, simply placing the data in the correct folder is not enough if the application’s internal settings are misconfigured.
If your emulator still displays an error like “firmware not found,” the software is likely looking in the wrong folder location. You can fix this by telling the emulator exactly where to look. In MelonDS, open the application and navigate to Config > Emu settings > DS-mode. Here, you will find options to manually assign the folder location where your firmware files currently reside.
Common Configuration Errors and Solutions
- Error: “Invalid BIOS Image”
- Solution: Your dumped files are likely corrupted. Delete them, re-run the dumping tool on your physical console, and ensure the transfer to your PC or phone completes without interruption.
- Error: Immediate Application Crash
- Solution: Re-check your file names against the critical warning above. Remember, the software specifically looks for exactly
bios7.binandbios9.binin lowercase.
- Solution: Re-check your file names against the critical warning above. Remember, the software specifically looks for exactly
- Error: White Screens on Game Load
- Solution: Ensure you are not confusing standard original DS system dumps with DSi or 3DS system files. A standard Nintendo DS Lite dump is recommended for standard DS emulation.
Proper configuration improves game stability and reduces crashes. When the emulator has uninterrupted access to clean, correctly named files, overall software behavior stabilizes. Tracking down a simple typo in a folder location or file name is often the final step before you enjoy smooth gameplay and gain a better understanding of emulation setup.
Decision-Making Guide: Comparing NDS Emulators and Hardware Requirements
Choosing the right software is just as important as securing the correct ds bios required files. Different emulators handle system software in varying ways, directly impacting your overall nds emulator compatibility and technical requirements.
When evaluating emulators, you must consider Success Rate, Time Cost, Technical Skill, and Hardware Load. Manual setup provides a very high success rate for running complex games accurately, but it demands a moderate level of technical skill to manage folders correctly.
For the software itself, two popular options dominate the landscape: MelonDS and DeSmuME.
| Feature | MelonDS | DeSmuME |
|---|---|---|
| System Boot Files | Strictly required for optimal use | Not strictly required (uses HLE) |
| Accuracy | High hardware accuracy | Moderate to High |
| Ease of Setup | Requires manual file directory setup | Easier for beginners |
| Device Load | Moderate | Can be heavy on older CPUs |
MelonDS is renowned for its high accuracy, but it strictly requires you to provide the system boot files to function optimally. In contrast, DeSmuME employs high-level emulation (HLE) workarounds, meaning it attempts to guess the hardware instructions. This allows it to run many games without needing you to supply the system files.
However, different emulators may require specific bios versions for optimal performance. Using authentic firmware files in an application like MelonDS often provides a significantly more stable experience for complex 3D titles and improves overall emulator performance. By assessing your technical comfort level, you can select an emulator that matches your skills . If you value strict hardware accuracy and avoiding graphical glitches, preparing the system boot files manually for MelonDS is highly recommended.
Understanding System Boot Files: Why Emulators Need the DS BIOS
To fully master your setup and understand why this process is necessary, it is helpful to explore the technical theory behind ds emulator bios files. When reading any nintendo ds bios emulator guide, you will frequently see references to ARM7, ARM9, and firmware.bin.
A key technical fact to remember is that bios files act as the core system software required for accurate emulation. In standard rom emulation basics, an emulator mimics physical hardware. However, it still needs the original console’s operating instructions to translate raw game data into playable video and audio .
- bios9.bin (ARM9): This file contains instructions for the main processor. It handles heavy technical operations like 3D graphics rendering and complex game logic.
- bios7.bin (ARM7): This handles secondary operations. It manages audio processing, touch screen inputs, and simulated Wi-Fi connectivity.
- firmware.bin: This acts as the console’s operating system. It manages user settings, boot screens, and foundational configurations.
Together, these nds system software files create a complete bridge between the game data and your screen. Without them, the emulator cannot interpret how the game is supposed to look or sound. By securing these exact files, you guarantee that your game emulation environment operates precisely as the original handheld console would.
Optimizing Your Setup: Hardware Controllers and Handheld Devices
Once you have resolved your blank screen errors and your emulator is running perfectly, playing touch-heavy or fast-paced games on a flat glass smartphone screen or a keyboard can feel incredibly awkward. To truly elevate your retro experience, consider pairing your newly configured emulator with dedicated hardware.
For Android and PC users, connecting a Bluetooth controller (such as an 8BitDo Pro 2 or a standard Xbox Wireless Controller) completely changes the dynamic of the games. You can easily map the DS’s D-pad, face buttons, and shoulder triggers to the physical controller within the emulator’s input settings. This provides tactile feedback and drastically improves gameplay precision.
Alternatively, many users are shifting toward dedicated custom firmware handheld systems, such as devices from Retroid or Anbernic. These portable devices run on Android or Linux-based emulation environments and feature built-in controls. The beauty of these devices is that the exact same BIOS setup rules apply. You simply connect the handheld to your PC, navigate to the device’s internal emulator folder, and drop your freshly dumped bios7.bin, bios9.bin, and firmware.bin files exactly as you would on a standard smartphone.
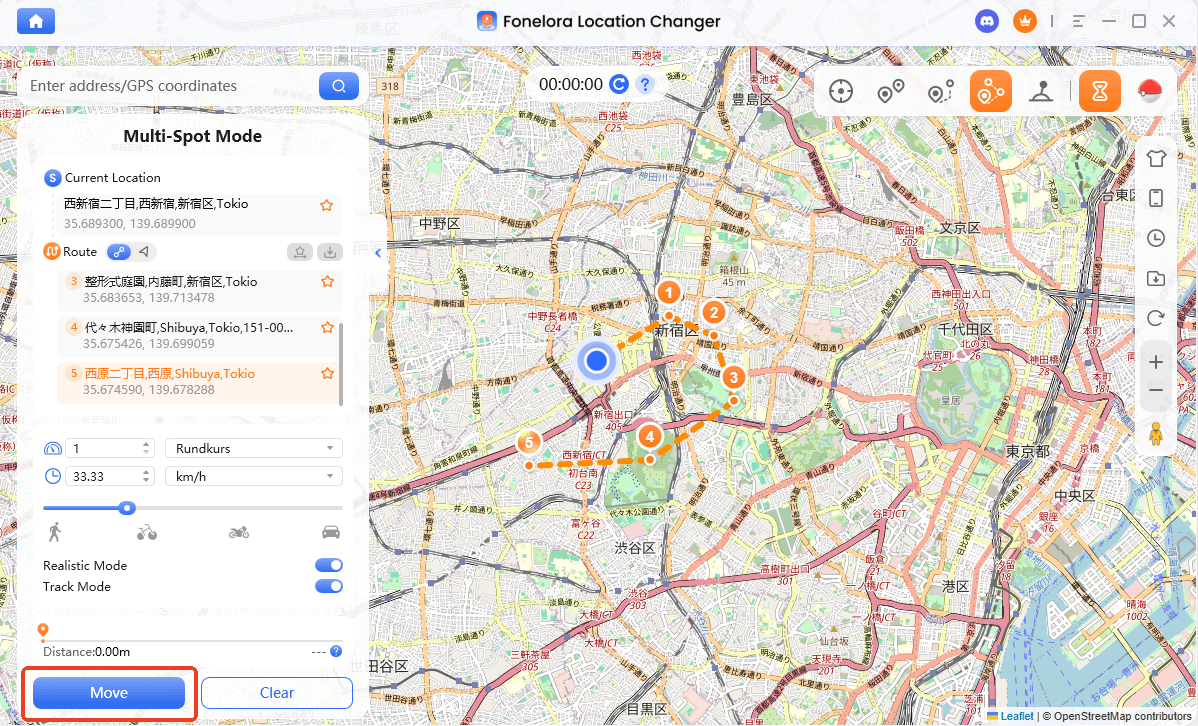
Alternative Solutions: Fonelora Location Changer
As mentioned earlier, desktop-based tools are generally the most dependable option for modifying GPS location. Compared to mobile apps that rely on easily detectable “Mock Location” settings, desktop solutions tend to deliver a more stable and consistent signal.
If you’re looking for a simpler and more reliable alternative, Fonelora Location Changer is a solid option to consider.
Instead of relying on basic spoofing techniques, Fonelora changes your device’s GPS location through a computer connection. This approach helps minimize common problems like location jumping (rubber-banding) and reduces the likelihood of immediate detection.
Why Choose Fonelora Location Changer?
Fonelora focuses on stability and realistic movement—two key factors when modifying location-based apps like Uber:
- Change GPS location instantly with one click
- Compatible with both iOS and Android devices
- No need to root or jailbreak your phone
- Built-in movement simulation for more natural behavior
- Adjustable speed and customizable routes
- Helps reduce sudden location resets or “snapping”
It’s especially useful for:
- Drivers aiming to position themselves in high-demand areas
- Users testing location-based features or scenarios
- Anyone seeking a smoother alternative to mobile spoofing apps
How to Use Fonelora to Change GPS Location
Follow these simple steps to get started:
Step 1: Download and Install
Download Fonelora Location Changer from the official website and install it on your computer.

Step 2: Connect Your Device
Connect your iPhone or Android device using a USB cable.
- On iOS: Tap “Trust This Computer” when prompted
- On Android: Enable USB Debugging

Step 3: Choose a Location
Open the map interface in the software:
- Enter a specific location (such as an airport or busy area)
- Or select a point directly on the map
Frequently Asked Questions About NDS System Emulation
To finalize your understanding of the game emulation environment, here are direct answers to common questions regarding system files and setup procedures.
Why is my emulator not working without BIOS?
Without the core nds system software, the emulator lacks the foundational instructions required to translate rom emulation basics into visual and audio outputs, resulting in a blank screen or a software crash.
How to set up BIOS files correctly?
You must extract the bios7.bin, bios9.bin, and firmware.bin files from their ZIP archive, ensure they are named in all lowercase letters, and copy them directly into the specific system folder address assigned by your emulator.
What errors occur if BIOS is missing?
The most common errors include “firmware not found,” immediate application crashes upon loading a game, or persistent white screens.
Conclusion
Resolving emulator errors does not have to be a confusing ordeal. By learning how to legally source and correctly organize your nintendo ds bios file, you eliminate the confusion about what files are required and easily bypass the difficulty of locating exact folder addresses. We covered the exact procedure to fix an emulator not working without proper bios setup, ensuring you resolve persistent errors during configuration, file placement, and strict naming conventions. You can now confidently address any uncertainty about compatibility with different emulators. Now that your software is running smoothly, consider pairing your setup with a dedicated controller to fully enjoy your perfectly optimized retro gaming environment.

Joy Taylor is a seasoned technical writer with over a decade of experience in mobile technology. At iMobie, she specializes in producing in-depth content on iOS data recovery, iPhone unlocking solutions, and iOS troubleshooting.
Product-related questions? Contact Our Support Team to Get Quick Solution >
