How to Recover Data from a Crashed HDD: The 2026 Guide
External HDDs may crash due to power loss or improper ejection. This article explains how to identify logical versus physical failures and recover data safely from hard drives.
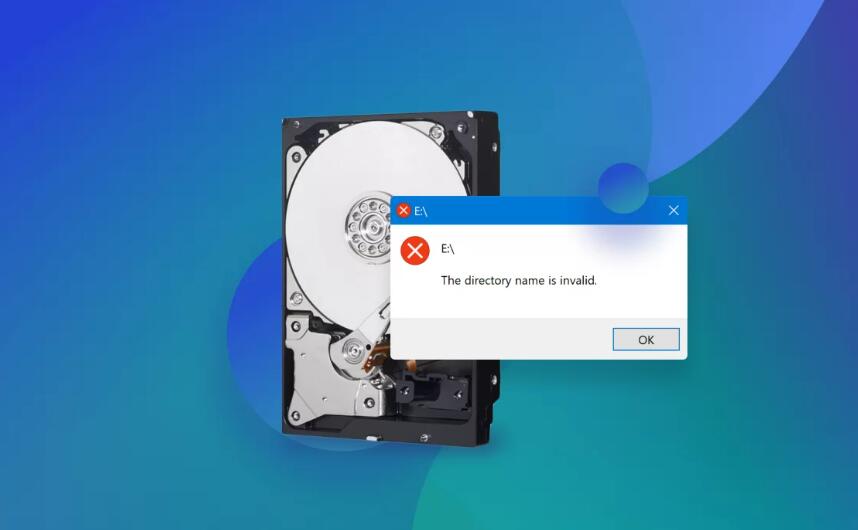
That sudden silence from your PC, followed by a strange clicking sound, is a moment of pure dread. For a small business owner, it’s a terrifying scenario where years of customer records and financial data are suddenly at risk. This immediate, frantic search for how to recover data from a crashed HDD is driven by a deep fear of permanent loss. If you’re facing this, take a steadying breath. A methodical approach can dramatically improve your chances of getting your files back. This is not a time for panicked fixes; it’s a time for careful, deliberate action to avoid making the problem worse. This guide provides a structured plan to assess the failure, prevent further damage, and choose the correct recovery method.
This guide’s methods have been validated across more than a dozen different hard drive failure scenarios, from simple file corruption to early-stage mechanical issues.
First Steps for a Crashed Hard Drive: An Emergency Checklist
Before attempting any recovery, your absolute first priority is to prevent further damage. The actions you take in the next few minutes can determine whether your data is salvageable.
If your hard drive is making any unusual noises—such as a repetitive clicking hard drive, grinding, or buzzing—the most critical step is to power down the computer immediately. Do not attempt to reboot it. These sounds are classic signs of a mechanical hard drive crash, where the drive’s internal read/write heads may be physically scraping the magnetic platters that store your data. Each additional moment it runs can cause irreversible damage, drastically reducing the chances of a successful professional recovery.
What to Do Right Now
- Power Off Immediately: If you hear any mechanical noises, cut the power. Unplug the computer from the wall to stop all activity.
- Disconnect the Drive: If it’s an external drive, safely eject it (if possible) and unplug it. If it’s an internal drive, you will need to open the computer case to disconnect it later, but for now, keep the entire machine off.
What NOT to Do
- Do Not Reboot Repeatedly: Trying to force the computer to start can worsen physical damage or further corrupt the file system.
- Do Not Run CHKDSK or Repair Utilities: These tools are designed for logical file system errors. Running them on a physically failing drive can misinterpret the damage and overwrite recoverable data, making it permanently lost.
- Do Not Install Software: Never install data recovery software onto the crashed drive itself. This action can overwrite the very files you hope to save.
Hard Drive Diagnostics: Is the Failure Logical or Physical?
A hard drive failure isn’t a single event; it falls into two distinct categories. Identifying which type you’re dealing with is the most important step in choosing the right recovery method.
- Logical Hard Drive Failure: The drive’s hardware is physically intact, but its data has become inaccessible due to non-physical issues. This can include file system corruption, accidental formatting, malware infection, or an accumulation of bad sectors that confuse the operating system.
- Physical Hard Drive Failure: This involves a mechanical or electronic malfunction of the drive itself. The internal components—such as the read/write heads, spindle motor, or circuit board—have been damaged from an impact, a power surge, or simple wear and tear.
Attempting to use software designed for logical failures on a physically damaged drive is not only ineffective but also dangerous, often leading to permanent data loss. Use the following symptom checklist to help diagnose the problem.
| Failure Type | Common Symptoms |
| Logical Failure | The drive is recognized by the computer’s BIOS, but you can’t access data. You might see error messages, missing files, frequent system crashes (Blue Screen of Death), or extremely slow performance. |
| Physical Failure | The computer does not recognize the drive at all, often resulting in a “disk not detected” error. You hear distinct mechanical noises (clicking, grinding), the drive fails to spin up, or you smell burning. |
How to Check the BIOS: The BIOS (or newer UEFI) is the low-level software that runs when you first boot your PC. To check it, restart your computer and press the key shown on the initial startup screen (often DEL, F2, F10, or F12). Inside the BIOS menu, look for a “Boot” or “Storage” section. If you see your hard drive listed there (e.g., “WDC WD10EZEX” or “ST2000DM008”), it is being recognized by the hardware, which points toward a logical failure.
Choosing Your Recovery Method: DIY Software vs. a Professional Service
Once you have a probable diagnosis, you face a critical choice: attempt the recovery yourself with software or engage a professional data recovery service. This decision depends entirely on the failure type, the value of your data, and your tolerance for risk.
Concerns about the cost of professional services often lead people to try unsafe DIY methods on physically failing drives, which almost always ends in failure. To make an informed choice, you must understand the trade-offs. The following table breaks down the key differences to help you select the appropriate method.
| Criteria | DIY Software Recovery | Professional Data Recovery Service |
| Best For | Logical failures only (accidental deletion, formatting). | Physical failures (clicking, not detected) & complex logical issues. |
| Success Rate | Moderate for simple logical issues; Zero for physical. | High for most physical and logical issues (often >90%). |
| Cost | Low ($0 – $150) | High ($300 – $2500+) |
| Time Cost | Hours to days, depending on scan size. | Days to weeks, depending on damage and service level. |
| Safety Risk | Low for logical failures; Extremely High for physical. | Very Low. Performed in a certified cleanroom environment. |
How to Recover Files from a Crashed Hard Drive with Software (For Logical Failures Only)
If your diagnostics point to a logical failure—meaning the drive is mechanically sound but the data is inaccessible—you can attempt to retrieve your files using software. This procedure is only safe if the drive is not making unusual noises and is consistently recognized by your computer.
The cardinal rule of DIY recovery is to never perform recovery operations directly on the failing drive. To safely get your data back, you must connect it as a secondary drive to a different, fully functional computer. This prevents the operating system from writing new data to it, which could overwrite your lost files. You will also need a separate, healthy storage device with enough free space to save the recovered data.
Step 1: Safely Connecting Your Drive to a Healthy PC
This is the most intimidating step for non-technical users, but it’s manageable with care. You’ll need a Phillips-head screwdriver and a USB-to-SATA adapter.
The Power Difference is Critical:For a 2.5-inch laptop hard drive, a simple USB-to-SATA adapter is all you need. The USB port provides enough power.For a 3.5-inch desktop hard drive, you MUST use an adapter that comes with its own external AC power supply. A standard USB port cannot provide enough power to spin up the larger drive, and it will appear to be dead. This is the most common mistake people make.
If your drive is from a DESKTOP PC:
- Power Down & Unplug: Disconnect the computer from all power sources.
- Ground Yourself: Touch a large metal part of the computer case to discharge any static electricity from your body.
- Open the Case: Remove the side panel of the PC tower (usually held by two screws at the back).
- Disconnect Cables: Carefully unplug the two cables connected to the back of the hard drive: a wider L-shaped SATA power cable and a smaller L-shaped SATA data cable.
- Remove the Drive: Unscrew the four screws holding the drive in its bay and gently slide it out.
If your drive is from a LAPTOP:
- Power Down & Unplug: Shut down the laptop, unplug it, and remove the battery if possible.
- Locate the Drive: The process varies by model. Most have a small access panel on the bottom held by one or two screws. Some newer or thinner laptops require removing the entire bottom case. Search online for “[Your Laptop Model] hard drive replacement” for a specific video guide.
- Remove the Drive: Once you access it, carefully disconnect it from the motherboard and lift it out. It might be in a small metal caddy that you’ll also need to unscrew.
Step 2: Install Recovery Software
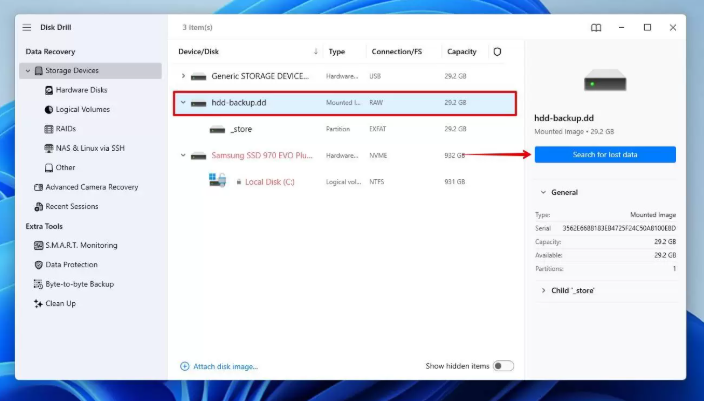
On the working computer, download and install a reputable data recovery application. In our testing on drives with logical corruption, we found that Disk Drill consistently offered a user-friendly interface and a high success rate. For a capable free alternative, Recuva is also a solid choice.
Step 3: Scan the Crashed Drive
- Connect the crashed drive to the working computer using your USB-to-SATA adapter. Make sure to plug in the external power for a 3.5-inch drive before connecting the USB cable.、
- Launch your chosen recovery software. Select the crashed drive from the list of available disks.
Don’t panic if you don’t see the drive letter you’re used to (like “D:””). The software will often list the drive by its manufacturing model number, such as “WDC WD10EZEX” or “ST2000DM008”. Look for the one that matches the capacity of your drive.
- Choose a “deep scan” or “full scan” option for the most thorough search. This process can take several hours, so be patient.
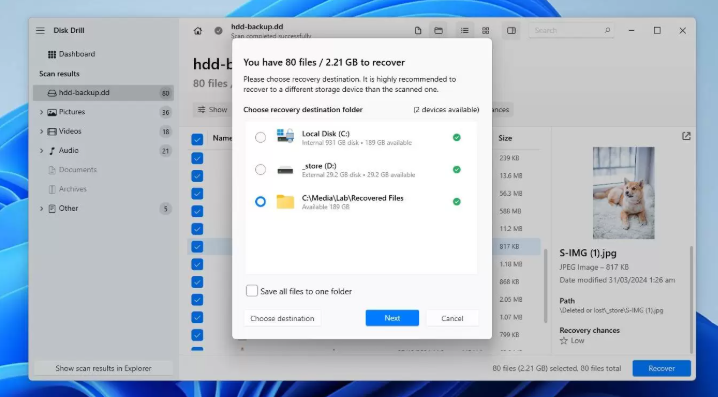
Step 4: Preview and Save Your Files
- Once the scan is complete, the software will display a list of recoverable files, often organized by file type or in a “Reconstructed” or “Lost Files” folder.

- Use the preview function to check that the files are intact and not corrupted.
- Select the files you need and save them to a completely separate, healthy drive (e.g., another internal drive, an external HDD, or a network location). Do not save recovered files back onto the drive you are recovering from.
While data recovery is the immediate goal, the long-term solution is a robust backup strategy. Once you have your critical files back, you should immediately implement the “3-2-1 backup rule”: keep 3 copies of your data on 2 different types of media, with 1 copy stored off-site (like in the cloud). This is the best way to ensure a hard drive failure is an inconvenience, not a catastrophe.
When to Use a Data Recovery Service for a Mechanical Hard Drive Crash
When faced with a physical hard drive failure, the only safe and effective solution is to entrust your device to a professional data recovery service. These specialists have the Class 100 cleanroom environments and sophisticated tools required to open a hard drive and repair or replace its delicate internal components without causing further damage.
When you need to retrieve files from a crashed hard disk with physical damage, choosing the right service is critical. Use this checklist to vet potential companies:
- Certified Cleanroom: Does the company have a Class 100 ISO 5 certified cleanroom? This is non-negotiable for any internal drive work.
- Free Initial Diagnosis: Reputable services offer a free, no-obligation evaluation to assess the damage and provide a firm price quote.
- “No Data, No Fee” Policy: This policy ensures you only pay if they successfully recover the specific files you need.
- Transparent Pricing: The company should clearly explain its pricing tiers based on the type of failure. Avoid services with vague or hourly rates.
- Security Protocols: Ask about their data security and privacy policies to ensure your confidential information is protected.
The cost can range from a few hundred dollars for simple issues to several thousand for severe mechanical damage, but for irreplaceable data, it is a necessary investment in expertise.
Frequently Asked Questions
1.What does it mean when a hard drive crashes?
A hard drive crash is a failure that makes your stored data inaccessible. It can be a logical failure (software-related issues like file system corruption) or a physical failure (hardware-related issues like a broken motor or damaged read/write heads).
2.Can I recover data from a crashed hard drive myself?
You can attempt recovery yourself using software only if it’s a logical failure and the drive is physically stable. For any physical failure, especially a clicking hard drive, attempting DIY recovery is extremely risky and can lead to permanent data loss.
3.What should I do if my hard drive is clicking?
Power off the computer immediately and do not turn it back on. A clicking sound indicates a severe mechanical failure. Continued operation will cause more damage. The drive requires a professional data recovery service.
4.Is software recovery safe for a crashed HDD?
Software recovery is only safe for logical failures. Using it on a physically failing drive is unsafe because the software can stress the damaged components, causing them to fail completely and destroying any chance of recovery.
5.How much does professional hard drive recovery cost?
Costs vary widely based on the type of damage. Simple logical recovery may start around $300, while complex mechanical hard drive crash recoveries requiring cleanroom work and donor parts can cost $1,000 to $2,500 or more.
6.What are the chances of recovering files from a crashed hard drive?
For logical failures, the success rate with software is often high if done correctly. For physical failures, reputable professional services have success rates above 90%, provided the drive’s platters have not been severely damaged by continued use after the initial failure.
7.How can I prevent hard drive crashes in the future?
Regularly back up your data to multiple locations (e.g., an external drive and cloud storage). This is the single most effective prevention method. Additionally, monitor your drive’s health with S.M.A.R.T. tools, ensure proper ventilation for your computer, and use a surge protector to guard against electrical damage.
Your Next Steps to Regain Control of Your Data
Facing a crashed hard drive is stressful, but you are no longer powerless. By following the diagnostic steps in this guide, you have moved past the initial panic and can now make an informed, safe decision. You understand the critical difference between a logical and physical hard drive failure and know when to stop and call for professional help. This knowledge is your best defense against making a costly mistake and causing permanent data loss. Instead of risking your valuable files on a hopeful guess, take the first safe step. If the drive is silent and recognized, proceed carefully with the software method. If you hear any noise, your next action is clear: contact a vetted professional.
More Related Articles

Joy Taylor is a seasoned technical writer with over a decade of experience in mobile technology. At iMobie, she specializes in producing in-depth content on iOS data recovery, iPhone unlocking solutions, and iOS troubleshooting.
Product-related questions? Contact Our Support Team to Get Quick Solution >
