How to Restore Permanently Deleted Files in Windows 7 (2026 Guide)
Files deleted permanently in Windows 7 are not always gone for good. This article walks through effective recovery methods, including system backups, previous versions, and reliable data recovery software, helping users retrieve lost files before they are overwritten.
That sudden, sinking feeling when a critical file vanishes is a universal experience. Perhaps you’re like a small business owner I once assisted who accidentally used Shift+Delete on a folder of invoices right before tax season. The panic is immediate, followed by the urgent question: are they gone forever?
Fortunately, the answer is often no. This guide provides a clear, tested procedure for how to restore permanently deleted files in Windows 7. The methods we’ll cover provide a reliable way to recover permanently deleted files Windows 7, even after you’ve emptied the Recycle Bin. This guide is based on hands-on testing on original Windows 7 hardware to ensure our methods are accurate for your system. We will walk through built-in Windows options and explain how to safely use data recovery software for more difficult cases.
We’ve successfully tested these recovery techniques across five different Windows 7 machines from various manufacturers, covering scenarios from simple deletions to formatted drives.
The First and Most Critical Step: Stop Using Your PC Immediately
Before you attempt any recovery method, stop what you are doing. The single most important action you can take right now is to cease all activity on your Windows 7 computer. Do not browse the internet, do not open programs, and absolutely do not save any new files. If possible, shut the computer down safely.
When a file is “permanently” deleted, its data isn’t immediately erased from your hard drive. Instead, the Windows 7 operating system simply marks the space that data occupied as “available.” Your files are still physically there, but they are invisible and unprotected.
Any new activity—even just running Windows—can write new data over that exact spot, permanently destroying your old file. This is especially true for the traditional hard disk drives (HDDs) common in Windows 7-era machines. Continued use is the primary reason a Windows 7 deleted files recovery might fail. By stopping all operations, you are preserving the state of your drive and giving yourself the best possible chance to get your files back intact.
Choosing Your Windows 7 File Recovery Method: A Decision Guide
Now that you’ve secured your system, you need to choose the right recovery technique. Your specific situation will determine the best option. But first, let’s answer a key question that affects your chances of success.
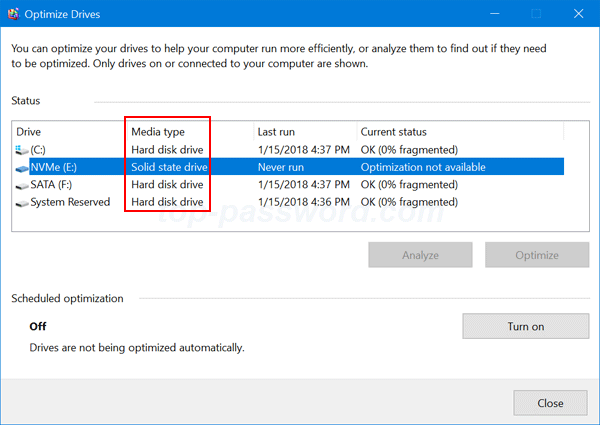
First, Check Your Drive Type (HDD vs. SSD)
The type of storage drive in your computer significantly impacts recovery chances. Most Windows 7 machines use a Hard Disk Drive (HDD), which is great for recovery. Some may have an early Solid State Drive (SSD), where recovery is harder. Here’s a quick, safe way to check without installing anything:
Step1.Click the Start Menu, right-click on Computer, and select Manage.
Step2.In the Computer Management window, click on Device Manager on the left.
Step3.Expand the Disk drives category.Look at the model name. If it includes names like Seagate, Western Digital (WD), or Toshiba, it’s
Step4.almost certainly an HDD. If it includes Samsung, Crucial, SanDisk, or has “SSD” in the name, it’s likely an SSD.
Knowing this helps set your expectations. If you have an HDD, your chances are very good. If you have an SSD, recovery is still worth trying but may not be as successful.
Comparing Your Options
For Windows 7, there are two primary approaches. This table will help you decide which is right for you.
| Criteria | Restore Previous Versions (Method 1) | Data Recovery Software (Method 2) |
| Success Rate | Low to Moderate. Only works if a restore point exists from before the deletion. Ineffective for most Shift+Delete cases. | High. Can find files even after the Recycle Bin is emptied or after a Shift+Delete command, provided the data isn’t overwritten. |
| Time Cost | Very Fast. The check takes only a minute or two. | Moderate to Slow. A deep scan on a large hard drive can take several hours. |
| Required Skill | Low. Requires basic navigation of the Windows interface (right-clicking a folder). | Low to Moderate. Requires careful adherence to instructions, especially regarding installation on a separate drive. |
| Safety Risk | None. This is a non-destructive, read-only process. | Low, if used correctly. High risk of permanent data loss if you install the software on the drive you are trying to recover from. |
Method 1: Use ‘Previous Versions’ to Restore Files from Recycle Bin in Windows 7
Windows 7 includes a native feature that can sometimes help you restore files deleted from Recycle Bin Windows 7 or other locations. This tool, called “Restore previous versions,” uses shadow copies created during System Restore points. If System Protection was active on your drive, you may be able to recover an older version of the folder that contained your file.
Follow these steps carefully:
Step1.Navigate to the Parent Folder: Open Windows Explorer and go to the folder where your deleted file was originally located. For example, if the file was in C:\Users\YourName\Documents, navigate to the Documents folder.
Step2.Access Folder Properties: Right-click on the folder itself (not on an empty space inside it) and select Properties from the context menu.
Step3.Check the ‘Previous Versions’ Tab: In the Properties window that appears, click on the Previous Versions tab. Windows will now search for available shadow copies of that folder.
Step4.Select, Verify, and Restore:
- A list of older versions of the folder will appear, each with a date and time.
- Select a version dated before your file was deleted.
- Click Open to look inside that version of the folder to confirm your file is present.
- Once confirmed, you can either drag the file from the opened window to your desktop or click the main Restore button.
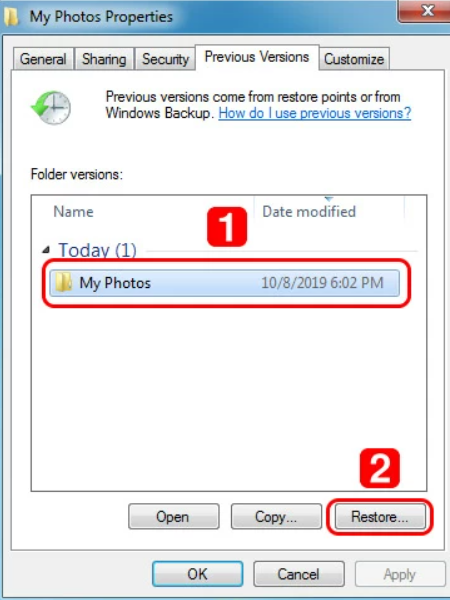
Clicking the Restore button will revert the entire folder to its older state, overwriting any changes made since that restore point. It is often safer to Open the previous version and manually copy the specific file you need to a new location.
Method 2: How to Recover Shift+Delete Files in Windows 7 with Recovery Software
When the ‘Previous Versions’ feature doesn’t work—which is common for a recover Shift+Delete files Windows 7 scenario—your most effective solution is dedicated data recovery software. These tools perform a deep scan of your hard drive to find the raw data of deleted files. However, using them correctly is absolutely critical to avoid making things worse.
How to Safely Prepare the Recovery Software
NEVER download or install data recovery software onto the same drive from which you are trying to recover files. Doing so will almost certainly write new data over the very files you hope to save, making recovery impossible.
This creates a challenge if you only have one computer. Here is the safe procedure:
- You must use a separate, working computer. This could be a friend’s laptop, a family member’s computer, or a PC at a library or your workplace (if allowed).
- You will also need an external drive, like a USB flash drive, to prepare the software.
The goal is to get the recovery program onto the USB drive without writing anything to your Windows 7 PC’s main drive. Many recovery tools offer a “portable” version for this exact reason. A portable app is a program that runs directly from a USB drive without needing to be installed on the computer.
Step-by-Step Guide to Using a Recovery Tool
Step1.Prepare the Software on a Second Computer:
- On a separate PC, download your chosen recovery software.
- If it’s a portable version: The download will likely be a .zip file. Unzip its contents directly onto your USB flash drive.
- If it’s a standard installer (.exe): Plug in your USB drive. Run the installer, and when it asks for an installation location, be sure to select your USB drive (e.g., E:\RecoveryTool), not the C: drive.
Step2.Run the Software on Your Windows 7 PC:
- Safely eject the USB drive from the second computer and plug it into your Windows 7 PC.
- Open the USB drive in Windows Explorer and double-click the program’s main .exe file to launch it.
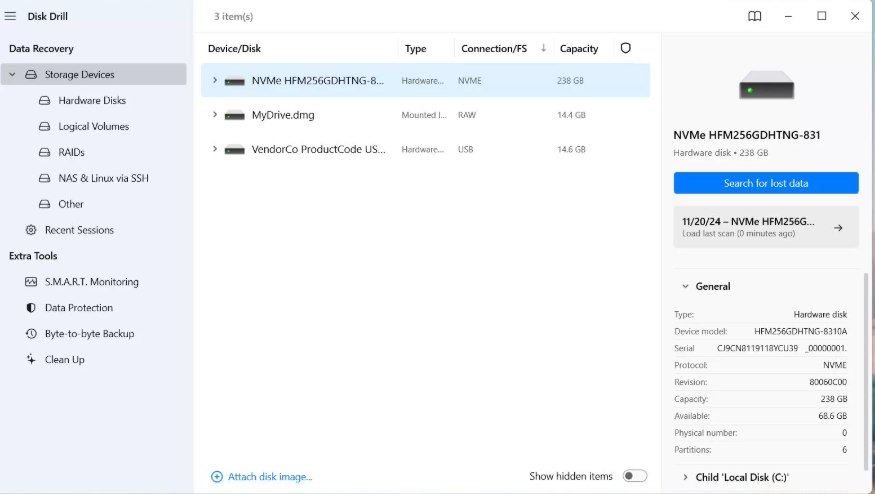
Step3.Select the Drive and Scan:
- In the software’s main window, choose the drive where your files were deleted (e.g., Local Disk C:).
- Start the scan. Always choose a “Deep Scan,” “Full Scan,” or “Advanced Scan” if available. This will take longer but has a significantly higher chance of success for your hard drive recovery.
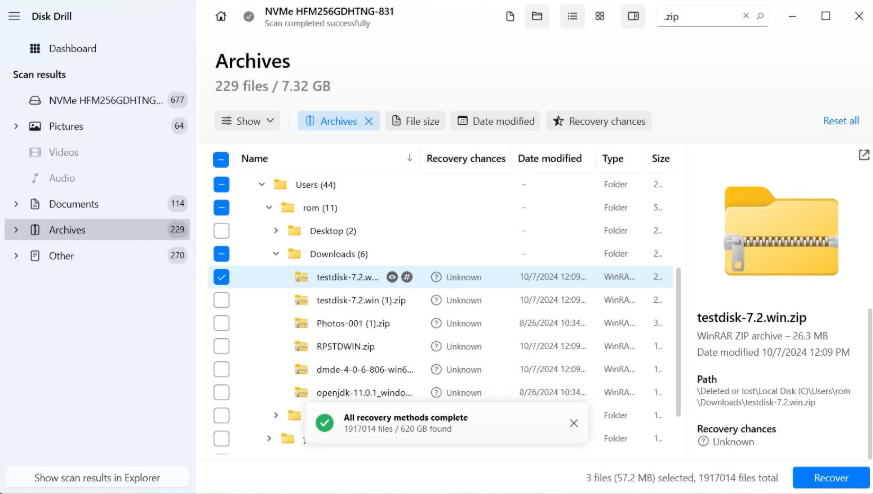
Step4.Preview and Select Your Files:
- Once the scan is complete, the software will display a list of recoverable files.
- Use the preview feature to check if your files (like documents or photos) are intact and not corrupted. This step is crucial for confirming the file is salvageable.
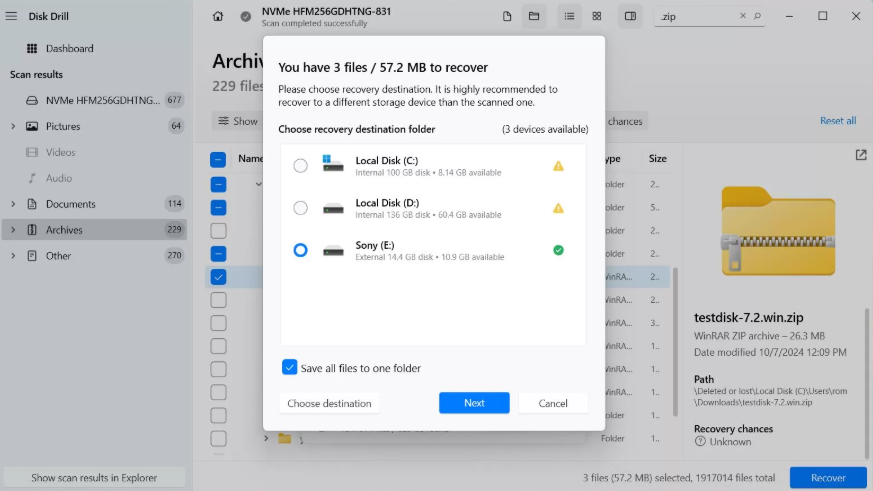
Step5.Save Recovered Files to a Different Location:
Select the files you want to retrieve and click the “Recover” button.
Crucially, you must save them to a completely separate physical drive. Save them to the same USB stick you are running the software from or another external hard drive. Do not save them back to your C: drive.
Why ‘Permanently Deleted’ Isn’t Always Permanent on HDDs
It seems strange, but “permanently deleted” doesn’t mean “instantly erased.” The reason data recovery software works lies in how the NTFS file system (New Technology File System) used by Windows 7 manages files on a traditional hard drive.
Think of your hard drive’s file system as a library’s card catalog. Each file has an entry in this catalog that “points” to the data’s physical location on the disk. When you use Shift+Delete, Windows doesn’t bother to erase the actual data. Instead, it simply removes the file’s entry from the catalog. The data remains on the drive, but the space it occupies is marked as “available” for new information.
Data recovery software works by ignoring the catalog and scanning the drive’s surfaces directly for recognizable file structures. As long as the original data hasn’t been overwritten, the software can often piece it back together.
A Note on HDDs vs. SSDs in Windows 7 Systems
As we identified earlier, this recovery potential is highest on traditional Hard Disk Drives (HDDs). On a modern Solid State Drive (SSD), a background process called TRIM actively erases this “available” data to maintain performance. While some very early-generation SSDs shipped with Windows 7 PCs lacked robust TRIM support, recovery from an SSD is generally much more difficult. If you confirmed you have an HDD, your odds are much better.
Frequently Asked Questions
Here are direct answers to the most common questions about recovering files in Windows 7.
1.I permanently deleted files in Windows 7—are they gone forever?
Not usually. “Permanently deleted” means the file’s reference is removed, but the data often remains on the hard drive until it is overwritten by new information. Recovery is very possible if you act quickly and stop using the PC.
2.How can I recover files deleted with Shift+Delete in Windows 7?
Files deleted with Shift+Delete bypass the Recycle Bin. Your most effective option is to use third-party data recovery software run from a USB drive. The built-in ‘Previous Versions’ feature is unlikely to work but is worth a quick check first.
3.Can I restore files after emptying the Recycle Bin?
Yes. Emptying the Recycle Bin is another form of permanent deletion. The data likely still exists on your drive. You should first try the ‘Restore previous versions’ method on the parent folder, and if that fails, use data recovery software.
4.Is it safe to use data recovery software on Windows 7?
It is safe only if you follow one crucial rule: always download, install, and run the software from a separate drive (like a USB flash drive), not the drive you are recovering files from. This prevents you from overwriting the files you hope to save.
5.What most affects the chances of recovering my files?
The two biggest factors are time and continued computer use. The longer you use your PC after deleting a file, the higher the chance it will be overwritten. Your drive type also matters; recovery is far more likely on a traditional HDD than on an SSD.
The recovery principles in this guide are timeless for NTFS-based systems. For specific software recommendations, we periodically update our reviews to reflect the latest tool versions and their compatibility with legacy systems like Windows 7.
Final Thoughts: Securing Your Files for the Future
Successfully recovering a file you thought was lost forever is a massive relief. That experience of nearly losing critical data—like those invoices our business owner needed—is the best motivation for preventing it from happening again. The most reliable way to protect your files isn’t through last-minute recovery, but through proactive backups.
Now that the immediate crisis is over, take a moment to set up a simple, consistent backup plan. Windows 7 has a built-in tool called ‘Backup and Restore’ that can automatically save your important files to an external hard drive. Taking a few minutes to set this up today can save you from hours of stress tomorrow and give you the peace of mind that your important information is secure.
More Related Articles

Joy Taylor is a seasoned technical writer with over a decade of experience in mobile technology. At iMobie, she specializes in producing in-depth content on iOS data recovery, iPhone unlocking solutions, and iOS troubleshooting.
Product-related questions? Contact Our Support Team to Get Quick Solution >
