Master the Leader Sierra Encounter: A Proven Strategy Guide
This guide explains how to consistently defeat Leader Sierra in Pokémon GO by using optimized team counters, understanding Lapras attack patterns, and applying strategic timing instead of relying on high CP brute-force battles.
I remember staring at my screen in disbelief as Leader Sierra’s Lapras wiped out my entire team for the fourth consecutive time. If you are experiencing repeated failures against this challenging boss, please know you are not alone. For weeks, I struggled with frequent losses because I relied on poor strategy—simply tapping the screen and hoping my highest Combat Power (CP) characters would survive. I lacked clarity on the best team combinations and felt entirely overwhelmed trying to counter her specific abilities. The in-game guidance for boss battles is practically non-existent, leaving many of us guessing.

The turning point came when I stopped relying on brute force. I spent days researching, testing various elemental matchups, and completely refining my approach. I learned that by adopting a balanced team and memorizing her exact attack patterns, the fight changes from a frustrating gamble into a highly predictable sequence. This guide outlines the exact, tested methods I used to finally defeat Leader Sierra. By focusing on specific lineups, precise timings, and smart resource management, you will gain the confidence to secure consistent victories.
Analyzing Leader Sierra’s Current Lineup
You cannot optimize your team setup if you do not know exactly who you are fighting. Leader Sierra’s team rotates, but she always selects from a specific pool of characters across three distinct phases. Understanding her current lineup and their elemental weaknesses is the mandatory first step to victory.
Phase 1: The Opener
Lapras (Water/Ice): Sierra almost always opens with Lapras. This is notoriously difficult because Lapras has incredibly high defensive stats and uses fast attacks (either Water Gun or Frost Breath) that generate energy rapidly.
Weaknesses: Fighting, Grass, Electric, and Rock.
Phase 2: The Mid-Game
Sharpedo (Water/Dark): Extremely high damage but very fragile.
Weaknesses: Fighting, Bug, Grass, Electric, Fairy.
Exeggutor (Grass/Psychic): Bulky and hits hard with psychic attacks.
Weaknesses: Bug (Double Weakness), Fire, Flying, Ice, Dark, Ghost.
Lapras (Water/Ice): Occasionally, she will bring out a second Lapras.
Phase 3: The Closer
Houndoom (Dark/Fire): A fast attacker with devastating charged moves.
Weaknesses: Fighting, Ground, Rock, Water.
Shiftry (Wood/Dark): Generates energy incredibly fast.
Weaknesses: Bug (Double Weakness), Fighting, Flying, Poison, Fire, Ice, Fairy.
Alakazam (Psychic): A glass cannon that will destroy your team if it manages to launch a charged attack.
Weaknesses: Bug, Ghost, Dark.
Exact Team Compositions to Defeat Sierra
Now that we know exactly who she is deploying, we can build a specific, balanced team. Balancing offense and defense in your lineup is crucial for longer battles. Here are three tested team compositions you can use, ranging from easily accessible to highly optimized.
1. The Budget Team (Accessible for Most Players)
- Slot 1: Machamp (Moves: Counter / Cross Chop)
- Slot 2: Venusaur (Moves: Vine Whip / Frenzy Plant)
- Slot 3: Arcanine (Moves: Fire Fang / Flamethrower)
Why it works: Machamp is your shield breaker. Counter destroys Lapras, and Cross Chop charges incredibly fast, forcing Sierra to burn her shields early. Venusaur handles any remaining Water types (Lapras, Sharpedo), while Arcanine easily cleans up Exeggutor or Shiftry in the back.
2. The Advanced Meta Team (Highly Optimized)
- Slot 1: Lucario (Moves: Counter / Power-Up Punch & Shadow Ball)
- Slot 2: Tyranitar (Moves: Smack Down / Crunch)
- Slot 3: Togekiss (Moves: Charm / Ancient Power)
Why it works: Lucario is the ultimate counter to Leader Sierra. Power-Up Punch requires very little energy and boosts Lucario’s attack stat every time it is used. Tyranitar can tank hits from Houndoom or Exeggutor, while Togekiss uses Charm to deal massive damage to Shiftry or Sharpedo without even needing a charged attack.
3. The Defensive Tank Team (For Surviving Heavy Damage)
- Slot 1: Melmetal (Moves: Thunder Shock / Rock Slide)
- Slot 2: Swampert (Moves: Mud Shot / Hydro Cannon)
- Slot 3: Sylveon (Moves: Charm / Moonblast)
Why it works: Melmetal generates energy faster than almost any character in the game, allowing you to spam Rock Slide, breaking her shields and stunning her repeatedly. Swampert is an excellent generalist with high bulk, and Sylveon handles the Dark types in phases two and three.
Step-by-Step Procedure: Executing the Battle
To achieve victory consistently, you must combine your team composition with precise execution. Here is the exact, step-by-step method to secure your win.
Step 1: The Instant Swap Strategy
Do not put your shield breaker (e.g., Lucario or Machamp) in your first slot. Instead, put them in your second slot. The moment the battle begins, instantly swap out your first character for your shield breaker.
Step 2: Exploit the AI Stun Delay
Here is a vital mechanic: whenever a character is swapped in, or whenever a charged attack is used, the AI opponent is frozen for exactly two seconds (four game turns). By swapping immediately at the start of the match, you freeze Sierra’s Lapras for two seconds, allowing you to get free hits and generate energy before she even starts attacking.
Step 3: Break the Shields
Use your fastest charging attack (like Cross Chop or Power-Up Punch) as soon as it is ready. Sierra is programmed to use her two defensive shields on your first two charged attacks, regardless of how weak they are. Your goal is to get rid of her shields as fast as humanly possible so your heavier attacks can land later.
Take full advantage of the stun mechanic! After you or the boss uses a charged attack, or after a shield is deployed, the boss will stop attacking for exactly two seconds. Use this window to land free fast attacks to build up energy for your next move. Do not immediately fire off back-to-back charged attacks; gather free energy first!
Step 4: Close the Fight with Type Advantages
Once her shields are gone, assess who she brings out for Phase 2 and Phase 3. If she brings out Shiftry, swap to your Fairy or Bug-type. If she brings out Houndoom, rely on your Water or Ground-type.
Mastering Leader Sierra Tactics: Timing and Defense
A common obstacle for players is knowing when to defend. Players who master cooldown timing and resource management perform significantly better than those who panic and waste their defenses.
Do not waste your shields on the first charged attack if your character resists the damage! If Sierra’s Lapras uses Surf against your Venusaur, let it hit you. Venusaur resists Water damage and will survive easily. Save your shields exclusively for the late-game phase to protect your final attacker from devastating moves like Alakazam’s Future Sight or Houndoom’s Foul Play.
Understanding enemy patterns and timing attacks correctly significantly increases your success rate. Implement these specific battle habits:
- Count the Fast Attacks: Every opponent requires a set number of basic attacks to charge their primary ability. For example, if Lapras is using Water Gun, it takes about 10-12 fast attacks to reach a Surf. Count these strikes mentally to predict exactly when the heavy damage is coming.
- Over-Farm Your Energy: When her shields are down, do not use your charged attack immediately if her current character has a sliver of health left. Defeat them with fast attacks instead. This allows you to carry a fully loaded charged attack into the next phase, hitting her next character the second they appear.
By observing her attack patterns and tracking cooldowns, you eliminate the guesswork. These advanced techniques shift the control of the encounter directly into your hands.
Background Mechanics: Why She Hits So Hard
Even with a perfect team composition, you might wonder why Lapras’s fast attacks wipe out your health bar so quickly. Understanding the underlying game engine mechanics explains why applying this strict strategy is mandatory.
First, this boss benefits from hidden stat scaling. Unlike standard opponents you find in the wild, Sierra’s characters receive massive hidden multipliers to their attack and defense stats. A direct, unshielded hit from her roster will inflict significantly more damage than the exact same attack from a regular enemy.
Second, her attack speeds are artificially optimized by the AI. The game engine allows her to execute attacks without human lag, rapidly filling her charged attack meter. This rapid pacing is exactly why understanding the 2-second stun mechanic is vital; it is the only way to manually slow down her artificial speed advantage. Knowing these mechanics clarifies why raw brute force fails and why calculated timing is your best option.
Evaluating Encounter Search Methods
Once your combat tactics and team compositions are prepared, the next hurdle is finding enough Sierra encounters to practice your timings. Players generally choose between traditional manual searching and employing specialized location software.
Manual Searching
Time Cost: High. You must walk or drive to multiple designated points of interest locally, hoping to find a specific boss.
Success Rate: Variable. This depends heavily on your local geographical density of game features.
Smart Location Tools
Time Cost: Low. You can instantly access multiple encounter zones globally.
Success Rate: High. Global access ensures a continuous stream of opportunities to practice your battle techniques.
For players dealing with insufficient local encounters or extreme weather, manual searching often proves highly inefficient, leading some players to seek out third-party solutions.
A More Reliable Uber GPS Spoofing Solution: Fonelora Location Changer
As mentioned earlier, desktop-based tools are generally the most dependable option for modifying GPS location on Uber. Compared to mobile apps that rely on easily detectable “Mock Location” settings, desktop solutions tend to deliver a more stable and consistent signal.
If you’re looking for a simpler and more reliable alternative, Fonelora Location Changer is a solid option to consider.
Instead of relying on basic spoofing techniques, Fonelora changes your device’s GPS location through a computer connection. This approach helps minimize common problems like location jumping (rubber-banding) and reduces the likelihood of immediate detection.
Why Choose Fonelora Location Changer?
Fonelora focuses on stability and realistic movement—two key factors when modifying location-based apps like Uber:
- Change GPS location instantly with one click
- Compatible with both iOS and Android devices
- No need to root or jailbreak your phone
- Built-in movement simulation for more natural behavior
- Adjustable speed and customizable routes
- Helps reduce sudden location resets or “snapping”
It’s especially useful for:
- Drivers aiming to position themselves in high-demand areas
- Users testing location-based features or scenarios
- Anyone seeking a smoother alternative to mobile spoofing apps
How to Use Fonelora to Change GPS Location on Uber
Follow these simple steps to get started:
Step 1: Download and Install
Download Fonelora Location Changer from the official website and install it on your computer.

Step 2: Connect Your Device
Connect your iPhone or Android device using a USB cable.
- On iOS: Tap “Trust This Computer” when prompted
- On Android: Enable USB Debugging

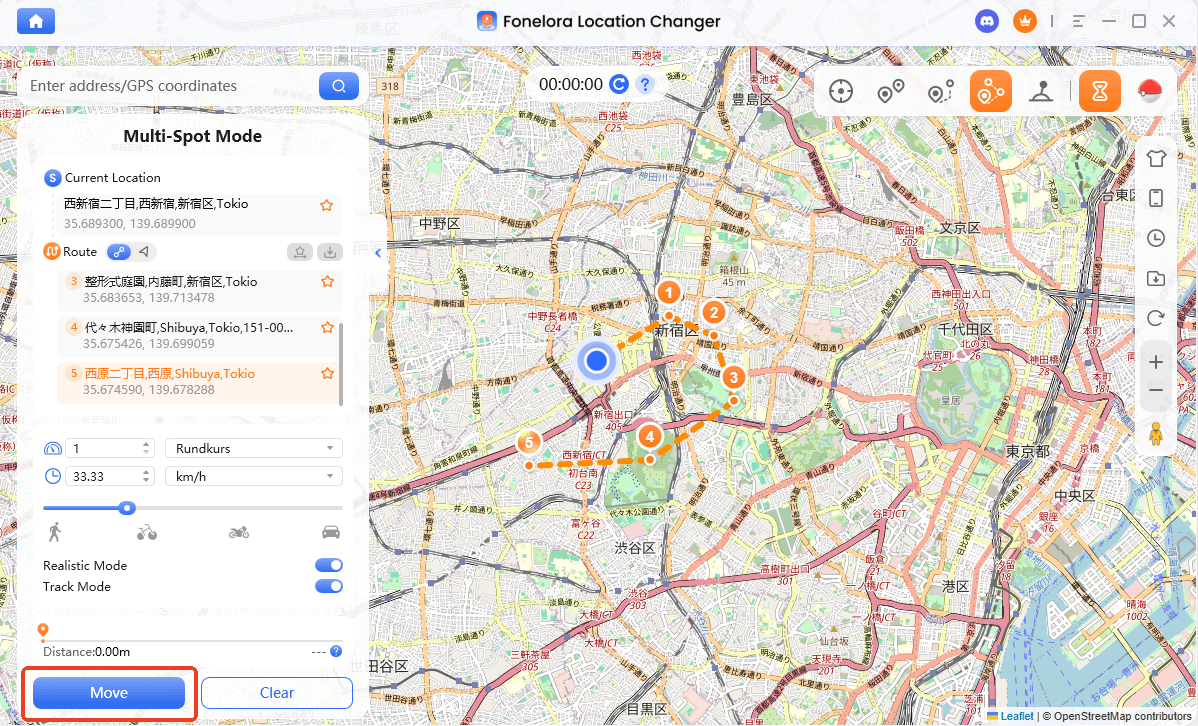
Step 3: Choose a Location
Open the map interface in the software:
- Enter a specific location (such as an airport or busy area)
- Or select a point directly on the map
Frequently Asked Questions: Practical Battle Answers
To clear up any remaining confusion regarding the mechanics of this fight, here are direct answers to the most common gameplay questions.
Why does Sierra use her shields on my weakest attacks?
The game’s AI is explicitly programmed to block the first two charged attacks you throw, regardless of the damage they would cause. This is why you must use attacks that require the least amount of energy (like Cross Chop, Power-Up Punch, or Dragon Claw) early in the match to “bait” and burn her shields.
What should I do if Sierra’s Phase 2 character defeats my shield breaker?
Expect your first character to faint eventually. This is why your team must be balanced. If your Lucario falls to Exeggutor, bring in your Arcanine or Tyranitar to finish it off, making sure you have saved at least one shield to protect them.
Sponsored: Optimize Your Practice with the Fonelora Location Changer Tool
For gamers struggling to locate enough encounters to practice their strategies, the Fonelora Location Changer offers a premium, subscription-based solution. This software allows iOS and Android users to alter their GPS coordinates globally without requiring root access or jailbreaking.
Fonelora allows you to instantly relocate to multiple coordinates, granting you unlimited opportunities to refine your combat tactics against different enemy lineups. If you are working on your skill optimization, the tool’s Safe Game Mode simulates realistic movement to help reduce the risk of software flags, ensuring you can replay encounters to memorize timings.
The software features Multi-Spot routing and a 360° GPS joystick, giving you precise control over your virtual movement. Additionally, Fonelora includes a built-in cooldown timer that tracks safe movement intervals to help manage account security.
Conclusion
Overcoming frequent losses against Leader Sierra requires more than just high-level characters; it demands clear, strategic mechanics. By understanding her exact lineup, bringing a balanced team with a dedicated shield-breaker like Lucario or Machamp, and mastering the two-second stun rule, you will completely change the pace of the battle. You no longer need to suffer from confusion about countering specific abilities. Take these exact team compositions, memorize the required cooldowns, and step into your next encounter with the confidence of an experienced player. Mastering these mechanics takes practice, but once learned, these skills transfer perfectly to every future boss battle you face.

Joy Taylor is a seasoned technical writer with over a decade of experience in mobile technology. At iMobie, she specializes in producing in-depth content on iOS data recovery, iPhone unlocking solutions, and iOS troubleshooting.
Product-related questions? Contact Our Support Team to Get Quick Solution >
