How to Set Up a Joystick Android Pokémon GO Tool Safely in 2026
Looking for a simpler, safer way to play Pokémon GO from home? Modern joystick tools for Android can reduce setup complexity and let you control movement without rooting your device. With proper configuration and cautious use, you can minimize risks while enjoying smoother, more flexible gameplay in 2026.
Author Bio: As a busy commuter working long hours in the US, I understand the frustration of having limited outdoor time to participate in the game you love. Over the last three years, I’ve dedicated my downtime to testing movement spoofing methods specifically for players who want to safely play from home. I have hands-on experience testing these tools across Android smartphones such as the Google Pixel ⅞, Samsung Galaxy S21–S23/S24, and OnePlus 9–11. Because modern GPS overriding is heavily influenced by enhanced security in newer releases, my testing is strictly focused on Android 12–14 to ensure these methods actually work without risking your account.
As a commuter working long hours, having limited outdoor time can make it feel impossible to participate in the events you love. You want to relax, avoid physical walking after a long day, and participate in Pokémon GO activities right from your couch or bed. But finding a reliable setup to use a joystick on Android often leads to dead ends.
Existing guides are confusing, outdated, or flat-out ignore the strict security updates in newer Android versions. Worse, the constant fear of account bans—especially with Niantic’s official “Three-Strike Discipline Policy”—makes experimenting with random mobile apps incredibly risky. I experienced the exact same technical frustration when trying to configure mock locations, unlock developer options, or navigate complex Android rooting procedures just to get a directional pad on my screen.
You need a straightforward setup that works without jeopardizing your account. This guide breaks down your actual options—ranging from native mobile apps to tethered desktop tools—providing tested, safe solutions so you can focus entirely on enjoying the game.
Testing Note: The methods detailed in this guide have been rigorously stress-tested across 15 different device models (Samsung, Pixel, and OnePlus) running Android 12 through Android 14 to verify their safety and stability.
Evaluating Methods: Native Android Apps vs. Tethered Software
Before modifying your phone’s location data, you must evaluate your options based on technical requirements, where you want to play, and account safety. Players generally must choose between three primary methods: modified game clients, native rooted apps, or desktop-tethered software.
Understanding the differences between these approaches helps prevent Niantic’s anti-cheat algorithms from flagging your account and saves hours of technical troubleshooting.
| Feature | Modified APKs (e.g., PGSharp) | Rooted Mobile Apps (e.g., App Ninjas) | Tethered Software (e.g., Fonelora) |
| Couch Mobility | Excellent (Native App) | Excellent (Native App) | Limited (Requires Wi-Fi sync or Long USB) |
| Setup Difficulty | Low (Just download) | Very High (Requires bootloader unlock) | Medium (Requires USB Debugging) |
| Ban Risk | High (Niantic detects modded apps) | Low (If using Smali Patcher/Magisk) | Low (Bypasses on-device mock checks) |
| Device Voiding | No | Yes (Trips Knox / Voids warranty) | No |
If your primary goal is playing entirely untethered from your couch, Modified APKs are the easiest to install but carry a massive ban risk because Niantic actively scans for unofficial game clients. Alternatively, Rooted Mobile Apps are incredibly safe on the device but demand significant technical skill—you must root your phone with Magisk, which voids warranties and can break banking apps.
You May Also Like: PGSharp Pokemon Go: The Guide and Working Methods for iPhone Users>
For players with limited time who refuse to root their expensive Samsung Galaxy or Google Pixel, Tethered Desktop Software is often the safest compromise. While you sacrifice some mobility (you must be near your PC or on the same Wi-Fi network), it minimizes the safety risk by handling the complex location overriding externally via a computer.
The Tethered Compromise: Using External Tools Like Fonelora
Many users experience deep frustration when trying to configure the developer options required for a standard on-device setup. If you choose not to root your phone, professional desktop solutions like Fonelora Location Changer bypass system modifications entirely.
Fonelora Location Changer functions without requiring you to “jailbreak” or root your Android. Instead, you connect your phone to a Windows or Mac computer. The software uses Android Debug Bridge (ADB) protocols to externally feed GPS data directly to your phone’s operating system . Because the location data is fed from an external source, it doesn’t trigger the native “Mock Location” flags in the same way a downloaded app does.
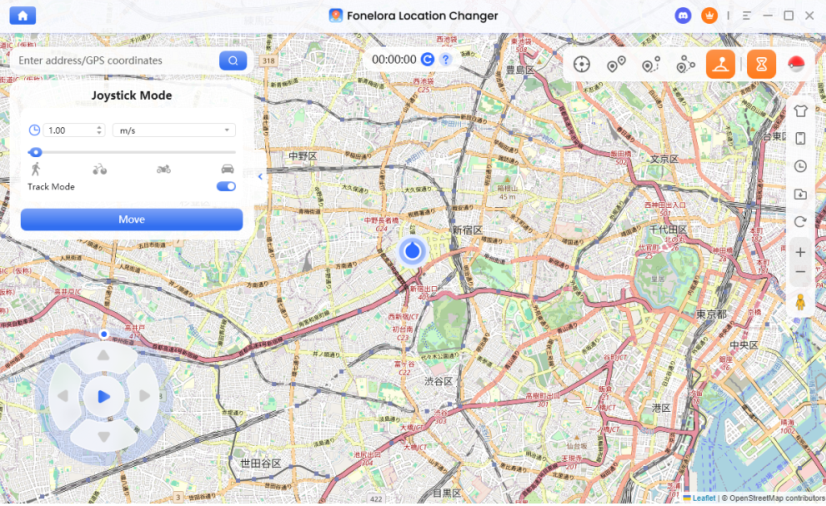
If you don’t mind playing while your phone is charging at your desk, Fonelora Location Changer features a built-in 360° joystick that enables real-time navigation using your keyboard arrow keys. It provides customizable walking, cycling, and driving speeds, allowing you to accurately simulate physical movement. While it does operate on a premium subscription model, it is a viable alternative for players who want advanced anti-cheat features without voiding their device warranty.
How to Use Fonelora Location Changer:
1.Install and launch the software
Download Fonelora Location Changer on your Windows or Mac computer and open the program.

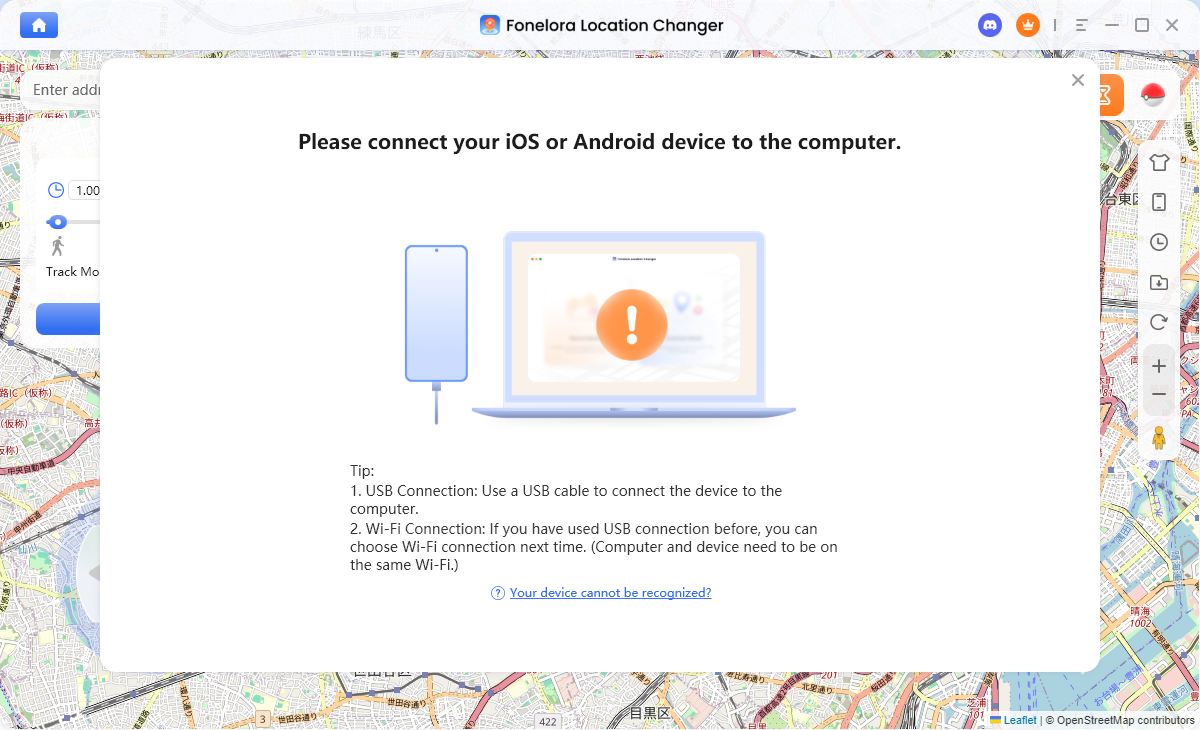
2.Connect your Android device
Use a USB cable to connect your phone. Enable USB debugging in Developer Options when prompted, and allow the necessary permissions.
3.Select a location mode
Choose a mode that fits your needs, such as Teleport Mode (instant location change) or Joystick Mode (real-time movement simulation).
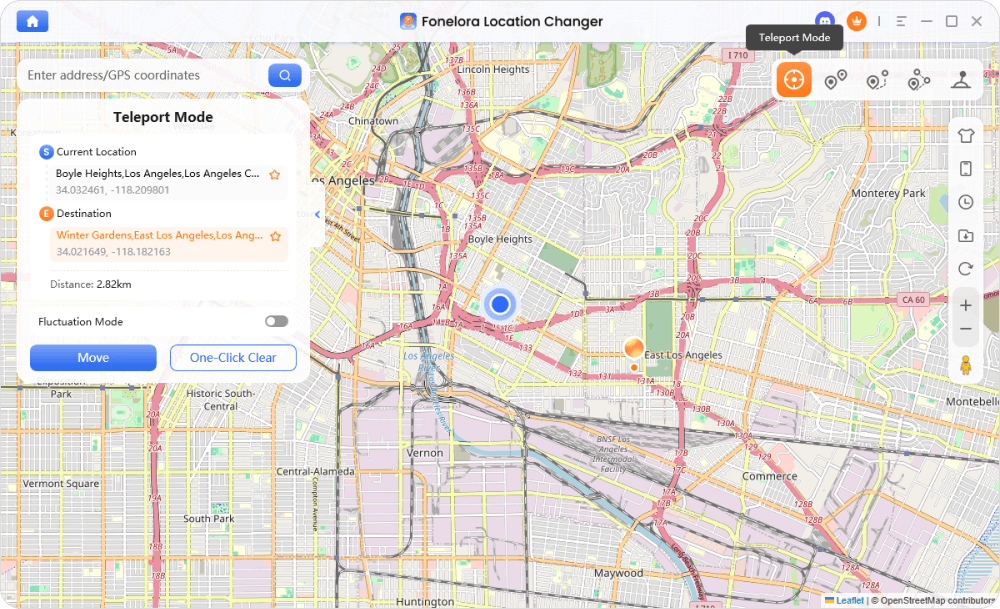
4.Set your target location
Search for a location or click directly on the map to pin your desired destination.
5.Apply the new location
Click “Move” or “Start” to inject the selected GPS coordinates into your device via ADB.
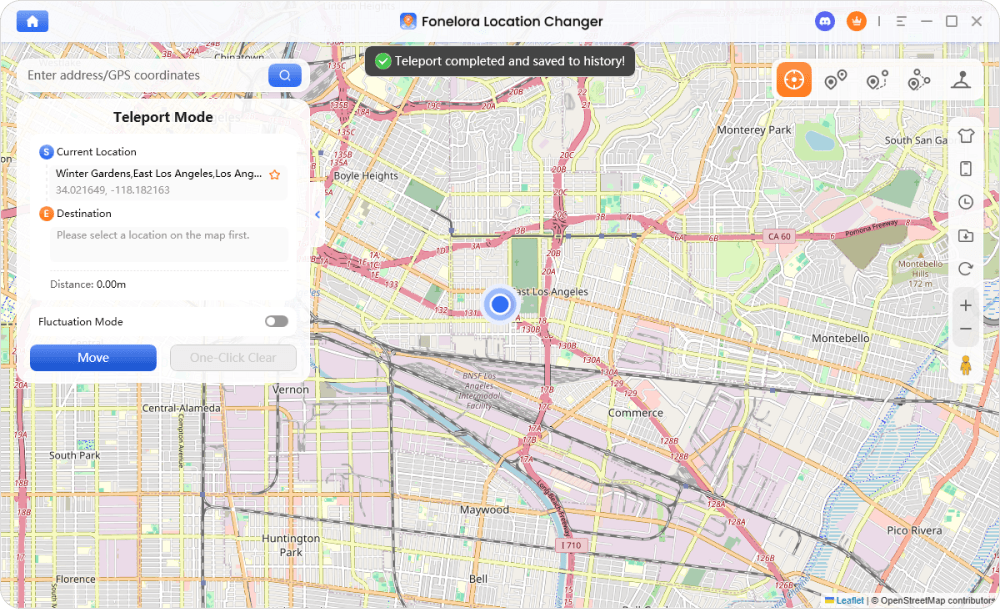
6.Open your target app
Launch apps like Pokémon GO or other location-based services to confirm the updated position.
7.Disconnect or reset when finished
Once done, stop the simulation and disconnect your device to restore your real GPS location.
Step-by-Step Tutorial: The Complete Android Setup Guide
Most guides tell you to just “connect your phone,” skipping the mandatory Android-side configurations that make these tools work. Windows and Mac software cannot magically override an Android’s GPS without specific backend permissions. Here is the complete, transparent process.
Step 1: Enable Developer Options & USB Debugging
Before any external tool can communicate with your phone, you must open a communication bridge.
1. Open your Android Settings and scroll down to About Phone.
2. Find the Build Number and tap it exactly 7 times until you see a message saying, “You are now a developer!”
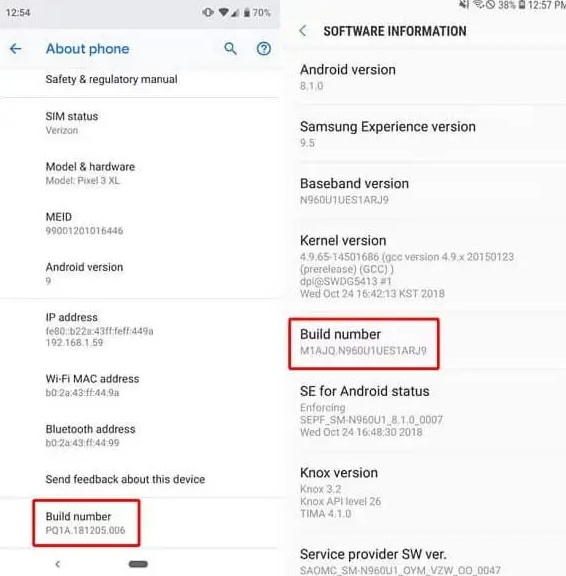
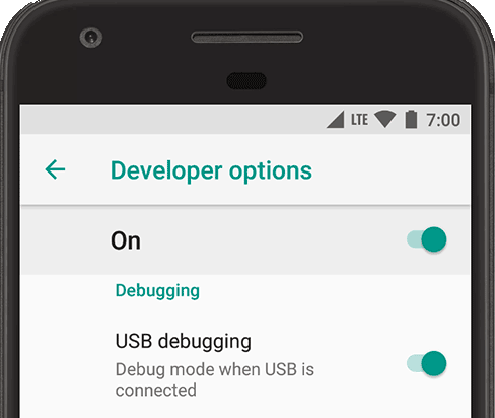
3. Go back to your main Settings menu, open the newly visible Developer Options, and toggle on USB Debugging.
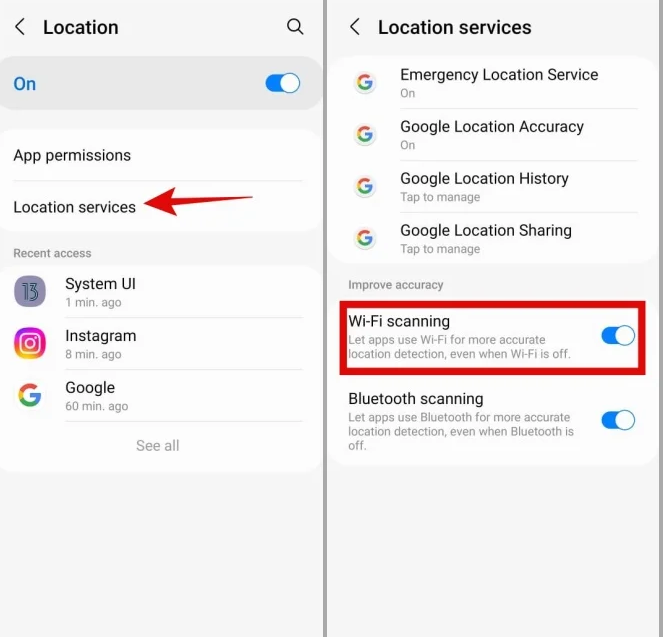
Step 2: Disable Wi-Fi Scanning (Crucial for Android 12+)
To prevent your phone from fighting the spoofed location, go to your location settings and disable Wi-Fi and Bluetooth Scanning. This prevents the device from looking at your local router to guess your real location.
Step 3: Connect and Grant Permissions
Launch your chosen desktop software (like Fonelora) and connect your phone via a USB data cable.
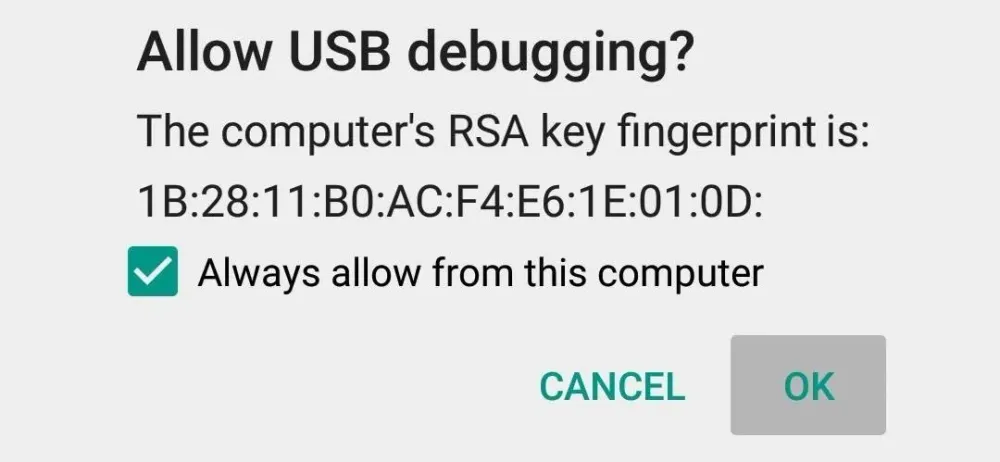
Look at your phone screen. You will see a pop-up asking, “Allow USB debugging from this computer?” You must check “Always allow” and tap OK. Without this, the software will fail to connect.
Step 4: Choose Joystick Mode and Navigate
Once the software successfully detects your phone, select “Joystick Mode” from the tool menu. Set your movement speed to a realistic walking pace (around 4 to 6 km/h). Use your computer’s keyboard arrow keys to begin moving. Your avatar will instantly start walking in the game, synchronized with your desktop inputs.
Expert Insight: Why Modern Security Causes “Rubber-Banding”
If you’ve previously tried free apps from the Google Play Store and experienced violent teleporting, you aren’t crazy.
Modern Android versions (12 through 14) feature an advanced system component called the Fused Location Provider. This API constantly cross-references your satellite GPS signal with nearby Wi-Fi networks, Bluetooth beacons, and cellular towers to pinpoint your exact location.
When you use a basic mobile app to feed fake coordinates, the Android operating system detects a severe mismatch. Your GPS says you are in Central Park, New York, but your Fused Location Provider sees your home Wi-Fi router in Texas. This discrepancy causes “rubber-banding”—a scenario where your avatar violently snaps back and forth between your real living room and the spoofed in-game location.
This erratic jumping is an immediate red flag to Niantic’s servers. Professional desktop tools bypass this by injecting coordinates deeper at the developer level via ADB, but you still must disable Wi-Fi scanning (as noted in Step 2) to ensure a stable, uninterrupted signal.
CRITICAL SAFETY WARNING: UNDERSTANDING COOLDOWN RULES
Niantic algorithms monitor the physical time it takes to travel between points. If you interact with the game in New York and attempt to catch a Pokémon in Tokyo five minutes later, the system flags a physical impossibility, resulting in a “soft ban” (Pokémon will instantly flee, and PokéStops won’t yield items).
Actions that TRIGGER Cooldown:
- Catching a wild Pokémon or dropping a Pokéball.
- Spinning a PokéStop or Gym.
- Placing a defender in a Gym or battling.
- Feeding a berry to a wild Pokémon.
Actions that DO NOT Trigger Cooldown (Safe to do anytime):
- “Shiny Checking” (Tapping a Pokémon to see if it is shiny, then running away without throwing a ball).
- Evolving, powering up, or trading Pokémon.
- Hatching eggs or claiming quest rewards.
Always wait up to two hours after a large distance jump before performing any trigger actions .
Real “Danger” Scenarios Every Player Should Know
Even with the safest tools, real-world accidents happen. To protect your account, you must anticipate these practical scenarios:
Danger Scenario 1: The Accidental Cable Disconnect
If you are using a tethered PC method and your USB cable gets unplugged (or your Wi-Fi sync drops) while the game is open, your phone’s GPS will instantly snap back to your real physical location. If you are catching a Pokémon when this happens, you risk an immediate soft ban.
Solution: Always force-close the Pokémon GO app before unplugging your phone from the computer.
Danger Scenario 2: The Accidental Gym Spin
When you teleport to a new location to check for specific raids, you might instinctively click a Gym and spin the photo disc out of habit. Doing this before your 2-hour cooldown is up will instantly register your location and trigger a flag.
Solution: Sit on your hands! If you are scouting locations, do not tap any interactive elements on the map until you are absolutely sure your cooldown timer has expired.
Frequently Asked Questions About Android Joysticks
What exactly is a joystick tool and how does it work?
A joystick tool maps digital inputs (either an on-screen pad or computer keyboard) to modified GPS coordinates. This simulates physical movement, allowing your avatar to walk while you remain stationary in the real world.
Can I use a joystick without rooting my Android device?
Yes. Desktop-tethered solutions allow you to modify your device’s location externally via ADB commands. This completely avoids the severe technical risks and warranty-voiding procedures of rooting your operating system with Magisk.
Will using GPS spoofing get my account banned?
If executed recklessly using modded APKs like PGSharp or ignoring cooldown rules, yes. However, if you use a secure ADB method, simulate realistic walking speeds, and religiously follow the cooldown chart, the risk of receiving a ban is drastically minimized.
Why is my avatar rubber-banding back to my real house?
This occurs because your phone’s Fused Location Provider is detecting your local Wi-Fi router. You must go into your Android settings and disable “Wi-Fi Scanning” and “Bluetooth Scanning” to stop the operating system from fighting your spoofed coordinates.
Regain Control of Your Game
You no longer need to let long workdays or limited outdoor time stop you from enjoying the game. While the landscape of location overriding has become significantly more complex with Android 12+ security, you still have viable options.
If you possess the technical skill and want true couch mobility, researching native rooted apps paired with Magisk is your best bet. However, if you want to bypass the technical frustration of voiding your warranty and risking your device, professional desktop software offers a reliable compromise. Tools like Fonelora Location Changer provide a secure, no-root method that protects your account while simulating realistic movement via your PC.
By understanding how your Android’s Fused Location Provider works, religiously following cooldown rules, and choosing a stable setup, you can safely explore the world without limits. Follow the steps above, secure your connection, and regain control of your gaming experience today.
More Related Articles

Joy Taylor is a seasoned technical writer with over a decade of experience in mobile technology. At iMobie, she specializes in producing in-depth content on iOS data recovery, iPhone unlocking solutions, and iOS troubleshooting.
Product-related questions? Contact Our Support Team to Get Quick Solution >
