3 Ways to Change Apple ID Without Losing Data
How to change Apple ID in iPhone/iPad/Mac and how to change Apple ID without losing data? Well, in this post, you’ll know everything you want.
While importing your data on another Apple smart device seems easy, as it involves switching between Apple ID, users need to be wary of the risk involved. For instance, when you change Apple ID on a device, the current data on it disappears leaving the ones from the recently signed in account. If you wish to change Apple ID without losing data, we are here to help you out. This article explains how to change Apple ID without data loss.
Before discussing how to change Apple ID without data loss, let’s discuss the question below.
Will I Lose Everything if I Change My Apple ID?
Unfortunately, yes. All of the data associated with the Apple ID automatically disappears when you change your Apple credential on an iDevice or Mac computer. You will only find the data from the newly added Apple ID.
Having answered the question above, let’s proceed to the tutorial guide on how to change Apple ID. Read on!
Change Apple ID on iPhone/iPad
Changing Apple ID on Apple smart devices like iPad and iPhone is pretty easy, and cost free.
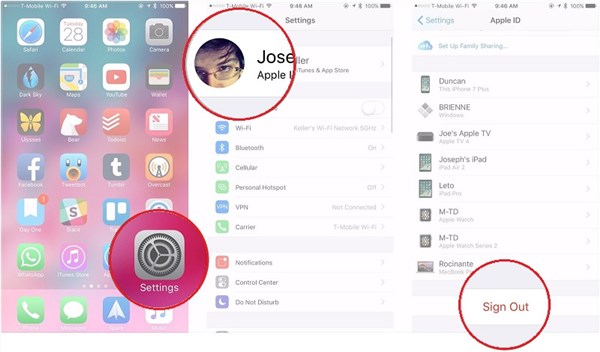
Change Apple ID via Settings
- Go to the Settings menu on your iPad or iPhone using the appropriate buttons.
- Locate and click on your Profile picture.
- Scroll down the page and select the red Sign Out icon to log out the current account on the device.
- Apple will automatically request you to enter your Apple ID password to confirm you own the device before signing out.
- Enter the password correctly and hit the Turn Off icon at the top right corner of your screen.
Sign Out Apple ID
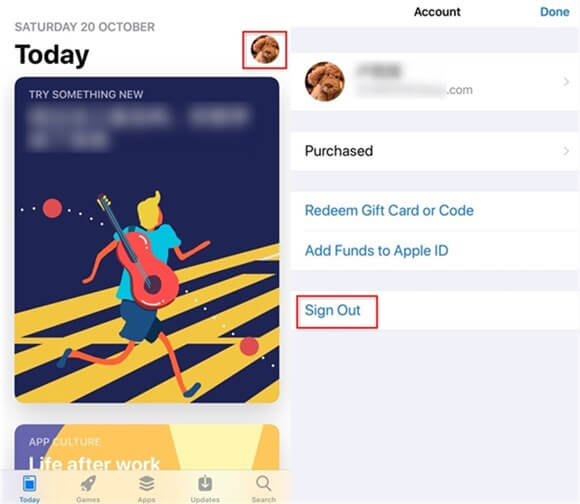
Change Apple ID via App Store
- Launch the Settings app.
- Scroll through the options and select iTunes & App Store.
- Locate your Apple ID at the top of the Store page and click on it.
- Apple ID management window will automatically come up. Kindly select Sign Out to log out of the Apple ID account.
Sign Out Apple ID from App Store
Apply any of the directions above to get out of the current Apple ID. To login your new credentials,
- Tap on Settings > Your Profile Picture.
- Enter the new Apple ID credentials, and click on the corresponding button to access your iPhone/iPad.
Change Apple ID on PC/Mac
For folks with PC/Mac computer operating system, changing your Apple ID shouldn’t be a challenge with the guide given below:
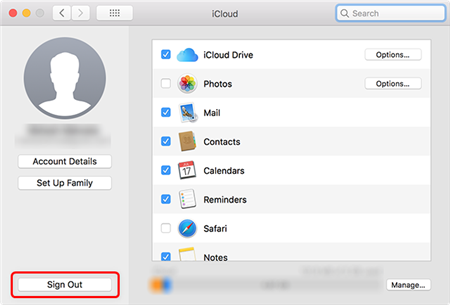
- Turn on your Mac computer and launch the Apple menu page.
- Next, select System Settings.
- Click on Profile Picture at the top of the sidebar to access your account page.
- Select Sign Out, follow the on-screen instructions, and Apple will automatically log you out of the server.
Sign out of your Apple ID on Mac
To log in a new Apple ID.
- Open System Settings on your Mac.
- Click on Sign In Apple ID.
- Enter the new Apple ID correctly and click on the corresponding button to gain access.
What if You Can’t Change Apple ID on iPhone?
Struggling to change your Apple ID even after implementing the solutions above? If so, we advise you to employ the services of a professional iOS unlock tool. There are countless iOS unlock tools online, but the AnyUnlock software is the most efficient amongst them.
AnyUnlock is a sophisticated software developed specifically for iOS users to change Apple ID on their Apple smartphone, whether iPad or iPhone, without data loss. It’s a powerful tool with incredible unlock features required for you to regain control of the device.
This iOS unlock software supports the removal of iCloud activation code, MDM bypass, removal of SIM lock, and lots more. It’s nicely designed with an easy-to-manage interface that makes it easy for anyone, regardless of their tech literacy, to navigate with complete ease.
Free Download* 100% Clean & Safe
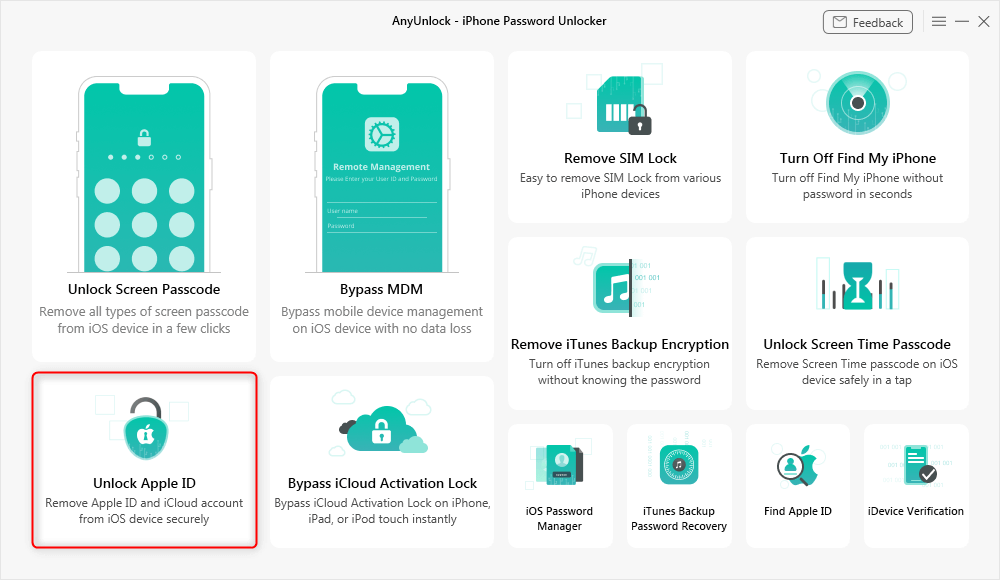
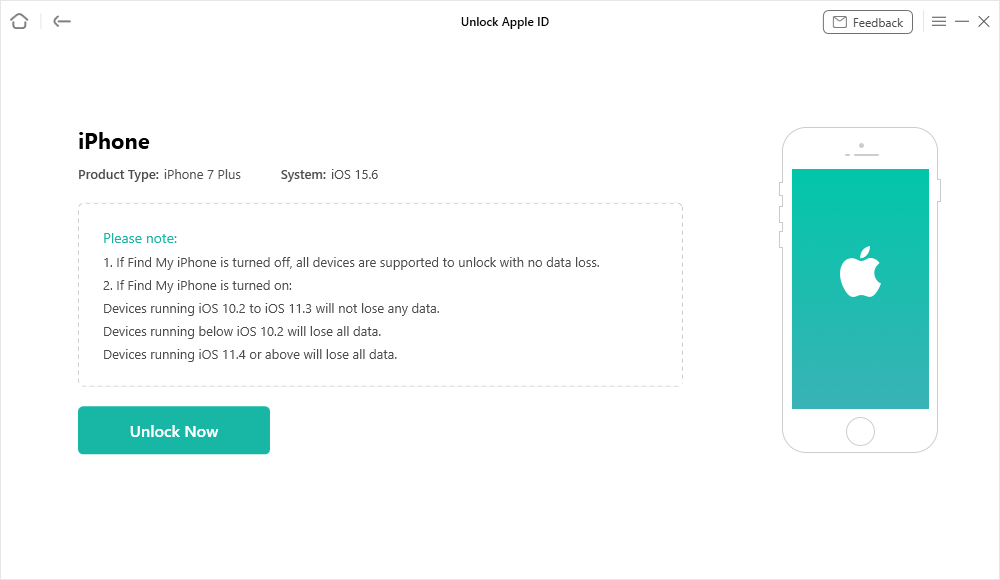
Step 1. Install and run AnyUnlock on your PC. On the main interface of the software, click on Unlock Apple ID option.
Click Unlock Apple ID from the Homepage
Step 2. Now, connect your iPhone to the PC, unlock the iPhone screen, and tap on Trust on the screen of your iPhone. On the next interface, click on Unlock Now button.
Click Unlock Now Button
Step 3. Before starting the Apple ID changing process, please make sure the screen passcode and the Two-Factor authentication are turned on, or your device will be locked by the activation lock. If so, please click “Continue” button. If not, please follow the instructions on the software page to set it up at first.
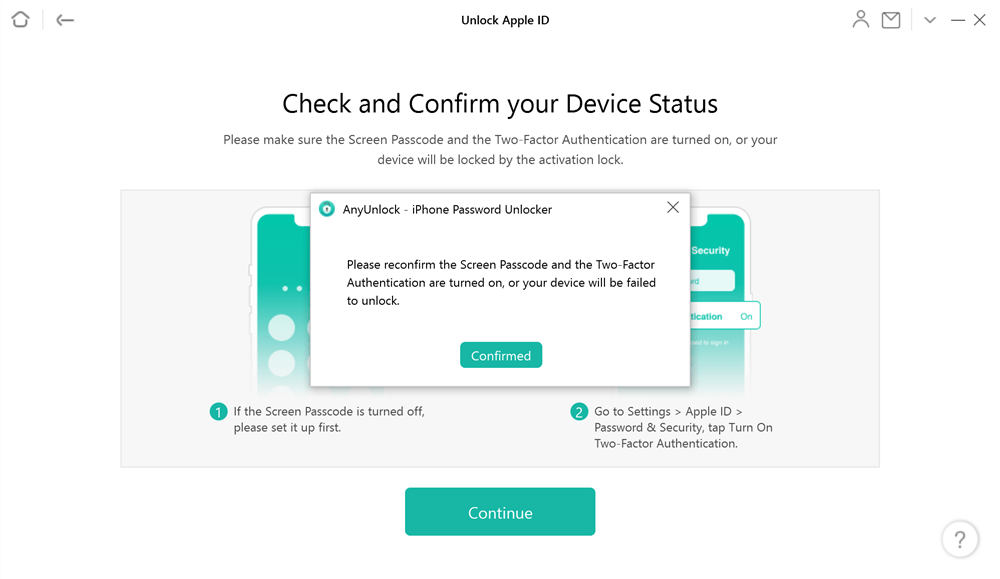
Check and Confirm Your Device Status
Step 4. Once you downloaded the firmware, the changing process will begin. Once the Apple ID removal process is completed, you will see an interface as shown below.
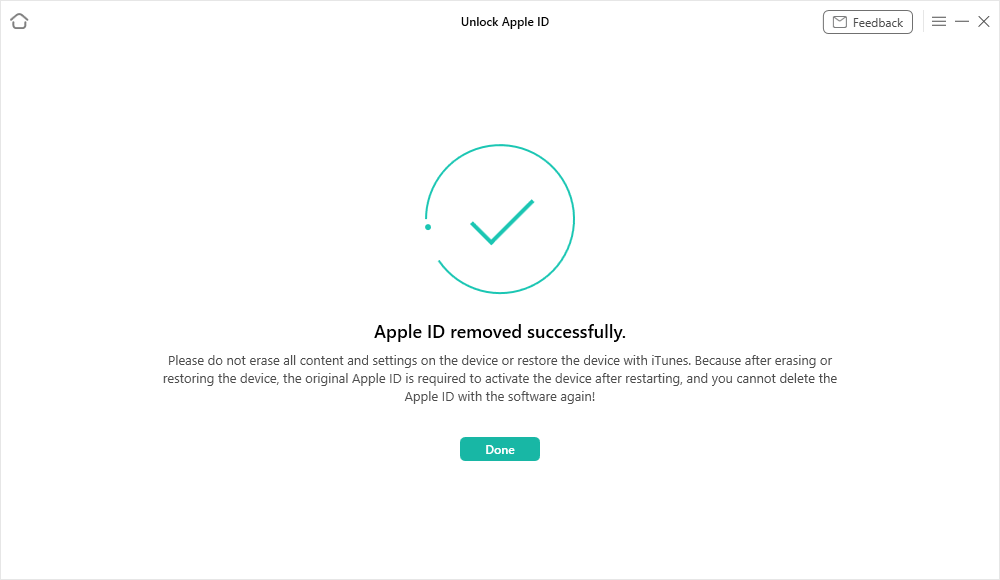
Apple ID Removed Successfully
That’s all! The Apple ID now is removed. You can set a new Apple ID now.
How to Change Apple ID without Losing Data?
For folks who are skeptical of losing their data while changing Apple ID, we recommend that you transfer your current data first before carrying out such an operation. AnyTrans is an amazing software program you can use to do this.
The AnyTrans software is one of the most powerful tools with excellent data migration services. It lets you move data to and fro iOS devices with minimal hassles right from the comfort of your home. It supports the migration of more than 20+ data types such as photos, videos, app, contact, and many more.
Not only can you use AnyTrans to transfer data between Apple IDs, you can also use AnyTrans as an alternative to iCloud to back up your Apple ID data at any time.
Free Download * 100% Clean & Safe
Transferring everything from one Apple ID to another via the AnyTrans software is simple with this guide down here:
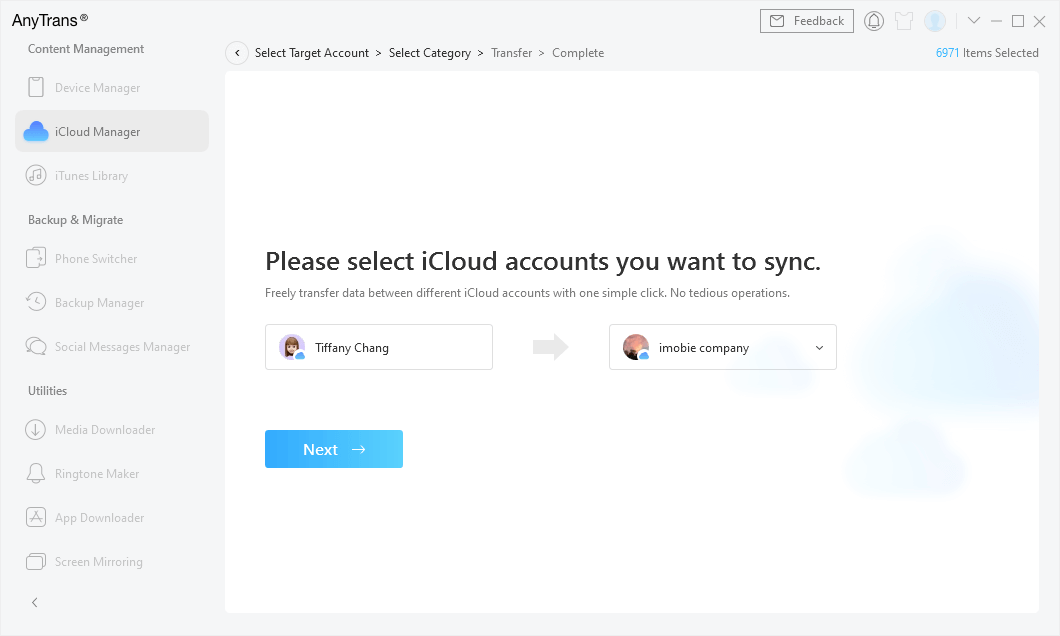
Step 1. Download AnyTrans on Mac/PC. Run AnyTrans > Choose iCloud Manager on the left side panel option > Sign in to your two Apple IDs > Click on iCloud Sync.
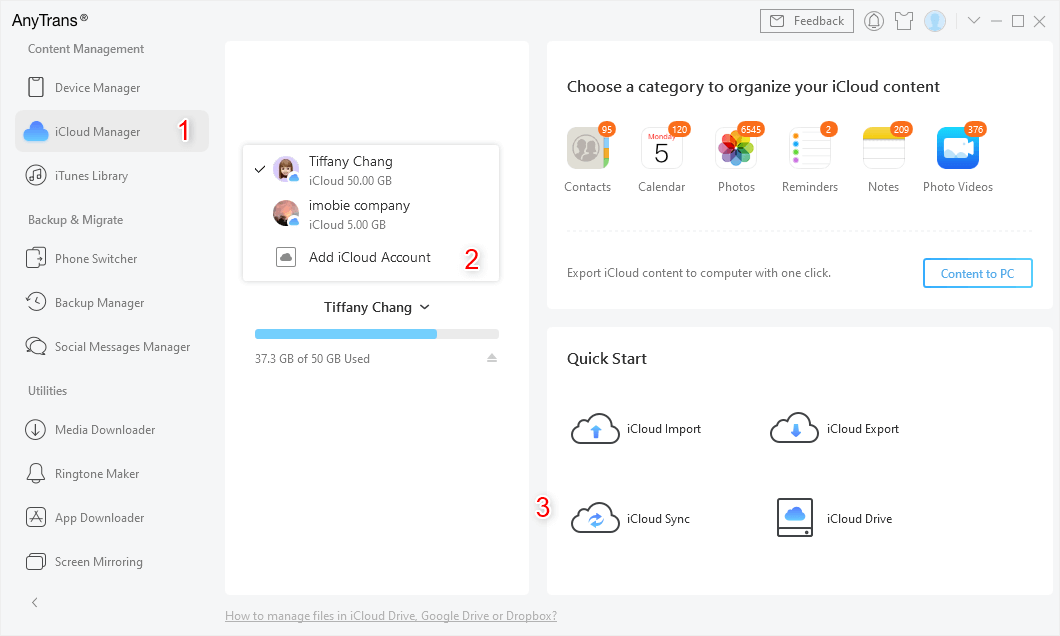
Sign in Two iCloud Accounts and Head to iCloud Sync
Step 2. Confirm that you’ve logged in the right Apple IDs >Click Next.
Confirm the Source Account and the Target Account
Step 3. Choose the exact files you want to transfer from one Apple ID to the other > Click Next to start. The duration would depend on how large the file you are transferring and the speed of the network.
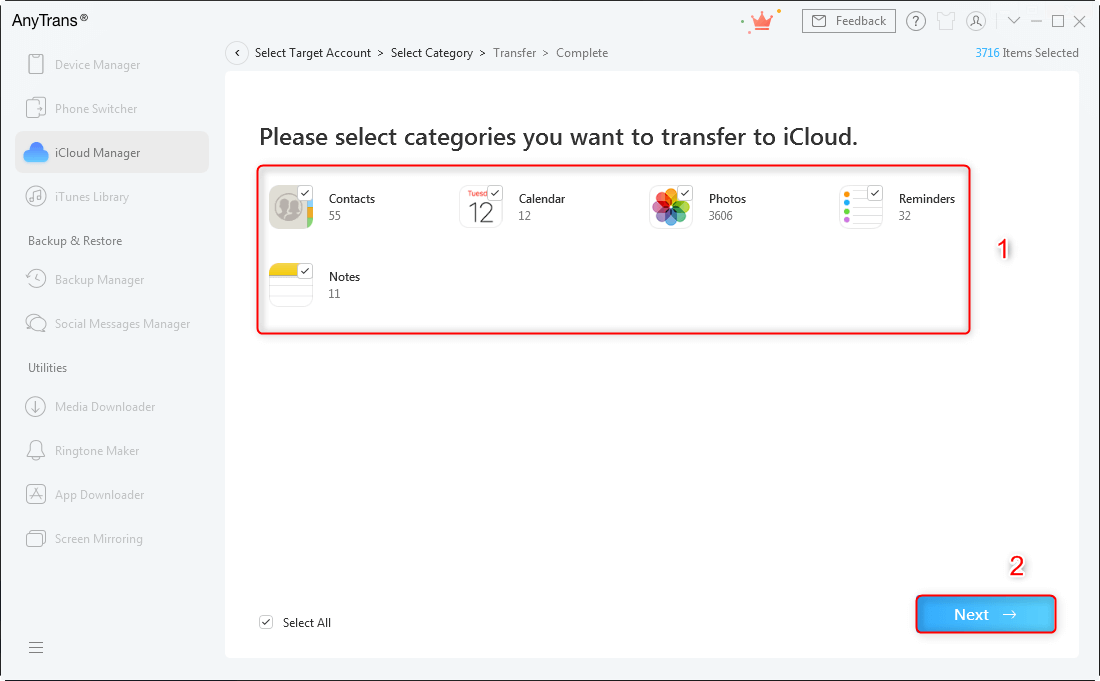
Click Next to Start Syncing
FAQs about Apple ID
For additional knowledge on how to change Apple ID without data loss, check out the frequently asked questions and answers below:
Can I have two Apple IDs on one device?
Having two Apple IDs logged in on the same Apple smartphone, or computer isn’t possible. You are only allowed to sign in one account at a time. To switch between Apple accounts, you should apply the appropriate instruction for iPhone/iPad and Mac respectively.
What to do when forget Apple ID password?
When you lose or forget the password to your Apple ID, resetting the account is the only option you’ve got. To do that,
- Open the Settings menu and tap on [your name].
- Select Password & Security on the next screen.
- Now tap on the blue Change Password button.
- Enter your passcode in the given field when the next screen appears.
- Type the new password you wish to use in accessing your Apple ID in the New and Verify fields.
- Now click on Change to complete the process.
Final Words
Changing Apple ID without data loss shouldn’t be a challenge for anyone with this tutorial guide at hand. We’ve provided different approaches to changing Apple ID on Apple smart devices, and computer systems.
Additionally, we introduced AnyUnlock to change Apple ID, and AnyTrans to transfer data between Apple IDs in case of data losing. Both software is tested, trusted and reliable. AnyTrans and AnyUnlock performs all operations without data loss. You should try them out!
Vital iPhone unlock Tips

Senior writer of the iMobie team as well as an Apple fan, love to help more users solve various types of iOS & Android-related issues.
Product-related questions? Contact Our Support Team to Get Quick Solution >
