This Device Was Reset to Continue Sign in with a Google Account Bypass [2026]
“This device was reset to continue sign in with a Google account” is a very common issue in new Android devices. In this article, we will discuss 4 easy methods to bypass Google account verification.
iMobie DroidKit – ‘This Device Was Reset’ Bypass in Minutes
What to do if you receive the message “This device was reset to continue, sign in with a Google account that was previously synced”? Free download iMobie DroidKit to bypass Google account verification even without account or password. No skills are needed. Supports Android 6 and above. Covers Samsung, Xiaomi, Vivo, OPPO, etc.

After factoring reset your device, you may be stuck on the “this device was reset to continue sign in with a google account” error. If your Android phone is stuck on this screen after a factory reset, don’t panic. This guide explains how to bypass Google account verification using several proven FRP bypass methods for Samsung, Xiaomi, Redmi, Motorola, OPPO, Vivo, and other Android devices.
Whether you forgot your Google account password or bought a second-hand phone locked by FRP, the methods below can help you regain access.
Quick Answer
If your phone says: “This device was reset. To continue, sign in with a Google account previously synced on this device” and you no longer remember the previously synced Google account, you can try:
- FRP bypass software
- OEM unlocking methods
- FRP bypass APK tools
- Hard reset solutions
Samsung, Xiaomi, Redmi, Motorola, OPPO, Vivo, and many Android 6–15 devices are supported.
Which FRP Bypass Method Should You Use?
Different situations require different FRP bypass solutions.
This quick comparison helps you choose the easiest and most effective method.
| Your Situation | Recommended Solution |
| Forgot Google account password | Use FRP bypass software |
| Samsung phone after factory reset | DroidKit FRP bypass |
| Android 13/14/15 device | PC-based FRP tool recommended |
| No computer available | Try APK or browser-based methods |
| Bought a second-hand phone | FRP removal tool |
| Need the fastest solution | Automated FRP bypass software |
Table of ContentsHide
What Is “This Device Was Reset to Continue Sign in with a Google Account”
Why My Phone Says “This Device Was Reset to Continue Sign in with a Google Account”
How to Bypass “This Device Was Reset to Continue Sign in with a Google Account”
Method 1. Bypass Google Account Verification within Minutes
Method 2. Bypass Google Account Verification with OEM Unlocking Feature
Method 3. Bypass Google Account Verification Using FRP Bypass APK
Method 4. Bypass Google Account Verification via Hard Reset
How to Avoid Being Locked by FRP Again
FAQ
What Is “This Device Was Reset to Continue Sign in with a Google Account”
What does it mean when it says ‘’this device was reset to continue sign in with a Google account that was previously synced on this device?
It means that: When you perform a factory reset on the device, for the purpose of security protection, the device needs to verify the identity of the legitimate user of the device. Google requires you to log in with the Google account that had already been set up for syncing on the device before the reset. This is done to prevent others from casually logging in and using the device after they obtain it and reset it, thereby protecting your personal data and the security of the device and ensuring that only the true owner or authorized user of the device can reactivate and use it.
This is a Google verification to improve the security of new Android devices. It is added by Google after Android 5.0 OS and is also known as Factory Reset Protection (FPR).
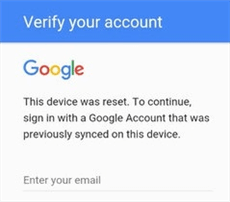
This Device Was Reset Error
To clearly understand the purpose of this feature. Let’s suppose someone stole your phone. The thief might be able to reset it to factory settings and access it. This feature helps prevent that by requiring a previous Google account to set up the device after a reset. That way, only someone who knows the correct email and password can use the phone.
You may also like: How to bypass FRP on Samsung
Why My Phone Says “This Device Was Reset to Continue Sign in with a Google Account”
Why you get the message “this device was reset to continue, sign in with a Google account that was previously synced” ? If you have the latest version of Android phone and you have done the following things:
- You have logged in to your phone with a Google account.
- You have a PIN, pattern, or password as your screen security.
Then, this protection feature will automatically turn on for your device. It will help ensure the device is accessible to an authorized user only in case you lost your phone, or it got stolen. The person who would find it has to perform a factory reset to remove the screen security. After the factory reset, he will get stuck on this error and have to enter the Google account to access the device.
However, many users encounter this issue because:
- they forgot the Google account password
- they purchased a used phone
- the previous owner did not remove the Google account properly
Fortunately, there are several ways to bypass Google account verification after reset.
How to Bypass “This Device Was Reset to Continue Sign in with a Google Account”
People forget their phone password and perform a factory reset to remove it. But they don’t know that the “the device was reset to continue sign in” error can also be problematic. But don’t panic; here are 4 easy methods to get ‘this device was reset to continue sign in with a google account that was previously synced’ bypass.
Method 1. Bypass Google Account Verification in Minutes
If you are looking for the easiest and fastest way to make “this device was reset to continue, sign in with a google account that was previously synced” bypass, then iMobie DroidKit – Android Phone Toolkit is one of the most effective solutions.
DroidKit is an all-in-one Android toolkit designed to solve common Android lock and recovery problems.
It supports:
- Samsung
- Xiaomi
- Redmi
- Motorola
- OPPO
- Vivo
- Android 6–15 devices
Unlike manual FRP methods, DroidKit simplifies the entire bypass process and is beginner-friendly.
Why Many Users Choose DroidKit
- Easy operation with guided steps
- High FRP bypass success rate
- Compatible with multiple Android brands
- Supports Windows and Mac
- No technical skills required
- Removes Google verification within minutes
It also supports:
- Android screen unlock
- Android data recovery
- System repair
- Google backup extraction
Now free download iMobie DroidKit and follow the steps below to bypass Google account verification quickly.
Free Download * 100% Clean & Safe
Steps to Bypass FRP with DroidKit
Step 1. Launch DroidKit on your Windows or Mac computer. Select FRP Bypass mode on the main screen.
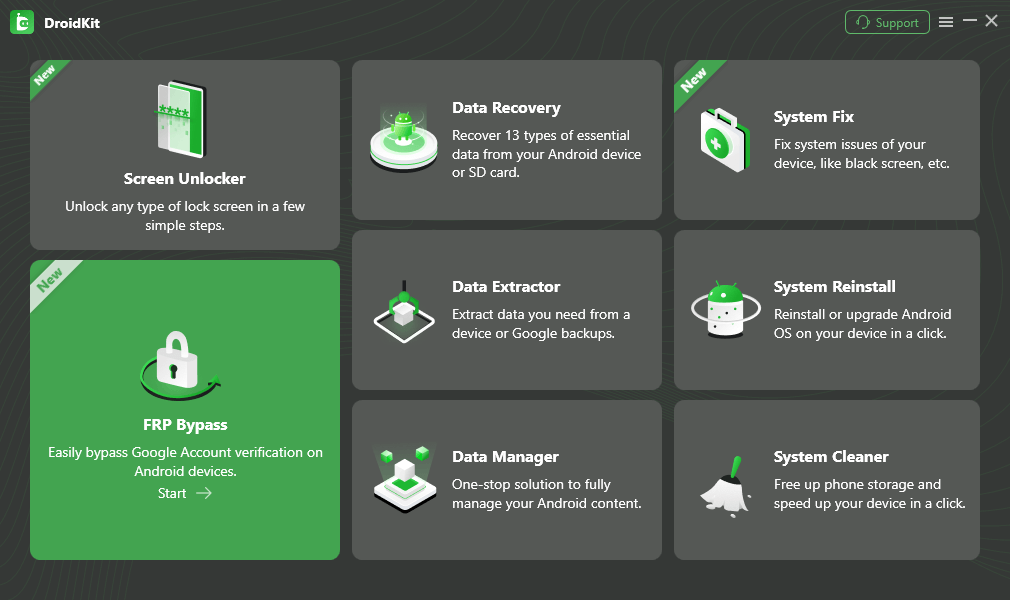
Choose FRP Bypass
Step 2. To start removing the Google account, you need to connect your phone to computer first, and then click Start and select device brand to proceed.
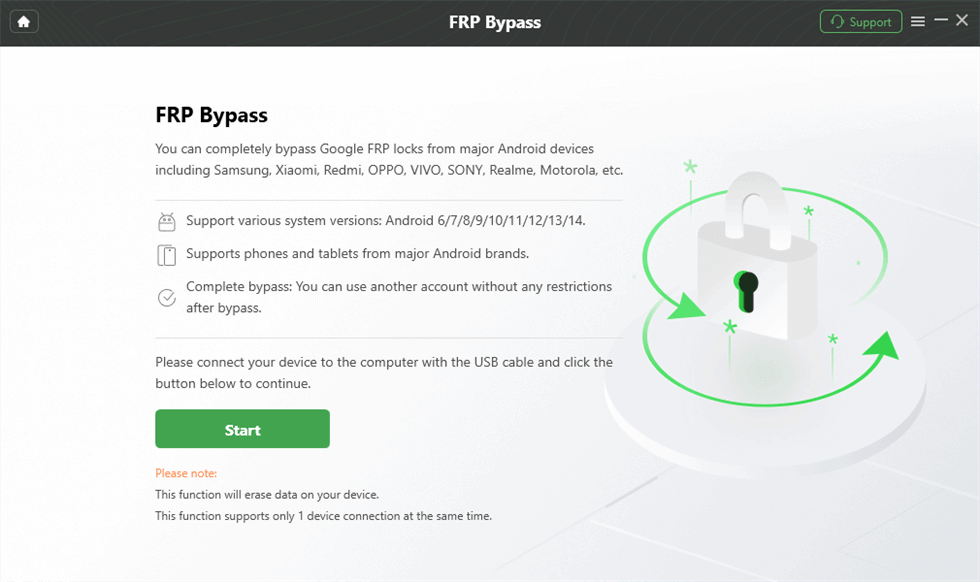
Connect Device and Click Start
Step 3. DroidKit will start preparing your configuration file. Once the preparation is completed. Click the Start to Bypass button.
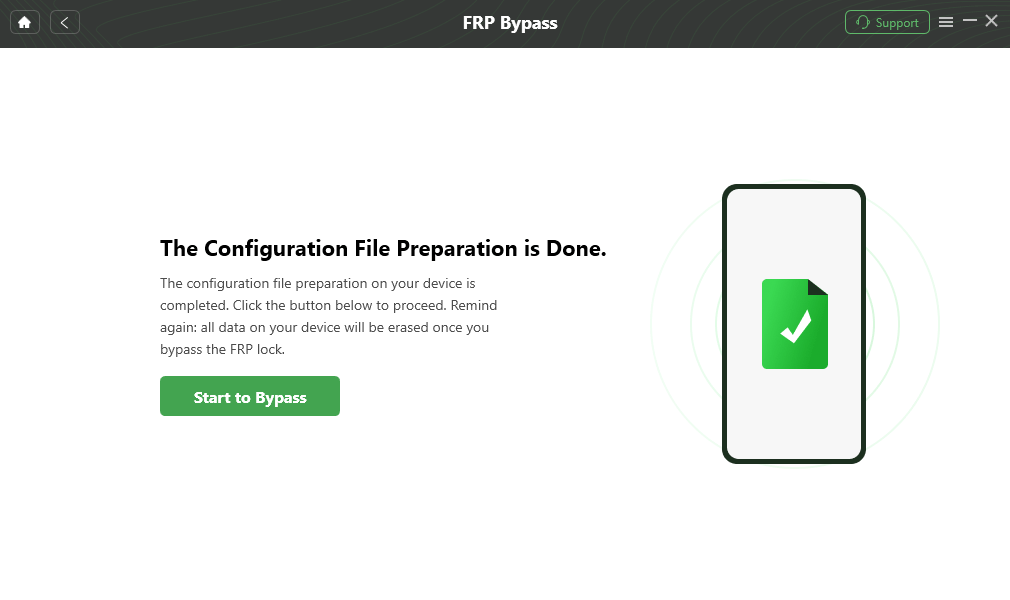
Tap on Start to Bypass
Step 4. Just follow the on-screen instructions to put your device in recovery mode. Find and select the system version of your Android device > Click the Next button.
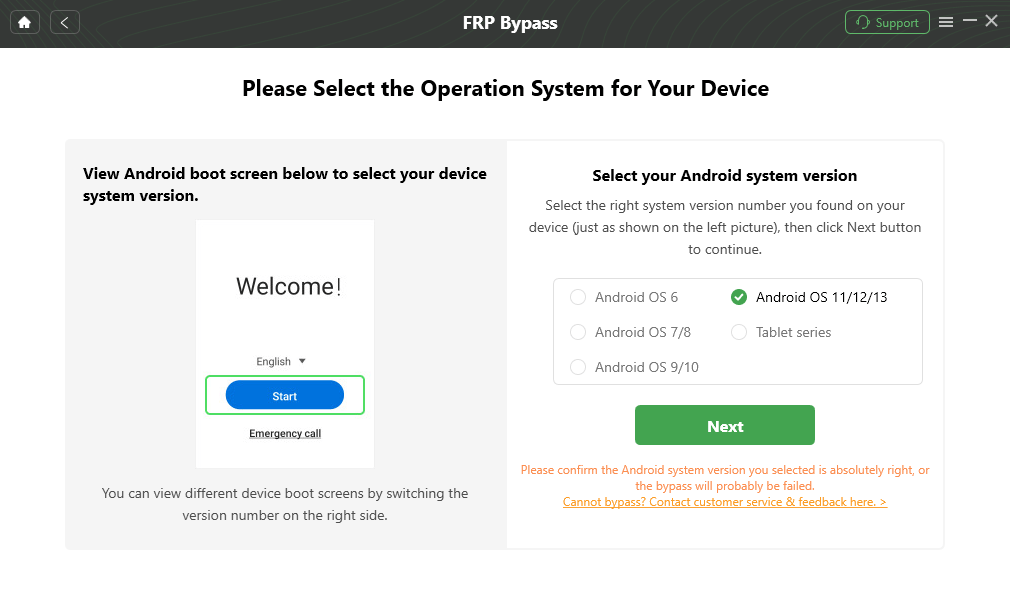
Select System Version and Click Next
Step 5. And then just set your device as the on-screen guide and wait for DroidKit to bypass FRP lock.
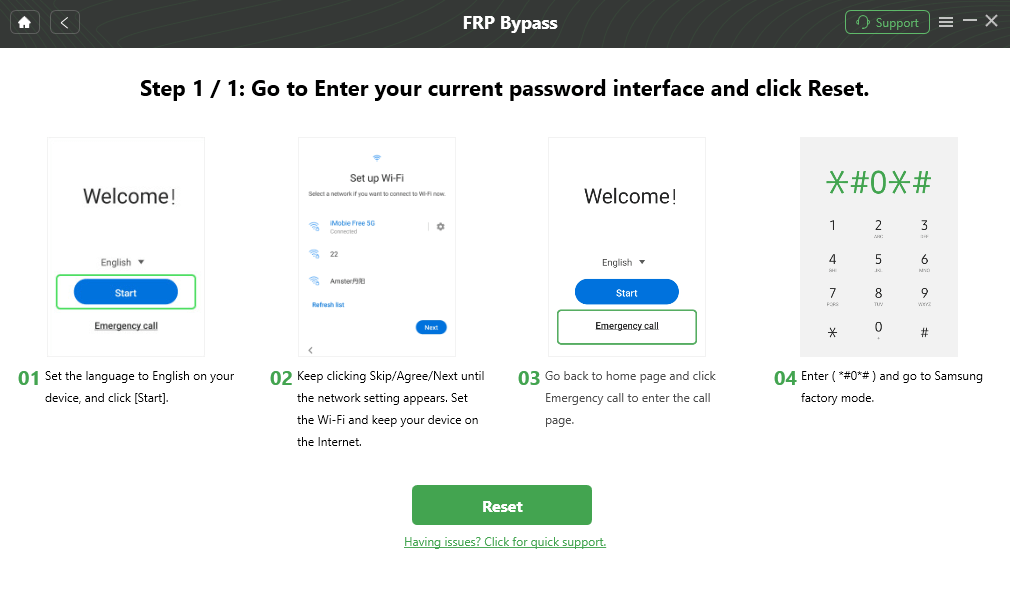
Complete Corresponding Settings
Step 6. After completing these steps, the device will be restarted, and the FRP lock will be removed successfully.
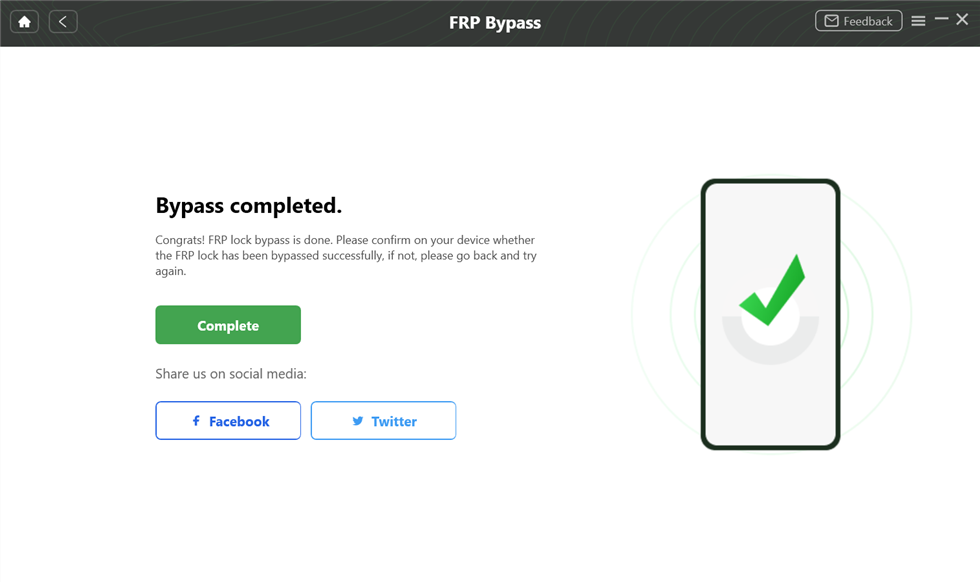
FRP Bypass Complete
Method 2. Bypass Google Account Verification with OEM Unlocking Feature
When you receive the “this device was reset to continue sign in with a Google account” message, you can resort to OEM unlocking feature on your Android phone. It allows you to perform anything on your phone without any limitations via the bootloader. Now, let’s start by trying the OEM feature to bypass Google account verification/Factory Reset Protection (FPR). Follow these easy steps to use this feature.
Step 1. When you see the error “Verify your account,” then long press “@” on the keyboard until a new window appears.
Step 2. Now click on the option “Google Keyboard Settings.”
Step 3. You will see three dots in the upper right corner, click and select “Help & Feedback.” > Press long on any random text to copy it > A search icon will appear, tap and type “Settings” in it.
Step 4. Go to “Settings,” then move to “Developer options” and enable OEM unlocking.
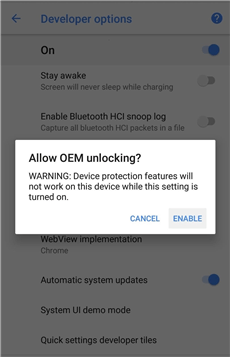
Enable OEM Unlocking
If you don’t see the Developer option, click on the builder number 7 times.
Step 5. Long press the power button to reboot your phone. Now while setting up, you will get “Add your account” instead of “Verify your account.”
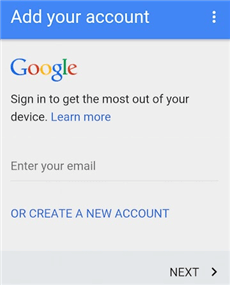
Get Add Your Account Screen
Method 3. Bypass Google Account Verification Using FRP Bypass APK
Another effective method to bypass Google account verification/FRP lock is using FRP Bypass APK. It is basically a third-party app in APK format. You can use it to get done with this situation. But to perform this, you will need.
- A laptop or computer
- A USB flash drive
- A USB and OTG cable
If you have these three, you are good to go. Follow the below instructions to get “this device was reset to continue, sign in with a google account that was previously synced” bypass.
Step 1. Download the APK app on your computer and copy the file onto your USB flash drive.
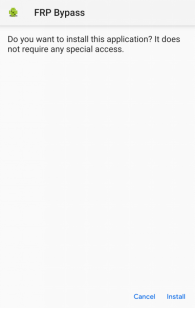
Install FRP Bypass APK
Step 2. Turn on your Android device where you are facing the FRP error. Wait until the Verify your Google toggle appears.
Step 3. Now connect an OTG cable with the USB and your Android device.
Step 4. You will see the file explorer feature on your mobile phone. Locate the APK file you downloaded and install the app on your Android phone.
Step 5. Once the installation is complete, tap on open from the development settings option. It will open the settings menu.
Step 6. Now scroll down and click on the “Backup and Reset” option. Then select the “Factory Data Reset” option and confirm.
This action will erase everything from your device, including your previous Google account. Finally, you will be able to access your phone again.
Method 4. Bypass Google Account Verification via Hard Reset
If you still can’t bypass “this device was reset to continue sign in with a Google account”, the last way is to hard reset your Android device. It will wipe all the data, including the account synced with the device. But in case you don’t know how to factory reset manually. Follow the instructions given below to bypass Google account verification now.
- Press and hold the Power + Volume Up + Home button.
- Keep pressing the buttons until you see a booting display.
- Click on the Wipe data/Factory Reset option and proceed.
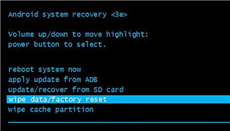
Click on Wipe Data/Factory Reset
- You will see a toggle asking, “Delete all user data” select yes.
It will start wiping your device, and you won’t face this issue after a restart.
How to Avoid Being Locked by FRP Again
With the above methods, you may successfully make “this device was reset to continue, sign in with a Google account that was previously synced” bypass. And if you don’t want to face this FRP error again. Then remove the previously synced Google account from your device. Here is how you can do it:
Step 1. Go to your phone’s Settings > Cloud and Accounts > Accounts.
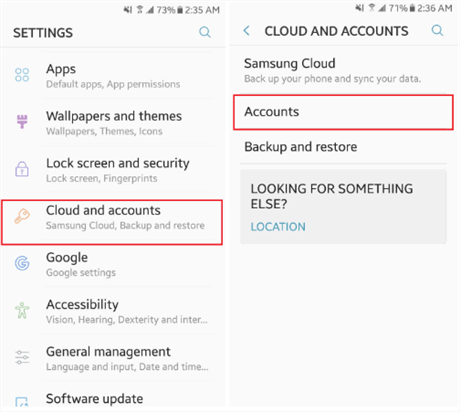
Go to Cloud and Accounts
Step 2. Now select Remove Account to sign out from the Gmail account.
The steps to remove the account depend on your phone model; the screenshots shown here are from a Samsung Android device, yet the process is likely to be similar across other models.
FAQ
Can I bypass Google verification without the previous account?
Yes. You can use FRP bypass tools, APK methods, or OEM unlocking methods depending on your device model and Android version.
Why does Android ask for the previously synced Google account?
This is part of Google Factory Reset Protection (FRP), designed to prevent unauthorized access after factory reset.
Can I bypass FRP without a PC?
Sometimes. Some APK or browser-based methods may work without a computer, but success rates are lower on newer Android versions.
Does factory reset remove Google verification?
No. Factory Reset Protection remains active after reset unless the Google account was removed before resetting the device.
Which Android brands support FRP bypass?
Most major Android brands support FRP bypass methods, including:
- Samsung
- Xiaomi
- Redmi
- Motorola
- OPPO
- Vivo
- Huawei
Which FRP bypass method is the easiest?
For most users, automated FRP bypass software is the fastest and easiest solution because it reduces manual setup steps and compatibility issues.
The Bottom Line
We know “this device was reset to continue sign in with a Google account” can be annoying. Fortunately, there are several effective ways to bypass Google account verification and regain access to your Android phone.
We hope the methods explained in this guide have fixed your issue. And if you want to solve this problem as quickly as possible, iMobie DroidKit will be your first choice due to its high efficiency and convenience. Just get iMobie DroidKit for free and try it out! Don’t forget to tell us in the comment box which method did the magic.
Free Download * 100% Clean & Safe
More Related Articles

Roger Smith is a senior technical writer with years of experience in providing Android solutions. He loves to help users solve various problems such as Android unlock, Android data recovery, and Android system repair.
Product-related questions? Contact Our Support Team to Get Quick Solution >
