How to Recover Missing Emails in Gmail [Solved]
Did you log in to your Google account and find your email disappeared from Gmail? In this article, we have discussed some easy ways to recover missing emails in Gmail.
With most of our work based online, our email inbox is like a second home. The moment you flip open your laptop at work, the first thing you do is check your email. What if one day you open your Gmail and find some emails missing?
We’re sure you’ll panic or have an anxiety attack, especially if those emails contain essential information. However, nothing is lost! You can quickly recover all your missing emails via the tried and tested ways we have put together in this article.
Why Your Email Disappeared from Gmail?
There could be a number of reasons for your emails disappearing from Gmail. For instance:
- You might be forwarding them to another account unknowingly.
- A Gmail filter might be blocking certain emails from appearing in your inbox.
- You accidentally deleted your emails.
- You might be out of storage space.
- There’s a glitch in your system.
Regardless of why your email disappeared from Gmail, here are 9 methods to retrieve them.
How to Recover Gmail Missing Emails?
If you ever find your emails disappearing from your inbox, try these methods to help recover them:
Tip 1. Check Gmail Trash Bin
The first and most probable reason for your Gmail missing emails is that you or someone else accidentally deleted them. Therefore, check your Gmail trash bin to see if they are there. Here’s how to check the trash on Gmail:
Step 1. On the left menu panel, click on “More > Trash.”
Step 2. If you have accidentally deleted your emails, you’ll find them there. To recover your lost emails, simply right-click on the email, and click “Move to Inbox.”
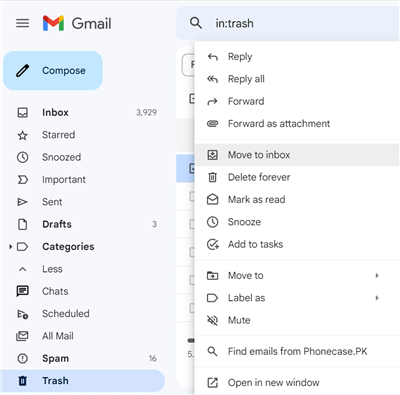
Click Move to Inbox
Your deleted emails will appear in your inbox, and you can read them.
However, check the Spam folder if you did not delete them and they are not in the trash bin.
Tip 2. Check Spam Folder
There’s always a possibility that Gmail detected spam in your missing emails. Therefore, they might go to your Spam folder instead of your inbox. To check your Spam folder:
Step 1. On the left menu panel, click “More > Spam.”
Step 2. If you find your missing emails in the Spam folder, mark them as “Not Spam” to prevent Gmail from sending them to the Spam folder. Right-click on the email you want to remove from Spam and click on “Not Spam.”
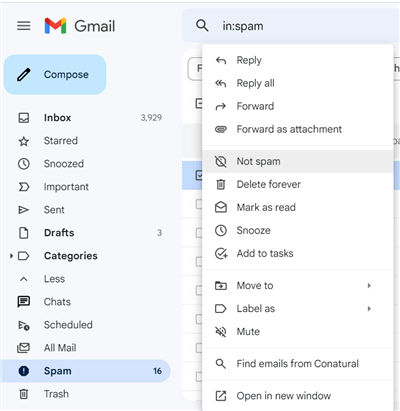
Click on Not Spam
Tip 3. Visit the Social and Promotions Tab
If your missing emails are not in the Spam folder, they could be in the Socials or Promotions tabs.
Step 1. Click on the Social or Promotions tab under Categories on the left menu panel.
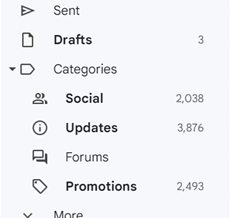
Click on Social or Promotions Tab
Step 2. If your emails are being redirected to these tabs by Gmail, you can select the checkbox next to the email and click “Not Social” or “Not Promotion” from the option at the top.
Tip 4. Check the Archived Email Folder
There’s also a possibility that you accidentally archived an email. While there’s no option to view archived emails separately, you can display all emails in one inbox, including the archived ones. Here are the steps to view all emails:
Step 1. Click “More > All Mail” from the left menu panel. This will display all your emails in one inbox, including archived, spam, promotions, social, etc. if you unknowingly archived your missing emails.
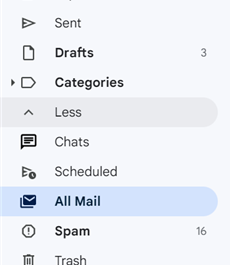
Click All Mail
Step 2. Select the checkbox next to the email and click “Move to Inbox” to unarchive them.
Tip 5. Use Advanced Search to Find Gmail Missing Emails
If nothing else works, you can always use the search bar in Gmail to find your missing emails because your missing email might be buried under hundreds of other emails.
- Type any snippet you remember from the missing email, like the email address, name, or subject, in the search bar at the top of your Gmail inbox.
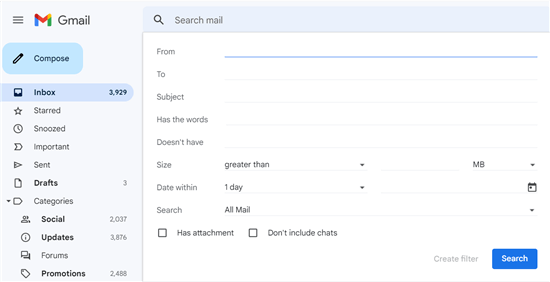
Use Advanced Search
The search feature will go through your entire account to find the information.
Tip 6. Check for Filters and Blocked Addresses
As we mentioned above, Gmail can filter the emails in your inbox. Similarly, if you block an email address, you won’t receive any emails from it. You can check the filters and blocked addresses to see if that’s the reason your emails are missing.
Step 1. Click on the gear icon in the top-right corner of your Gmail inbox and select “See All Settings.”
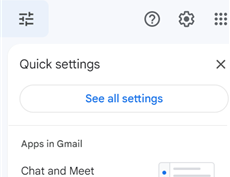
Select See All Settings
Step 2. Now click on “Filters and Blocked Addresses” to see if the sender’s email address is accidentally blocked or filtered.
If the sender’s email address is blocked, you can click the checkbox next to their address and select “Unblock Selected Addresses” to remove them from the list.
Tip 7. Make Sure Enough Storage
Perhaps you’re running out of free storage space on Gmail. That could also be why new emails are not appearing in your inbox.
To check how much storage is used:
Step 1. Scroll down to the bottom of the inbox to view the total and used storage.
Step 2. If you’re out of storage, click on the arrow icon to get more storage from Google.
Tip 8. Contact Gmail Support
If you’ve tried all the methods mentioned above and can still not recover your missing emails in Gmail, it’s time to contact Gmail Support.
Simply visit Gmail Message Recovery Tool website and click “Continue” to try and recover your deleted emails from the last 30 days.
Bonus Tip. How to Recover Missing Voicemail on iPhone?
In addition to emails in Gmail, many iOS users may also lose voicemails due to various reasons, which may contain important information. So how to recover them? PhoneRescue for iOS, a data recovery software specially designed for iOS users, can help you recover all your lost data, including voicemails, easily. And the recovered files will not overwrite the original data, ensuring that every data on the device is safe and sound. So let’s take a look at its key features!
Free Download * 100% Clean & Safe
- Recover with/without backup – Whether you have backed up your data before or not, this tool can help you get them back with ease.
- Support all data types – PhoneRescue can help you recover all types of data, such as voicemails, photos, videos, text messages, App data, and more.
- Batch/selective recovery – You can preview all the data, and then recover all of them with one click or selectively get back part of the data as needed.
- Simple and fast – You only need to click on buttons to complete the recovery. And the whole process only takes a few seconds or minutes.
In addition, PhoneRescue can also help you fix some iOS system issues, like black screen spinning wheel, green line on the screen, stuck on Apple logo, stuck in recovery mode, etc.
Now free download PhoneRescue and follow the steps below to recover your data even without backup.
Step 1. Open PhoneRescue on your computer > Choose Data Recovery list > Select Recover from iOS device.
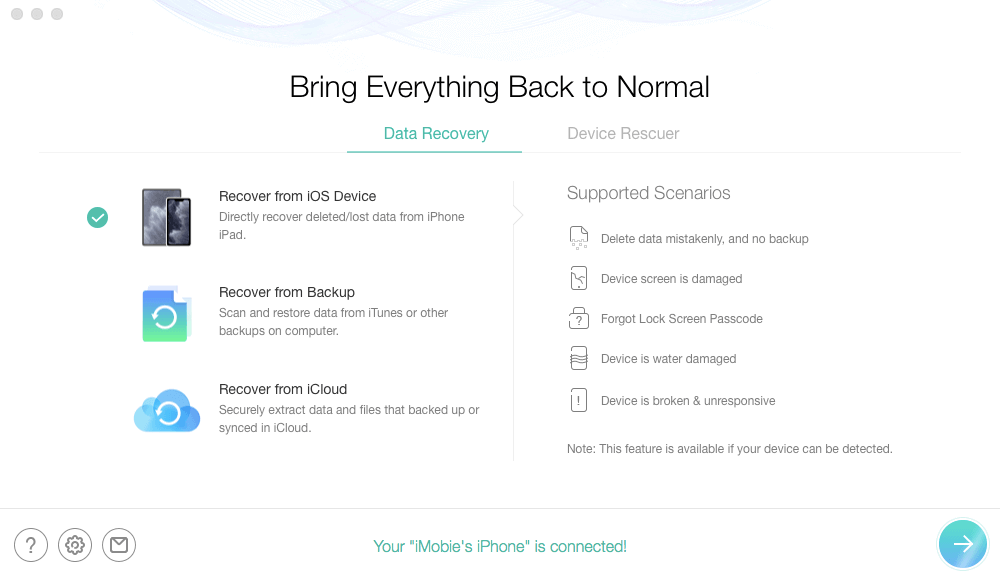
Recover from iOS without Backup
Step 2. Then you need to choose data types. Here you can only select Voicemail.
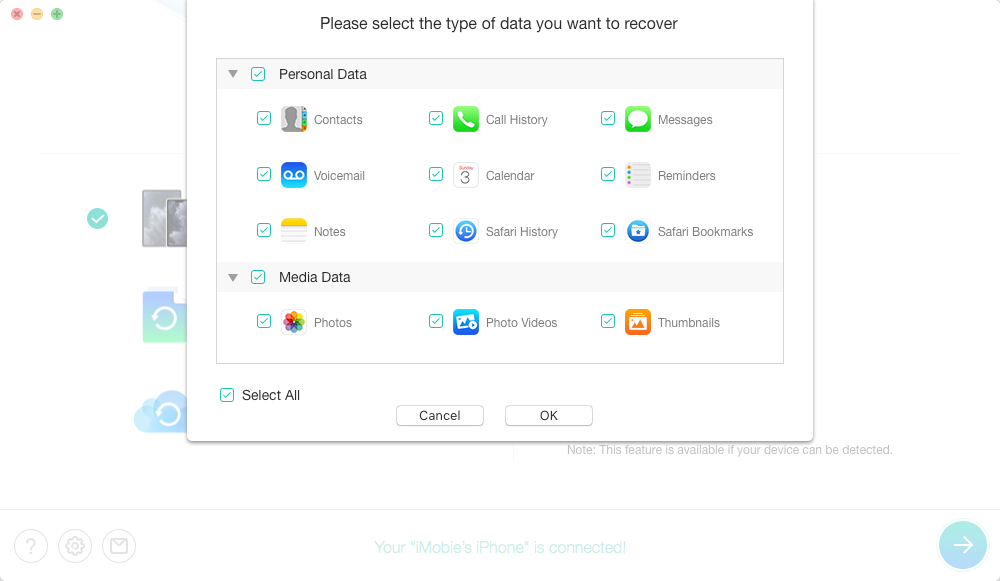
Choose Data Category to Scan from iOS Device
Step 3. It will show you all the data. Just preview and select what to recover. Tap on To Device or To Computer button to recover the selected data.
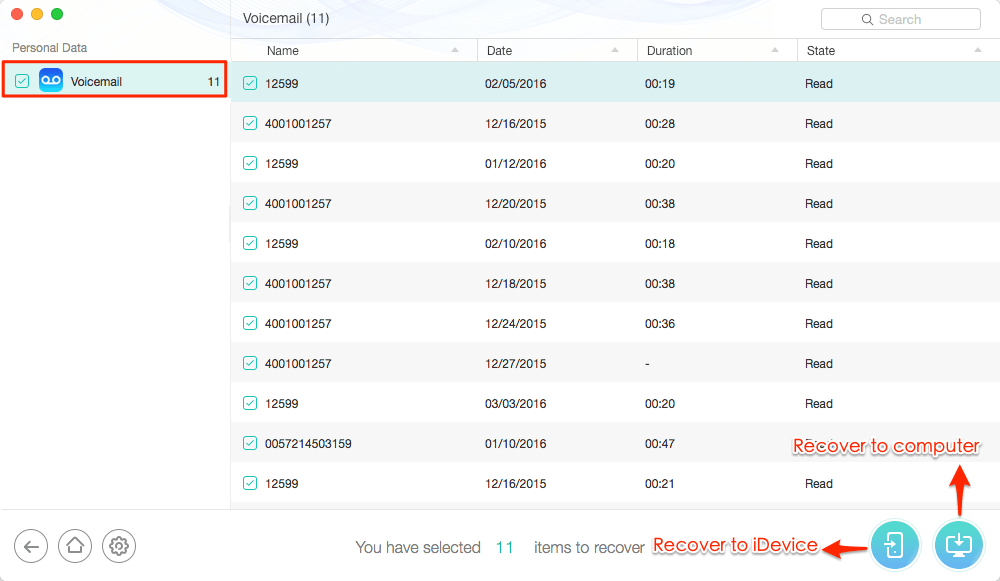
Get Back Deleted Voicemail to iPhone
The Bottom Line
It can be quite overwhelming if your important emails go missing from Gmail. However, the tips mentioned in this article will surely aid you in recovering your lost emails. And if you want to recover voicemails easily, you can also try PhoneRescue for free. Have you ever deleted your emails accidentally or due to a system glitch? How did you recover them? Share your experience with us in the comments.
Free Download * 100% Clean & Safe
iOS Data Recovery
iPhone Recovery
- How to Recover Missing Emails in Gmail [Solved]
- Recover Deleted Screenshots on Phone & Windows
- iMobie PhoneRescue Recovers Deleted Messages on iPhone/Android Without a Backup
- How to Recover Recently Deleted Apps on iPhone/iPad
- How to Recover Deleted Voicemail iPhone
- How to Retrieve Call History from iCloud Easily

Senior writer of the iMobie team as well as an Apple fan, love to help more users solve various types of iOS & Android-related issues.
Product-related questions? Contact Our Support Team to Get Quick Solution >
