How to Edit YouTube Videos on iPhone
If your video requires a little bit of retouching before it goes live on YouTube, you will learn how to edit a YouTube video on an iPhone right here in this guide.
Before you let your videos go out live on YouTube, you might want to make sure they are in a proper style and are good for an audience as large as millions. One of the ways to make that sure is to edit the video before you put it live on the platform. An edited video gives you the opportunity to convey your message in a better way, and overall looks great.
So, how do you go about editing YouTube videos on an iPhone? Well, there are multiple ways to do the task. Your iPhone lets you edit your YouTube videos using various ways, and depending on what you want to accomplish, you can go for your desired editing method to get your videos polished.
Here we show you three ways to edit YouTube videos on an iPhone.
Part 1. How to Edit iPhone Videos for YouTube
If you are not looking to add any fancy elements to your video but at the same time, you want a little bit of control as to what is shown and what is not shown in your video, the built-in editing feature on your iPhone should be good enough for you.
This editing option is part of the Photos app that comes preloaded on all iOS-based devices. Since your videos are already inside this app, it will be easier for you to find your videos and give them a little bit of retouching so they are ready for publication on YouTube. With the Photos app, you can cut a clip from the video, or rotate this video to change its orientation, etc.
Step 1. Launch the Photos app on your iPhone by tapping on the app icon on your springboard.
Step 2. When the app opens, open the album where your YouTube video is saved and then tap on the video to select it for editing.
Step 3. The video should open full-screen on your device. What you need to do is tap on the edit icon appearing at the bottom of your screen. It will open the video editing tools for you.
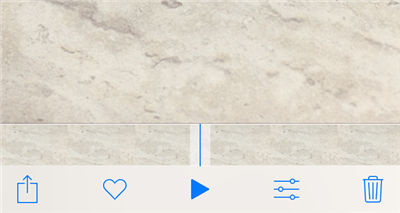
Edit a video in Photos
Step 4. The following screen will let you edit your video however you want. Once you have made the required edits and you think the video looks good, tap on Done at the bottom-right corner to save the edited video to your iPhone.
You are all set. Your video is now edited and is ready to be uploaded to your YouTube channel.
Part 2. How to Edit iPhone Videos with iMovie
Although the built-in video editing options in the Photos are good for some uses, they are not built for professional-grade video editing. If you are looking to make your video more attention-grabber, you might want to use the iMovie app on your iPhone.
iMovie is a free video editor and movie maker app for both iPhone and Mac machines. It is developed by Apple and it allows you to edit your videos using a number of editing tools right on your iOS device. You can add texts, trim videos, add filters, use background audios, and so on.
It is a perfect tool to edit videos for YouTube on your iPhone and the following shows how you go about doing it on your device.
Step 1. iPhones do not already come preloaded with iMovie so you will need to manually install the app on your device. Open App Store, search for iMovie and install the app on your device.
Step 2. When the app is installed, launch the Photos app on your iPhone to select your video to be edited. Find your video in the app, tap on it, tap on the edit icon at the bottom, tap on three-dots at the bottom, and select the option that says iMovie.
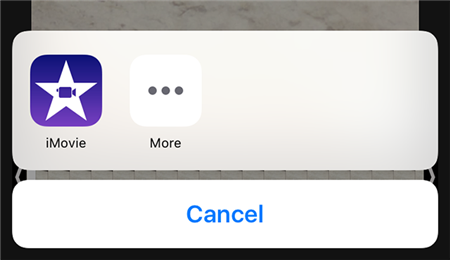
Edit a video in iMovie
Step 3. Your selected video will launch in the iMovie app for editing. You can now start editing your video as you want and then save it to your device. To get started, you can tap on the scissor icon at the bottom and it will let you cut your video.

Trim a video in iMovie
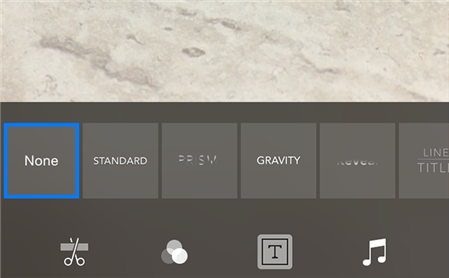
Step 4. If you want to change the color scheme of your video, you can do so using the second option in the bottom menu-bar. It lets you choose from a number of color schemes available for your video.
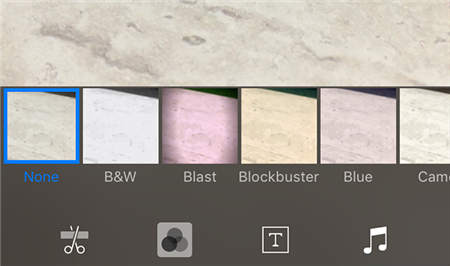
Apply color effects to your video
Step 5. The third option is for adding texts and titles to your video. Select it and you will be able to add a custom text to your video.
Add text to your video
Step 6. Lastly, if you want to add background music to your video, tap on the last option in the bottom menu-bar. You can then select a music file from your Music app and it will be added to your video’s background.
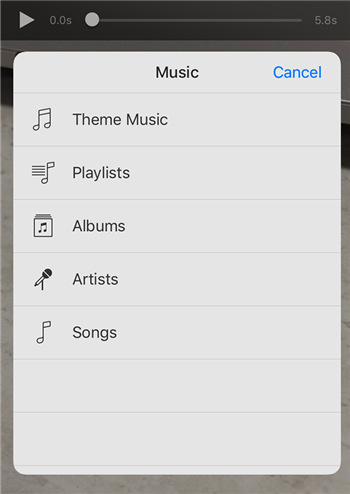
Add music to your video
Make sure to tap on Done at the top-right corner when you have edited your video so the edited file can be saved on your iPhone. If you do not do it, you will lose the changes that made to your video.
Part 3. How to Edit iPhone Videos with Third-Party App
iMovie should be sufficient for most video editors as it provides pretty much everything you need to get a video ready for YouTube. However, if you are not satisfied with the features it offers, or if you do not like its user-interface, you might want an alternative option.
When it comes to third-party video editing apps for iPhone, you have dozens of options to choose from. However, be careful as not all the apps offer the features they claim to have. To help you save time searching for a good video editing app for your device, we narrow your choice down to just one.
Video Editor, as the name implies, is an app for iPhones that let you edit videos right on your device. It provides more features than the built-in iPhone video editing tool and is available for free on the official App Store.
The following shows how to use it to edit YouTube videos on your iPhone.
Step 1. Go to the App Store, search for Video Editor by Luni, and download and install the app on your iPhone.
Step 2. Open the app and tap on the + (plus) sign to create a new project for your YouTube video.
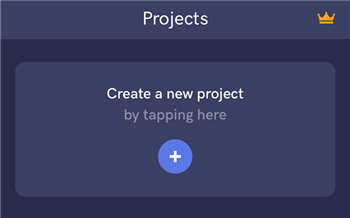
Start New Project
Step 3. You will be asked to choose the source of your video file. If you have not already filmed your video yet, choose the first option. Otherwise, tap on Photo library to choose an existing video from your Camera Roll.
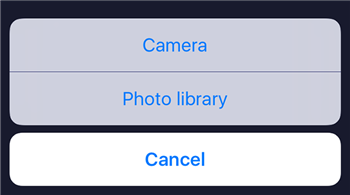
Choose a Video from Photo Library
Step 4. Camera Roll should open and you will be able to select a video to be added to your project. Tap on your YouTube video and it will be added to the app.
Step 5. You will see all the editing tools available in the app. Some of the options you can choose from include adjusting volume levels, changing color settings, modifying the speed of the video, adding background music, and adding special effects.
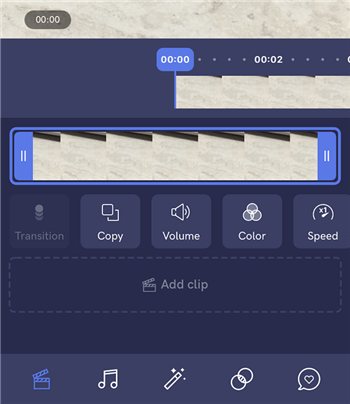
Use Video Editing Tools
Step 6. When you have finished editing your YouTube video, you can have it uploaded straight to YouTube from within the app. Tap on the share icon at the top-right corner and select Youtube to do so.
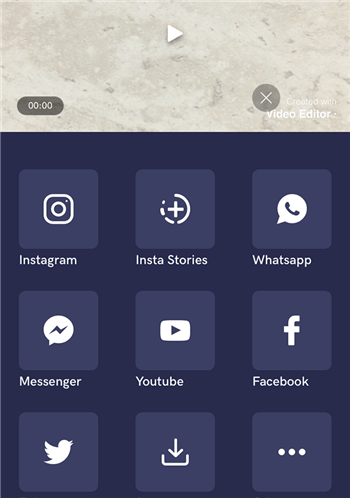
Share Edited Video
The Bottom Line
YouTube videos often require editing and iPhone lets you do that using multiple ways. We hope the above guide helps you edit your videos using various ways and to get them ready to go live on the YouTube platform.
More Related Articles

Work for iMobie team for 5 years as well as an Apple fan, love to help more users solve various types of iOS or Android related issues.
Product-related questions? Contact Our Support Team to Get Quick Solution >
