How to Fix Trusted Devices List Is Not Available [10 Ways]
When Trusted Devices list is not available on your iPhone, try to refresh your network, restart your device, and make sure iOS and two-factor authentication are up to date. If it still doesn’t work, re-sign in to your Apple ID, reset all settings, or use factory reset or Apple Account Recovery. If you can’t sign out due to a forgotten password, AnyUnlock offers a quick and secure solution to unlock Apple ID without password.
Trusted devices are an essential part of keeping your Apple account secure. When the error message “Trusted devices list is not available” appears, it can be frustrating, especially if it interferes with sign-ins or prevents security verifications. The good news is that this issue can be resolved. In this guide, we’ll explain the common causes and outline 10 proven solutions to help you restore full access to your Apple ID without disruption.
Table of ContentsHide
Why Is the Trusted Devices List Not Available on My iPhone?
How to Fix Trusted Devices List Is Not Available on iPhone
- Fix 1. Check & Refresh Network Connection
- Fix 2. Restart iPhone
- Fix 3. Enable Two-factor Authentication
- Fix 4. Check Apple ID via Another Device
- Fix 5. Re-sign Apple ID
- Fix 6. Sign Out of Apple ID Without Password
- Fix 7. Update iOS Version
- Fix 8. Reset All Settings on iPhone
- Fix 9. Factory Reset Apple Device
- Fix 10. Use Apple Account Recovery
FAQs about Trusted Devices List Is Not Available Error
Why Is the Trusted Devices List Not Available on My iPhone?
The error message “Trusted devices list is not available” usually occurs when your iPhone fails to sync correctly with Apple’s servers or your Apple ID account. Common technical causes include:
- Weak or unstable network signals
- Apple ID sign-in errors or outdated details
- Disabled Two-Factor Authentication
- Outdated iOS compatibility issues
- Apple’s servers are not available
How to Fix Trusted Devices List Is Not Available on iPhone
After careful research, we’ve gathered ten proven solutions to help you resolve this issue quickly. Go through each to find the one that works for you.
Fix 1. Check & Refresh Network Connection
A fluctuating network connection can block Apple servers from verifying your device. Refreshing your connection helps re-establish secure communication and can make the device list visible again. Try the following methods:
Check Wi-Fi Connection:
- Open “Settings” > “Wi-Fi.”
- Reconnect to a stable network.
Alt-text: check the wifi
Toggle Airplane Mode:
- Swipe down Control Center.
- Activate Airplane Mode. Wait for 10 seconds and disable it.
Reset Network Settings:
- Open “Settings. Go to “General” > “Transfer or Reset iPhone.”
- Tap “Reset.” Then, choose “Reset Network Settings.”
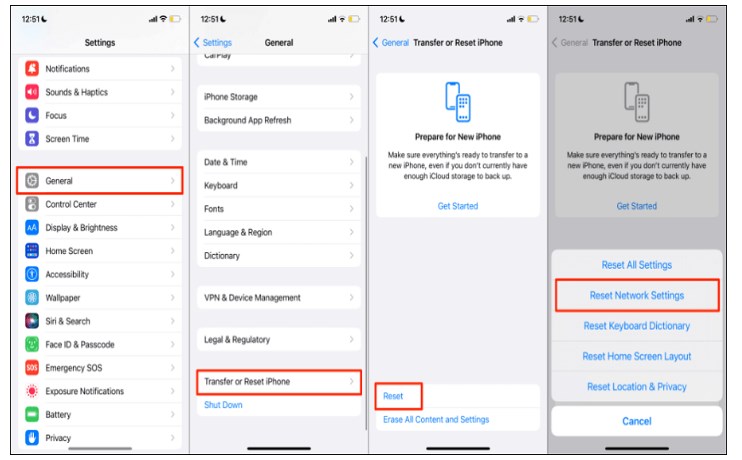
Reset Network Settings
Fix 2. Restart iPhone
If the trusted devices list is still not available, restarting your iPhone can help. A simple reboot refreshes the system and clears temporary glitches that may be causing the issue. To restart your iPhone:
For iPhone X or later:
- Press and hold the Side + Volume buttons.
- Slide to power off.
- Then hold the Side button to restart.
For iPhone 6 – 8, SE (2nd/3rd gen):
- Hold the Side button.
- Slide to power off.
- Press the Side button again.
For iPhone SE (1st gen) or earlier:
- Hold the Top button.
- Slide to power off. Then restart.
Fix 3. Enable Two-factor Authentication
The “Trusted Devices List Not Available” error often appears when Two-Factor Authentication (2FA) is disabled. Without 2FA, Apple does not generate or display a list of trusted devices, since there is no need to send verification codes. To resolve this, enable 2FA on your iPhone:
Step 1. Open Settings and tap your Apple ID name at the top.
Step 2. Go to Sign-in & Security (or Password & Security on older iOS versions).
Step 3. Tap Turn On Two-Factor Authentication. Once enabled, your trusted devices list should reappear as Apple links your devices to 2FA verification.
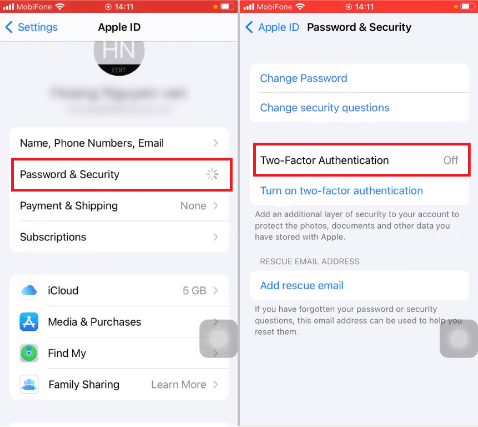
Tap Two-Factor Authentication
Fix 4. Check Apple ID via Another Device
Sometimes, the error “Trusted Devices List Is Not Available” is caused by a temporary glitch on your iPhone rather than an issue with your Apple ID itself. To confirm whether the problem is device-specific, you can check the trusted devices list from another Apple device. Steps to check on another device:
Step 1. On a different iPhone, iPad, or Mac, open Settings (or System Settings on macOS).
Step 2. Tap your Apple ID name. Scroll down to view the list of trusted devices.
- If the list appears: The issue lies with your original iPhone, and you can focus on troubleshooting that device.
- If the list is still unavailable: The problem is likely with your Apple ID or Apple’s servers, not the iPhone.
Fix 5. Re-sign Apple ID
Sync errors with your Apple ID may also prevent the trusted devices list from loading. Signing out and back in forces a fresh connection to Apple’s servers, which often restores the list. Here are steps:
Step 1. Go to “Settings” > Apple ID name.
Step 2. Tap “Sign Out.” Enter your Apple ID password.
Step 3. Tap “Turn Off” at the top.
Step 4. Restart iPhone. Then sign in to your Apple ID again.
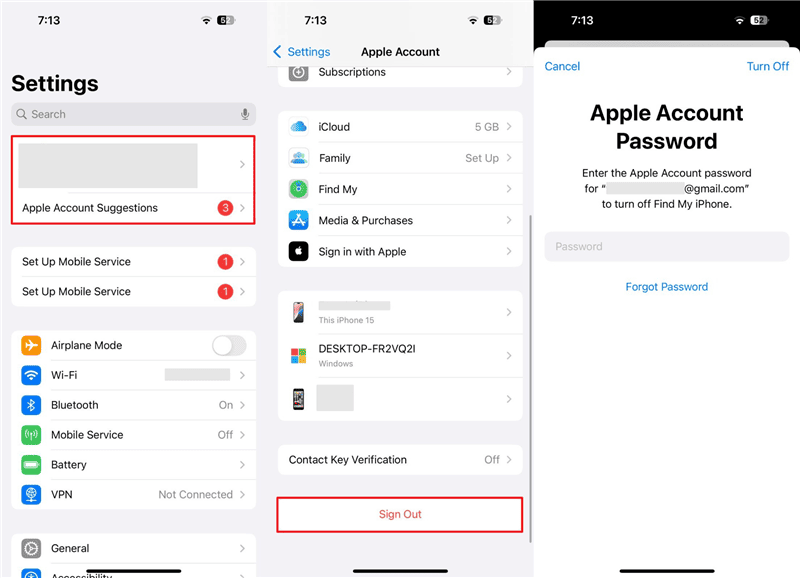
Sign Out Apple ID & Back In
Fix 6. Sign Out of Apple ID Without Password
If you’ve forgotten Apple ID password, AnyUnlock offers a secure solution by removing your Apple ID without requiring a password. When Find My iPhone is turned off, it can complete the sign-out without erasing data, and it works across all iOS devices running iOS 5 or later, making it a reliable way to restore access and sync your trusted devices. Beyond this, AnyUnlock also helps you bypass iPhone screen passcodes, disable Screen Time, manage iTunes backup passwords, and export iPhone passwords, giving you an all-in-one iOS unlocking toolkit.
Main Features of AnyUnlock:
- Remove Apple ID without a password to refresh the trusted devices list.
- Keep all files safe without data loss when Find My iPhone is turned off.
- Bypass complicated Apple ID and lock screen issues in just a few clicks.
- Also supports bypassing iPhone screen locks, unlocking screen time passcode, etc.
Free Download * 100% Clean & Safe
Steps to Remove Apple ID Without a Password:
Step 1. Download and install AnyUnlock on your computer. Launch it and select “Unlock Apple ID.”
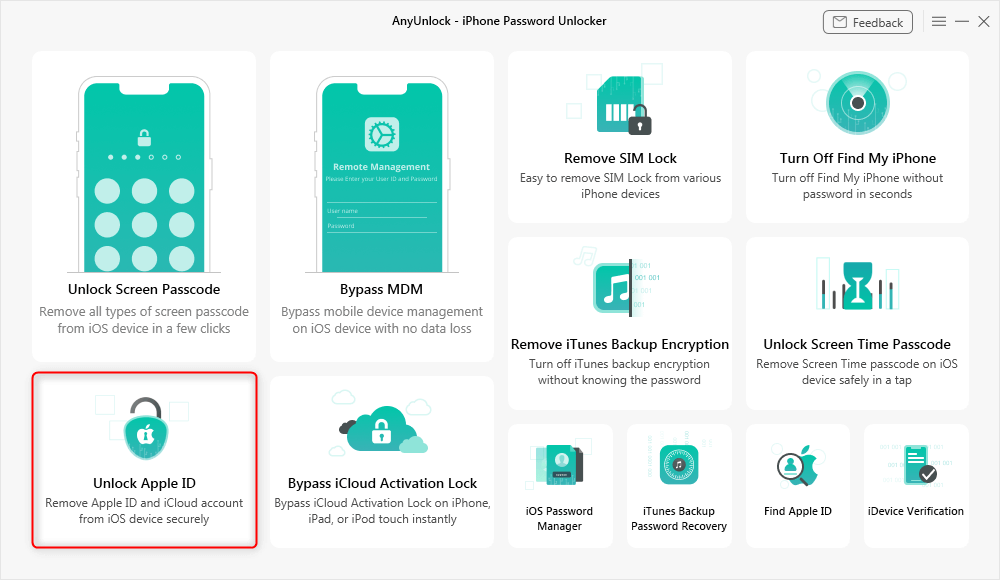
Click Unlock Apple ID from the Homepage
Step 2. Select “Start Now” from the next window. Then, link your iOS phone to the computer via a USB connection. Once it’s detected, click “Unlock Now.”
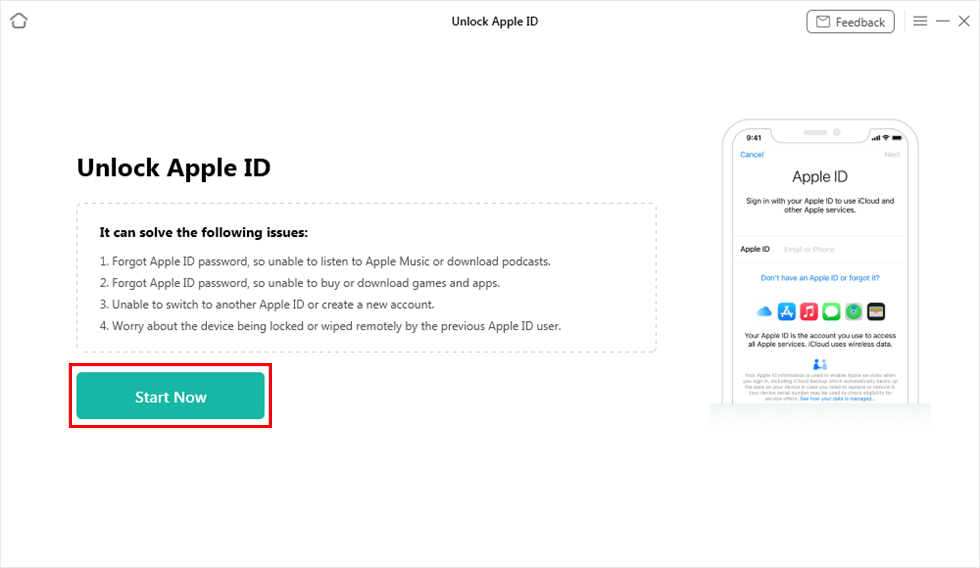
Click on Start Now Button
Step 3. AnyUnlock will start removing your Apple ID. Once completed, you will see Apple ID removed successfully on your screen.
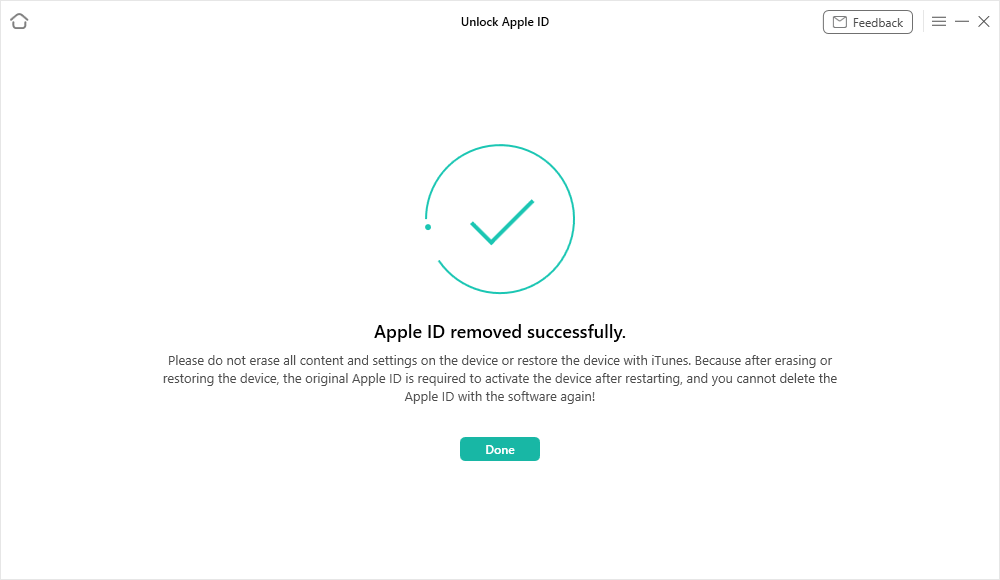
Apple ID Removed Successfully
Fix 7. Update iOS Version
An outdated iOS version can interfere with Apple ID services. As a result, the trusted devices list won’t load properly. Updating the software can fix the problem.
Step 1. Open “Settings.” Go to “General” > “Software Update.”
Step 2. Check if updates are available. Then, tap “Download and Install.”
Fix 8. Reset All Settings on iPhone
Misconfigured settings on your device can also interfere with your Apple ID. If you don’t know the exact cause, resetting all settings can resolve the issue.
Step 1. Go to “Settings” > “General.” Then, select “Transfer or Reset iPhone.”
Step 2. Tap “Reset” > “Reset All Settings.”
Step 3. Enter your passcode. Tap “Reset All Settings.”
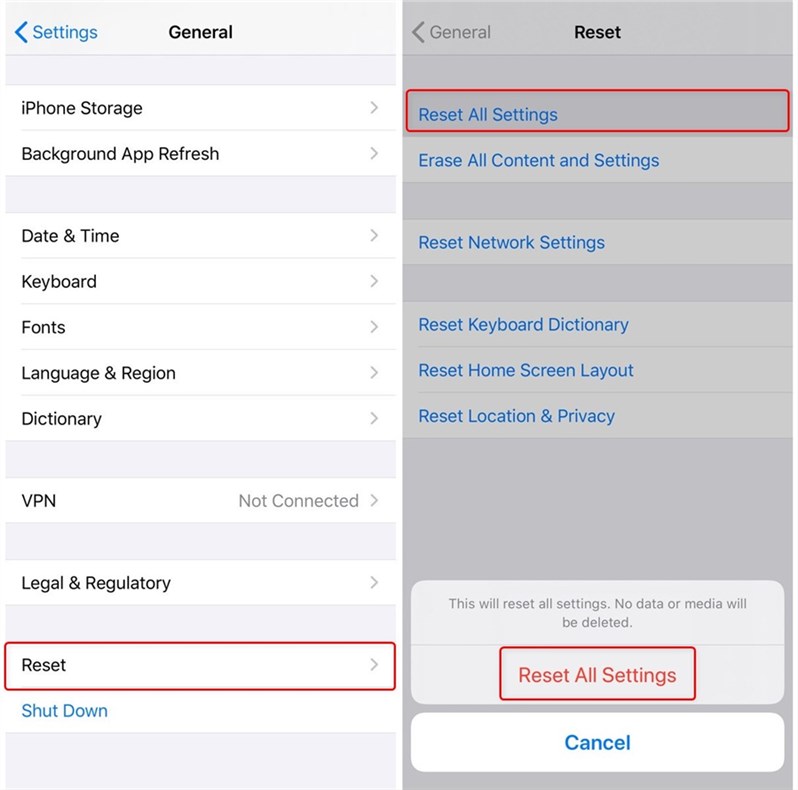
Reset All Settings
Fix 9. Factory Reset Apple Device
If the trusted devices list is not available even now, try factory resetting your device. It will erase data and remove hidden issues that are causing the problem.
Step 1. Open iPhone “Settings.” Tap “General” > “Transfer or Reset iPhone.”
Step 2. Choose “Erase All Content and Settings.” Then follow the instructions.
Fix 10. Use Apple Account Recovery
It’s possible that the trusted devices list is erased permanently. In this case, use Apple Account Recovery instead. It will help you verify your identity directly with Apple. And you won’t need to use a trusted device for this purpose. You can start account recovery via Apple iForgot website.
FAQs about Trusted Devices List Is Not Available Error
Q1. What to do if you no longer have access to trusted devices for Apple ID?
If you no longer have access to trusted devices, go to Apple iForgot website and start Apple Account Recovery. Then update your trusted phone number and wait for Apple to recover your account.
Q2. How to enable trusted devices on iPhone?
To activate trusted devices on your iPhone, enable trusted devices by turning on Two-Factor Authentication in Settings, adding a trusted phone number, and verifying it with the code.
Q3. How do I reset Apple Trusted Devices?
To reset trusted devices, sign in to the Apple ID website. Select unneeded devices under “Account Security” and click “Remove from Account.” Then, re-sign in to your Apple ID on your device to refresh the trusted list.
Q4. How to fix trusted devices list is not available iPhone 13?
If the trusted devices list is not visible on your iPhone 13, make sure you’re connected to a stable WiFi. Then re-sign in to your Apple ID. Otherwise, use Apple Account Recovery if the list is deleted permanently.
Q5. How to fix trusted devices list is not available iPad?
On your iPad, check your Wi-Fi connection and make sure iPadOS is updated. If the error continues, re-sign in to your Apple ID to refresh the trusted devices list.
Conclusion
When the trusted devices list is not available, it can be unsettling. Fortunately, these ten fixes mentioned above can help you resolve the error and ensure your Apple account stays in your control. If you cannot sign out of your Apple ID due to a forgotten password, AnyUnlock can help you. It can remove the ID without a password in a few easy steps. Download and try it now!
Free Download * 100% Clean & Safe

Joy Taylor is a seasoned technical writer with over a decade of experience in mobile technology. At iMobie, she specializes in producing in-depth content on iOS data recovery, iPhone unlocking solutions, and iOS troubleshooting.
Product-related questions? Contact Our Support Team to Get Quick Solution >
