Adding Location on Snapchat in 2026: A Guide for iPhone and Android
Having trouble adding a location on Snapchat? This 2026 guide shows how to properly tag your snaps, troubleshoot missing location stickers, and adjust settings to control how your location is shared while keeping your privacy in check.
You snap a great photo at a coffee shop or a concert, open the sticker drawer to tag the venue, and find that the location sticker is completely missing. If you have ever assumed this was a random bug or felt frustrated by outdated guides that no longer match the current interface, you are not alone.
Snapchat updates frequently, and recent UI changes have left many users confused about how to tag their current whereabouts, why their location filters are absent, and how to safely control who can see their geographic data. Whether you want to add a location to a brand-new photo, tag a venue on a video you took last night, or simply ensure your privacy settings are locked down, this 2026 guide provides tested, working solutions. We will explain exactly how to manage your location natively on your device before diving into advanced options.

How to Put Location on Snapchat Story Natively
Adding a location to your Snapchat Story is the most straightforward way to share where a photo or video was taken without broadcasting your continuous movements to your entire friends list.
Provided your location services are active, the interface is nearly identical across modern iOS and Android operating systems. Here are the exact steps to tag a location, whether you are taking a new photo right now or uploading one from last weekend.
Adding a Location to a New Photo or Video
1.Capture Your Content: Open the camera interface and take a photo or record a short video.
2.Open the Sticker Drawer: Locate and tap the square sticker icon (it looks like a sticky note with a folded corner) situated on the right-side vertical tool menu.
3.Select the Location Tool: Tap the sticker clearly labeled “Location.”
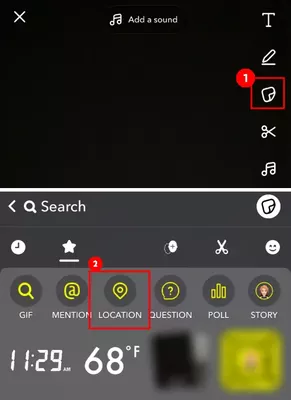
4.Search for Your Venue: The app will present a list of nearby places based on your current GPS data. If your exact business or landmark is not immediately visible, type the venue’s name into the search bar at the top of the screen.
5.Place and Adjust the Sticker: Tap the correct location name from the list. The sticker will appear on your draft. You can use a pinching motion to resize the graphic, tap it to change its visual style, or drag it to your preferred position on the screen before posting it to your Story.
Adding a Location to an Existing Snap (Camera Roll or Memories)
A common frustration is figuring out how to tag a venue on a photo you already took hours or days ago. Here is how to do it:
1.Access Your Media: From the main camera screen, swipe up to open your Memories, or tap the “Camera Roll” tab to view the photos saved on your phone.
2.Select the Photo: Tap the specific photo or video you want to upload.
3.Enter Edit Mode: Tap the pencil icon in the bottom left corner, or press and hold the screen and select “Edit Snap” from the pop-up menu.
4.Add the Sticker: Tap the square sticker icon on the right menu and select “Location.”
5.Choose the Venue: Note: If your original photo has metadata attached, the app will often suggest locations based on where the photo was originally taken. If it does not, it will suggest locations based on your current physical whereabouts. Type the name of the venue you visited into the search bar and select it.
What if the Business Isn’t Listed?
Sometimes, you might search for a new, local, or obscure business, and it simply does not appear in the search results. If you cannot find the venue, scroll to the very bottom of the location search results. You will see an option labeled “Suggest a Place.” Tapping this allows you to input the name of the business and its category, submitting it to the platform’s mapping system for future inclusion.
Snapchat Location Sticker Missing? The Expert Fix for App Permissions
If you open the sticker drawer and the location option is completely absent, it is incredibly common to assume the app is broken. However, expert analysis reveals a specific root cause: the sticker is almost always missing because your phone is only providing “Approximate Location” data to the app.
Snapchat relies on high-accuracy location data to surface relevant stickers and custom geofilters. If your device is restricting this data, the platform cannot determine nearby venues accurately, causing the sticker to vanish entirely. To fix this, you must adjust your core system permissions.
Fix App Permissions iPhone
If you use an Apple device (iOS 16, 17, or 18), adjust your settings with this procedure:
1.Open your iPhone’s main Settings application.
2.Scroll down through your installed app list and tap Snapchat.
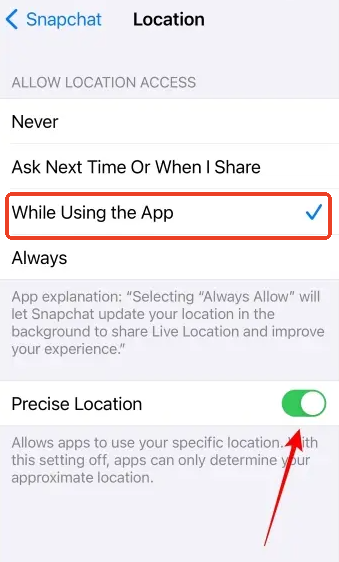
3.Tap the Location menu.
4.Select While Using the App.
5.Crucial Step: Ensure the Precise Location toggle switch is turned on (it will appear green). If this is off, your sticker will not appear.
Fix Android Location Settings
If you are using a Samsung Galaxy, Google Pixel, or another Android device, update your location settings by following these steps:
1.Open your device Settings and tap on Apps (or Apps & Notifications).
2.Locate and select Snapchat from the application list.
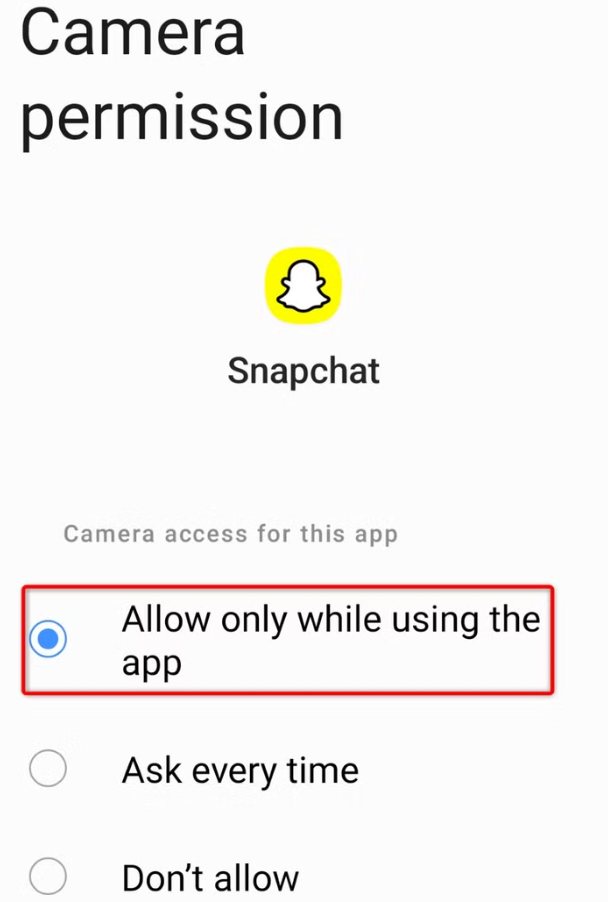
3.Tap on Permissions, followed by Location.
4.Choose the option labeled Allow only while using the app.
Crucial Step: Ensure the toggle for Use precise location is switched on.
Real-World Troubleshooting: Overcoming Friction
Sometimes, simply flipping the “Precise Location” toggle is not enough to immediately bring the sticker back. If you have updated your settings and the sticker is still missing, follow these friction-busting steps:
- Force-Quit the App: Do not just minimize the application. Swipe up from the bottom of your screen and swipe the app away entirely to close it.
- Force a GPS Ping: Toggle your phone’s Wi-Fi off and back on. Even if you are not connecting to a network, turning on Wi-Fi assists your phone’s internal GPS in triangulating your exact coordinates more quickly.
- Reopen the App: Open the camera, take a test photo, and check the sticker drawer again. The menu should now be refreshed with the location option restored.
Snap Map vs. Location Stickers: Managing Snapchat Privacy Settings
Understanding your privacy settings is critical for managing your digital footprint. Users frequently confuse static story tags with dynamic mapping features, leading to anxiety about who is monitoring their movements.
A location sticker is static. It adds text to a single photo or video on your Story. It only updates when you consciously post a new piece of content.
The Snap Map, however, is dynamic. It continuously updates your Bitmoji’s location in the background whenever the application is open, allowing approved contacts to view your real-time whereabouts. If you want to share live data, the Snap Map is great, but it requires active privacy management.
You May Also Like:How Often Does Snapchat Location Update? The Real Answer>
Configuring Ghost Mode
If you wish to stop broadcasting your live coordinates to friends, you need to enable Ghost Mode.
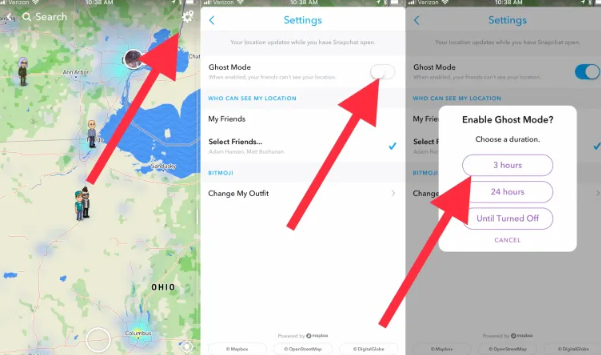
1.Open the application and tap the Map icon located at the bottom left of the camera screen.
2.Tap the Settings gear icon in the top right corner of the Map interface.
3.Toggle Ghost Mode to the active position.
4.The system will prompt you to enable it for 3 hours, 24 hours, or Until Turned Off. Activating Ghost Mode immediately removes your Bitmoji from the maps of your friends.
Ghost Mode only applies to the dynamic Snap Map. Ghost Mode does NOT hide static location stickers you post to your Story. If you are in Ghost Mode but post a photo with a location sticker of a local restaurant, anyone who can view your Story will still know exactly where you are.
Advanced Tools: Safely Sharing a Custom Location
For the vast majority of users, the native tools described above will completely solve your location tagging needs. However, there are times when users need to safely modify their geographic data—whether to access geo-restricted content from another country, apply a custom global geofilter, or protect their privacy from aggressive tracking algorithms.
Before downloading any software, review this quick comparison to ensure you choose the right solution for your needs:
| Feature/Method | Success Rate | Technical Skill | Best Used For |
| Native Location Sticker | High | Low | Tagging specific, real-world venues on a Story draft. |
| Native Snap Map | High | Low | Sharing your live, ongoing location with friends. |
| Fonelora Location Changer | Very High | Medium | Spoofing GPS to protect privacy or accessing international global filters. |
Using Fonelora Location Changer
If you need to change your coordinates to a different city or country, you cannot do this natively within the app. You will need a professional desktop tool like Fonelora Location Changer. This software masks your actual whereabouts without requiring a jailbreak on iOS or rooting on Android.
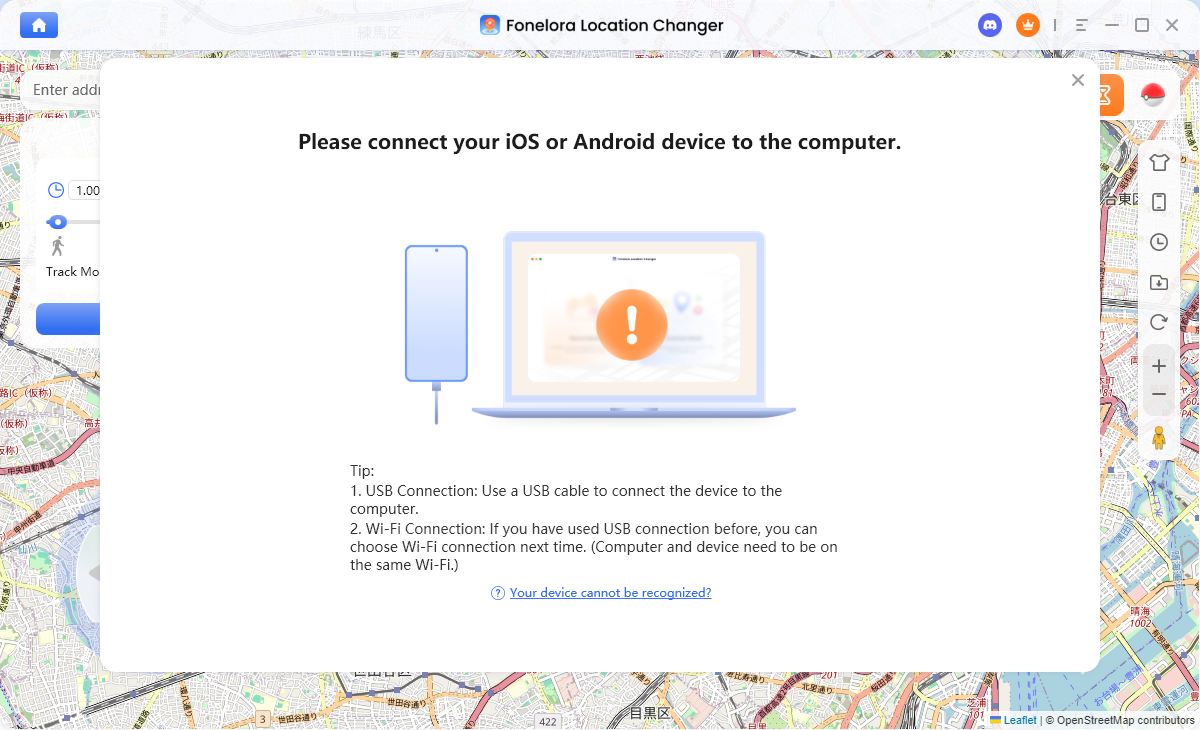
1.Connect Your Device: Download the Fonelora Location Changer on your Windows or Mac computer. Connect your smartphone via a USB cable.
2.Choose Teleport Mode: Select “Teleport Mode” from the main interface.
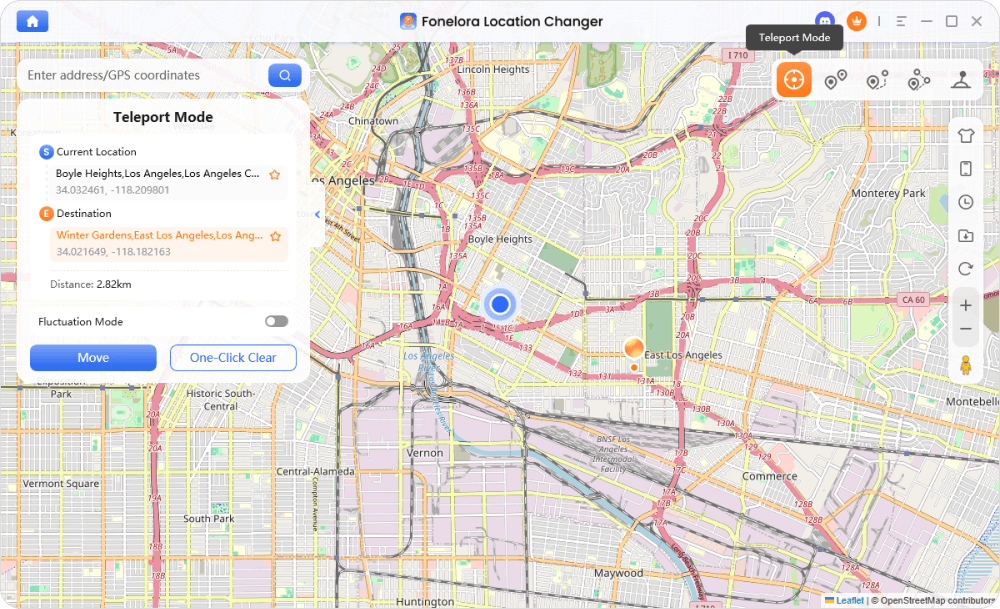
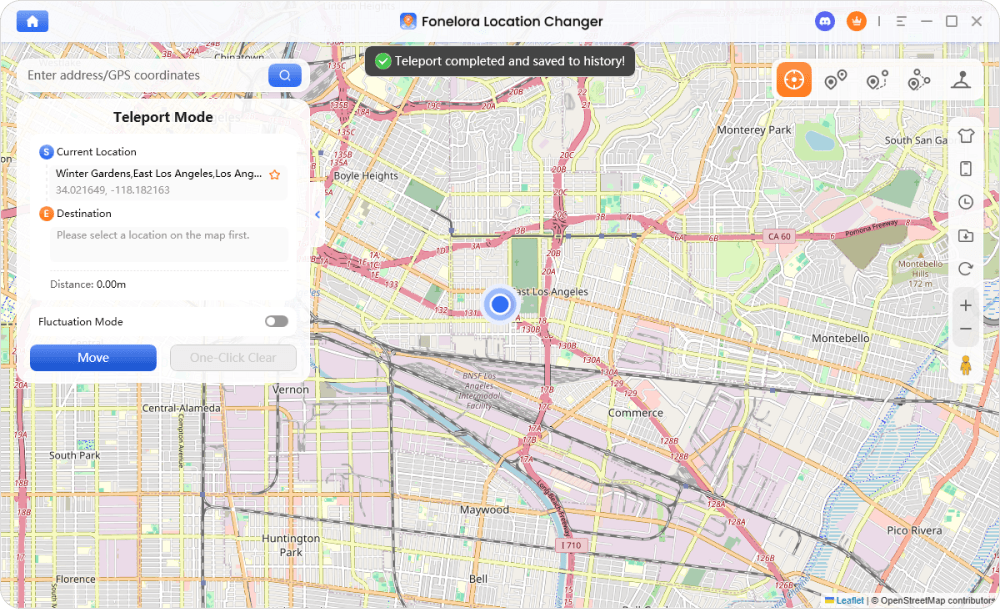
3.Change Your Location: Type your desired destination into the search bar and click “Move.” Your phone’s core system coordinates will update. When you open the sticker drawer on your phone, you will now see options for the new city you selected.
Frequently Asked Questions About Snapchat Locations
How do I add a location to an existing photo from my Camera Roll?
Swipe up from the camera screen to access Memories or your Camera Roll. Select your photo, tap the edit (pencil) icon, and open the sticker drawer. Tap the Location sticker. You can then search for the venue.
Why can’t I see the location sticker at all?
If the sticker is missing, your device is likely restricting precise geographic data. Go into your phone’s central settings (iOS or Android), find the app permissions, and ensure the “Precise Location” toggle is switched on. Afterward, force-quit and reopen the app.
How do I suggest a new business location if it isn’t listed?
When searching for a venue in the location sticker menu, scroll all the way to the bottom of the search results. Tap the “Suggest a Place” button to submit the business name and category to the mapping system.
What is the difference between Snap Map and a location sticker?
The Snap Map broadcasts your live, real-time Bitmoji location continuously whenever the app is open on your screen. A location sticker is a static graphic applied to a single photo or video that does not track your ongoing movements.
Who can see my location on Snapchat?
For location stickers, anyone who has permission to view your Story can see the tag. For the Snap Map, you can customize visibility in the Map Settings to “My Friends,” “Only These Friends…,” or activate Ghost Mode so nobody can see your live location.
How do I turn off live location sharing?
Open the Snap Map, tap the Settings gear icon in the top right corner, and toggle “Ghost Mode” on. This immediately hides your real-time location from all contacts. Remember, this does not hide static stickers you manually place on your Stories.
Why is my Snapchat location wrong or not updating?
Inaccurate locations are usually caused by weak GPS signals. Ensure your Wi-Fi is turned on (which assists with GPS triangulation even if you aren’t connected to a network), verify Location Services are active, and confirm “Precise Location” is enabled.
Can I add a custom location from another city?
Natively, you can only tag venues near your current physical coordinates. To add a custom location from a different state or country, you must use a professional GPS modification tool like Fonelora Location Changer to alter your device’s system coordinates before opening the mobile app.
Does Snapchat show my exact location to strangers?
No, the platform defaults to privacy regarding strangers. If you have “Precise Location” enabled and are visible on the Snap Map, the application will only display your exact location to the specific friends you have approved in your settings.
Can I share my live location with just one specific friend?
Yes. Open a direct chat with a specific friend, tap their profile name, and select “Share My Live Location.” You can set a duration (e.g., 15 minutes, 1 hour, or 8 hours). This is incredibly helpful for safety during meetups without broadcasting to your entire map.
Conclusion
Opening your app only to discover you cannot find the location sticker is a frustrating experience, especially when navigating constantly changing user interfaces. By verifying your device’s app permissions and ensuring “Precise Location” is enabled, you can quickly solve the mystery of the missing sticker. Whether you need to tag a brand-new photo, add context to a memory from your camera roll, or simply secure your privacy by enabling Ghost Mode, you now have the exact steps to manage your geographic data.
More Related Articles

Joy Taylor is a seasoned technical writer with over a decade of experience in mobile technology. At iMobie, she specializes in producing in-depth content on iOS data recovery, iPhone unlocking solutions, and iOS troubleshooting.
Product-related questions? Contact Our Support Team to Get Quick Solution >
