Imagine settling in to play a nostalgic favorite like Pokémon Platinum on your phone, only to be hit with a harsh error message: “Missing DS BIOS files (bios7.bin, bios9.bin, firmware.bin).”
Instead of jumping into gameplay, you are blocked. Searching online for a “bios7 bin download” often leads to sketchy ROM websites, endless fear of downloading malware, and pure confusion about which files your emulator actually needs. You don’t need generic advice; you need your games to run.
This guide cuts through the noise. Below, you will find the exact hardware dumping steps to legally obtain your files, the correct file sizes to prevent instant crashes, and the specific terminal commands to verify you haven’t downloaded malware. Let’s bypass the “invalid file” errors and get your emulator running.
Table of ContentsHide
Sourcing Your DS BIOS Files Safely
Before setting up your emulator, you need the files. Users face a clear choice: legally extracting the files from their own physical hardware, or searching the web for an unofficial download.
Method 1: Hardware Dumping (The Verified Safe Method)
Extracting the firmware from your own legally purchased console is the only reliable, legal, and community-endorsed method to get your bios7.bin file. It guarantees 100% compatibility and zero risk of malware.
What you need:
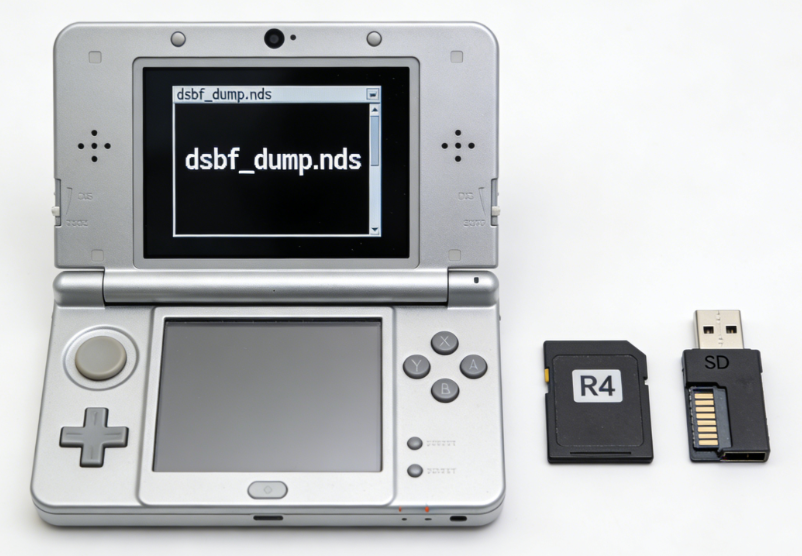
- Original Nintendo DS: An original Nintendo DS or DS Lite console.
- Compatible Flashcart: A flashcart such as an R4 card.
- MicroSD and SD Reader: A MicroSD card and an SD card reader for your computer.
- Homebrew Tool: The open-source tool
dsbf_dump.nds, available on reliable homebrew archives or GitHub.
How to extract your BIOS files:
- Insert MicroSD Card: Plug your MicroSD card into your computer.
- Copy Tool to Card: Download
dsbf_dump.ndsand copy it to the root directory of the MicroSD card. - Prepare the Console: Insert the MicroSD card into your R4 flashcart, then place the flashcart into your Nintendo DS.
- Launch Flashcart Menu: Turn on the DS and open the flashcart menu.
- Run Extraction Tool: Select and run
dsbf_dump.nds. - Complete Extraction: Wait for the process to finish, then power off the DS.
- Retrieve Files: Remove the MicroSD card, reconnect it to your computer, and check the root folder for
bios7.bin,bios9.bin, andfirmware.bin.
Method 2: Online Sourcing (High Risk)
Many users instinctively search for DS BIOS files on Google. While this takes only seconds, it introduces critical vulnerabilities to your system.
🚨 WARNING: THE DANGERS OF UNOFFICIAL DOWNLOADS
Unofficial ROM sites frequently bundle deceptive advertisements, intrusive .exe files, or outright malware alongside supposedly legitimate BIOS files.
Furthermore, many of the .bin files available on these sites are often corrupted, incorrectly named, or may belong to entirely different console architectures (such as the Game Boy Advance).
If you choose to source files online, you must verify their exact byte size and cryptographic checksums before allowing your emulator to read them, as detailed in the troubleshooting section below.
Step-by-Step Emulator Setup
Once you have your three verified files, you need to import them. Emulators handle BIOS directories differently. Delta is streamlined for mobile, melonDS requires high accuracy, and DeSmuME offers vast customization. Here is exactly how to set up the most popular environments.
How to Add BIOS Files to Delta (iOS 16–18)
Getting files onto an iPhone trips up many users. You cannot simply plug it in and drag files into the app. Here is the easiest transfer method using iCloud Drive.
Transferring the files to your iPhone:
- Upload to iCloud Drive: On your computer, open a browser, log into iCloud.com, and access iCloud Drive.
- Create Folder and Upload Files: Create a folder named “DS BIOS” and upload your three .bin files.
- Download on iPhone: On your iPhone, open the Files app, go to iCloud Drive > DS BIOS, and tap the cloud icon to download the files locally.
Configuring Delta:
- Open Delta Settings: Open the Delta app and tap the Settings gear icon in the top left.
- Access Core Settings: Scroll to the Core Settings section and tap “Nintendo DS”.
- Locate BIOS Slots: Under the DS BIOS Files section, find slots for
bios7.bin,bios9.bin, andfirmware.bin. - Import BIOS Files: Tap
bios7.bin, navigate to your “DS BIOS” folder in the Files app, and select the file. - Repeat for Remaining Files: Import
bios9.binandfirmware.binusing the same method. - Verify Setup: Once all three slots display checkmarks, your Delta setup is complete.
Setting Up melonDS (Windows/macOS)
melonDS is highly regarded for its Wi-Fi emulation and high accuracy, but it refuses to boot without BIOS files.
- Create BIOS Folder: Create a folder named “Emulator BIOS” on your computer and place your three extracted files inside.
- Open Emulator: Launch melonDS.
- Access Settings: In the top menu bar, go to Config > Emu settings.
- Open DS Mode Tab: Click on the DS-mode tab.
- Link BIOS Files: Use the Browse buttons to locate and assign
bios9.bin(ARM9 BIOS),bios7.bin(ARM7 BIOS), andfirmware.bin(Firmware). - Confirm Setup: Click OK. The emulator is now ready to launch games.
Setting Up DeSmuME (Windows/macOS)
DeSmuME can sometimes boot games without external BIOS files by simulating them, but providing the real files drastically improves game compatibility and audio quality.
- Open Emulation Settings: Open DeSmuME and go to Config > Emulation Settings.
- Enable External BIOS: Check the option “Use external BIOS images”.
- Select BIOS Files: Click the folder icons next to ARM9 and ARM7 to choose
bios9.binandbios7.bin. - Apply Changes: Click OK, then restart the emulator to ensure the settings take effect.
Learn More:If You Delete Life360 Does It Still Track You? The Real Answer >
Understanding the Architecture: Why Do I Need These Files?
To understand why your touch screen won’t work or why your audio is glitching, it helps to know how the original Nintendo DS functions. The console uses a unique dual-processor architecture: an ARM9 processor and an ARM7 processor.
The bios7.bin file is the Basic Input/Output System for the ARM7 chip. On the physical console, this chip handles critical background tasks. It manages the device’s audio output, processes Wi-Fi connectivity, and most importantly, reads the sensitive inputs from the bottom touchscreen.
Conversely, the bios9.bin file powers the ARM9 chip, which handles the main game logic and 3D graphics rendering. Finally, the firmware.bin acts as the console’s internal operating system, storing persistent data like your username, preferred language, and the clock.
Emulators cannot legally bundle this proprietary Nintendo code. If you don’t provide the bios7.bin file, the emulator literally lacks the programming required to generate sound or register your screen taps.
Learn More:How to Spoof Find My iPhone: A Guide to Real Privacy Control >
Advanced Troubleshooting: Verifying Corrupted Files
If your emulator still says “Invalid BIOS file” even after importing exactly what you thought was a bios7.bin file, the file is likely corrupted or modified.
To definitively prove if your file is legitimate, you need to check its cryptographic checksum—a unique digital fingerprint. If your file’s fingerprint doesn’t match the known original hardware fingerprint, the emulator will reject it.
Here is exactly how to check the MD5 hash of your file using your computer’s built-in terminal tools.
For Windows Users:
- Open Command Prompt: Open the Start menu, type
cmd, and press Enter. - Prepare Hash Command: Type
certutil -hashfile(include the space at the end) but do not press Enter yet. - Insert File Path: Drag and drop your
bios7.binfile into the Command Prompt window to automatically paste its path. - Specify Hash Type: Type
MD5at the end of the line and press Enter. - Read Output: The terminal will display a string of numbers and letters representing the file’s MD5 hash.
For Mac Users:
- Open Terminal: Press Cmd + Space, type
Terminal, and hit Enter. - Prepare MD5 Command: Type
md5followed by a space, but do not press Enter yet. - Insert File Path: Drag and drop your
bios7.binfile into the Terminal window. - Run Command: Press Enter to execute the MD5 hash calculation.
The Results:
A genuine, uncorrupted bios7.bin file will output this exact MD5 hash:
df692a80aebb1df6504ce350af961bc4
If your hash is completely different, your file is broken, tampered with, or a virus in disguise. Delete it immediately and perform a proper hardware dump.
🚨 WARNING: HIDDEN ZIP FILES
Ensure your operating system is not hiding known file extensions. A common mistake is downloading a compressed archive (like bios.zip) and renaming it to bios7.bin without actually extracting it.
Emulators cannot read zipped files as BIOS files. They must be extracted as raw .bin files.
Alternative Tool for Location-Based Apps
If you’re experiencing recurring location-related issues while using GPS-based apps, it may be worth trying a dedicated location-changing solution instead of relying on complex configurations.
FoneLora Location Changer allows users to change their GPS location on iOS and Android devices with just a few clicks. It supports virtual location changes, route simulation, and customized movement settings, helping users manage location-based apps more easily and reduce common GPS-related problems.

Frequently Asked Questions
- Why does my emulator still say the BIOS is missing?
- If the error persists after importing, the file is either corrupted (check the 16 KB size and MD5 hash), placed in the wrong directory, or misnamed. Ensure the file is unzipped and named exactly bios7.bin in all lowercase letters.
- Do I absolutely need bios9.bin and firmware.bin too?
- Yes. You cannot run commercial games properly with only one file. The emulator requires all three files to accurately replicate the original console’s dual-processor architecture and boot sequence.
- Can I just rename a text file or random .bin file to bios7.bin?
- No. Emulators scan the internal byte structure of the file, not just the name. If it lacks the exact ARM7 processor instructions, the emulator will crash.
- Is downloading DS BIOS files legal?
- Downloading proprietary BIOS files from unofficial internet archives is a violation of copyright law in most jurisdictions. The legally accepted standard is extracting (dumping) the firmware from a physical console that you legally own using homebrew software.
Conclusion
The Bios7.bin error can usually be fixed by downloading the correct file version, placing it in the proper directory, and ensuring that your emulator or location-based app is correctly configured. Following the troubleshooting steps above should help resolve most issues quickly.
If you frequently use location-based apps and want a simpler way to manage GPS settings, FoneLora Location Changer is also worth considering. It offers an easy way to change and customize your device’s location, helping create a smoother experience across many GPS-dependent applications.


Hot Topics
