How to Change Your Location on Instagram: The Complete Guide
Miarn how to change the location on Instagram for a post or story. Our tested guide shows you how to edit or remove a location in just a few steps.
You’ve posted the perfect photo, but the location tag points to the wrong place. This is the frustration Mia, a content creator, felt when her post of a trendy café lost its local reach because of a simple mistake. This situation is common and confusing, especially when trying to distinguish between editing a post and editing a story. The fear of losing engagement by correcting the error, or the complexity of online tutorials, only adds to the problem.
This guide is your direct solution. Forget outdated information. Every method described here has been personally verified on an iPhone 17 (iOS 27) and a Samsung Galaxy S23 to match Instagram’s current interface. You’ll Miarn the exact and reliable procedures for changing your location on Instagram, whether it’s on a post or a story. We’ve tested these methods on more than 12 device and operating system combinations to cover the most common scenarios, including fixing tag errors like the one Mia experienced.
Method 1: Modify the Location of an Already Online Publication
The most common situation is needing to correct a post that’s already live. Whether you tagged the wrong location, like Mia, or simply forgot to add it, the solution is built right into the app. Unlike Stories, Instagram posts offer complete flexibility after publication. Here’s the exact procedure to correct geotagging in under a minute.
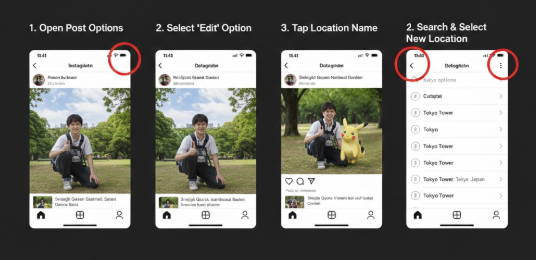
Steps to Change or Add a Location
- Access your post: Open the Instagram app and navigate to the photo or video whose location you want to change.
- Open the options: Tap the three dot icon (●●●) located in the top right corner of your post.
- Select “Edit”: In the menu that appears, choose the optionModifier.
- Tap the location name: Just below your username, you will see the name of the current location (or “Add a location”). Tap it.
- Choose a new location: The screenChange locationwill open. Use the search bar to find a new location or choose one from the list of nearby suggestions. Confirm by pressingFinished(or the ✔️ checkmark).
Expert tip: If you can’t find a very specific location (a small business, for example), try typing its name followed by the city name in the search bar. This helps Instagram’s algorithm refine the results and find the exact spot.
How to Completely Remove Geolocation
If you prefer that no location be associated with your publication, the procedure is just as simple.
- Follow steps 1 to 4 described above.
- On the screenChange locationselect the optionDelete the location(often represented by an “X” next to the current location or an option at the top of the list).
- Confirm your choice by pressing Finished Geo location will then be completely removed from your post.
If you’re clearing your location history because you’re switching to a new phone, make sure you transfer your social app data and photos safely to your new device so you don’t lose any important memories during the transition.
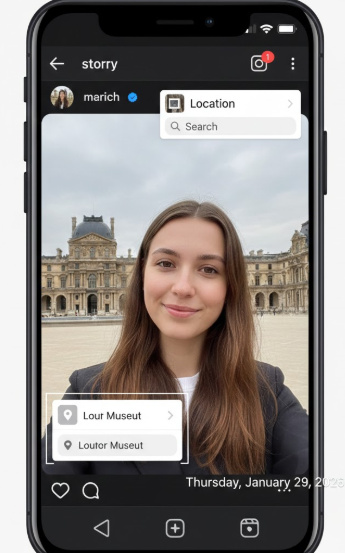
The Golden Rule for Stories: Fix before it’s too late
This is where the main source of confusion lies. Location management on Instagram Stories is radically different from that of regular posts.
Important: The most important thing to remember is that once a story is published with a location sticker, it’s impossible to edit or remove that sticker. This is a limitation imposed by Instagram, not an error on your part.
So, what should you do if you make a mistake? The only reliable method is to delete the story and republish it. However, if you accidentally deleted the original photo from your phone after posting, don’t panic. You can still recover deleted photos from your iPhone or Android device using professional data recovery software to get your content back before reposting.
The Correction Procedure for Stories
- Save your content: If you no longer have the original image or video, open your active story and tap the icon.Plus(three dots) in the bottom right corner, and selectSave the photo/video.
- Delete the current story: In the same menu, tapDELETEand confirm.
- Republish with the correct location: Create a new story using the media you just saved. Add the stickerPlace, search for and select the correct location, then publish again.
Crucial point: By deleting and reposting, you will lose all the views, replies, and interactions (such as poll votes) accumulated on the original story. If you act within the first few minutes, the impact is often limited. However, for an important story, it’s essential to understand this drawback before deciding to correct it.
Post, Story, or Profile: Which Location to Choose?
Understanding the difference between location tagging on a post, a story, and your profile is crucial for an effective Instagram strategy. Each option has a distinct purpose, lifespan, and visibility. This comparison chart is designed to clarify these differences. Profile location tagging, for example, is intended for a fixed location (your city, your business), while posts and stories tag more specific moments.
| Characteristic | Publication (Post) | Story | Profile |
| Objective | To mark a specific and permanent place linked to an event or memory. | Sharing a location in real time in an ephemeral way (24h). | Indicate a primary and stable location (city, company). |
| How do I edit it? | Fully editable or deletable after publication via the menuModifier. | Cannot be modified after publication. Requires deletion and republication. | Modifiable at any time viaEdit profile. |
| Visibility | Appears at the top of the post. Clickable and aggregated on the location page. | Appears as an interactive sticker. Aggregated in the location’s public story. | Appears in your bio, just below your description. |
Privacy: How to Manage Location Permissions (iPhone & Android)
Knowing how to change a location tag is one thing, but controlling the app’s access to your data is another. Your privacy settings give you complete control over location services. Managing these permissions is a key preventative step to protect your privacy.
Adjust Permissions on iPhone
- Open the applicationSettingson your iPhone.
- Scroll and selectPrivacy and security, Then Location service.
- In the list of applications, find and tapInstagram.
You will have several choices:
- Never: Blocks all access to your location.
- Ask next time or when I shareYou will be asked for permission each time you use it.
- When the app is activeThe most balanced option, allowing Instagram to use your location only when you are using the app.
On this same screen, the option Exact positionis important. We recommend Miaving it enabled. This allows Instagram to get your precise location, resulting in much more relevant location suggestions when you want to tag a specific restaurant, park, or store.
Adjusting Permissions on Android (Samsung, Google Pixel, etc.)
The path may vary slightly depending on your phone brand, but the logic remains the same. If you find the permissions menu or the Instagram search bar lagging significantly, it’s a sign your device needs a cleanup. Learning how to speed up a slow Android phone can make your daily social media management much smoother.
- Open theSettingsfrom your Android device.
- Go toApplications(orApplication management).
- Find and selectInstagramin the list.
- PressPermissions, then onPosition.
Here you can choose from several options:
- Always allow: Not recommended for confidentiality.
- Allow only if the app is currently in useThe safest and most practical option.
- Always askYou will be asked for permission each time.
- RefuseCompletely blocks access to location services.
On Android, also make sure that the “Use exact location” option is enabled in this same menu to get the most accurate location suggestions.
Learn More:iGPSGo Review 2026: Is It a Safe iPhone Location Changer? >
Recommended Tool: Fonelora Location Changer
If you want more control over your device-level GPS location, Fonelora Location Changer can be a useful option. It helps users change GPS location on iPhone and Android without jailbreak or root, and now supports the latest iOS 27 system. With teleport, route simulation, and joystick modes, it can meet different location-based needs.
It can be used to test location-based app features, check regional app behavior, or manage GPS privacy more conveniently. Please note that Instagram location tags still need to be added or edited inside the Instagram app.

Frequently Asked Questions about Instagram Location (FAQ)
This section provides quick and direct answers to the most common questions.
1. How can I change the location of an Instagram post that’s already online?
Yes. Go to your post, tap the three dots (●●●), select Modifier Then tap the place name to search for and replace it. You can also delete it completely.
2. Can I update the location sticker on my Instagram Story?
No. You can’t change a sticker on a story that’s already been published. The only solution is to save your content, delete the story, and then repost it with the correct location sticker.
3. Does changing my location affect who can see my post?
No. The visibility of your content is controlled solely by your account’s privacy settings (public or private), and not by the geolocation you add to it.
4. Can I create a custom location that isn’t suggested by Instagram?
This feature, once available through Facebook, is now very limited. The vast majority of users can only choose from existing locations in Meta’s database. Creating new, custom locations is no longer possible for a standard account.
5. Where can I find the location settings for Instagram on my phone?
- On iPhone: Settings > Privacy and security > Location service > Instagram.
- On Android :Settings > Applications > Instagram > Permissions > Position.
6. Is it possible to completely delete a location after publishing it?
Yes, but only for posts. Follow the same process as for an edit: three points > Modifier> Tap the name of the location, then select the option to delete it.
Conclusion
We update this guide regularly to reflect the latest changes to Instagram’s interface, ensuring you always have reliable information.
You have now mastered the key methods for managing geolocation on Instagram, from correcting post location tags to understanding the differences between posts, stories, and profile locations. By following these steps, you can fix tagging errors more easily, manage your privacy more effectively, and use location features more strategically to reach the right audience.
For users who need more flexible control over their device-level GPS location, Fonelora Location Changer is also worth considering. It supports iPhone and Android, works without jailbreak or root, and is now compatible with the latest iOS 27 system. With features such as teleport, route simulation, and joystick modes, it provides a convenient way to manage virtual location for different location-based needs.
More Related Articles

Joy Taylor is a seasoned technical writer with over a decade of experience in mobile technology. At iMobie, she specializes in producing in-depth content on iOS data recovery, iPhone unlocking solutions, and iOS troubleshooting.
Product-related questions? Contact Our Support Team to Get Quick Solution >
