You eagerly download a hiking trail document for an upcoming weekend trip, only to discover a major technical hurdle: Google Maps does not natively support direct GPX uploads. Facing an unreadable data format when you want to view your planned route acts as a frustrating barrier, turning valuable navigation data into a digital paperweight.
If you are struggling to visualize GPS tracks natively, you are not alone. The standard application interface frequently leaves outdoor enthusiasts guessing. The most reliable procedure requires a specific workaround: you must import the file into Google My Maps or convert the document into a KML format before uploading. By applying the tested tools outlined below, you can bypass these technical limitations, ensure your waypoints remain intact, and securely open your tracking files for any adventure.

CRITICAL WARNING: The Static Line Limitation
Before proceeding, you must understand a major limitation of this ecosystem. Google Maps on mobile will only show a custom My Maps route as a static line. It does not provide turn-by-turn voice navigation or route you actively along that drawn line. You must manually follow your blue GPS dot visually along the route. If you require live, turn-by-turn trail navigation, you should use dedicated backcountry applications like Gaia GPS or OnX.
You may also like: How to Track Family Members on Google Maps
Decision-Making Guide: Choosing Your Import Method
Before you attempt to parse your location data, evaluating your options saves time and prevents formatting errors. You generally have three main methods for handling mapping data. Each method varies heavily in its success rate, time cost, and technical skill requirement.
| Method | Success Rate | Time Cost | Technical Skill Needed | Best For |
| Google My Maps Integration | Very High | Low | Low | Everyday users need reliable, immediate map route imports for standard trail visualization. |
| Free Web Converters (e.g., GPS Visualizer) | High | Medium | Medium | Translating files with proprietary metadata or preparing raw coordinate data for seamless uploads. |
| Desktop GPS Software (e.g., Garmin BaseCamp) | High | Medium | High | Advanced users managing hundreds of files, needing strict waypoint customization, or merging tracks entirely offline. |
Integrated web methods offer a near-perfect success rate for a standard GPS route file and require minimal technical expertise. If you value your time and want a guaranteed outcome, the official Google My Maps integration provides the most efficient technique for your mapping needs.
The Core Solution: Google Maps Import via My Maps
Here is a critical expert insight that many basic tutorials miss: the standard mobile application lacks a native upload button for raw tracking data. You must import the document into a specialized desktop interface first. After completing this desktop upload, the map syncs to your account, allowing you to visualize the terrain and share the exact route with your hiking group.
Step-by-Step Desktop Procedure
To perform a successful file import, begin on a desktop or laptop computer. The desktop environment provides the necessary processing power and interface options to handle complex location data.
PRO TIP: Understanding Strict File Limits
Google My Maps enforces a strict 5MB file size limit and a maximum of 2,000 track-points per layer. Multi-day tracking files recorded at high frequencies regularly exceed these limits. If your upload fails, you will need to simplify the file using a tool like GPX Studio (detailed in the troubleshooting section below) to reduce the point count before uploading.
1. Access the Interface: Open your desktop web browser and navigate directly to the official Google My Maps website. Ensure you are logged into the exact account you use on your mobile smartphone.
2. Create the Canvas: Click the “Create a New Map” button located in the top left corner of the screen. This action opens a blank geographical canvas.
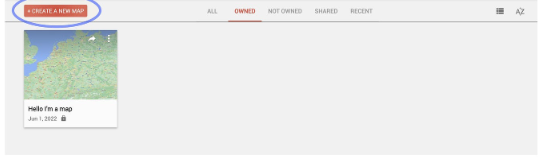
3. Locate the Import Tool: Look at the menu panel on the left side of your screen. Locate the section labeled “Untitled layer,” and click the small “Import” button directly beneath it.
4. Execute the Upload: A new dialog box will appear. Select your saved tracking document from your computer’s storage drive and confirm the upload.
Once the map route import finishes processing, your route visualization will appear automatically on the screen. The interface translates the raw XML code into a visible, colored line mapping your exact trajectory. You can then click on the map title to rename the project and customize the visual markers for easy identification later.
Mobile Users: Viewing Custom Maps on iPhone and Android
After completing the desktop import procedure, you need to know how to open your custom maps using your smartphone. Because the mobile application syncs with your desktop account automatically, you simply navigate through the correct menu sequence to view your route in the field.
WARNING: Offline Caching and Battery Drain
Custom map layers drain your smartphone battery noticeably faster than standard map browsing. Additionally, the application caches offline custom maps poorly. Always open your custom project and load the surrounding visual data before you lose cellular service, ensuring the map is fully cached on your screen.
Accessing Custom Maps on Android (Versions 11–14)
Android devices integrate seamlessly with the mapping ecosystem. Follow these specific menu selections to find your prepared data:
1. Open the primary mapping application on your Android smartphone.
2. Tap the “Saved” icon located at the bottom center of your display.
3. Scroll down the page until you see the list of saved categories.
4. Tap “Maps” from the available options.
5. Tap the specific name of the project you created on your desktop to display your imported route over the standard map view.
Accessing Custom Maps on iOS (Versions 15–18)
iPhone users can access the exact same data by following a nearly identical procedure:
1. Launch the application on your Apple device.
2. Tap the “Saved” tab located at the bottom of the interface.
3. Scroll to the very bottom of the menu and tap the “Maps” icon.
4. Select your newly imported file name to load the customized visual layer onto your screen.
Advanced Formatting: Essential Tools and KML Conversion
Advanced data users often encounter specific file compatibility issues based on the hardware used to record their trips. To address the problem where complex metadata causes an upload to fail, you might need to translate the file format or edit the raw data. Converting your file to KML (Keyhole Markup Language) translates the raw coordinates into the exact specialized language that Google’s mapping software natively understands.
Naming the Best Third-Party Tools
Instead of relying on vague searches for “desktop software,” you should use specific, industry-vetted programs to manage your tracking data.
1. GPX Studio (Free Web Tool): An excellent, browser-based editor. It is perfect for quickly merging broken track segments, reversing routes, and simplifying track points to get under the 2,000-point upload limit.

2. CalTopo (Web & Mobile): A highly advanced mapping interface favored by search and rescue teams. It excels at displaying deep backcountry topography and exporting highly customized KML files.

3. Garmin BaseCamp (Free Desktop Software): A robust, fully offline program for your PC or Mac. It remains the gold standard for managing massive databases of waypoints and organizing thousands of miles of hiking tracks without needing an internet connection.
How to Convert Files Using GPS Visualizer
If your file stubbornly refuses to upload to My Maps, running it through a converter is your best troubleshooting step. GPS Visualizer is a highly reliable, free online tool for this exact process.
1. Configure the Output: Navigate to the GPS Visualizer website and locate the “Get Started” box. Select “Google Earth KML” as your desired output format.
2. Adjust Advanced Settings: Upload your file. Before clicking convert, look for the advanced track options and ensure “Draw as tracks” is selected. This guarantees your route connects seamlessly rather than appearing as a jumbled pile of disconnected waypoint dots.
3. Convert and Download: Click the “Create Map” button. The server will process your coordinates and provide a downloadable KML document that is fully optimized for a flawless My Maps upload.
Troubleshooting: Fixing Common Import Errors
Even with the correct tools, an upload attempt can sometimes fail to display correctly. Understanding exactly why native uploads fail helps you resolve these technical obstacles efficiently.
Fixing Multiple Track Segments
A frequent issue arises because raw files from GPS recording devices often contain multiple separated track segments. The importing engine struggles to connect disjointed lines automatically, resulting in a fragmented visual line across your screen.
If your route appears disconnected, you must consolidate the data first. Open your original document in GPX Studio. Use the “Merge Tracks” function to combine all overlapping or separated segments into one continuous line. Save the newly merged file to your computer and attempt the upload procedure again.
Resolving Broken Waypoints and <sym> Tags
When custom markers fail to load or cause an upload to crash entirely, the issue usually relates to incompatible metadata symbols hidden inside the file code. If your original hardware applied proprietary symbols (like a unique icon for a “water source” or “summit”), the web interface will reject them.
The fastest way to fix this is to load the file into GPX Studio, select all waypoints, and change their icon to a standard, generic dot before exporting.
If you prefer a manual method, you can open the document in a standard text editor, such as Notepad (Windows) or TextEdit (Mac). Search the document for <sym> tags. Delete the custom text trapped between these tags or replace it with a universally recognized marker name (such as “Waypoint”). Save the text file and proceed with your map layer upload to restore your visual data.
Frequently Asked Questions
Can Google Maps open GPX files natively?
The standard mobile application does not support direct uploads of raw GPS files. To bypass this limitation, you must use a secondary web-based interface (My Maps) or convert the document format into KML first.
Does the custom map offer turn-by-turn navigation?
No. Uploading a custom trail via My Maps only provides a static colored line overlaid on your screen. You will see your blue location dot moving along the terrain, but the application will not give you voice prompts or automatic rerouting along your custom trail.
What happens if my file is larger than 5MB?
Google My Maps will reject the upload entirely. You must open the file in a track editing tool, select a “simplify track” option to reduce the overall number of data points, and export a smaller version of the document.
How do I view my downloaded tracks on mobile?
First, import the tracking data into your desktop account. Then, open your mobile mapping application, navigate to the “Saved” section, tap “Maps,” and select your imported project name to view the visual layer on your smartphone screen.
Can I share a custom route using Google Maps?
Yes. After importing your route into a custom project layer on your desktop, click the “Share” button within the My Maps interface. You can generate a shareable link or invite specific people via email to view your mapped route directly on their own devices.
Conclusion
Managing location data should empower your travel plans, not hinder them. Recognizing that the standard application interface does not directly support these raw formats is the first step toward regaining control of your navigation tools. By taking a few extra minutes to import your documents into the desktop interface, simplifying your track points, or choosing to translate the data into KML formatting, you completely bypass the risk of broken waypoints and disjointed segments.
You now possess the exact techniques required to transform raw XML data into a clear, visual trajectory on any modern device. Download a sample tracking file today, test the desktop import tool, and solve your mapping problems in minutes. Regain full control over your route planning and navigate your next journey with absolute confidence.


Hot Topics
