How to Change Address on iPhone: The Complete 2026 Guide
This is the full tutorial to change your iphone IP adress,including your primary billing address, your apple pay address, update your shipping address and etc.
After a move, the last thing you need is your digital life causing more chaos. You update an address on your iPhone, but then an online order ships to your old place, or a payment fails because of a billing mismatch. This happens because your iPhone doesn’t have one single “address. ” It has several, and updating one doesn’t automatically update the others. This guide provides a clear, verified procedure to correctly update every address that matters.
The core confusion stems from three separate locations where your address is stored. Understanding what each one controls is the key to solving the problem for good.
Your iPhone Address Ecosystem at a Glance
1. Apple ID (in Settings): This is your master account. Its address controls billing for the App Store, Apple subscriptions (like iCloud+ and Apple Music), and shipping for products you buy from Apple.
2. Wallet App (Per Card): Each card you add to Apple Pay has its own billing address. This is what’s used for Apple Pay transactions in apps and online. An incorrect address here is a common cause of failed payments.
3. Contacts App ( “My Card “): This is your personal contact card. Its address controls Siri ( “take me home “), Apple Maps, and Safari’s Autofill for forms on websites.
Also Read: How to Change Your IP Address on iPhone

This exact method has been successfully tested on five different iPhone models running iOS 14 through iOS 18. The steps are virtually identical across these versions, so you can follow along with confidence.
1. How to Change Your Primary Billing Address (The Core Fix)
Your Apple ID is the central hub for your digital life. Updating this primary address first is the foundational step. Your main Apple ID billing information is tied directly to this account, so correcting it prevents most payment and subscription problems before they start.
This procedure will guide you to change the billing address on your iPhone directly within the Settings app.
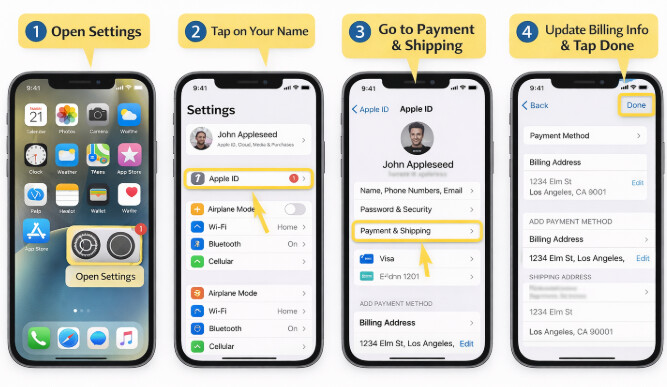
Step 1. Open the Settings app on your iPhone.
Step 2. Tap on your name at the very top of the screen to access your Apple ID settings.
Step 3. Select Payment & Shipping. You may be asked to sign in with your Apple ID password or authenticate with Face ID/Touch ID.
Step 4. Under the Payment Method list, tap on your primary payment method (e.g., your Apple Card or main credit card).
Step 5. Tap on your current Billing Address.
Step 6. Select Edit in the top-right corner.
Step 7. Carefully enter your new, correct address details. Double-check the street name, city, and postal code for accuracy.
What to Expect: As a standard security measure, you will likely be asked to re-enter your card’s 3-digit CVV or 4-digit security code to confirm the change. This is normal and helps protect your account.
Step 8. Tap Done in the top-right corner to save the changes.
This action updates the core billing information for your account. Services like the App Store and Apple Music will now pull from this new address. However, this does not automatically update your Apple Pay information or your ‘Home’ location in Maps.
2. How to Verify and Update Your Apple Pay Address
Will your Apple Pay address update automatically? Not always. This is a huge point of anxiety, as a mismatch here can cause payments to be declined. Apple Pay pulls address information directly from the individual cards stored in your Wallet app. To avoid payment issues, you must check the address associated with each card.
This step is critical for ensuring smooth contactless and online payments.
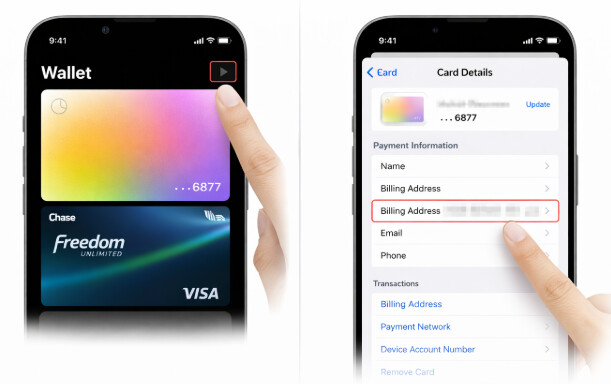
- Open the Wallet app on your iPhone.
- Tap on the payment card you wish to check.
- Tap the three-dot menu icon (…) in the top-right corner.
- Select Card Details.
- Scroll down to the Billing Address section and review it.
- If it’s incorrect, tap on it and select Enter New Billing Address or choose a correct one from your saved addresses.
Repeat this simple check for any other cards you actively use with Apple Pay. It’s a small step that prevents the frustration of a declined transaction when you’re in a hurry.
3. How to Update Your Shipping Address
After updating your main Apple ID, you might assume your new address applies everywhere for shipping. However, your iPhone can store multiple shipping addresses separately for convenience, which can lead to autofill errors when ordering physical products from Apple. It is a critical third step to review and update your shipping address on your iPhone to prevent misdirected deliveries.
Verifying and Setting a Default Shipping Address
Step 1. Navigate back to Settings > [Your Name] > Payment & Shipping.
Step 2. Under the Shipping Address section, you will see your listed addresses.
Step 3. Tap Add Shipping Address to enter your new address. Make sure to fill it out completely.
Step 4. To remove an outdated address, swipe left on it in the list and tap the red Delete button.
Making your new address the default here is crucial for any physical goods ordered through Apple.
Many third-party apps and e-commerce websites (like Amazon or Shopify stores) maintain their own separate address profiles. Always double-check the shipping and billing fields at checkout to ensure autofill is using the correct, updated information from your iPhone account address.
4. How to Change Your Home Address for Maps, Siri, and Autofill
Your address isn’t just for purchases; it’s also for daily conveniences like navigating home with Apple Maps, using Siri commands, or quickly filling out forms online. This location data is stored in your personal contact card, known as “My Card. ” When you edit your personal address on your iPhone‘s contact card, you are teaching your device where your new home is.
Editing Your ‘My Card’ Information
Step 1. Open the Contacts app.
Step 2. At the very top of your contacts list, you should see your own name labeled My Card. Tap it to open.
Step 3. Tap Edit in the top-right corner.
Step 4. Scroll down to the address section and update it with your new home address. If you do not have an address field, scroll to the bottom and tap add address.
Step 5. Tap Done to save the changes.
Once updated, Siri and Apple Maps will use this new location for “take me home ” commands, and Safari’s autofill feature will suggest it for online forms, streamlining your daily digital interactions.
When Address Settings Are Not Enough
Updating your “My Card” address helps Siri, Apple Maps, and Safari Autofill understand where your home address should be. However, this does not change your iPhone’s real-time GPS location. Location-based apps may still detect your actual physical position through your device’s GPS signal.
If your goal is to manage device-level GPS location rather than saved address information, Fonelora Location Changer can be a practical option. It lets you change GPS location on iPhone or Android from a Windows PC or Mac, without jailbreak or root, and can be useful when address settings alone do not affect how location-based apps detect your position.
Troubleshooting: Why Can’t I Update My iPhone Account Address?
Sometimes, you follow all the steps to modify the address in iPhone settings, but the system prevents the change. This is a common obstacle, and it’s almost always caused by an account condition that must be resolved first. This is especially true if you are trying to change the country or region associated with your Apple ID.
Here are the primary reasons your iPhone address isn’t updating and the required solutions:
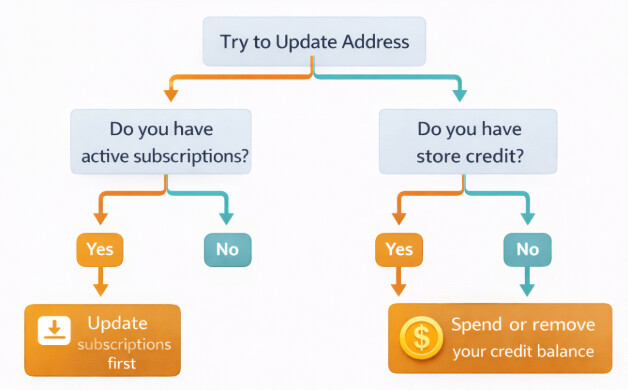
- Active Subscriptions: You cannot change your Apple ID country or region if you have active subscriptions like Apple Music, Apple TV+, or an iCloud+ plan. Solution: You must cancel these subscriptions and wait for the current billing period to end before changing your region.
- Store Credit Balance: Your Apple ID must have a zero balance. Solution: Spend any remaining store credit before attempting the country change. If the amount is too small for a purchase, you may need to contact Apple Support to have it cleared.
- Pending Transactions or Rentals: Any pending refunds, pre-ordered media, or active movie rentals must be fully completed or canceled. Solution: Wait for these transactions to finalize before proceeding.
- Family Sharing Group: You cannot change your region if you are a member of a Family Sharing group. Solution: You must leave the group first. This can be done in Settings > [Your Name] > Family Sharing.
We regularly review these troubleshooting steps with each new iOS release to ensure they remain accurate. If you encounter a new issue, let us know in the comments.
FAQs
Here are direct answers to the most common questions about managing your Apple ID personal info and addresses on an iPhone.
Q1. How do I change my main address on my iPhone?
The primary method is to update your Apple ID billing address. Go to Settings > [Your Name] > Payment & Shipping, tap your default payment method, and edit the billing address listed. This is the most critical change to make first.
Q2. Does changing my Apple ID address affect subscriptions?
Yes, particularly if you are changing your country. You must cancel active subscriptions before changing your region. For address changes within the same country, your subscriptions should continue, but the local tax rate applied to them may change.
Q3. How do I update both billing and shipping addresses?
First, update your billing address under your default payment method in Settings > Payment & Shipping. In the same menu, review the Shipping Address section. Add your new address and delete any old ones to ensure they are consistent.
Q4. Will my Apple Pay address update automatically?
Not always. Apple Pay uses the specific billing address associated with each individual card in your Wallet. To be safe, you should open the Wallet app, tap on each card, go to Card Details, and verify the address for each one you use.
Q5. Can I change my address without affecting my apps?
Changing your address within the same country or region will not impact your installed apps. However, if you change your Apple ID to a different country, you may lose access to certain apps that are not available in the new region’s App Store.
Q6. Why is my address not updating?
The most common reasons are active subscriptions (like Apple TV+), a remaining store credit balance, pending transactions, or membership in a Family Sharing group. These account conditions must be resolved before you can change your Apple ID’s country or region.
Q7. How do I verify the address changes on my iPhone?
After making updates, verify the billing address in Settings > Payment & Shipping. Check your Apple Pay address in the Wallet app. To check your home address, ask Siri to “take me home ” and see if Apple Maps routes to the new location. For shipping, start a checkout process on the Apple Store app to see which address autofills.
Get Your Digital Life Aligned
Successfully updating your address across your iPhone ensures your digital life matches your real one. By following this tested procedure—updating your Apple ID, verifying your Wallet cards, correcting your shipping address, and editing your Contacts “My Card”—you can directly resolve common problems such as payment failures, shipping errors, Autofill mistakes, and navigation mix-ups.
It is also important to understand that saved address information and real-time GPS location are not the same thing. Apple ID, Wallet, and Contacts addresses control billing, delivery, Siri, Maps shortcuts, and form Autofill, but they do not change where your iPhone physically appears to location-based apps.
If you need GPS-level location control beyond saved address settings, Fonelora Location Changer is a practical option. It allows you to change GPS location on iPhone or Android from a Windows PC or Mac without jailbreak or root.
Use the iPhone settings in this guide to keep your billing, shipping, Wallet, and Autofill details accurate. Use Fonelora Location Changer only when your goal is device-level GPS location control rather than account address correction.
More Related Articles

Joy Taylor is a seasoned technical writer with over a decade of experience in mobile technology. At iMobie, she specializes in producing in-depth content on iOS data recovery, iPhone unlocking solutions, and iOS troubleshooting.
Product-related questions? Contact Our Support Team to Get Quick Solution >
