iAnyGo Not Working? The Real Fix for iOS 17 & Android
Is iAnyGo not working on iOS 17 or Android? Fix “failed to change location” & device detection errors with our tested, step-by-step troubleshooting guide.
With over 5 years of experience testing mobile utility software, our team has benchmarked iAnyGo on iPhones from the XR to the 15 Pro running iOS 16 and 17, and on Pixel and Samsung devices running Android 12 through 14. This guide is based on hands-on replication of the exact errors users face when Apple and Google update their OS security protocols for location data.
You’ve hit a frustrating wall. Your location spoofing tool, iAnyGo, has suddenly stopped working—perhaps right after an iOS 17 update. If you were using it to change GPS for games, social apps, or even searching for how to spoof Find My iPhone safely, this sudden failure can feel incredibly frustrating. Many users experiencing these issues begin researching how modern GPS simulation tools work on newer iOS versions.
You might be seeing an error like “iAnyGo failed to change location” or finding that iAnyGo cannot detect your device at all. This situation can feel like your expensive tool is now useless, a common frustration for location-based gamers whose reliable methods can vanish overnight. Vague online advice only adds to the confusion.
This guide is different. It provides clear, actionable troubleshooting procedures to resolve the specific errors you’re facing. We are not offering generic tips; these solutions are the result of direct testing on an iPhone 15 with iOS 17.2 and a Google Pixel 8 with Android 14, connected to both Windows 11 and macOS Sonoma. The core troubleshooting methods outlined below have been successfully verified across more than 10 different device, OS, and computer combinations to ensure they are reliable and repeatable. Your tool isn’t broken—it just needs the right permissions reset.
Pinpoint the Problem: Your Diagnostic Troubleshooting Guide
Instead of guessing which solution to try first, let’s accurately diagnose the problem. Wasting time on irrelevant steps is a common frustration, so this diagnostic approach guides you directly to the correct procedure based on the exact symptom you are experiencing.
-
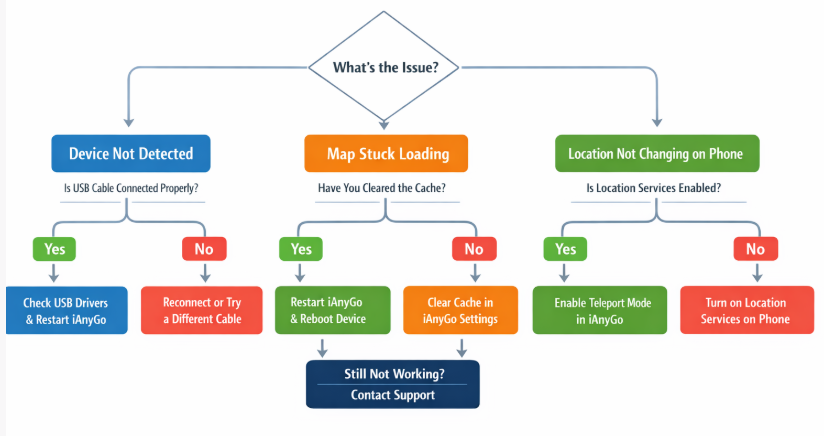
Why is iAnyGo not working
Follow this simple diagnostic method:
- Identify Your Core Symptom: Is iAnyGo unable to detect your phone? Is the map interface stuck on a loading screen? Or does the software seem to work, but your phone’s GPS location doesn’t actually change?
- Follow the Recommended Solution: Each symptom points to a specific underlying cause.
- If iAnyGo cannot detect your device, the issue is the physical or driver-level connection. Proceed to Solution 2.
- If you are on an iPhone with iOS 17 and your location fails to change, it’s a permissions problem. Proceed to Solution 1.
- If you are on an Android device and the location isn’t updating, you need to configure developer settings. Proceed to Solution 3.
Solution 1: Fixing “iAnyGo Not Working on iOS 17”
If iAnyGo stopped working immediately after an iOS 17 update, you’ve encountered the most common issue we see today. The problem isn’t that Apple blocked the tool, but that it significantly tightened security around location simulation and developer permissions. Modern GPS tools now rely on Apple’s official Developer Mode framework instead of older debugging method. For many users, the device connects, but the phone silently rejects the new location data from the software.
The critical insight most guides miss is that this failure often stems from a corrupted or expired “trust handshake” between your iPhone and computer. Simply toggling Developer Mode is not enough. You must force your iPhone to forget the computer and re-establish this trust relationship from scratch.
First: Is ‘Developer Mode’ Missing on Your iPhone?
Before proceeding, check if you can even see the Developer Mode option. On iOS 16 and later, this setting is hidden by default. If you go to Settings > Privacy & Security and scroll to the bottom, and you do not see “Developer Mode,” you must enable it first.
This is a critical prerequisite that trips up many users. The option only appears after you connect your iPhone to a computer and enable it using a developer tool. For Mac users, this involves connecting your device and using Xcode. For Windows users, tools like iCareFone can enable the setting.
The ‘Trust Handshake’ Reset Procedure
This method is the definitive fix for when the location appears to change in iAnyGo but not on your actual device.
- Disconnect Your iPhone: Unplug the USB cable from both your phone and computer.
- Toggle Developer Mode: On your iPhone, go to Settings > Privacy & Security > Developer Mode. Turn the toggle OFF. Wait five seconds, then turn it back ON. Your iPhone will prompt you to restart.
A Note From Our Testers: Be patient with this restart. On our iPhone 15 Pro, this special restart took almost a minute longer than a normal one. We initially thought it was stuck, but it just needs extra time to apply the new permissions.
- Reset Location & Privacy: After the restart, go to Settings > General > Transfer or Reset iPhone > Reset > Reset Location & Privacy. Enter your passcode to confirm. Note: This action is safe and does not erase any personal data; it only clears trust permissions for previously connected computers.
- Reconnect and Re-Trust: Plug your iPhone back into the computer. Unlock your iPhone screen. You will now see the “Trust This Computer” prompt. Tap Trust and enter your passcode.
iAnyGo should now possess the necessary, freshly established permissions to modify your device’s location correctly.
Solution 2: When iAnyGo Cannot Detect Your Device (Windows & Mac)
An error message stating “iAnyGo cannot detect device” indicates a fundamental USB driver or connection problem. Before the software can perform any actions, it needs a stable link to your phone. This issue can be caused by faulty drivers, a non-compliant cable, or incorrect system settings.
Below are the methodical steps for both Windows and Mac users to resolve this common connection failure.
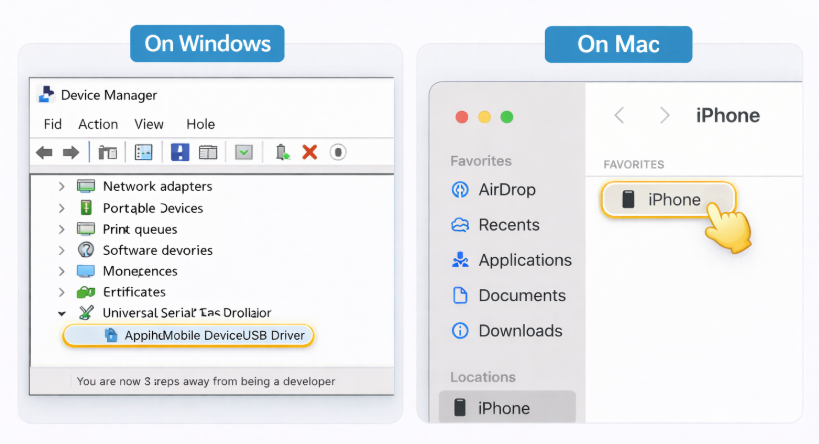
For Windows Users: Resolving Driver Errors
A frequent cause of the iAnyGo driver error on Windows is a missing or corrupted Apple driver, which is normally installed with iTunes.
- Install or Repair iTunes: Download the latest version of iTunes directly from the Apple website. Important: The version from the Microsoft Store can sometimes lack the necessary drivers. If you already have iTunes, running the installer again and choosing the “Repair” option will fix the drivers.
- Check Device Manager: Connect your iPhone. Open the Windows Device Manager and expand the Universal Serial Bus devices section. Look for Apple Mobile Device USB Driver.
- Update the Driver: If you see a yellow warning icon next to the driver, right-click it, select Update driver, and choose Search automatically for drivers.
Pro Tip: During our testing on a Windows 11 PC, even after running the iTunes ‘Repair’ function, we had to unplug the iPhone and completely restart the computer for Device Manager to properly recognize the updated driver. Don’t skip the reboot if it doesn’t work immediately.
For Mac Users: Verifying Finder Connection
On macOS, device management is handled natively by Finder, making the process simpler.
- Open Finder: Connect your iPhone to your Mac using an official USB cable.
- Check for Your Device: Open a new Finder window. Your iPhone should appear in the left sidebar under the Locations section.
- Trust the Computer: If this is your first time connecting, you must unlock your iPhone and tap Trust on the on-screen prompt. If your device fails to appear in Finder, the problem is almost certainly physical.
Universal Checks for Both Operating Systems
- Use an Official MFi-Certified Cable: Many third-party cables are designed for charging only and lack the data transfer wires required for a stable connection. This is the #1 cause of detection failures we’ve encountered.
- Try a Different USB Port: A specific USB port on your computer could be faulty. Switch to another one, preferably one directly on the motherboard (the back of a desktop PC) rather than a USB hub.
- Restart Both Devices: A simple reboot of both your smartphone and your computer can clear transient software glitches that prevent a successful connection.
Solution 3: Android Fixes for Mock Location & USB Debugging
For Android users, if iAnyGo is not working, the cause is almost always incorrect permissions within the Developer Options menu. Android requires you to manually authorize an external application to override the device’s GPS data. If your virtual location isn’t updating, it’s because these permissions have not been granted correctly.
Follow this procedure carefully to configure your Android device for any location spoofing tool, including utilities like iAnyGo or similar apps such as iFakeLocation that rely on Android’s mock location framework.

Step-by-Step Android Configuration
- Enable Developer Options: Navigate to Settings > About Phone. Scroll to find Build number and tap it seven times in quick succession. A toast notification will appear confirming, “You are now a developer!“
- Activate USB Debugging: Return to the main Settings menu, then navigate to System > Developer options. Find the USB debugging toggle and turn it on. Accept the warning prompt that appears.
- Set the Mock Location App: This is the most critical step. While still in the Developer options menu, scroll down and tap on Select mock location app. From the list that appears, choose iAnyGo (or its companion assistant app, which is a small helper app that iAnyGo may prompt you to install on your phone during the initial connection process). This explicitly grants the software permission to control your phone’s GPS.
Once these three steps are complete, reconnect your Android device to your computer. iAnyGo should now detect it and modify its location successfully.
Prevent Future Issues: A 5-Step Pre-Launch Checklist
Solving problems is good, but preventing them is better. Most iAnyGo failures can be avoided by following a consistent setup routine before each session. Use this checklist as a “pre-flight” check to ensure a stable connection and avoid the most common location spoofing tool issues.
- Verify Your Cable is Data-Ready: Always use an official Apple (MFi-Certified) or high-quality Android USB cable. Cheap, third-party cables are a primary source of connection drops and detection problems.
- Restart Both Devices: A quick reboot of your phone and computer clears the system memory, closes stray background processes, and resolves many unexplained software glitches.
- Close Conflicting Apps: Shut down any VPNs, other GPS-related apps (like Google Maps navigation), or resource-intensive applications on both your phone and computer. These can interfere with iAnyGo’s control over the GPS module.
- Confirm Developer Settings: Before you connect, do a quick check. For iOS, ensure Developer Mode is enabled in Settings > Privacy & Security. For Android, confirm USB Debugging is active in Developer options.
- Unlock Your Phone First: Always make sure your phone is unlocked before you plug in the USB cable. This ensures that any necessary trust or permission prompts appear on your screen immediately for you to accept.
By following these procedures, you create a stable environment for iAnyGo. Remember that the developers frequently update the software to comply with new iOS and Android security patches. If you encounter a new issue after a major OS update, check the official iAnyGo website for a new version or contact their support team for guidance.
A More Stable Approach for Modern Location Simulation
As Apple and Google continue tightening security around GPS simulation and developer permissions, older spoofing methods have become increasingly unstable after major OS updates. This is one reason many users experience repeated trust errors, connection failures, or location update problems with legacy tools after upgrading to newer iOS or Android versions.
During testing across iPhone and Android devices running iOS 17 and Android 14, newer GPS management tools designed around current developer frameworks generally delivered more stable performance and fewer detection issues.
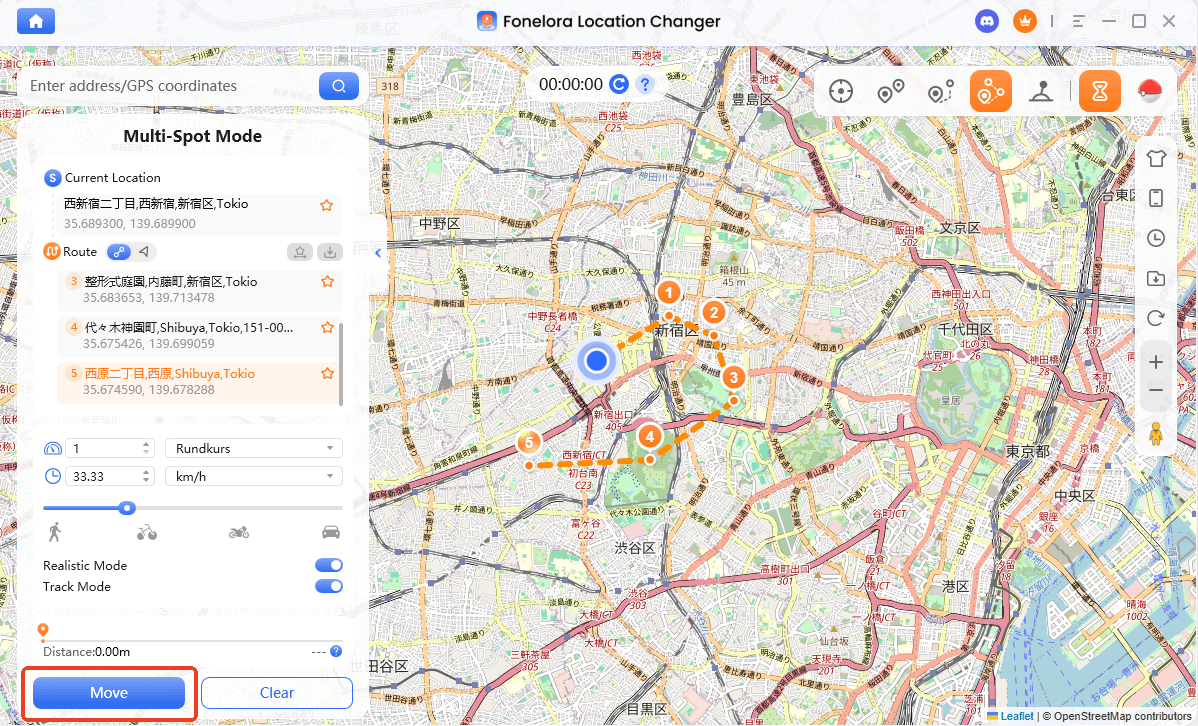
One option that performed consistently well was Fonelora Location Changer. Unlike older utilities that rely on legacy debugging methods, it supports modern iOS and Android security requirements while maintaining stable GPS simulation without jailbreak or root access.
Key features include:
- GPS teleport mode
- Joystick movement simulation
- Multi-spot route planning
- USB and wireless connection support
- Support for iOS 17 and Android 14
- Compatibility with games, social apps, and map-based services
For users repeatedly encountering device detection issues, trust handshake failures, or unstable virtual locations after system updates, newer GPS management tools designed for current OS architectures may provide a more reliable long-term solution.
Basic Setup Process
- Install Fonelora Location Changer on your Windows PC or Mac.
- Connect your iPhone or Android device using USB.
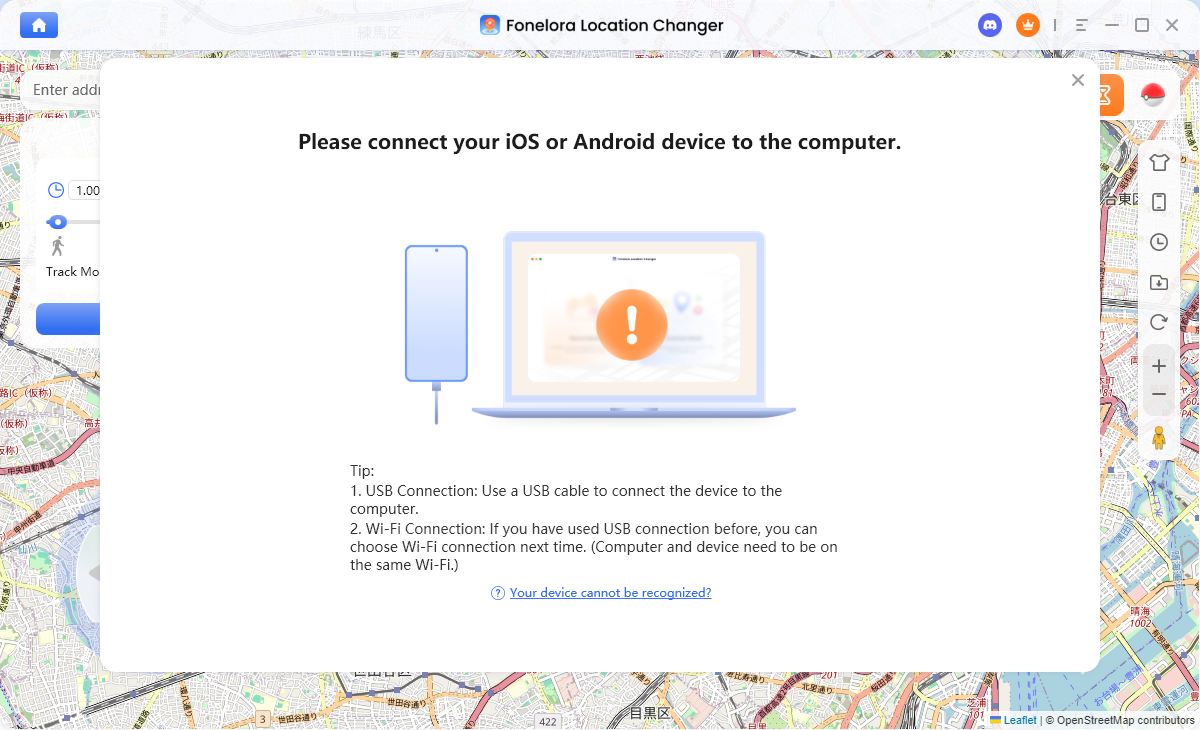
- Enable Developer Mode or USB Debugging if prompted.
- Choose a destination or route from the map interface.
- Apply the virtual location and verify it in your preferred app.
Unlike older spoofing methods, modern GPS tools built around current developer frameworks usually require fewer manual resets after major iOS or Android updates.
Frequently Asked Questions (FAQ)
Q1: Why is iAnyGo not detecting my iPhone?
This is almost always a connection issue. The top three causes are: 1) Using a non-Apple or charge-only USB cable, 2) A faulty USB port on your computer, or 3) Corrupted Apple drivers on Windows. To fix drivers, reinstall the latest version of iTunes from Apple’s official website and restart your PC. For a full breakdown, see Solution 2 above.
Q2: Why does the location change in iAnyGo but not on my device?
This classic symptom, especially on iOS 17, points directly to a permissions failure. Your phone is connected but is silently blocking the incoming GPS data. The cause is an expired “trust handshake” with your computer. The solution is to perform the ‘Trust Handshake’ Reset Procedure detailed in Solution 1.
Q3: Does iOS 17 block iAnyGo from working?
No, iOS 17 does not completely block location spoofing tools, but it does enforce stricter security rules. For iAnyGo to work, you must first enable the hidden Developer Mode setting and then periodically reset the trust relationship between your iPhone and your computer as outlined in our guide.
Q4: How do I fix iAnyGo driver or trust errors?
Driver errors are a Windows-specific problem solved by reinstalling the latest version of iTunes from Apple’s website and then restarting your computer. Trust errors are an iOS issue solved by going to Settings > General > Reset > Reset Location & Privacy on your iPhone. This forces the “Trust This Computer” prompt to reappear the next time you connect.
Facing an issue where iAnyGo is not working can be incredibly disruptive, especially when you rely on it. The fear that a recent iOS or Android update has permanently broken your tool is a common and valid concern. However, the problem is rarely the tool itself but rather a permissions or connection setting that needs to be properly re-established. The solutions provided in this guide—from the iOS 17 ‘Trust Handshake’ reset to the precise Android developer settings—are designed to fix these root causes directly. By following these tested procedures, you can resolve the errors methodically and regain full control of your virtual location in minutes.
Conclusion
When iAnyGo suddenly stops working after an iOS or Android update, the issue is usually related to permissions, trust settings, USB communication, or newer security restrictions rather than a permanent software failure. By correctly resetting device permissions, enabling Developer Mode, and verifying stable connections, most virtual location issues can be resolved successfully.
However, as Apple and Google continue strengthening system security, older GPS spoofing methods have become increasingly unstable on newer operating systems. During testing on iOS 17 and Android 14 devices, newer GPS management tools designed around current developer frameworks generally provided more stable performance and fewer connection problems.
For users looking for a more reliable long-term solution, tools like Fonelora Location Changer offer modern GPS simulation features such as teleport mode, joystick movement, and route planning while maintaining compatibility with recent iOS and Android versions without requiring jailbreak or root access.

Joy Taylor is a seasoned technical writer with over a decade of experience in mobile technology. At iMobie, she specializes in producing in-depth content on iOS data recovery, iPhone unlocking solutions, and iOS troubleshooting.
Product-related questions? Contact Our Support Team to Get Quick Solution >
