How to Transfer iPhone/iPad Purchases to iTunes on Computer?
Do you want to learn how to transfer iPhone purchases to iTunes? In this guide, we’ve covered two methods to help you transfer iPhone/iPad purchases to iTunes library on the computer.
You can easily download & purchased music/apps directly from iTunes Store on your iDevice. There are times when you want to transfer purchases from iPhone to iTunes. For instance, you accidentally deleted your iTunes library and you would like to restore it by simply transferring purchases to iTunes from iPhone. Else, you would like to sync your purchased music on all of your devices or want to create a backup of your purchased items to iTunes. For whatever reason you want to transfer iPhone purchases to iTunes on a computer, there are methods available to get the job done with ease.
So, let’s learn about what are the possible ways you can use to transfer your iPhone purchases to iTunes without much hassle.
Part 1: Transfer iPhone Purchases to iTunes with iTunes
Even though iTunes doesn’t provide support for transferring non-purchased items from iPhone to iTunes, it offers a convenient way for users to transfer iPhone purchases from the iTunes store to iTunes. It’s a common thing that most of us purchase songs through the iPhone, and many would like to listen to and access them on the computer too. Here’s how to transfer iPhone purchases to iTunes via iTunes.
Step 1: To start with, you have to authorize the computer. So, go to “iTunes” > ”Account” > ”Authorizations” > ”Authorize This Computer” > ”Enter your Apple ID and pass code if you see a dialog box” > ”Tap the Authorize button”.
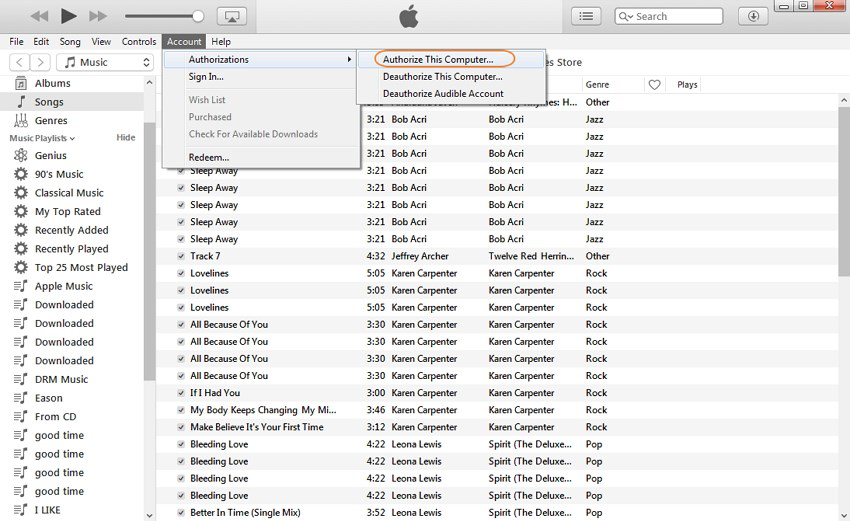
Transfer iPhone Purchases to iTunes with iTunes – Step 1
It will be a little bit tricky if your iDevice purchases were purchased using several accounts as you will have to authorize the computer for each account.
Step 2: Next, connect your iPhone to the computer using a USB cable. Once the iTunes detected your device, go to the “Menu” bar and select “File” > ”Devices” > ”Transfer Purchases from [device name]” as shown in the below figure.
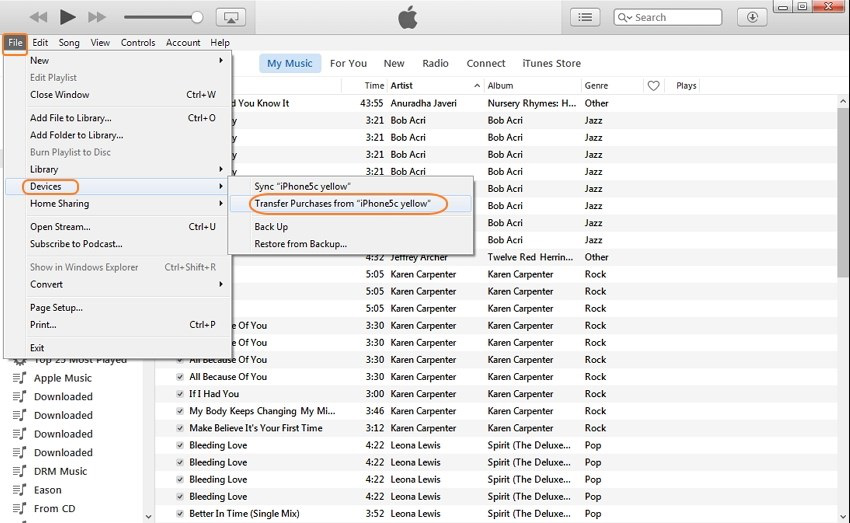
Transfer iPhone Purchases to iTunes with iTunes – Step 2
That’s how you can transfer purchases from iPhone to iTunes on a computer. Keep in mind that this method works only for items bought from the iTunes Store. Any other items you have purchased from other sources won’t transfer from your device to the iTunes library.
Part 2: Transfer iPhone Purchases to iTunes with iTunes Alternative
If you cannot transfer purchases to iTunes library with iTunes, then you can simply use the best iTunes alternative available on the internet. And AnyTrans is a recommended one in terms of the features it provides to iOS users. The best part is that this software can help you transfer both purchased and non-purchased items to iTunes from iPhone/iPad in one-click. In fact, it is an all-in-one iOS data manager to help you manage your iDevice’s data more efficiently on a computer.
Here are its key features:
- Besides music, you can transfer other types of file including messages, contacts, photos, etc.
- Supports transferring data from iPhone to computer and vice versa, or iPhone to iPhone.
- It is compatible with all iPhone models and versions and both Windows and Mac.
- You can selectively transfer data from iPhone to iTunes.
To learn how to transfer purchases from iPhone to iTunes using AnyTrans, get it from its official site on your computer and follow the below steps.
Free Download * 100% Clean & Safe
Step 1: To start with, run AnyTrans after installing it and connect your iPhone to the computer with a USB cable. Once the software detects your device, click on the Content to iTunes mode at the bottom.
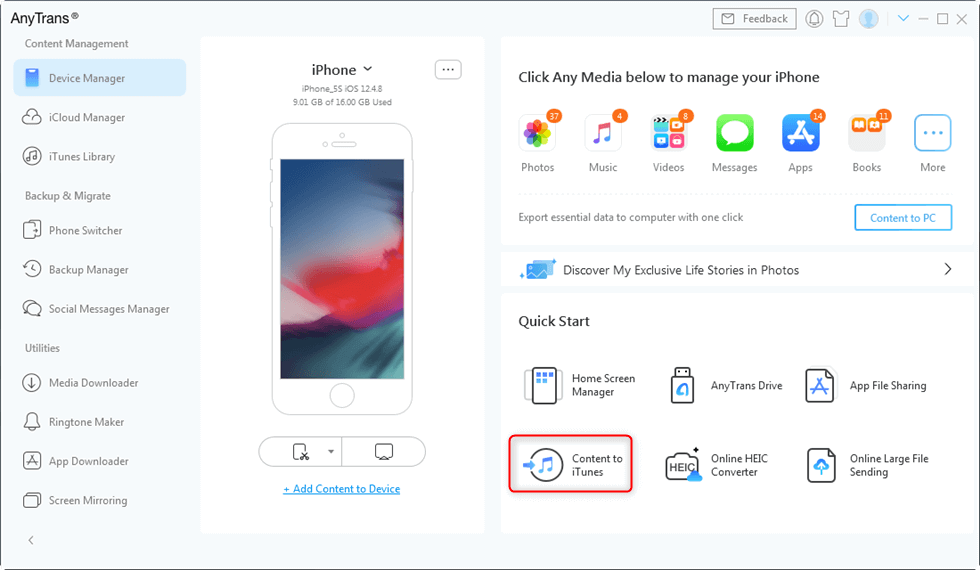
Choose Content to iTunes
Step 2: Next, click on “Songs”, “Podcasts” or “Ringtones” files you would like to transfer, and click on the “Next” button to initiate the progress.

Select Categories to Transfer to iTunes
The Bottom Line
We hope that our guide has helped you to learn how to transfer iPhone purchases to iTunes. As you can now see that either you can use iTunes or its alternative to do the job. If you want a hassle-free way to transfer purchases from iPhone to iTunes on a computer, there is no better option than AnyTrans. Try it now and if you encounter any problem, please feel free to ask us in the comment section.
More Related Articles

Member of iMobie team as well as an Apple fan, love to help more users solve various types of iOS & Android related issues.
Product-related questions? Contact Our Support Team to Get Quick Solution >
