How to Fix Webcam Not Working
You have got a laptop and are preparing for a video call with your family or an online hangout with your friends. However, you see a webcam not working error. Don’t worry; below in this article, we’ve got you covered on how to fix this error.
With an increasing number of processes that require a webcam in some way or another, and the growing number of different software that uses webcam potential, visualization and video streaming have become a vital component of everyday computer device use.
Unfortunately, built-in (in laptops) and external (for desktop PCs) webcams do not always work well in Windows or Mac for a number of reasons. Various difficulties with webcams can be fixed using standard troubleshooting techniques and a new system option available in Windows and Mac that manages your webcam across all apps on your computer. In today’s article, we’ll go over the various methods for resolving the computer not detecting my webcam error.
How to Fix: Google Meet Camera Failed to Work >
What to Do When Webcam Not Working on Windows 7/8/10
If your webcam isn’t working, there are a few things you may do to get it to work again. We’ll teach you how to repair a broken webcam using most internal and external webcams on Windows 10, 8, and 7 PCs.
1. How to Fix Laptop Internal Camera Not Working
If your internal webcam isn’t working on Windows, follow the solutions provided below to get it working again.
Fix 1. Not working due to Update
If your internal webcam stops operating after a Windows update, the problem is most often caused by faulty drivers or driver conflicts. You can fix this issue by following the steps outlined below.
Step 1: First, open Device Manager and check for a yellow mark next to the webcam device. The device could be listed under the category Imaging devices or Other devices. The device name under Other devices is most likely Unknown Device.
Step 2: If you see a yellow indicator there, you can reinstall or update the driver to resolve the issue. If not, you can just disable and re-enable the device.
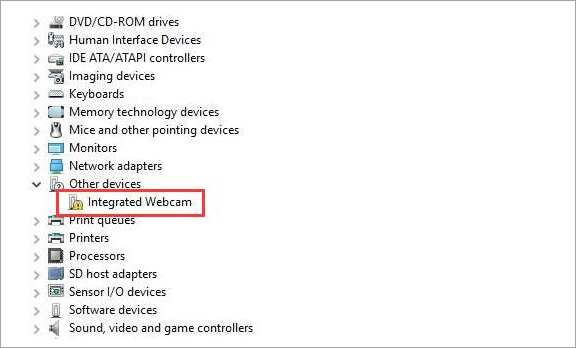
Check Integrated Camera Status
Fix 2. Reinstall the Driver
Reinstalling the camera driver can fix system problems that cause the camera to stop working on Windows and restart the driver.
To reinstall the driver, perform the following steps:
Step 1: Right-click the device and pick Uninstall from the context menu that appears.
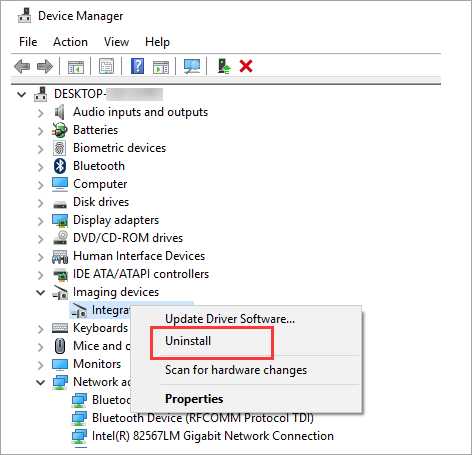
Uninstall and Reinstall Camera Driver
Step 2: A window titled Confirm Device Uninstall will appear. To complete the uninstall, click the OK button.
Step 3: Now restart your computer, and Windows will reinstall the drivers.
Step 4: Finally, check if you can access your webcam on your Windows computer.
Fix 3. Update the driver
It is possible that the webcam driver is out of date and will not function properly. To update the driver, go to your PC manufacturer’s website and download the most recent Windows 10 driver for the integrated webcam. Before you begin, double-check that you have the correct PC model and operating system installed.
The manufacturer of some PC models may not release Windows 10 drivers. If this is the case, download the Windows 7 or Windows 8 driver, which is always compatible with Windows 10.
The downloaded driver file is usually an a.zip or.exe file. To acquire the.exe file from a.zip file, extract it completely. Double-click on the.exe file and just follow the on-screen instructions to install the driver.
If the problem remains after installing the driver, install it again in Windows 7 compatibility mode. Follow these steps to get started:
Step 1: Navigate to the Webcam software app folder and look for the executable file (.exe).
Step 2: Now, right-click on the files and tap on Properties.
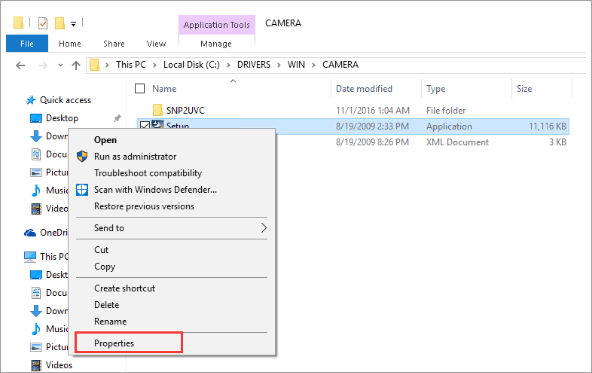
Select Properties
Step 3: Navigate to the Compatibility tab and set the Compatibility mode to Windows 7. After that, click Apply and press OK to save the changes.
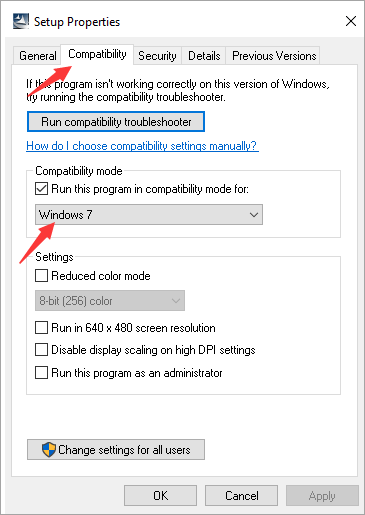
Change Compatibility Mode
Step 4: In the end, install the driver again and check if the webcam works or not.
Further Reading: How to Fix iTunes Driver not Installed on Windows 10 >
2. How to Fix External Webcam Not Working
The webcam troubleshooting steps listed below can assist you in resolving a non-working webcam. The instructions are more general and apply to any specific brand of webcam.
Fix 1. Unplug and replug
Almost all cameras these days connect to a computer’s USB connection. USB devices, including cameras, might occasionally stop working due to the operating system’s issues or the USB port itself. Unplugging and replugging a USB device is one of the quickest ways to attempt and repair it.
Unplug the webcam from the computer and reconnect it. You could also try inserting the webcam into a different USB port than the one it was originally plugged into to fix the USB webcam not working Windows 10 issue.
If unplugging and replugging the webcam does not work, unplug it again. Restart the PC while unplugging the webcam. Plug the webcam into a USB port after restarting the computer and reloading the operating system.
Unplugging and replugging USB devices frequently resolves issues by causing the operating system to re-recognize and reload the device drivers or software. Continue to the following section if the unplug and replug fix did not work.
Fix 2. Uninstall and reinstall
A webcam’s device drivers or software can become corrupted at times. Driver or software corruption can be fixed by uninstalling and removing the device from the computer, then reinstalling it.
To uninstall and reinstall the webcam driver on your computer, follow the steps below.
Step 1: First, uninstall any webcam software installed on your PC.
Step 2: Open the Device Manager and click on the Universal Serial Bus controllers section and look for all webcams in the list.
Step 3: Select the Webcam device and right-click and tap on the Uninstall device.
Step 4: Unplug the webcam and Restart your computer.
Step 5: After the operating system has loaded, reconnect the webcam to the computer. The operating system should detect the webcam and reinstall the necessary drivers.
Check the webcam to see if deleting and reinstalling fixed the issue. Continue to the next fix if the problem persists.
Fix 3. Connect to another computer
A problem with the operating system may cause the computer to fail to identify the webcam. Connect your webcam to another computer if feasible to see whether it works. If the webcam works on another laptop, the problem is with your computer’s operating system or the USB connections.
If the webcam does not work on another laptop, proceed to the last phase of troubleshooting.
Fix 4. Defective webcam
If none of the troubleshooting options above address your webcam’s problems, the webcam is defective and no longer works. If the webcam is still under warranty, contact the manufacturer’s support or customer service staff for assistance in getting the webcam repaired.
Some webcams may require different, more specialized troubleshooting steps than those listed above.
How to Fix Webcam Not Working on Mac
Many of Apple’s desktops and laptops contain a built-in webcam, which the firm cheerfully refers to as a FaceTime camera. However, if your mac webcam isn’t working and displays as disconnected or unavailable when you try to view it, you might not be feeling so upbeat. Here we provide you a few fixes that will help you solve webcam not working mac issues in no time.
Fix 1. Check for Applications Using the Camera
Typically, only one Mac app can use the camera at the same time. Check that the program you’re attempting to use isn’t being denied access to the camera because someone is currently using it. You can resolve this problem by closing all other open applications that may be using the camera.
Fix 2. Restart the Computer
You can restart your Mac by going to the Apple Menu in the upper left-hand corner of the screen and selecting the Restart option. If any processes use the camera in the background, restarting the computer may resolve the issue, restoring complete access to the camera. Once the computer has been restarted, check to see if your webcam is working normally.
Fix 3. Reset your Mac’s System Controller
This may appear to be a bit daunting, but don’t worry. If your Mac’s webcam isn’t working properly, you can reset the System Management Controller (SMC). The SMC is in charge of many of your Mac’s hardware tasks, and restarting it may solve your difficulties.
Here’s how to reset your SMC on a MacBook.
Step 1: First, you need to shut down your MacBook and ensure the power adapter is attached to the socket.
Step 2: Hold down the Shift+Control+Options keys on the MacBook’s keyboard simultaneously, then turn on the computer.
Step 3: After turning on the Mac, hold down the Shift, Control, and Option keys simultaneously.
Step 4: Allow thirty seconds before releasing the keys, which will allow the Mac to boot normally.
Step 5: Finally, when your Mac starts, try to see if you have access to your Webcam.
Fix 4. Go to an Apple Technician
If none of the fixes helped to restore your Mac’s webcam, find an Apple Store or an authorized Apple technician to have your Mac serviced. Apple Stores provide free technical support. We recommend scheduling an appointment online through Apple’s support website so that you have a considerably reduced wait time when you arrive at the store.
Tips about Using Webcam on Computer
Now you got to know how to fix a laptop camera not working on Windows 7/8/10 or Mac. Below we have provided some basic tips on using a Webcam on computer one should always keep in mind for a better experience.
- Always make sure you give Access my Camera for all the apps.
- You can restart your Windows and Mac device for a quick fix.
- Make sure your drivers are updated; if not, update them on time.
Conclusion
We hope this guide was helpful to you and that your webcam is now operational. If you have any suggestions, questions, or recommendations, please leave them in the comments area below. We look forward to hearing from you.
More Related Articles

Member of iMobie Inc., is also a more than 3-year user of iPhone, iPad and iMac, like to fix all kinds of iOS and Mac OS problems.
Product-related questions? Contact Our Support Team to Get Quick Solution >
