How to Access Android Internal Storage on Phone, PC & Mac [2026]
Android lets you browse shared internal storage such as DCIM, Download, Pictures and Documents, but app-private data is protected. This guide shows how to view accessible files on the phone, Windows PC or Mac, explains Android storage limits, and fixes common USB and file-access problems.
Android internal storage contains the files you use every day, including camera photos, downloads, documents, music and videos. But there is an important distinction: the folders you normally browse in Files, My Files or Windows File Explorer are user-accessible shared storage. Android also keeps app-private files in protected locations that ordinary file managers, USB File Transfer and desktop Android managers cannot freely expose.
So, if you want to access Android internal storage, first decide what you are trying to find. Photos in DCIM, files in Download, and documents in shared folders can usually be opened directly on the phone or copied to a computer. Private application databases and protected app-specific folders follow Android’s storage permissions and are a different case.
Access User-Visible Android Internal Storage
Quick distinction: “Internal storage” in a file manager usually means shared phone storage you can browse, such as DCIM, Download, Pictures, Movies, Music and Documents. It does not mean unrestricted access to every app’s private files.
Quick Answer: What Android Internal Storage Can You Access?
| Data or Location | Phone File Manager | Windows USB | Desktop Android Manager | Main Limitation |
| DCIM / Camera | Yes | Usually yes | Usually yes | The phone may need to be unlocked before computer access works. |
| Download | Yes | Usually yes | Usually yes | Files must be stored in user-accessible shared storage. |
| Pictures / Movies / Music | Yes | Usually yes | Usually yes | The exact folder depends on where the app saved the file. |
| Documents and user-created folders | Yes | Usually yes | Usually yes | Protected app-specific copies may not appear like normal files. |
| Contacts / messages | Through their apps or system features | Not ordinary MTP folders | Some managers can display supported data categories | They are not simply loose files in DCIM or Download. |
| App-private internal data | No normal unrestricted access | No normal unrestricted access | No normal unrestricted access | Android protects each app’s private storage. |
| Locked phone | Limited | Usually unavailable through normal File Transfer | Depends on the specific product and device state | Normal USB file browsing generally expects the device to be unlocked. |
| Dead or system-crashed phone | No normal file-manager access | No normal MTP access | Requires a separate supported extraction/recovery workflow | This is a recovery problem rather than ordinary file management. |
Internal Storage vs App-Private Storage
Android uses the phrase “internal storage” in more than one technical sense, which is why online instructions can be confusing.
User-Accessible Shared Storage
This is the part most users mean when they ask how to access internal storage. Common folders include:
- DCIM — camera photos and videos.
- Pictures — screenshots and other images.
- Download — files downloaded from browsers and compatible apps.
- Movies — user-accessible video files.
- Music — audio files.
- Documents — documents saved to shared storage.
These folders can usually be browsed from Files by Google, Samsung My Files or another manufacturer file manager. When USB File Transfer is enabled, many of the same folders can also appear on a Windows computer.
App-Private Storage
Android also gives apps their own protected storage. These files can include databases, account information, preferences, caches and other data intended for the app itself. Modern Android prevents other ordinary apps from freely browsing another app’s private internal files, and newer Android versions also restrict access to app-specific directories in external storage.
This means a desktop file manager should not be expected to expose every file under protected Android application storage. If the item you need belongs to an app, use that app’s export, backup or sync function when available.
Why this matters: If DCIM appears on your PC but a private messaging-app database does not, USB File Transfer is not necessarily broken. The two files are governed by different Android storage rules.
Way 1. Access Internal Storage Directly on Android
For most users, the built-in Android file manager is the fastest way to browse internal storage.
Step 1. Open Files, Files by Google, My Files, or the file-manager app supplied by your phone manufacturer.
Step 2. Tap Browse, Internal storage, Phone storage, or the equivalent storage entry.
Step 3. Open the folder you need. For example:
- Camera photos: DCIM
- Downloaded files: Download
- Screenshots and images: Pictures
- Music: Music
- Videos: Movies or another media folder
- Documents: Documents
Step 4. Use the file manager’s search function if you know the filename but not its folder.
Step 5. If you are checking capacity rather than looking for a specific file, open Settings > Storage. The exact menu name varies by manufacturer, but the storage screen normally shows used and available space by category.
Samsung Example
On a Samsung Galaxy phone, open My Files and choose Internal storage. From there, you can browse user-accessible folders such as DCIM, Download and Documents.
If your files are actually on removable storage, use the guide to viewing SD card files on Android instead.
Way 2. Access Android Internal Storage on a Windows PC
For normal shared files, try Android’s built-in USB File Transfer method before installing extra software. You usually do not need USB debugging for ordinary photo, video, document and download transfers.
Access Android Storage with USB File Transfer
Step 1. Unlock your Android phone.
Step 2. Connect it to the Windows computer with a USB cable that supports data transfer.
Step 3. On the phone, tap the USB notification, which may say Charging this device via USB or something similar.
Step 4. Under Use USB for, choose File transfer or File Transfer / Android Auto, depending on the phone.
Step 5. Open File Explorer or This PC on Windows and select the Android device.
Step 6. Open Internal shared storage, Internal storage, or the equivalent entry and browse folders such as DCIM and Download.
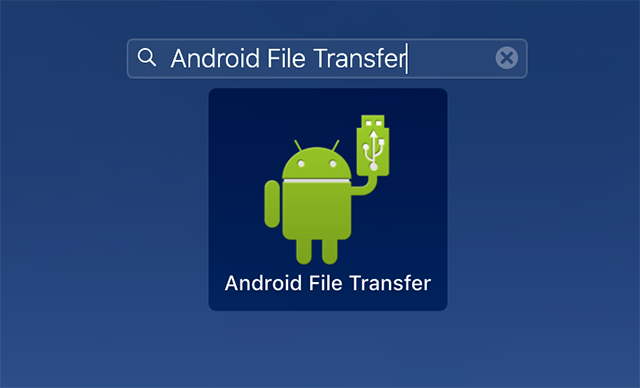
Access Android Shared Storage from a Computer
MTP is not the same as a USB flash drive. Your Android device often appears in File Explorer as a portable device rather than receiving a normal disk drive letter.
Need Category-Based Browsing and Export? Use DroidKit Data Manager
If you would rather preview supported Android data by category instead of browsing folders manually, DroidKit Android Data Manager provides a desktop interface for managing, previewing, exporting and transferring supported Android content such as photos, videos, contacts, messages, music and other files.
This does not mean DroidKit can bypass Android’s app-private storage protections. Its useful role here is making supported user data and file categories easier to preview, organize and export on a computer.
How to View Supported Android Data with DroidKit
Step 1. Install and open DroidKit, then choose Data Manager and Device Manager.
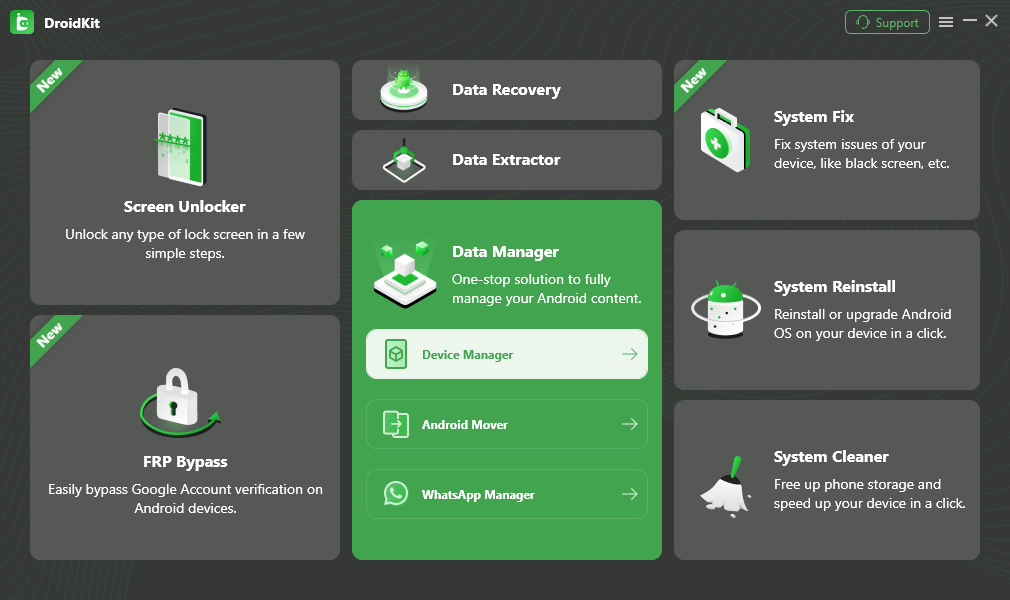
Choose Device Manager
Step 2. Connect the Android phone or tablet to the computer and follow the connection prompts.
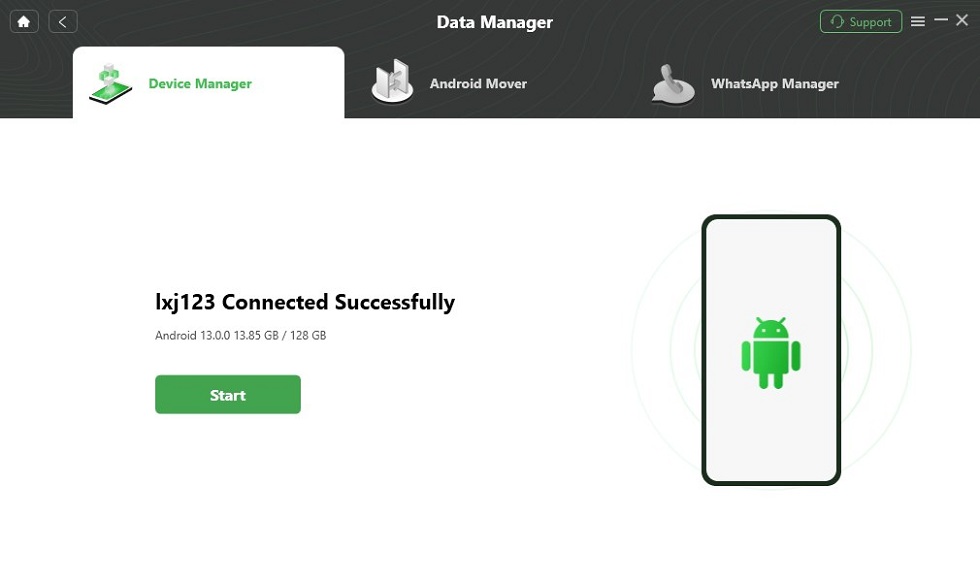
Connect the Android Device
Step 3. Choose Export Content or select a supported data category to preview what DroidKit can access.
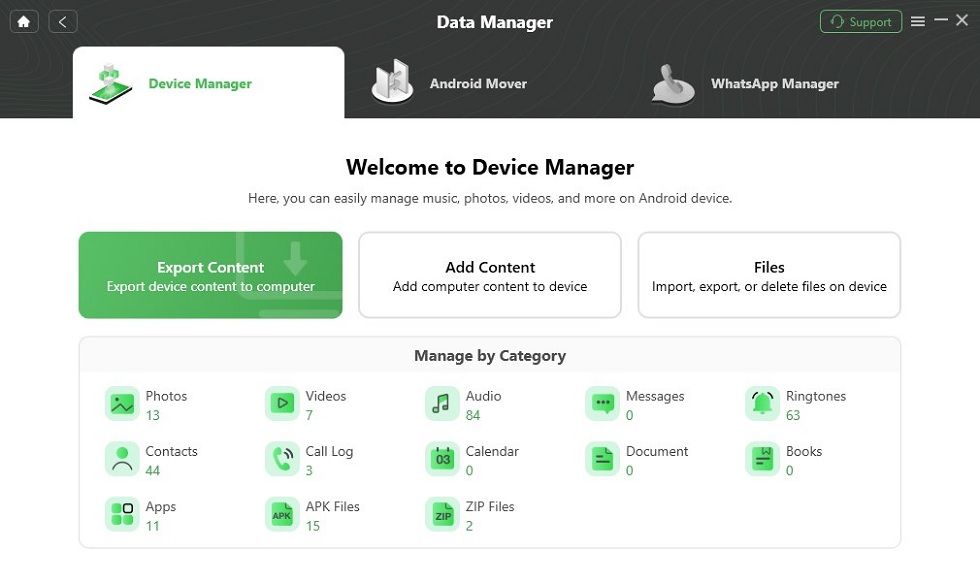
Choose Export Content
Step 4. Select the files or supported data category you want to export, then choose the computer as the destination when that option is available.
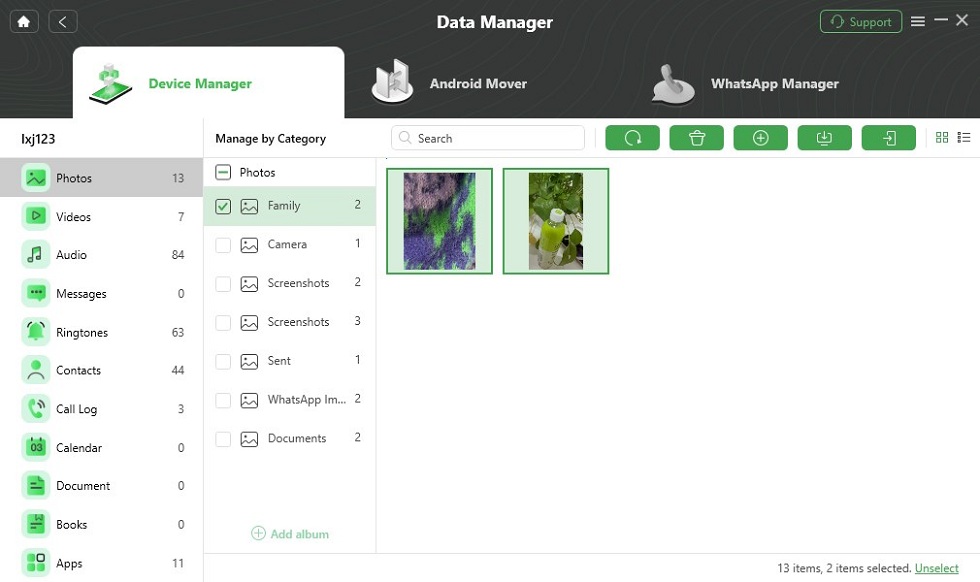
Select the Data You Want to Export
Broken or dead phone? Normal Device Manager access assumes the phone can establish the required connection. A system-crashed or physically damaged device may need a separate data-extraction or recovery workflow with its own device-compatibility requirements.
Way 3. Access Android Internal Storage on a Mac
Older guides commonly told Mac users to download Google’s Android File Transfer application. That advice is now outdated. Google no longer provides the old Android File Transfer for Mac as an official download, and the former Android File Transfer URL now redirects to Google’s Quick Share for Windows page.
For a Mac in 2026, choose the method that matches what you need:
| Mac Scenario | Practical Direction |
| You only need a few documents | Upload them from Android to a cloud service and open them on the Mac. |
| You need backed-up photos and videos | Use Google Photos when those items are already backed up to your Google Account. |
| You want a desktop Android-data interface | Use a current Mac-compatible Android manager and confirm its supported data types first. |
| You specifically need old Android File Transfer | Do not download an abandoned installer from an unknown mirror merely because an old article links to it. |
If your main requirement is frequent file management rather than a one-time transfer, the next method gives you another option that currently supports PC/Mac and wireless Android management.
Way 4. Manage Android Files with AnyDroid
AnyDroid is another current iMobie Android-management option. It can organize supported media, personal information, apps and files, and it also provides wireless management options when you do not want to depend on a USB cable.
AnyDroid’s current product page describes support for almost all common file types and category-based management. That is different from unrestricted access to Android’s protected app-private directories, which remain governed by Android permissions.
Access User-Accessible Files with AnyDroid
Step 1. Open AnyDroid on your computer and connect the Android device using the connection method supported by the current app.
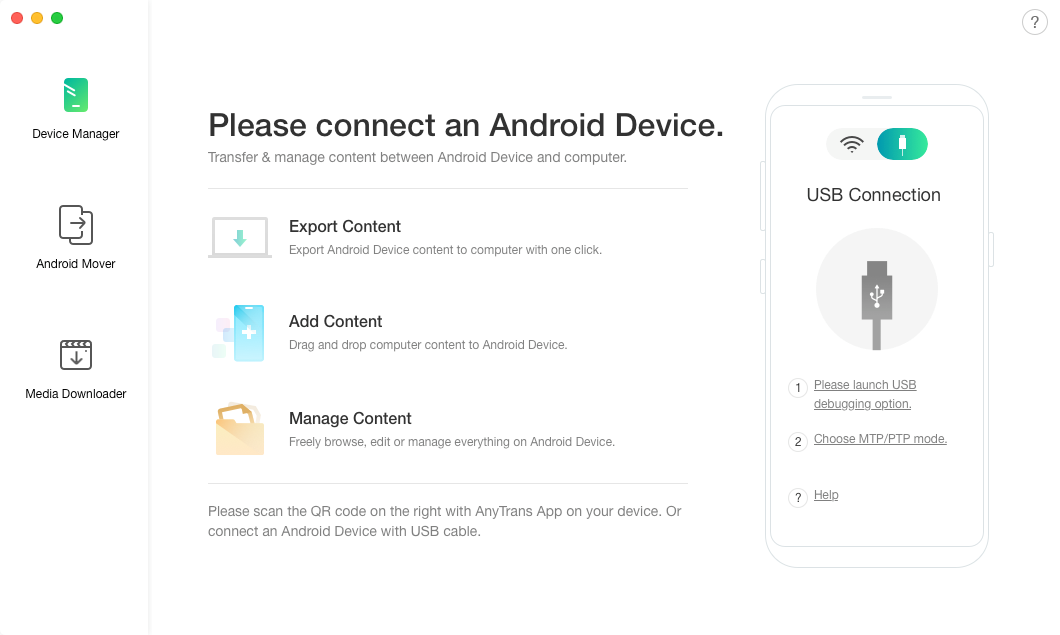
Connect the Android Device
Step 2. Choose Files or the relevant data category.
Step 3. Browse the user-accessible files and folders exposed through the current AnyDroid interface.
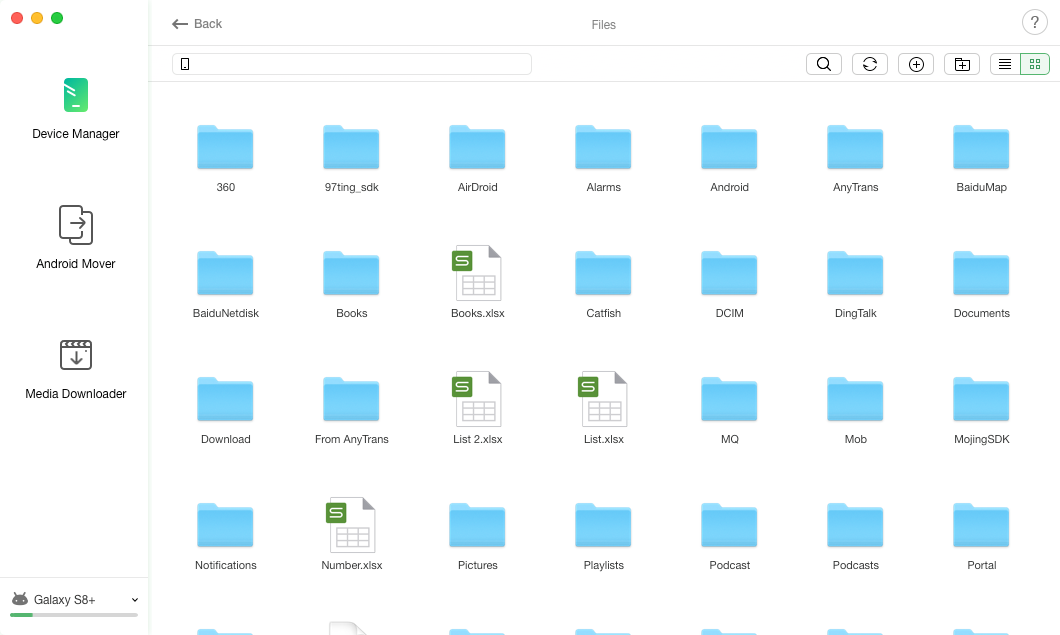
Browse Supported Files and Folders
Step 4. Select the supported file or folder you want to copy and use the available transfer option to export it to the computer.
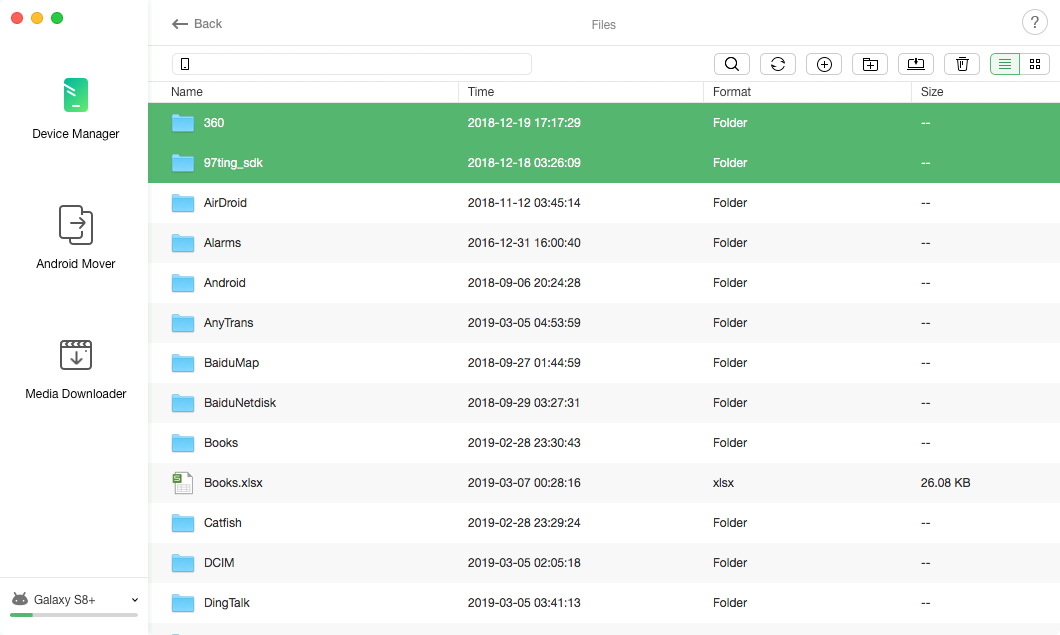
Transfer Accessible Files to the Computer
Android Internal Storage Not Showing on PC?
If Windows detects your phone but internal storage does not appear, check the connection before installing another file manager.
| Symptom | Check First | What It May Mean |
| Phone only charges | Open the USB notification and select File transfer | The phone is still using Charging-only mode. |
| No USB notification appears | Try another data-capable cable and USB port | The cable may support charging but not data. |
| Phone appears but storage is empty | Unlock the phone and reconnect | Android may not expose user files while the device is locked. |
| DCIM appears but another app’s private files do not | Check whether those files are app-private | The connection may be working normally; Android is protecting app data. |
| Windows does not recognize the phone | Restart both devices and check Windows device detection | A USB, driver or device-recognition issue may exist. |
| Only some photos are visible | Check their actual folder and whether they are cloud-only | Not every photo shown by a gallery app must exist as a local DCIM file. |
1. Unlock the Android Phone
Normal Windows File Transfer generally expects the phone to be unlocked. Unlock it before reconnecting the cable.
2. Select File Transfer Instead of Charging
Tap the USB notification and choose File transfer. Do this even if Windows already makes a connection sound.
3. Check the USB Cable
Some USB cables provide power only. Try a known-good data cable if the device charges but never appears in File Explorer.
4. Try Another USB Port
Use a direct computer port when possible. An unreliable hub can cause detection or transfer interruptions.
5. Restart the Phone and Computer
A fresh USB/MTP session can resolve a connection that became stuck after sleep, a driver update or an interrupted transfer.
6. Identify Whether the Missing Item Is Actually Shared Storage
If DCIM, Download and Documents appear correctly but a private app database does not, stop troubleshooting the cable. Normal USB File Transfer does not provide unrestricted access to Android’s app-private internal storage.
Free Up Android Internal Storage Safely
If you reached this page because your phone says storage is full, remove user files and caches deliberately instead of deleting unfamiliar Android folders.
Use Files by Google or Your Built-In File Manager
Files by Google can browse files and provide cleanup suggestions for items such as temporary files, duplicate files, screenshots and unused content. Manufacturer file managers may offer similar storage-cleanup tools.
Useful places to check include:
- Download for old installers, documents and downloaded media.
- DCIM for large camera videos.
- Movies and video folders for large local files.
- Pictures and screenshots.
- Offline downloads saved by media apps.
Back Up Photos Before Removing Local Copies
If you use Google Photos, confirm that the photos and videos you want to keep show as backed up to the correct Google Account before deleting local copies. A cloud thumbnail is not a reason to delete a local file until you have verified the backup state.
Clear Cache Carefully
For an app using too much temporary space, go to Settings > Apps, select the app, and open its storage settings. Clear cache removes temporary cached files and is different from clearing the app’s stored data.
Clear cache is not the same as Clear storage / Clear data. Clearing an app’s data can reset local settings, sessions or other app information. Do not use it as a generic storage-cleanup button unless you understand what that app will remove.
Move Large Files Elsewhere
Export large photos, videos or documents to a computer before deleting local copies. If your phone supports removable storage, an SD card may also be useful for appropriate user files.
For more storage-management ideas, see how to get more space on an Android phone.
FAQs About Android Internal Storage
Where is internal storage on an Android phone?
Open Files, Files by Google, My Files or your manufacturer’s file manager, then choose Internal storage or Phone storage. User-accessible folders commonly include DCIM, Download, Pictures, Movies, Music and Documents.
Why can’t I see every file in Android internal storage?
Android separates shared user storage from app-private storage. Photos, downloads and documents in shared storage are normally browseable, while app-private internal files are protected by Android and are not exposed as ordinary folders to other apps or normal USB File Transfer.
Do I need USB debugging to access Android internal storage on a PC?
No for normal file browsing. To copy shared files with Windows, unlock the phone, connect a data-capable USB cable and choose File transfer from the USB notification. USB debugging is a separate developer feature and is not normally required for MTP file transfer.
Why is Android internal storage not showing on my PC?
First unlock the phone and change the USB connection from Charging to File transfer. If it still does not appear, try another data-capable cable, USB port and restart. If normal folders such as DCIM are visible but a specific app’s private files are missing, Android storage permissions may be the reason rather than a USB problem.
Can I access Android internal storage on a Mac?
Yes, but the old Google Android File Transfer for Mac is no longer the current official route. You can use cloud services for individual files and backed-up media, or use a current Mac-compatible Android file manager for supported data and file categories.
What happened to Android File Transfer for Mac?
Google no longer provides the old Android File Transfer for Mac application as an official download. The former Android File Transfer URL now redirects to Google’s Quick Share for Windows page, so an old article linking there is no longer providing a Mac installer.
Can I access internal storage if my Android phone is locked?
Normal USB File Transfer generally expects the Android device to be unlocked before shared storage is exposed to the computer. If the phone cannot be unlocked, do not assume that an ordinary file manager can bypass the lock or reveal protected app-private data.
Can I access internal storage on a dead Android phone?
Not through the normal Files or USB/MTP methods described above. A dead, physically damaged or system-crashed phone is a data-recovery scenario and may require a separate extraction method whose support depends on the device and type of damage.
Does clearing an app cache delete my files?
Clearing cache is intended to remove temporary cached data. It is different from Clear storage or Clear data, which can reset local app information. Always read the option carefully before confirming a cleanup action.
Conclusion
The easiest way to access Android internal storage depends on what you mean by “internal storage.” For photos, downloads, videos and documents in shared storage, start with the phone’s file manager or Windows USB File Transfer. Those methods are free and usually all you need.
If you want category-based browsing, bulk export or a desktop interface, DroidKit Data Manager or AnyDroid can make supported user data easier to organize. They should not be presented as a way to remove Android’s normal protection around app-private data.
When files do not appear, diagnose the exact boundary: phone locked, USB still set to Charging, cable not carrying data, file stored only in the cloud, or the requested item located in protected app storage. Those cases need different fixes, and treating them all as a “storage not showing” problem usually wastes time.
More Related Articles



Joy Taylor is a seasoned technical writer with over a decade of experience in mobile technology. At iMobie, she specializes in producing in-depth content on iOS data recovery, iPhone unlocking solutions, and iOS troubleshooting.
Product-related questions? Contact Our Support Team to Get Quick Solution >
