How to Put iPhone in DFU Mode
If you have come across a procedure that requires using DFU mode, you will want to learn how to put an iPhone in DFU mode. This guide explains everything that you need to know about this mode and how to enter it. Read on to learn more.
iPhone & Android Recovery Tips
iPhone Recovery Tips
iPhone Reset Tips
Android Reset Tips
Your iPhone comes with a mode called DFU mode that is used in certain procedures to install or fix something on your device. If you are going through a procedure that asks you to put your iPhone in DFU mode, you will need to learn to do that as this is not something that everyone knows how to do. Also, there are many things you need to know about this mode before you actually go ahead and use it.
This guide focuses solely on DFU mode and tells what this mode is, what it does to your iPhone, how you can reboot various iPhones into this mode, and finally how you can exit the mode on your phone. You will learn that all in the guide below.
Part 1. Before Putting iPhone in DFU Mode
Whether or not you already know this, but there are a few things you should be aware of before you put your iPhone in DFU mode. This is not a mode that a regular user should use so learning these things before you use it will be really useful.
1. What is DFU Mode
If you have not restored your device, faced many issues on it, or tried to jailbreak the device, you have likely no idea what this mode is and how it works on your phone. Here we explain what DFU mode means on Apple’s iOS devices.
DFU stands for Device Firmware Update and it is a mode you would use on your iPhone to install custom firmware on your device. This firmware could be an old version of iOS that you want to use on your phone, or it could be something else.
Some jailbreaking procedures also require you to put your iPhone into DFU mode before you can jailbreak it. This mode basically allows you to deeply restore or work with the core files of your iOS device.
2. Does DFU Mode Erase iPhone
If you are going to be using DFU mode on your iPhone, you will probably want to know if it will delete any of the data saved on your device. Unfortunately, if you use this mode and install something or restore your device, all the data stored on your iPhone will be erased. This functions just like the iTunes restore method that also deletes all your data.
It fully erases your iPhone deleting your videos, photos, messages, apps, and even the configured setting options. When you have finished using this mode, you will need to set up your device from scratch to use it.
You could use something like AnyTrans to back up files from your iPhone before you use DFU mode and it wipes off your data.
3. Is DFU Mode the Same as Recovery Mode
If you have performed some soft restore methods on your iPhone, you have likely used the iOS recovery mode. This mode basically helps you to fix many issues on your device when your device will not boot-up. You can reboot your phone into recovery and get iTunes to restore it.
DFU mode is not the same as recovery mode. The former helps you deeply restore your system which is not the same as what happens when your phone is in recovery mode. While Apple guides you to use recovery mode in certain situations, it does not recommend you to use DFU mode as it poses many risks if you do not know what you are doing.
As explained, DFU mode has different workings from recovery mode and it should not be used as a substitute for recovery mode.
Further Reading: Fix iTunes Not Recognizing iPhone in Recovery Mode >
Part 2. How to Put an iPhone in DFU Mode
Now that you have learned what DFU mode is and what it does, you will want to learn to reboot your iPhone into this mode. There are different steps for various models of the iPhone to enter DFU mode and the following will help you out with that.
1. For iPhone X and Newer Models
If the device that you want to reboot into DFU mode is an iPhone X or a later model of the iPhone, the steps here in this section will help you put your phone in DFU mode. Unlike many other guides on the Internet, you do not actually need to switch off your device to enter DFU mode.
You can enter the mode even when your iPhone is turned on and you are on your home screen. The following shows how to do this.
Step 1. Connect the device to a computer using a USB cable.
Step 2. Press the Volume Up button and let it go quickly.
Step 3. Press the Volume Down button and let it go quickly.
Step 4. Press and hold down the Side button until your screen becomes black.
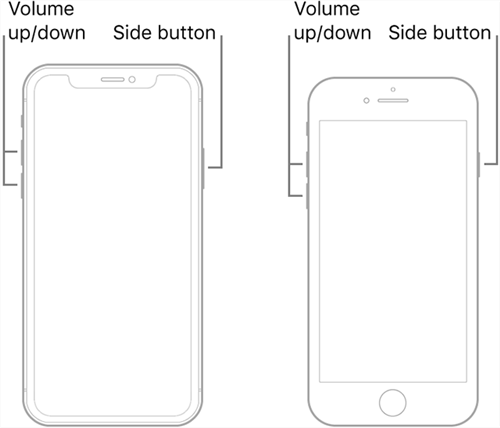
Enter DFU Mode on the Latest iPhone Models
Step 5. Keep the Side button held down and press and hold down the Volume Down button.
Step 6. Wait for about five seconds and let go of the Side button. Keep holding the Volume Down button.
Step 7. Your iPhone will show up in iTunes or Finder and you can then let go of the Volume Down button.
2. For iPhone 7 and 7 Plus
If you are using an iPhone 7 or 7 Plus, the steps to enter DFU mode are slightly different than the other methods. However, that does not make rebooting your iPhone into this mode any difficult. You still need to press and hold down certain keys on your phone to reboot into the mode and the following shows how to do just that.
Ensure your device is connected to your computer when you perform the following steps.
Step 1. Press and hold down the Volume Down and Sleep buttons at the same time.
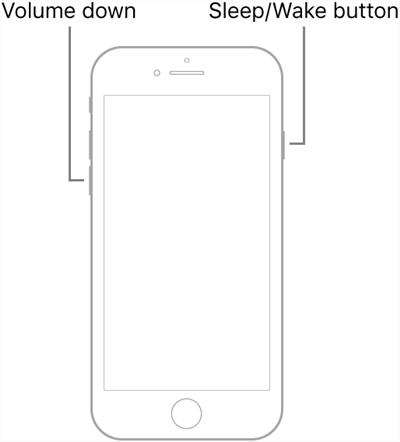
Reboot an iPhone 7/7 Plus into DFU Mode
Step 2. Wait for about eight seconds and then release the Side button but keep the Volume Down button held down.
Step 3. If iTunes or Finder detects your iPhone, release the Volume Down button that you have been holding down.
Your iPhone’s screen should now be all black which means it is in DFU mode.
3. For iPhone 6 and Older Models
If you have one of the relatively older models of the iPhone like an iPhone 6 or an earlier version, you will need to use the Home button in combination with other buttons to reboot your phone into DFU mode. This procedure is just as simple as the others and your iPhone will be ready to be restored in the aforementioned mode.
The following are the steps for how to do this.
Step 1. Connect the device to a computer using a USB cable.
Step 2. Press and hold down the Side and Home buttons simultaneously on your iPhone.
If your iPhone does not have a Side button, use the Top button instead.
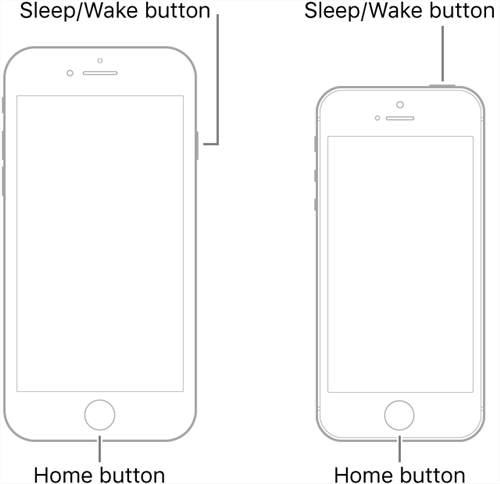
Access DFU Mode on Older iPhones
Step 3. After eight seconds of holding down the buttons, let go of the Side or Top button but do not release the Home button just yet.
Step 4. Your iPhone should appear on your computer, and it is at this point that you can let go of the Home button.
Part 3. How to Exit DFU Mode
Once you have finished whatever it is that you wanted to do in DFU mode, you will want to exit the mode and get back to the normal screen. You can do this by force rebooting your device as follows.
- On an iPhone 6S or earlier, press and hold down the Side and Home buttons at the same time.
- On an iPhone 7 or 7 Plus, press and hold down the Side and Volume Down buttons together.
- On an iPhone 8 or later, quickly press Volume Up, quickly press Volume Down, and hold down the Side button.
Your iPhone should now be out of DFU mode.
Bonus Tip. How to Enter or Exit Recovery Mode with 1-Click [AnyFix]
Generally, you will be using recovery mode rather than DFU mode on your iOS-based devices. Therefore, it is more important to learn how you can reboot your device into the iOS recovery mode. While you can always use a key combination to get into the mode, there are better methods to do that.
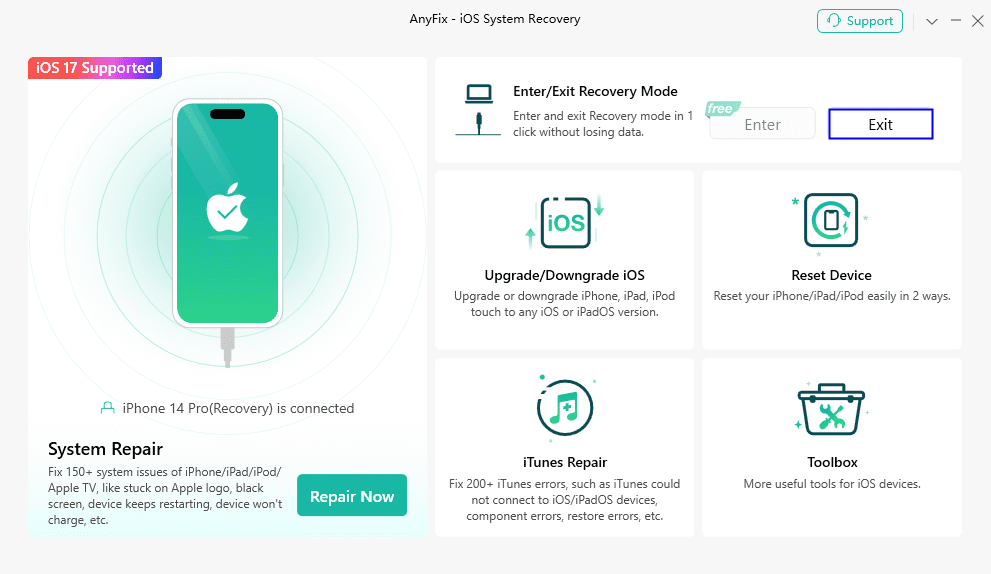
One way to quickly and easily enter or exit recovery mode on an iPhone is to use AnyFix – iOS system recovery. It is an app that helps you to reboot your device into recovery mode with the click of a single button. It works exactly the same way to help you exit the recovery mode on your iPhone.
The following is how you can use it to enter and exit recovery with one click. Make sure to get the AnyFix – iOS system recovery app installed on your computer.
Free Download * 100% Clean & Safe
To Enter Recovery Mode:
Step 1. Connect your phone to your computer, launch the app, and click on Enter/Exit Recovery Mode.
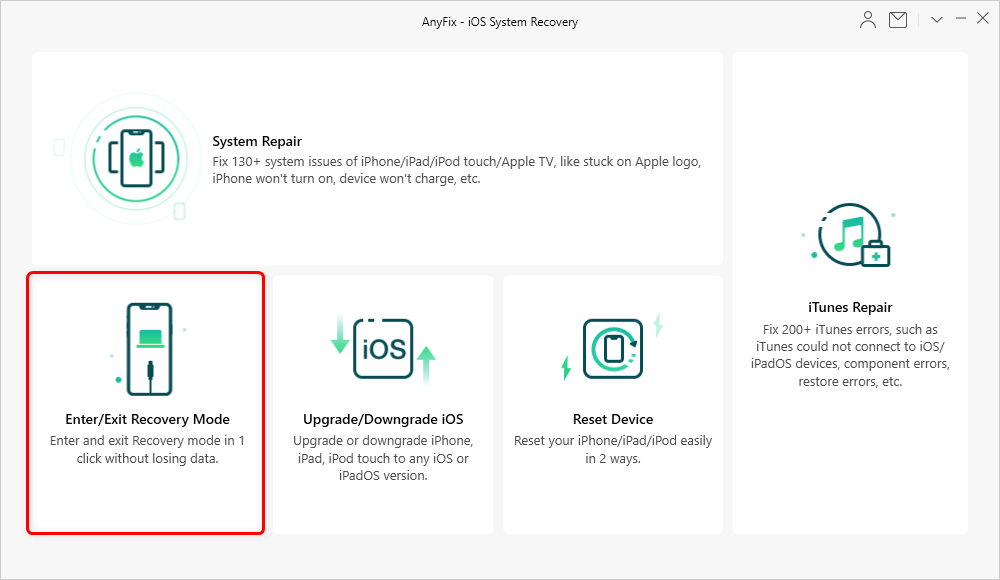
Choose Enter/Exit Recovery Mode
Step 2. Click on Enter Recovery Mode to reboot your iPhone into recovery mode.
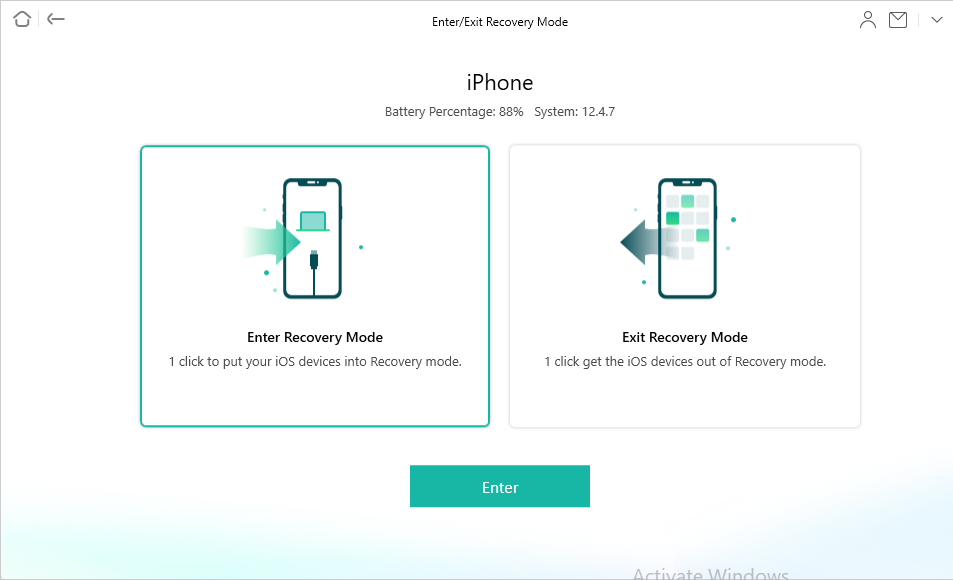
Enter Recovery Mode with AnyFix
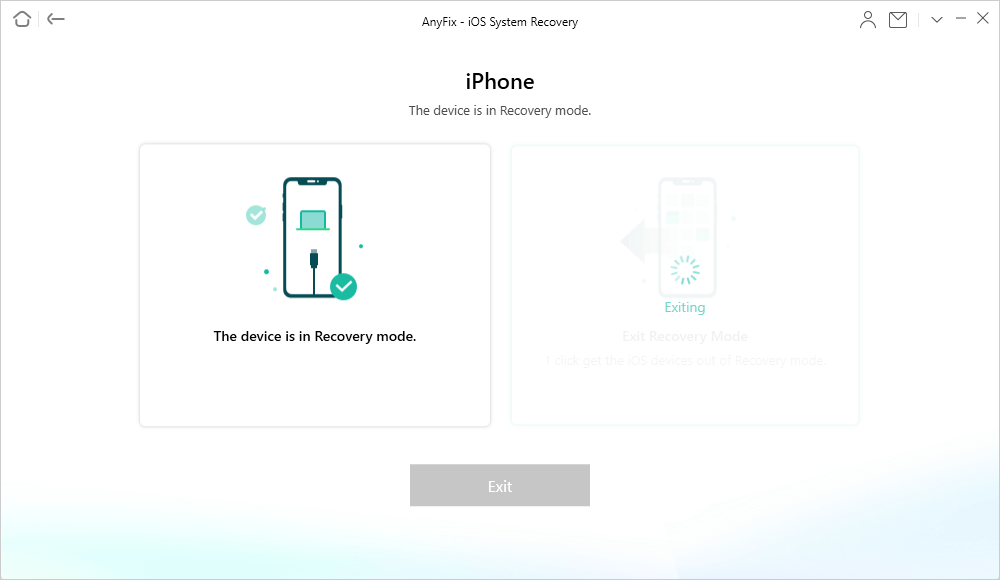
Step 3. The app will confirm that your iPhone is indeed in recovery mode.
Exit Recovery Mode with AnyFix
It is as easy as that.
To Exit Recovery Mode:
Step 1. Plug-in your iPhone to your computer, open the app, and click on Enter/Exit Recovery Mode.
Step 2. Select the Exit Recovery Mode option and tap on Exit to bring the iPhone out of recovery mode.
iPhone is Exiting Recovery Mode
Your phone should now be out of recovery mode.
The Bottom Line
You will need to put your iPhone in DFU mode for several reasons. While it is not exactly the mode you are recommended to use, the above guide will help you reboot into it in case you are downgrading the firmware or are looking to jailbreak your phone. Lastly, you learn how to reboot into and get out of recovery mode on your iPhone, which is something you will use more often on your device.

Member of iMobie team as well as an Apple fan, love to help more users solve various types of iOS & Android related issues.
Product-related questions? Contact Our Support Team to Get Quick Solution >
