5 Ways to Fix iPhone Stuck in Guided Access [iPhone 26 Included]
Trying to fix your iPhone stuck in Guided Access mode? Here are five foolproof methods to do so without any hassle.
AnyFix – Fix iPhone Stuck in Guided Access 1-Click
iPhone stuck in guided access? How to Fix? Free download AnyFix to fix iPhone stuck in guided access safely and easily! AnyFix is your one-stop solution to fix various iOS/iPadOS/tvOS/iTunes issues in minutes and bring your Apple devices back to normal without data loss.

iPhone users undoubtedly enjoy the most advanced features in the world of technology. One of the unique and outstanding features of iOS devices is Guided Access. But what if you get stuck on this Guided Access? That’s the situation where this blessing suddenly turns into a disaster.
If you are also facing this unfortunate issue, then you don’t need to try some random methods because we’ve got you covered. In this brief article, we’ll walk you through 5 different ways you can fix your iPhone stuck in Guided Access. But before that, let’s first overview what Guided Access is.
And here are some other tips about how to fix iPhone issues: How to Fix iPhone Stuck on Reset >
What Is Guided Access on iPhone?
When focusing on a particular task, certain areas of the screen, hardware buttons, or other gestures may distract us. For this specific issue, the company launched a unique feature that is no other than Guided Access.
You can enable Guided Access from the “Accessibility” settings and disable those distracting factors. This will also allow you to focus on a specific app without interception from other apps.
But the same Guided Access becomes even more disturbing if your iPhone gets stuck on it. You can’t use the usual methods because many features and buttons are already disabled. Instead of smashing your head on the wall, try these methods one by one, and you will get your iPhone back to normal in no time.
Here are the 5 ways to get rid of Guided Access on iPhone. And out of these five ways, let’s start with the easiest one.
Method 1. Fix iPhone Stuck in Guided Access with Home Button
The Guided Access mode in iPhone is usually added to the Apple Accessibility Shortcut. And you can use this shortcut to get out of Guided Access quickly. So what you have to do is:
1. Triple-press the Home/Side button. This will open your Apple Accessibility features.
2. Now select “Guided Access” from there.
3. After that, enter your Guided Access passcode. Now you can “End” your Guided Access without any trouble.
But there are circumstances when people forget their Guided Access passcode. Other than that, when your iPhone is stuck on Guided Access, this method usually doesn’t work.
In those cases, let’s proceed forward and see what we can do.
Method 2. Fix iPhone Stuck in Guided Access with Force Restart
The second method we will use to get rid of Guided Access is our almighty “Force Restart” method. Whenever you get any system bug or software issue, then Force restarting the iPhone solves the problem most of the time. And in our case, force restart can also end the Guided Access.
Now the question is, “How do we Force Restart our iPhone?” To Force Restart an iPhone, the process is different for various models. Here we have made three categories to see how to do it on every model. Let’s dive right into them!
iPhone 6 and Older Models:
1. Press the Home and Power buttons together and hold them until the Apple Logo appears.
2. When the Apple logo appears, it’s time to release both buttons. Your iPhone will restart after some time.
iPhone 7 and 7 Plus:
- This time, press the Volume Down & Power buttons and hold them until you see the Apple Logo. And then release them right away.
iPhone 8 or Later Models:
1. The process is slightly different for the iPhone 8 or any later model. What we have to do is;
2. Press and release the Volume Up button once, followed by the Volume Down button.
3. Once done, press the Side button and hold it.
4. You have to release the Side button when you see the Apple Logo.
If even force restarting your iPhone doesn’t solve the issue, the problem might be in your iOS system.
Therefore, we are now going to show a powerful software that will fix your iPhone for sure.
Method 3. Fix iPhone Stuck in Guided Access without Data Loss 1-Click [SAFE]
People get panicked when even the force restart doesn’t get rid of Guided Access. But it’s not a thing to worry about. Why? You ask. That’s because many third-party tools out in the market are developed for such iPhone issues. And out of those tools, here we will present you with special software that can fix any iOS system error, including the stuck Guided Access. This outstanding software is no other than the AnyFix – iOS System Repair. Let’s first get a brief intro to AnyFix; then we’ll move on to the step-by-step guide for repairing the iOS system.
Key Features
- Fix 150+ system issues and 200+ iTunes errors – Whether you encounter iPhone/iPad stuck on the loading screen, stuck in DFU mode, or your iTunes cannot recognize your device, iPhone/iPad disabled cannot connect to iTunes, etc., you can easily solve it with AnyFix.
- 3 repair modes for any issues – To ensure the successful repair of system errors, AnyFix provides three repair modes, so that you can always find the corresponding repair method for any issue, whether it is simple or complex. No data loss!
- Simplify operation with button clicks – The whole repair process only requires you to tap on buttons a couple of times, making system repair no longer a complicated and troublesome process.
- Compatible with multiple devices and system versions – iPhone, iPad, iPod, and even Apple TV can all be repaired with AnyFix. And even the latest iOS 26 has been covered by this tool.
Free download and install AnyFix on your computer. This software is available for both Windows and Mac computers. So just visit the official website of AnyFix and download the tool without any cost. After the software is downloaded, install it right away.
Free Download * 100% Clean & Safe
How to Fix iPhone Stuck in Guided Access with AnyFix:
Step 1. Start the Repair Tool
Free get AnyFix and launch it to help you fix the corrupt system causing your iPhone stuck in guided access. Select the System Repair mode.
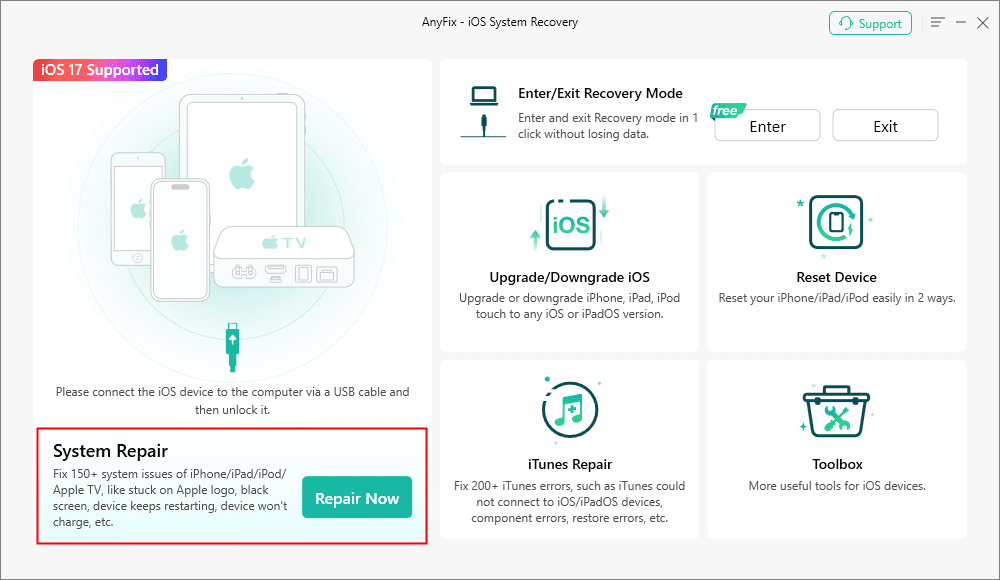
AnyFix System Repair Option
Step 2. Choose the Type of System Issue
You will see a list of 4 system issue types. According to your problem, here you need to select Screen Stuck. Then click on the Start Now button to get started.

AnyFix System Repair Screen Stuck
Step 3. Select Repair Mode
Now you must select a mode of AnyFix for repairing your iOS system. AnyFix provides three ways to fix the system: Standard, Advanced, and Ultimate. Select the Standard Repair from there because it doesn’t erase any of your device’s data.
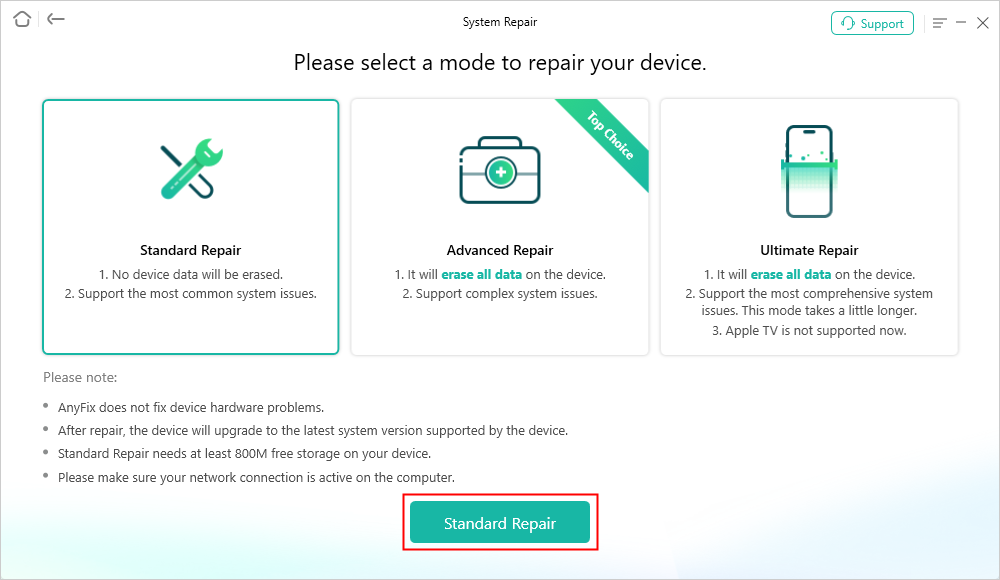
AnyFix Standard Repair
Step 4. Download the Firmware
Once you have selected the standard mode, you need to download the firmware for your repair. AnyFix will automatically find suitable firmware for you with an internet connection. You just need to put the device’s model on it and hit the Download button. You can also add an already downloaded firmware.
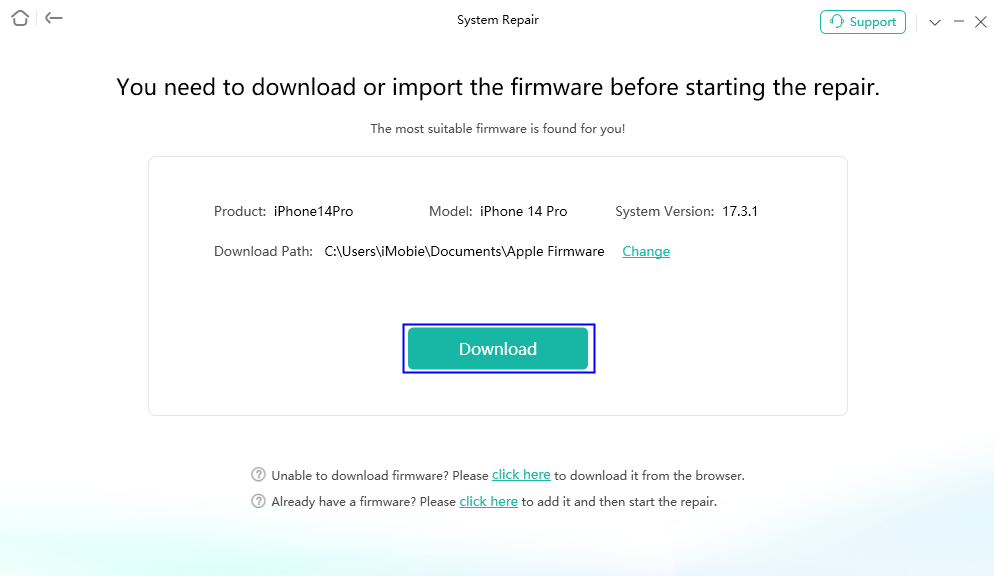
AnyFix System Repair Firmware Download
Step 5. Fix the Stuck Guided Access
So when the download of firmware finishes, we are all set to repair our iOS system. Click on the Start Standard Repair button that will appear on the screen to proceed forward. Congratulations!!! The repair process is completed. Click on OK and use your device freely.
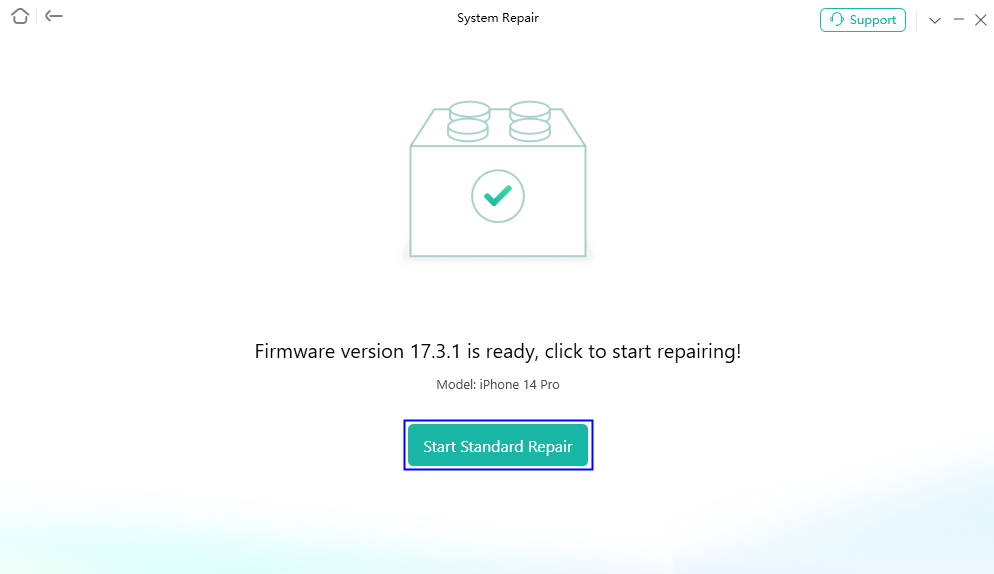
AnyFix System Repair Firmware Finish Downloading
Most people get rid of the stuck Guided Access using this method. But if you are facing the same issue, here’s another hack you can use.
Free Download* 100% Clean & Safe
Method 4. Fix iPhone Stuck in Guided Access in Lost Mode
You can also use iCloud to fix stuck Guided Access. But it’s not like the usual iCloud method. Here we are going to use iCloud smartly. Let’s see what to do in a stepwise manner.
Step 1. Visit the official website of iCloud and sign in using your Apple ID.
Step 2. Once logged in, go to the “Find iPhone” option and select your iPhone stuck on Guided Access.
Step 3. Now iCloud will find the location of your iPhone. After that, select “Lost Mode” from there. This will put your device in lost mode. When the device is in lost mode, it will automatically turn off the Guided Access and will be locked.
Step 4. Moving forward, just enter your screen passcode and use your iPhone like before.
But even if this iCloud method fails, we have our last resort. And what’s that? It’s to restore our phone using iTunes.
Method 5. Fix iPhone Stuck in Guided Access with iTunes
However, restoring an iPhone using iTunes is not recommended because of the data loss. We can still use it if all the above methods fail. Here are the steps for restoring an iPhone using iTunes.
Step 1. First, download and install the latest version of iTunes on your computer. After that, launch iTunes and connect your iPhone to the computer using a connection cable.
Step 2. Then wait until iTunes detects your device. Once the device is detected, hit the small iPhone icon on top of the interface.
Step 3. Now click on the “Restore iPhone” option. A prompt will appear for confirmation. Click on “Restore” again.
Step 4. Wait patiently until the process is completed. And once it’s done, hit the “Done” button and enjoy your iPhone just like a new one.
Now, moving on to some frequently asked questions before we wrap up our article.
Frequently Asked Questions
Q1. How to set a new password for Guided Access?
When you turn on Guided Access on your device for the first time, the default password is the same as the device’s password. But you can easily set a new password for Guided Access.
1. For this, go to Settings > Accessibility and turn on Guided Access.
2. After that, tap on the Passcode Settings > Set Guided Access Passcode and enter the password you want to set.
There’s also an option to set Face ID or Touch ID to exit the Guided Access mode.
Q2. Will Guided Access turn off if the phone dies?
Yes, the Guided Access session will automatically turn off if the phone dies. So this is also a method to get your iPhone back to normal if it’s stuck on Guided Access. You just leave it alone until the battery drains completely. But this process takes a lot of time, so just force restart the iPhone instead, as we explained above.
The Bottom Line
Guided Access has brought a lot of ease if used correctly. But when the iPhone gets stuck in Guided Access, it becomes a headache. Moreover, users can’t even use standard features or buttons as they are disabled in Guided Access. Therefore, the five methods we discussed in our brief guide come in handy whenever you want to exit the Guided Access.
And if you want to know which one is the most useful method, it is AnyFix. So you can free download it first and no data will be lost in this way. Make sure you like our guide and share it with your friends and family. And don’t forget to give feedback on these methods in the comments below.
Free Download * 100% Clean & Safe

Joy Taylor is a seasoned technical writer with over a decade of experience in mobile technology. At iMobie, she specializes in producing in-depth content on iOS data recovery, iPhone unlocking solutions, and iOS troubleshooting.
Product-related questions? Contact Our Support Team to Get Quick Solution >
