[Solved] How to Fix Top of iPhone Screen Not Working
Problems with the iPhone screen frequently occur. The ten solutions listed below are designed to help you resolve this problem.
Are you worried because your iPhone screen is not working? You wonder, even after using a screen protector and avoiding drops, your screen is still malfunctioning. Your iPhone screen may twitch or cease working without any physical harm.
This article explains why your iPhone’s top screen isn’t working and how to fix it. Each technique is a solution to fix your iPhone’s screen. Before stepping towards the solutions for unresponded iPhone’s top screen, let’s understand the reasons why your iPhone’s top screen is not working.
Why is the Top of the iPhone Screen Not Working?
It’s essential to determine the underlying causes of the iPhone screen not working issue before we look at the possible solutions for fixing your unresponsive iPhone screen.
Sadly, Apple has not yet addressed this concern, but we’ve done our homework and have compiled a list of possible primary reasons for the situation.
- Physical damage
- Freezing and conflict of Apps
- Malfunctioning digitizer
- Software bugs in iOS
- Greasy surface
While the issue usually rests with iOS software and apps, many iPhone owners tend to replace their screens immediately. Therefore, we recommend trying the alternatives listed below to avoid hassles and excessive spending.
3 Basic Fixes for Top of iPhone Screen Not Working Issue
You can begin with these basic fixes and see if the screen works. If you have more severe problems, they might not be able to help you since these methods have a low success rate. Part 3 is the section where you can check out some more advanced techniques.
1. Clean Your Finger and iPhone Screen
It is the most obvious yet widely overlooked fix for an unresponsive iPhone screen. Typically, you will experience an unresponsive screen if the iPhone screen is oily, moist, or unclean. The same will occur if you operate your iPhone with dirty or oily hands.
As a result, you must first wash and dry your hands before cleaning the iPhone screen with a gentle detergent and a fresh piece of woolen fabric. Never wipe the screen with water!
2. Force Restart iPhone
One of the many issues that can be fixed by forcing an iPhone to restart is the issue of the unresponsive screen. The process for forcing an iPhone restart differs depending on the version, but we’ve got you covered.
- For iPhone 6 or earlier models: If you have an iPhone 6s or any earlier model, you can force a restart by pressing and holding the Home button and the Sleep/Wake button simultaneously for at least 10 seconds.
- For iPhone 7 or even 7 Plus: For iPhone 7 or even 7 Plus, press and hold the Volume Down and Sleep/Wake buttons simultaneously until the Apple logo shows.
- For iPhone 8 and subsequent models: For iPhone 8 and subsequent models, swiftly press and release the Volume Up and Down buttons in succession. Then, press and hold the Power/Side button till the apple logo appears on the screen.
Restart Your iPhone
3. Remove Screen Protector
Many iPhone owners use screen protectors to guard the device’s display from serious harm in the case of a drop. However, if your screen protector separates from the screen, the portion of the screen that has been affected is no longer touch-sensitive, making it difficult for you to use your iPhone.
In this situation, we advise you to detach the screen protector, reboot your iPhone, and determine whether the issue has been resolved. You can always get a new screen protector if the problem is resolved.
7 Advanced Fixes for Top of iPhone Screen Not Working Issue
If the screen is still not working even after using above mentioned fixes, You need to follow the more advanced solutions listed below.
1. Fix System Issue with PhoneRescue for iOS
If the top of iPhone screen isn’t working properly, it’s most likely due to a system error. Then to solve this problem, you need a powerful iOS system repair tool, and PhoneRescue for iOS is what you are looking for. As its name suggests, PhoneRescue is a system repair and data recovery tool specially designed for iDevices, which can bring your iPhone/iPad back to life from the top of the screen not working or other system issues in just a few minutes. Here are some attractive features of PhoneRescue.
Free Download * 100% Clean & Safe
- You can solve almost all common iOS system issues only with PhoneRescue, including but not limited to screen not working, stuck on Apple logo, iOS update failure, iPad screen flickering, etc.
- You just need to click the corresponding buttons as the instruction says to fix system errors. It can be easily operated and completed by all the people such as children, the old, and technical novices.
- PhoneRescue will not sacrifice the data on your device to achieve system repair, allowing you to access and use various data as before immediately after the repair is completed.
- With this tool, you can solve system problems in a few minutes even at home. No need to spend hours in the repair store or waiting for technicians to fix them.
What’s more, PhoneRescue can also help you recover accidentally deleted or lost data such as photos and videos, with or even without backup. Currently, this tool has been updated and supports the latest iPhone 14 and iOS 16. So feel free to download PhoneRescue and try it for free with the following steps to fix the top of iPhone screen not working issue.
Step 1. Launch PhoneRescue and select Repair iOS System in Device Rescuer from the main screen. Your iPhone needs to be connected to your computer using the USB cable. You will see the interface below after your device is detected.
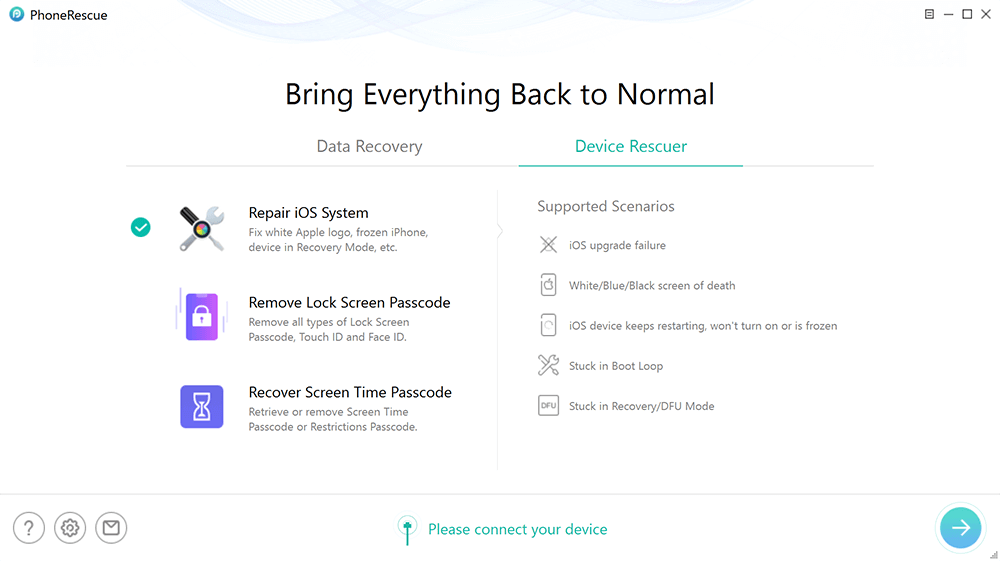
Click Device Rescuer and Choose Repair iOS System
Step 2. Then you will see two further options Standard Mode and Advanced Mode. As in Advanced Mode, you can fix more serious iOS bugs without losing any data, here you are recommended to choose Advanced Mode first.
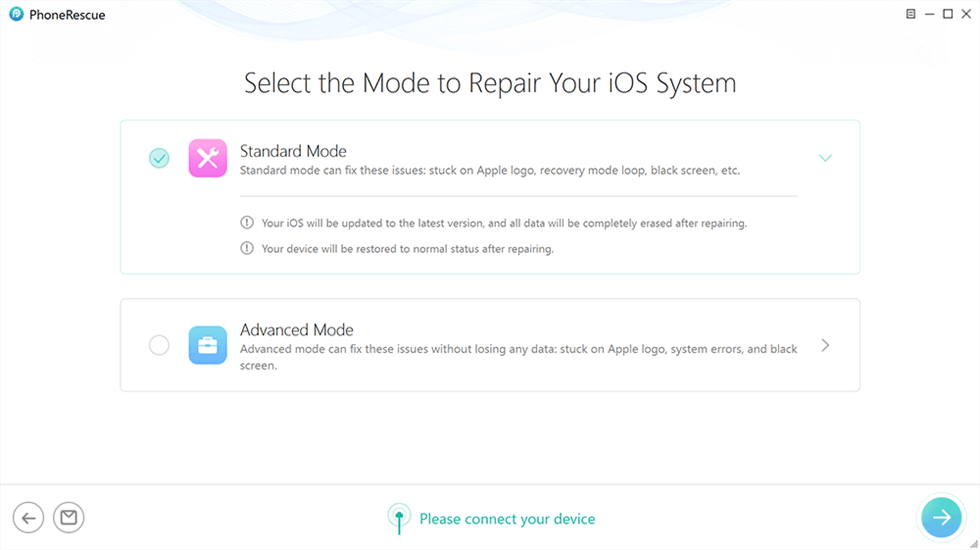
Choose Advanced Mode
Step 3. You need to set your device to recovery mode. And to enter this mode, you can follow the step-by-step instructions on the interface.
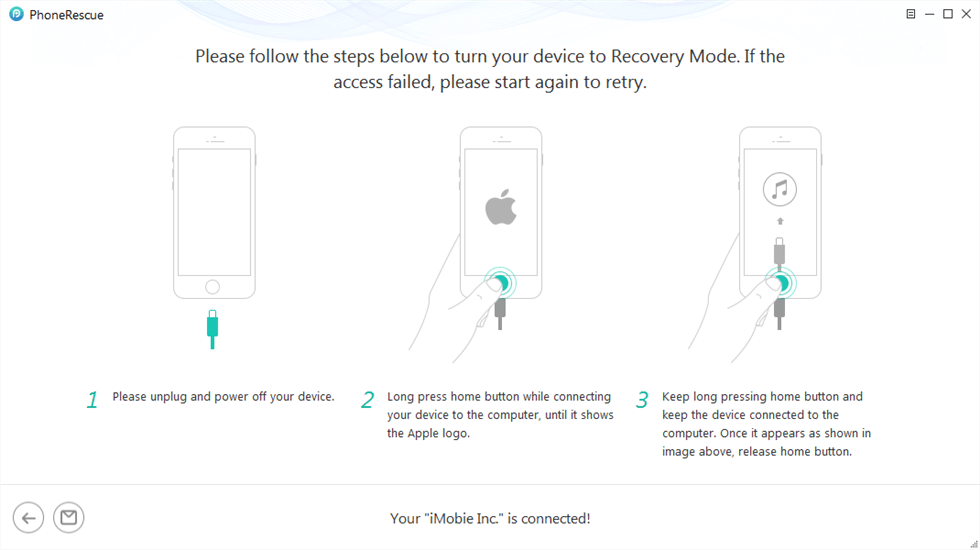
Enter Recovery Mode
Step 4. After that, please check the detailed information of your device and click on Download button to get the matched firmware for your Apple device. Downloading requires a good Internet connection.
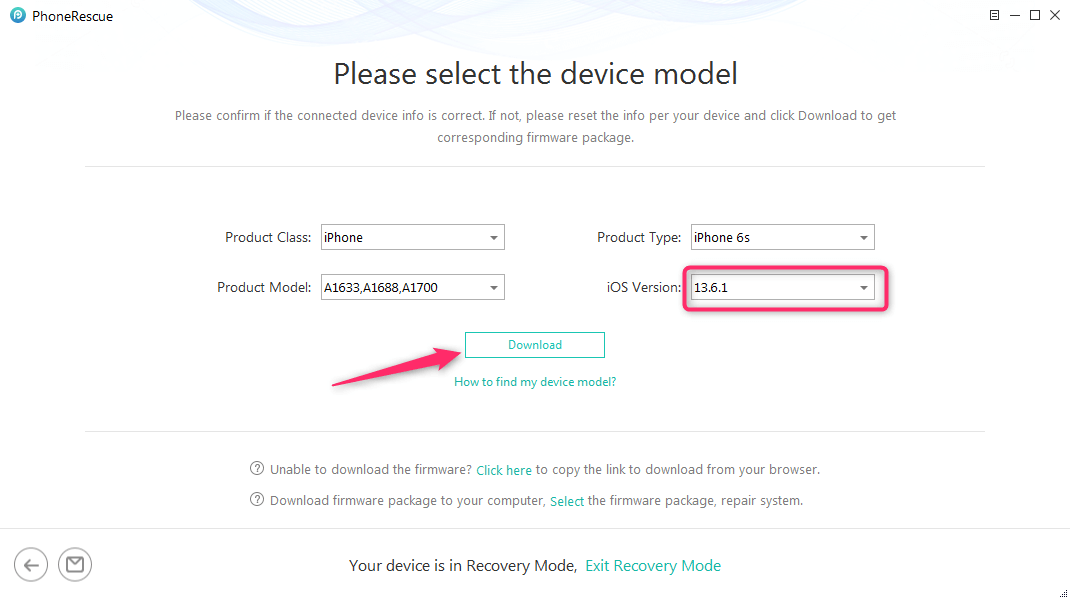
Click Download to Get Firmware
Step 5. PhoneRescue will immediately repair your iOS device after downloading the firmware package. Wait till the iOS fixing process is complete before unplugging your device. Once the damage has been repaired, the interface below will appear.

iOS Repairing Completed
You’ll notice that your iPhone, iPad, and iPod touch are once again in full working order when the iOS system has been repaired.
2. Uninstall Problematic Apps
Apple maintains a strict iOS and app store to shield its customers from unreliable programs. To fulfill Apple’s security and performance standards, all programs in the app store have undergone meticulous inspection. Therefore, downloading malicious applications from the Apple App Store is impossible.
Third-party apps are frequently the source of malfunctioning apps, so if you recently installed one, consider uninstalling it to see if that resolves your iPhone’s screen problem.
Hold the delete key while long-pressing the desired app to remove it from your device permanently.
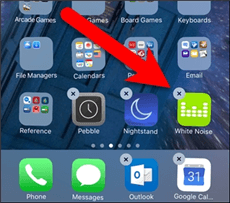
Uninstall Problematic Apps
3. Adjust Touch Screen Sensitivity Settings
A 3D Touch sensitivity issue might cause a disabled state if you use an iPhone 6 or an earlier iPhone model. You can attempt to fix the problem by adjusting the touch screen’s sensitivity level. See the instructions below!
Step 1. Go to General > Accessibility in Settings after opening it.
Step 2. Go to Touch option in Accessibility.
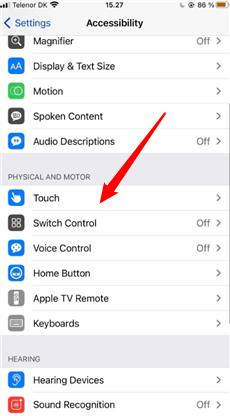
Go to Touch Option in Accessibility
Step 3. Choose the 3D and Haptics option under “Touch Settings”.
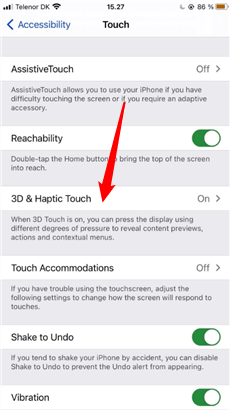
Choose 3D & Haptics Option
Step 4. To change the amount of pressure needed to activate 3D Touch, tap it and move the slider.
Step 5. Turn off the 3D Touch and give it another go if the problem is still there.
4. Check Orientation Lock
Even though the iPhone’s screen is designed to rotate nearly effortlessly depending on how you’re holding it, it could become stuck in landscape mode and refuse to shift to portrait or vice versa. This can be useful if you would like to switch your screen’s orientation from the part which is not working. It’s not a solution, but it can be a sneaky way out right under your nose. The iOS control center’s orientation lock is usually the problem.
- Swiping up from beneath your screen will allow you to find the control center icon depicting a lock with a circle around it.
- Then, press the Portrait Orientation Lock symbol to enable or disable the orientation you like.
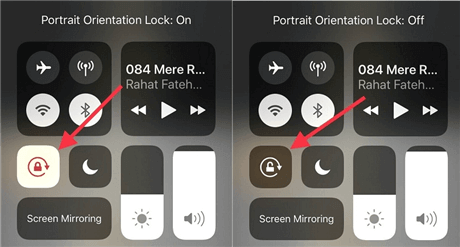
Check Orientation Lock on iPhone
5. Update iPhone to Latest Version
Apple Inc. often releases software upgrades to improve the functionality and smooth operation of apple devices. As a result, you will likely have iOS-related problems, including slowdowns, uncooperative apps, and screens if you use an outdated piece of software.
In this regard, repairing software flaws and the issues they cause may be significantly helped by updating your system software. We strongly advise using iTunes software to swiftly and efficiently upgrade your iOS.
Step 1. Install the iTunes program on your computer after downloading it. If you already have one, ensure it is the most recent version to prevent iPhone update issues.
Step 2. Open the iTunes software, then attach your iPhone to the PC with a genuine Apple USB cord.
Step 3. iTunes will instantly detect your iPhone. Choose your iPhone from the list of linked devices, then select Summary.
Step 4. Click the “Check for Update” option to continue. iTunes automatically finds the most recent iOS updates. Finally, select Update to update the software on your iPhone.
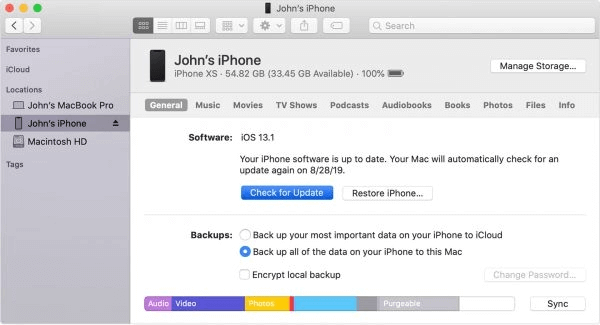
Click Check for Update Option
6. Restore iPhone via iTunes
You may reset your gadget to its factory settings via iTunes. Most iPhone issues can be resolved with this technique. However, it works exceptionally well if your iPhone screen is malfunctioning.
Step 1. Restoring your device can solve some internal issues. To avoid data loss, back up your device before repairing your phone to its factory default settings. You can use iCloud, iTunes, or any other programme you’re comfortable with. You may regain your device once you’ve made a backup.
Step 2. Connect your device and launch iTunes on your computer. Select your iPhone after that, and then click Restore in the Summary window.
Step 3. iTunes will delete your iPhone and install the most recent version of iOS when you click Restore once again to confirm. Once its factory settings have been restored, the device will restart.
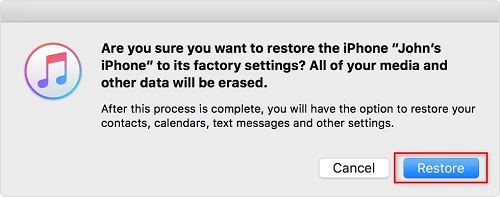
Restore iPhone with iTunes
Step 4. Restore the most recent backup or set up the device as a new one. See if the problem with the iPhone screen not working has been fixed.
7. Go to Apple Store
After attempting the fixes mentioned above, if your iPhone screen continues not to work, you can make an online appointment at an Apple Store. You have to make sure your device has the Apple Store application downloaded.

Contact Apple Support
Open the app and choose Stores > Genius Bar > Make a Reservation from the menu that appears.
Then, you can adhere to additional instructions to provide the appointment’s specifics.
The Bottom Line
All done! Now even if your iPhone screen isn’t working, you can access every potential solution. We can confidently state that the techniques are secure and have successfully solved the issue of unresponsive screens. All iPhone devices can use the solutions without any problems. You need to test them to see which solves your problem. And if you are sure that this issue is caused by system issues, PhoneRescue is undoubtedly your best choice, which will remove system issues in minutes without any data loss.
Free Download * 100% Clean & Safe

Senior writer of the iMobie team as well as an Apple fan, love to help more users solve various types of iOS & Android-related issues.
Product-related questions? Contact Our Support Team to Get Quick Solution >
