9 Ways to Fix iPad Screen Flickering Issue [Guide]
Many iPad users face iPad screen flickering after updating the iPad to iPadOS 15. This article will give you 9 rapid solutions for this problem-solving.
Many iPad users face iPad screen flickering after Apple updates the iPad to the latest iPadOS 16/15. Are you experiencing this issue too? This problem is obviously a big problem when you’re using your iPad. So what causes the iPad screen to keep flickering? And how to solve this problem? Luckily, you have come to the right place.

iPad Screen Flickering
We are here to get you out of this by giving you 9 ways to fix iPad screen flickering issues. Maybe you were ignorant of the mini tricks of fixing screen flickering issues before; this article will reveal all for you and give you rapid solutions for problem-solving. So let’s begin without further doubt!
If your iPad stuck on black screen, you can read: [Resolved] iPad/iPad Pro Black Screen of Death >
Why Is iPad Screen Flickering?
You must first recognize the causes of your restricted situation to go on to the solutions that will protect you from iPad screen glitching lines:
Upgrading or Recovering Software Bugs:
If the method of upgrading iPadOS to the latest 16 or recovering is accidentally damaged, many bugs, including the flickering iPad screen, will occur at once.
Low RAM or Storage Capacity:
Low RAM or storage capacity in the iPad causes screen flickering, which is directly associated with the iPad’s performance
Unidentified Virus:
A flickering iPad screen might occasionally be caused by an unidentified virus or a USB cable that wasn’t supplied with the device.
Hardware Issue:
The iPad’s hardware forms its base. If the iPad has issues, such as a faulty part or a water-damaged LED, it won’t function properly and may even have a flickering screen.
You might be facing flickering issues for any of these reasons. Here are 9 ways to fix this issue.
9 Ways to Fix iPad Screen Flickering Issue
Try these simple 9 fixes if your iPad flickering problem becomes more than a mild annoyance.
1. Disable Auto Brightness
According to the ambient light on the iPad’s screen, it features a capability that automatically adjusts the screen brightness. When the Auto-Brightness feature is turned on, the backdrop light constantly changes, giving the impression that your screen is flickering even though it may not be. You can disable or turn off the automatic screen brightness feature by following the instructions listed below:
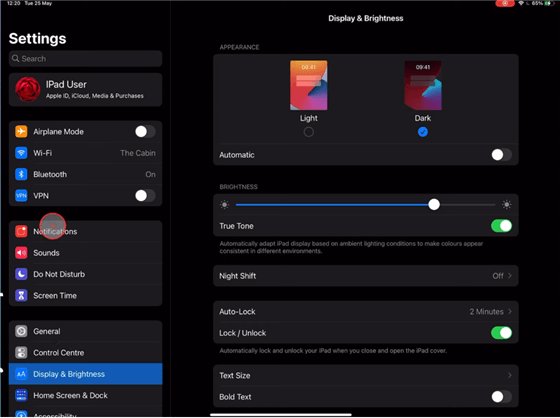
Step 1. Go to the Settings menu on your iPad’s home screen.
Step 2. Select Accessibility from the list of options.
Step 3. Select Display Accommodations from the drop-down menu below this title.
Step 4. Here is a slider that allows you to select the Auto-Brightness option.
Select the Auto-Brightness Option
2. Reduce Transparency and Motion
You can adjust your iPad’s visual settings to get the necessary repair for the flickering display issue. These upgrades significantly increase the efficiency of the iPad system. The steps listed below can be used to make the adjustments:
Step 1. Select Settings from the menu options on the main screen.
Step 2. To continue, choose General, followed by Accessibility.
Step 3. Select the Increase Contrast option and move the slider to the right side to enable Reduce Transparency/Motion.
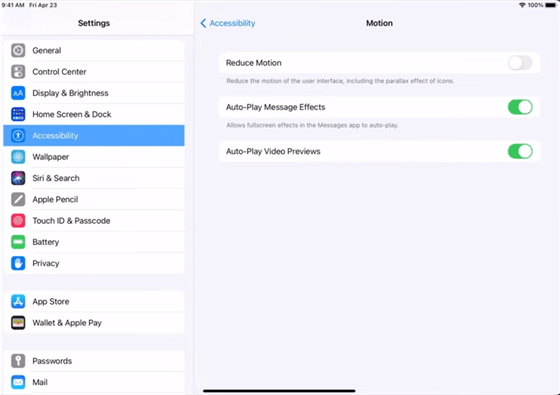
Enable Reduce Motion
Step 4. Return to the accessibility menu, then move the slider to the “Allow” position in front of Reduce Motion.
3. Force Quit Apps
Most iPad models include a front Home button, whereas others, like the intensive iPad Pro, don’t. Apart from this, as long as an iPad has the most recent version of iOS, closing applications is the same on all iPads. Steps to force-quit an app:

Force Quit Apps on iPad
Step 1. Slide up from the bottom edge of the screen and hold it when on the Home Screen or inside an app. You’ll get a list of all open applications along with a preview.
Step 2. Locate the app you want to close by swiping horizontally. Lastly, slide up the app icon to end it immediately.
4. Force Restart Your iPad
If lines continue to appear on your iPad screen, you will need to force a restart. A problematic iPad can typically be made to shut down and turn on again by tapping the proper button combination. The only difference between iPad models that affects the processes is the model, not the iPadOS version. You can still follow the instructions below even if your iPad is running iPadOS 16 right now:

Restart Your iPad
For iPads without a Home button: Hold and leave the Volume Up button quickly > Do the same with the Volume Down button > Till you see the Apple logo, hold down the Top button.
For iPads with a Home button: First, hold down the top button until the power off slider displays > After moving the slider, give your device 30 seconds to power off.
5. Fix System Issues with iOS System Fixer
Do you still not get over the screen flickering issue? It is because Software bugs, a flawed backup, or a problem that prevents the iOS from operating normally are all likely causes. Tech gadgets frequently have faults, and resolving them isn’t too tricky until you have decent bug-repair software like AnyFix – iOS System Recovery. The software is a one-stop shop for all Apple devices’ flaws, returning them to proper usage without erasing any data. Here are its features:
Free Download * 100% Clean & Safe
- For more than 130+ iOS/iPadOS/tvOS issues, like screen flickering, frozen screen, etc. AnyFix contains fixes that effectively tackle every circumstance.
- It can also get your iTunes back to normal from 200+ errors, such as connection errors, sync errors, etc.
- With three system repair modes, you can always find a suitable repair method for any system problem.
- With AnyFix, system repair no longer requires complicated and boring steps, and no longer erases the data in your device.
Now free download the AnyFix on your Windows or Mac computer. To use AnyFix effectively, simply review the complete instructions.
Step 1. Launch AnyFix on your computer and then choose the System Repair Option. You can attach your iPad to the computer using the USB cord / Micro-USB.
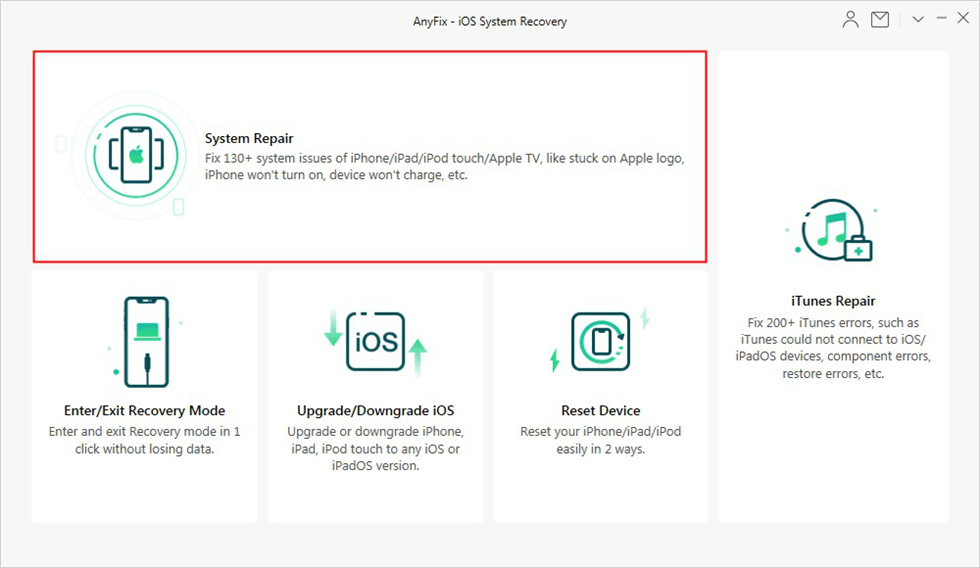
Choose System Repair on the Homepage
Step 2. Then you’ll come up with a list of issues you need to tackle. Choose 40+ iPad Problems and continue the process by tapping Start Now option.
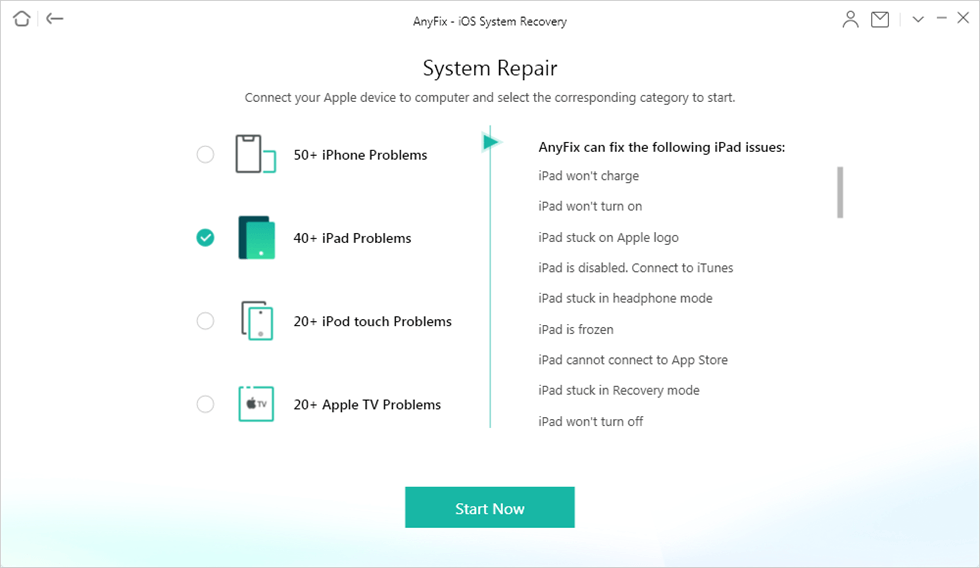
Click 40+ iPad Problems in System Repair
Step 3. Three repair options are now available for iOS devices using the repair function. Select Standard Repair because the most frequent system problems are supported by it, and no device data is lost following the repair.
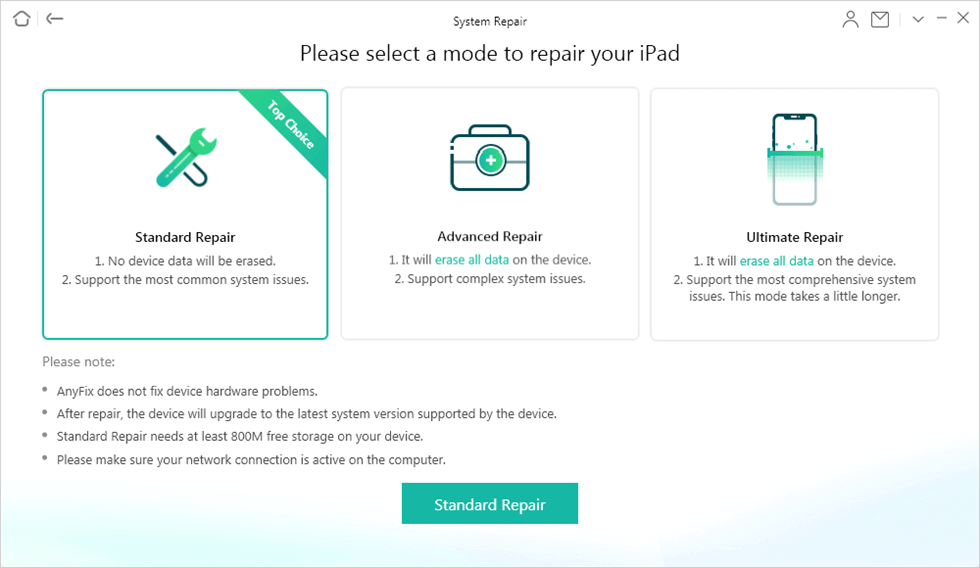
Choose Standard Repair in System Repair
Step 4. Check the information on your device after entering recovery mode. Click the Download button to get the firmware for your iOS device in order to fix the abnormal operating system. After that, click Fix Now.
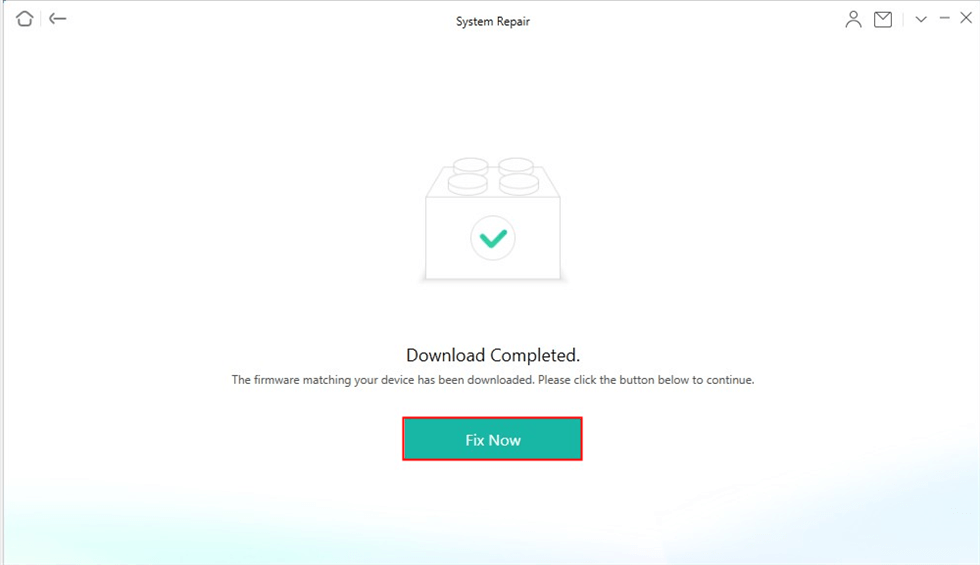
Firmware Download Completed
Step 5. AnyFix can immediately restore your iPad to working order. Please keep your device connected till it restarts. You will view the finished page after the recovery procedure is complete.
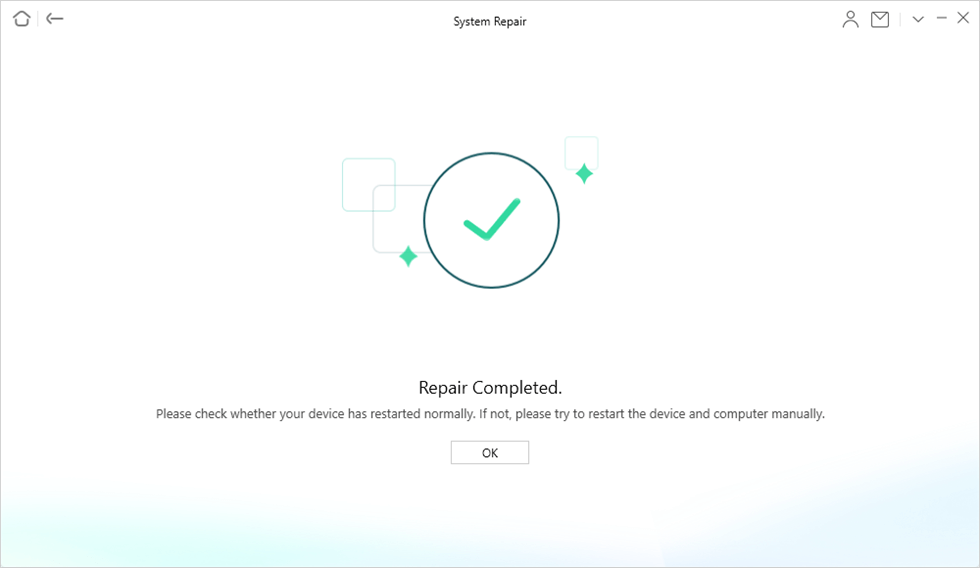
Repair Completed
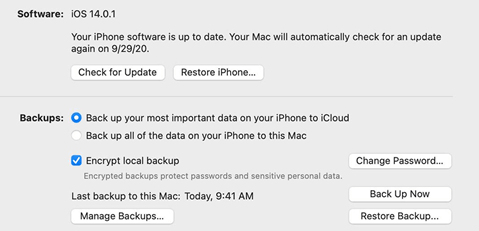
6. Update/Restore iPad via iTunes/Finder
This is a risky procedure because the restoring method will delete your iPad. Alternatively, if you already have iTunes/Finder enabled, you might want to try restoring your iPad from an earlier backup. This means that you may back up your iPad using iTunes or Finder and then restore it to your PC at a later time. The data on your iPad will be replaced with the backup files in this case. As an alternative, you may easily restore the iPad to its factory settings using iTunes or Finder.
To understand how to restore the iPad from a backup using iTunes or Finder, follow these instructions:
Step 1. First, you can connect your iPad to the PC using a working lightning wire.
Step 2. Launch iTunes or Finder on it immediately, then wait for your iPad to be recognized. The iPad that is connected to the computer may be chosen by clicking the computer symbol at the top of the page.
Step 3. Under “Backups”, select the Restore Backup option. Then, follow the on-screen directions to select the backups you want. Hold off until the restoration procedure is complete.
Restore iPad from iTunes Backup
Restore your iPad to factory settings:
You can only restore the iPad to factory settings if the prior backup failed to restore your iPad’s functionality or if you didn’t have a previous backup.
Step 1. Run the most recent iTunes/Finder while the iPad is connected to your PC.
Step 2. Tap on the Summary tab shown on the left side of the iPad icon on the top side if your iPad can be identified instantly. Following that, choose Restore iPad and complete the procedures.
Step 3. You’ll need to put your iPad into recovery mode if it can not be identified. Just instantly press and release the Volume Up and Volume Down buttons. Finally, hold down the Top button while pressing it until the recovery mode screen appears.
Step 4. You will be displayed with the options “Update” and “Restore” in a pop-up window once iTunes/Finder recognizes that your iPad is in recovery mode. Select Restore, then confirm your option.
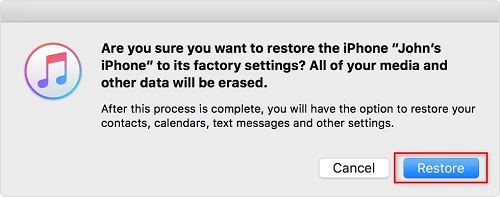
Restore iPad with iTunes
7. Hard Reset iPad
A hard reset could be necessary if a power cycle does not fix the problem. To accomplish this, hold down the Home and Sleep/Wake buttons at the same time until the Apple logo appears, at which point the iPad will restart.
8. Repair or Replace the Screen
If none of the above options work, your iPad may require part replacement or repair. Visit an Apple Store for expert help or a repair business for a screen replacement at a cheaper cost.
9. Slightly Press iPad Back Side
If you still get screen glitching lines on the iPad, then lightly press the back 2 inches under the camera for a while. It mostly works at the start of flickering or you can try this after following all above steps.
Hope you have fixed your iPad screen flickering issue using these 9 methods.
The Bottom Line
Flickering of the iPad screen is the most common issue when the iPad is turned on after 2-3 years. It also happens when the iPad is updated to a new IOS version. This article is an easy guide for anyone to get out of this problem by following the above 9 ways to Fix iPad screen flickering.
We suggest utilizing AnyFix, which enables quick and easy issue correction, rather than using complicated methods. It can resolve all iOS-related issues with proper instructions.
Free Download * 100% Clean & Safe

Senior writer of the iMobie team as well as an Apple fan, love to help more users solve various types of iOS & Android-related issues.
Product-related questions? Contact Our Support Team to Get Quick Solution >
