Proven Ways to Unlock Notes on Your iOS Device
Did you lock your “Notes” and forget how to unlock them on your iPhone? Find solutions in the article below.
Password protection for “Notes” is a very useful feature that Apple implements to secure the information that you write down in your notes, such as financial data or personal addresses. By using a password to lock your note, the note will be automatically locked on all of your iOS devices.
Unlock Notes on Your iOS Device
In this article below, you will learn everything you need to know about this very useful feature on your iPhone, including why you can’t open certain notes, how to lock them on your iPhone, whether you can recover them, and how to handle multiple passwords in the “Notes” app. Let’s go through the topics now!
Why Can’t I Open My Notes on My iPhone?
In the “Notes” app, you may write down some of your important information for the record, such as financial data. Therefore, it will be very inconvenient if you can’t access them anymore. In this section, you will see several reasons why you can’t open your notes on your iPhone and how to solve such problems.
Firstly, you can’t access your notes stored with a third-party account, such as your Gmail, if you don’t enable the “Notes” feature for this account. You can check this feature and turn it on in “Settings” with the following steps.
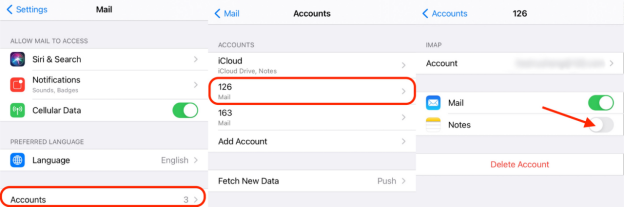
Enable Notes for the Third-Party Account
- Go to “Settings”.
- Go to “Mail” and then tap “Accounts”.
- Select the email account in which you store your notes.
- Toggle “Notes” on.
After these steps, check your notes again. You should be able to open them now.
Secondly, you may accidentally delete notes on your iPhone. In this case, if you store your notes with iCloud, you can find them in the “Recently Deleted” folder and restore them. If you store your notes with a third-party account, you may be able to find your deleted notes in the trash folder of that email account in the “Mail” app. You can restore such notes by copying and pasting them into the “Notes” app.
Finally, if your notes are created on another Apple device via iCloud, you need to check whether the “Notes” feature is turned on for your iCloud. If not, you won’t be able to see those notes on your iPhone. Here’s how to turn on the “Notes” feature for your iCloud.
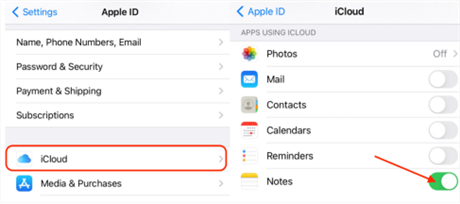
Enable Notes for iCloud
- Go to “Settings” and then tap your name.
- Go to iCloud.
- Toggle “Notes” on.
- Now you should be able to open your notes on your iPhone.
You May Also Like: How to Backup Notes on iPhone/iPad >
3 Methods to Unlock Notes on iPhone
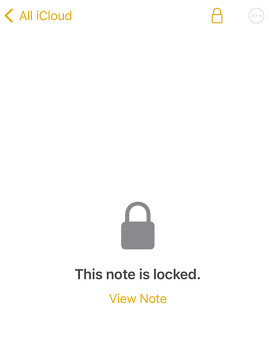
Although you may be upset when you are not able to open your notes, it’s even more frustrating if you find out that someone else has access to your important information in the “Notes” app. Thus, it’s crucial for you to take caution with your information security. Locking your notes is an easy and secure measure you can take to protect your information. In the section below, you can learn three methods to lock the notes on your iPhone.
Method 1. Unlock Notes via Entering the Password
If you can recall the password for your encrypted notes, you can lock them in the “Notes” app by entering the correct password.
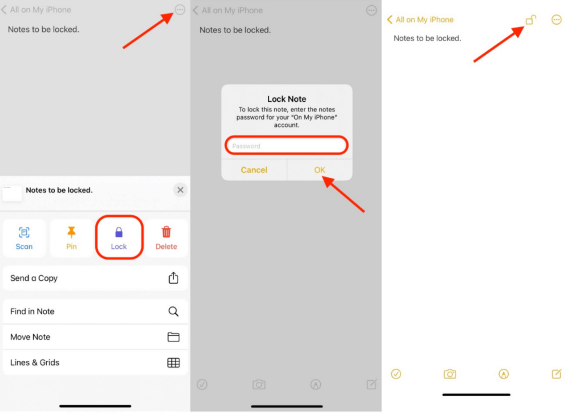
Lock Your Note with A Password
- Open the “Notes” app and go to the note you want to lock.
- Tap on the three-dots icon in the upper right corner.
- Then, tap “Lock”.
- When prompted, enter the password you created for the selected account. Then, tap “OK”.
- A lock icon will show up in the upper right corner of your note. Tap the lock icon.
Method 2. Unlock Notes via Face ID or Touch ID
If your iPhone has the Face ID or Touch ID feature, you can use them to replace a password. In this way, it reduces your risk of forgetting your password and losing access to your notes.
To lock your notes with Face ID or Touch ID, you need to follow the steps below to allow Notes to use your Face ID or Touch ID first.
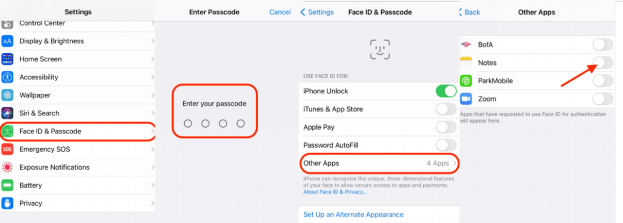
Enable Face ID for the Notes App
- Go to “Settings”> Scroll down to find Face ID & Passcode or Touch ID & Passcode. Tap on it.
- When prompted, enter your device password.
- Tap on “Other Apps” and toggle it on for “Notes”.
Now that you’ve allowed “Notes” to use Face ID or Touch ID, you can enable them for your notes, and here’s how.
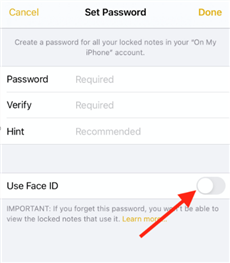
Use Face ID as Notes Password
- Follow the instructions in method 1. When you reach step 5 in Settings or step 4 in the Notes app, you’ll see an option that says “Use Face ID” or “Use Touch ID”. Toggle it on to enable Face ID/Touch ID for your notes.
- Then follow the steps afterward to lock your notes.
If you don’t choose to enable your Face ID or Touch ID when you create the passwords but still want to do so afterward, you can still follow the steps above to do so. However, you will be asked to enter the password you created before.
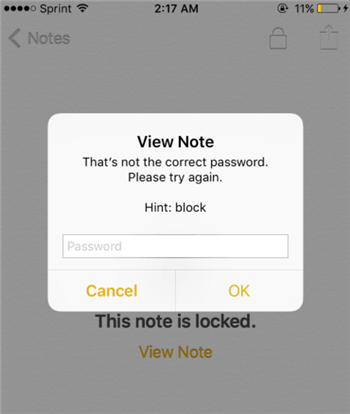
Method 3. Unlock Notes via the Password Hint
If you don’t have an option to use Face ID or Touch ID to lock your notes and are not good at remembering your passwords, you can choose to create a password hint which can help you unlock your notes when you forget your passwords. Here’s how.
Unlock Notes via the Password Hint
- Follow the instructions in method 1. When you reach step 5 in Settings or step 4 in the Notes app, you’ll see an option to create a Hint. Enter anything that will remind you of which password you have chosen.
- Then follow the steps afterward to lock your notes.
With this method, your hint will be presented after three unsuccessful attempts to enter your password. You need to be careful about what hint you have entered. It’s recommended that the hint is neither so obvious that other people can guess your password, nor so ambiguous that it can’t remind you of your password.
How to Recover Locked Notes on iPhone?
It’s very important for you to remember your “Notes” password because if you forget your password, there is no way to recover your locked notes on your iPhone. You can’t retrieve it from an iTunes backup and Apple can’t help you regain access to those locked notes either.
The only thing you can do is create a new password. However, the new password won’t give you access to your old notes. It can only protect any notes you lock in the future. Therefore, it’s recommended to use a Face ID or Touch ID to lock your notes, or if such methods are not applicable, create a password hint to help you remember your password.
How to Handle Multiple Apple Note Passwords?
If you, unfortunately, forget your password but still want to use the Lock feature for your notes, you can create a new password to be used for all your notes in the future. Here’s how to change the password for multiple notes in Settings.
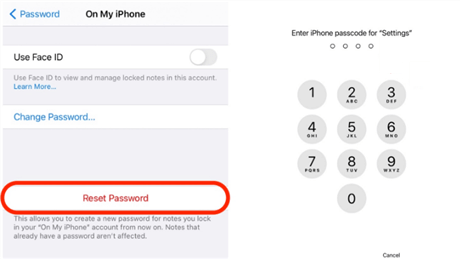
Handle Multiple Apple Note Passwords
- Go to Settings and then go to Notes.
- Tap “Password”.
- Select the account for which you wish to reset the password.
- Tap “Reset Password”.
- When prompted, enter your device passcode.
- Your device will ask you to confirm your intent to reset the password. Tap “Reset Password” again if you’re sure you want to change the password for Notes from now on.
- Enter your new password in the “Password” and “Verify” sections. You can also create a Hint to remind you of which password you have chosen*.
Now you’ve successfully reset the Notes password for all notes on your iPhone.
Once you select “Reset Password” here, your old Notes password will be removed even if you choose to cancel in the following steps. So if you’re not sure whether you want to reset your password yet, select “Cancel” in this step.
The Bottom Line
Now that you have learned about locking your notes on your iPhone, don’t forget to use this feature to protect your information! If you still have any questions about this topic, please feel free to comment below. We’ll do our best to help!

Member of iMobie team as well as an Apple fan, love to help more users solve various types of iOS & Android related issues.
Product-related questions? Contact Our Support Team to Get Quick Solution >
