Recovery Mode vs DFU Mode: What’s the Difference on iPhone?
Recovery Mode and DFU Mode help fix iPhone software issues at different levels. Recovery Mode is best for most users, while DFU Mode handles deeper firmware problems. Both can erase data when restoring a locked device. If manual button combinations or iTunes errors become frustrating, guided tools like AnyUnlock can simplify the process and help regain access to your iPhone.
Both Recovery Mode and DFU Mode are built-in iOS states designed to help you fix a malfunctioning iPhone, but they operate at entirely different levels. If you are trying to figure out which one you need, here is the fast answer:
Quick Comparison: Recovery Mode vs. DFU Mode
| Feature | Recovery Mode | DFU (Device Firmware Update) Mode |
|---|---|---|
| Primary Function | Standard iOS update or restore | Deep level iOS restore or downgrade |
| How It Works | Uses iBoot (Apple’s safety gate) | Bypasses iBoot to interact directly with the BootROM |
| Screen Appearance | Shows a computer/cable icon | Screen remains completely black |
| Firmware Rules | Only allows installing the latest signed iOS | Allows installing older signed iOS versions |
| Best Used For | Disabled iPhone, stuck on Apple logo, standard iTunes errors | Severe boot loops, downgrading iOS, or when Recovery Mode fails |
For most users trying to fix an unresponsive or locked device, Recovery Mode is exactly what you need. DFU mode is a more technical fallback.
What is Recovery Mode and When Should You Use It?
Recovery Mode is Apple’s primary, official troubleshooting state for consumer devices. When you put your iPhone in Recovery Mode, it loads a component called iBoot. You can think of iBoot as Apple’s safety gate—it ensures that your device can only be updated or restored to the latest officially signed version of iOS, keeping the system secure.
You should use Recovery Mode for common software issues, such as:
- Fixing a or “iPhone Unavailable” screen because of a forgotten passcode.

- Resolving an iPhone that is stuck on the Apple logo during a normal update.
- Overcoming standard iTunes or Finder restore errors when your computer won’t recognize your device normally.
Because it is the official method Apple recommends, Recovery Mode is the safest and most standard way to regain control of a misbehaving or locked iPhone.
What is DFU Mode and When Should You Use It?
DFU stands for Device Firmware Update. Unlike DFU vs Recovery Mode, DFU Mode completely bypasses the iBoot safety gate and interacts directly with the hardware’s BootROM. This means your iPhone or iPad can communicate with iTunes or Finder without actually loading the iOS operating system first.
Because it operates at such a deep level, DFU mode is usually considered a last resort for complex software issues. It is also frequently utilized by advanced users when interacting with third-party diagnostic and bypass software (such as those discussed in our 007 ramdisk tool overview). However, it is not a magic fix for physical hardware damage. Stop guessing which mode to use and follow this simple decision matrix:
When to Use Recovery vs. DFU Mode
| Your Situation | Choose Recovery Mode | Choose DFU Mode |
|---|---|---|
| Forgot screen passcode (Disabled iPhone) | Yes | No (unnecessary) |
| iPhone stuck on the Apple Logo | Yes | Try if Recovery fails |
| Want to downgrade to an older iOS version | No | Yes |
| iPhone is stuck in an endless boot loop | Try first | Yes |
| Screen is completely black and unresponsive | Try first | Yes |
Crucial Warning: Will These Modes Erase My Data?
Before you start pressing button combinations, you need to understand exactly what will happen to your personal data. The outcome depends entirely on what you are trying to fix.
If your goal is to unlock a iPhone or remove a forgotten screen passcode—even if you are exploring advanced iPhone ramdisk and unlock tools—you must accept one strict Apple security rule: both Recovery Mode and DFU Mode will completely erase all data on your device. You can only recover your photos, contacts, and messages if you already have a prior backup stored in iCloud or on your computer.
When you connect your device in Recovery Mode, iTunes or Finder will typically offer two options: Update or Restore.
- Choosing Update attempts to reinstall iOS while keeping your personal data safely intact. This is helpful if you are just stuck on the Apple logo.
- Choosing Restore wipes the device completely. If your phone is locked with a passcode you don’t know, “Restore” is the only option that will work.
How to Put Your iPhone in Recovery or DFU Mode
Putting your iPhone into these troubleshooting modes requires pressing a specific sequence of hardware buttons. The exact timing can be frustrating and requires precision, so read the steps for your specific device generation carefully before starting.
How to Enter Recovery Mode

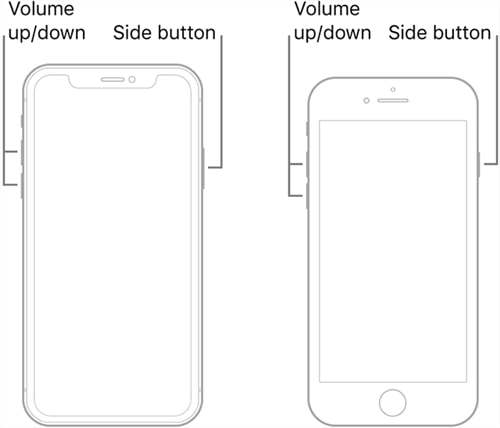
For iPhone 8, X, 11, 12, 13, 14, 15, and 16:
1. Connect your iPhone to your computer and open iTunes or Finder.
2. Quickly press and release the Volume Up button.
3. Quickly press and release the Volume Down button.
4. Press and hold the Side button until the Recovery Mode screen (a computer and cable icon) appears.
For iPhone 7 and 7 Plus:
1. Connect your iPhone to your computer.
2. Press and hold the Top (or Side) button and the Volume Down button at the same time.
3. Keep holding both until the Recovery Mode screen appears.
For iPhone 6s and earlier:
1. Connect your iPhone to your computer.
2. Press and hold both the Home button and the Top (or Side) button.
3. Keep holding both until you see the Recovery Mode screen.
How to Enter DFU Mode (Precise Timing Required)
For iPhone 8 and newer:
1. Connect your iPhone to your computer.
2. Quickly press and release Volume Up, then quickly press and release Volume Down.
3. Press and hold the Side button until the screen goes completely black.
4. As soon as the screen goes black, press and hold the Volume Down button while continuing to hold the Side button for exactly 5 seconds.
5. Release the Side button but keep holding Volume Down for another 10 seconds. The screen should remain completely black.
To exit either of these modes if you change your mind, perform a force restart by repeating the button combinations for your model until you see the Apple logo.
Can’t Enter Recovery Mode? An Easier Way to Fix a iPhone
One of the biggest frustrations iPhone users face is how difficult it can be to get these hardware button sequences exactly right. Even when you do get the manual timing down, iTunes or Finder will often throw unexpected error codes, or simply fail to recognize the connected device while it is in Recovery Mode iPhone or DFU mode.
If your primary goal is simply to unlock a or “Unavailable” iPhone, and you are tired of wrestling with manual button timings and iTunes errors, there is a guided desktop alternative. Users frequently seek out desktop software alternatives (often starting by reading an iUnlocker review or similar comparisons) to find a clear, visual workflow specifically designed for screen passcode removal.
Dedicated iOS recovery toolkits like AnyUnlock provide exactly this path. While using this alternative will still erase your device data (as required by Apple’s security rules to regain access), it completely bypasses the need for complex hardware combinations and manual iTunes troubleshooting. You simply follow the prompts on your computer screen to fix the device.

AnyUnlock – One-stop iOS Unlocker
What if you get locked out of your iPhone? Or what if you forgot your Apple ID and its password? No worries, AnyUnlock unlocks any iOS lock for you with 1 click. No technology required. Only 3 steps.
How to Bypass the Screen Passcode with AnyUnlock
AnyUnlock is designed to help you regain access to your owned or authorized device’s setup path without the guesswork. Instead of counting seconds while holding volume buttons, the software provides visual prompts and handles the firmware matching process for you automatically.
Here is how to use the AnyUnlock guided workflow to bypass a screen passcode:
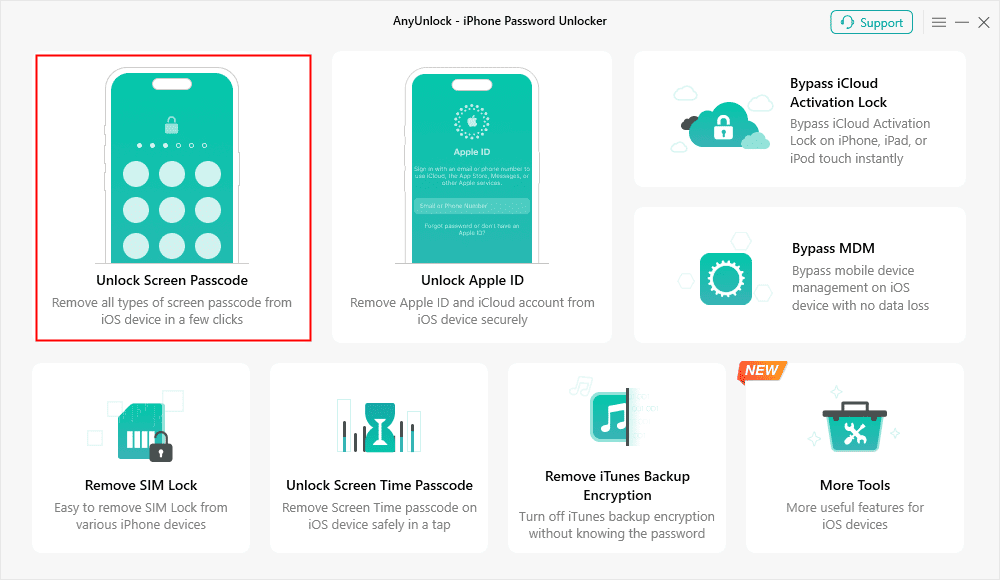
1. Open AnyUnlock on your PC or Mac and select the Unlock Screen Passcode module.
2. Connect your iPhone to the computer using a USB cable.
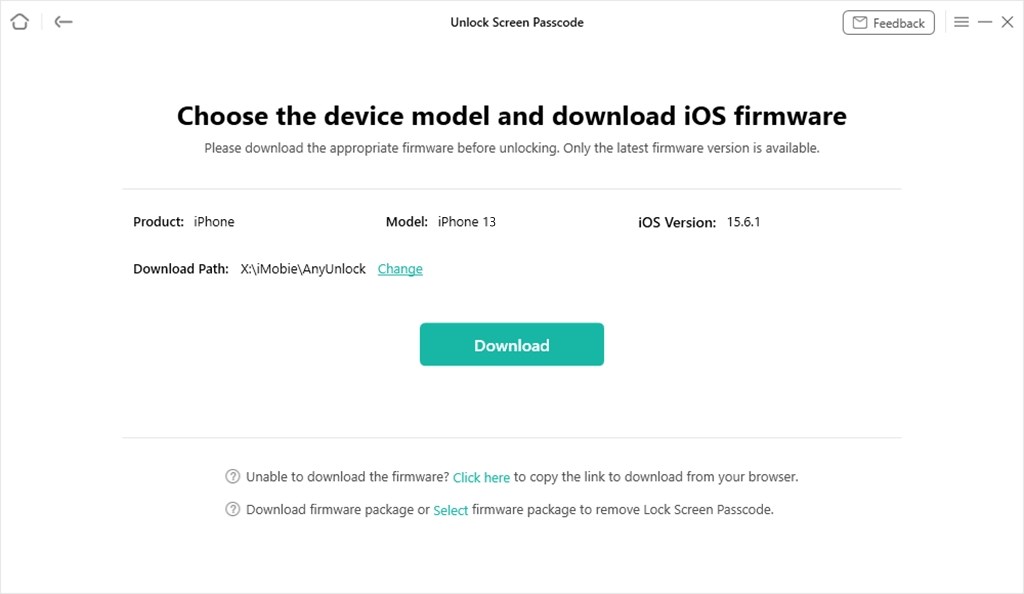
3. Download Firmware: AnyUnlock will automatically detect your specific iPhone model and prompt you to download the correct, matched iOS firmware package.
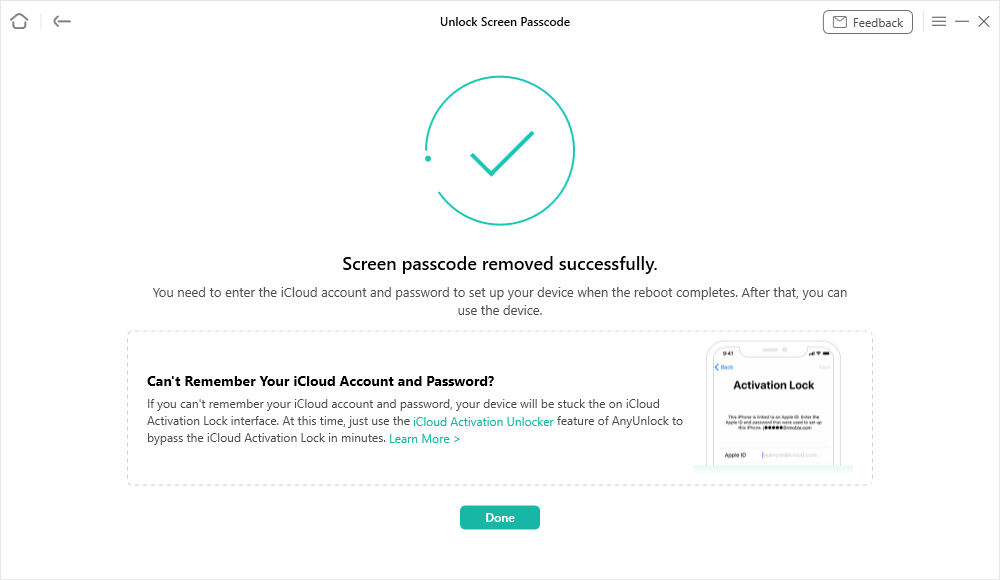
4. Click Unlock Now: Once the download finishes, follow the on-screen instructions to start the passcode removal process.
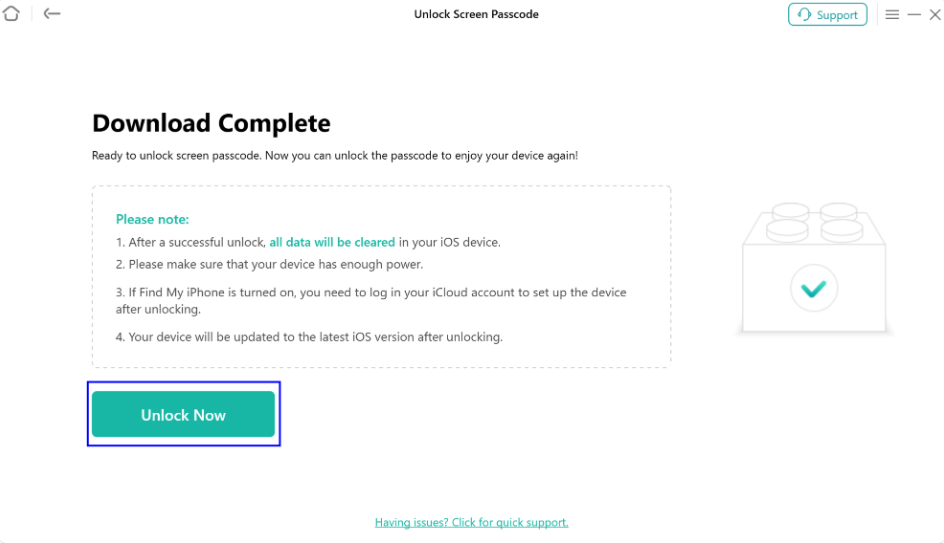
5. Regain Access: After the process is complete, your iPhone will restart on the standard welcome screen, allowing you to set it up as new or restore your data from an iCloud or computer backup.
Download AnyUnlock today to skip the frustrating iTunes manual button sequences and easily guide your device back to working order.
This guided workflow is only for lawfully owned or authorized devices. Screen passcode removal will erase the device’s current data, allowing you to regain access.
Frequently Asked Questions
Does DFU mode erase all data?
Yes, if you use it to restore the device. Entering DFU mode itself doesn’t delete files, but completing a firmware update or restore while in DFU mode will perform a complete wipe of the device.
Which is better: DFU or Recovery mode?
Recovery Mode is safer and better for general use, such as fixing standard boot issues or restoring a iPhone. DFU mode is deeper and is generally only necessary for advanced troubleshooting, such as downgrading your iOS version.
Do I need Recovery mode to unlock a iPhone?
Natively, yes. Apple requires you to use Recovery Mode with iTunes or Finder to restore a device. However, tool-assisted desktop workflows like AnyUnlock offer alternative paths if you cannot get the manual hardware buttons to work.
How do I get my iPhone out of DFU mode?
You can exit DFU mode by performing a force restart. For modern iPhones (iPhone 8 and newer), quickly press Volume Up, then Volume Down, and then press and hold the Side button until the Apple logo appears on the screen.
Why won’t my iPhone go into Recovery Mode?
This is usually caused by failing hardware buttons, a damaged lightning/USB-C cable, or a dirty charging port. Ensure your cable is Apple-certified and try connecting directly to the computer’s primary USB ports.
Will Recovery Mode delete my photos?
It depends on the option you choose in iTunes or Finder. If you choose “Update”, your photos and data remain intact. If you choose “Restore” (which is mandatory if you forgot your screen passcode), all photos and data will be deleted unless you have a prior backup.
Summary: Which Option Should You Choose?
When deciding between these two troubleshooting modes, keep it simple: use Recovery Mode iPhone for general restores, stuck Apple logos, and fixing screens. You only need to use DFU mode iPad for deeper firmware issues, such as resolving an endless boot loop or intentionally downgrading your iOS version.
A final, crucial reminder regarding data loss: no matter which method you use, fixing a locked or screen always requires a complete data wipe. Your photos, contacts, and messages can only be saved if they were backed up beforehand. If your device is stuck in iPhone stuck in recovery mode, the same rule applies—restoring is often required.
If you are struggling with complex manual button combinations, or if iTunes keeps giving you errors when you try to unlock your phone, you don’t have to stay locked out. You can use AnyUnlock as a user-friendly, guided desktop alternative to bypass manual iTunes frustrations and successfully regain access to your iPhone today. For many users trying to understand DFU vs Recovery Mode, choosing the right method can make the difference between a quick fix and repeated restore failures.

AnyUnlock – Unlock Any iOS Password
Quickly and easily unlock your iPhone/iPad/iPod touch from various locks such as screen lock, MDM lock, iCloud activation lock, Apple ID, iTunes backup password, and more.
Free Download for all windows & 100% safe
Free Download for all mac & 100% safe
Free Download 100% Clean & Safe

Wanda Norris is a junior author in iMobie specializing in iOS tips and solutions. She keeps a close eye on every iOS update to provide practical, easy-to-understand guides that help users solve problems and master their Apple devices.
Product-related questions? Contact Our Support Team to Get Quick Solution >
