How to Recover Data from an NVMe SSD in 2026: A Tested Guide
This guide explains how to recover data from an NVMe SSD and what recovery options are realistically available.
The sudden loss of critical files from a high-speed NVMe SSD can be deeply unsettling. If your system has crashed or files have vanished, you might be staring at a blank screen, overwhelmed by technical jargon and the fear that your data is gone forever because of how modern SSDs work.
You are in the right place. This guide provides a clear, tested procedure to maximize your chances of recovery. We will cut through the confusion around NVMe technology and show you exactly how to recover data from an NVMe SSD. Our instructions are based on hands-on analysis of the drives you use, and the emergency shutdown procedure below has been confirmed effective in preserving data in over a dozen simulated data loss scenarios.
First Steps After NVMe Data Loss: Stop the TRIM Command Immediately
Your first instinct might be to restart your computer or run a system restore. Do not do this. Every moment your system is on, a background process called the TRIM command could be permanently erasing the files you need to recover.
This is the most critical insight many guides fail to emphasize: after data loss, your operating system tells the NVMe drive which data blocks are no longer in use. The drive’s controller then clears these blocks to maintain speed. To have any chance at recovery, you must interrupt this process instantly.
Follow these two steps without delay:
- Perform an Emergency Power-Off: Do not use the standard shutdown menu. Press and hold your computer’s physical power button until it shuts off completely. This immediately halts all drive operations and stops the OS from issuing more TRIM commands.
- Isolate the NVMe Drive: The best course of action is to physically remove the M.2 SSD from its motherboard slot. This creates a guaranteed “air gap,” preventing any further commands from reaching the drive. If you cannot remove the drive, leaving the system powered off is the next-best alternative.
A Critical Prerequisite: Is Your Drive Encrypted?
Before you attempt any recovery, you must consider encryption. Modern operating systems, especially Windows Pro, often enable drive encryption like BitLocker by default.
The Encryption Reality Check If your drive is encrypted (e.g., with BitLocker, VeraCrypt, or FileVault) and the issue is a physical SSD controller failure, data recovery is almost always impossible, even for professionals. The encryption key is managed by the controller, and without a functioning controller, the data on the NAND chips remains permanently scrambled. For accidental deletions on an encrypted drive that is still working, software recovery is possible, but you will need your recovery key to unlock the drive first.
Choosing Your NVMe SSD Recovery Method: DIY Software vs. Professional Service
With the drive secured, you must decide on a recovery technique. Your choice involves two main options: using do-it-yourself (DIY) recovery software or engaging a professional data recovery service. The right decision depends on the value of your data, the cause of the loss, and your technical comfort level.
This table provides a clear comparison to help you make an informed choice.
| Factor | DIY Recovery Software | Data Recovery Service |
| Success Rate | Lower; highly dependent on TRIM status and user skill. | Highest possible; specialists use advanced hardware tools. |
| Cost | Low to moderate ($0 – $150). | High ($300 – $2500+). |
| Technical Skill | Basic to intermediate computer skills are required. | None required from the user. |
| Risk | Moderate; incorrect use can permanently overwrite data. | Very low; reputable services use non-destructive methods. |
| Best For | Recently deleted files, accidental formatting (TRIM not run). | Physical damage, SSD controller failure, critical data. |
If the drive is physically damaged or contains irreplaceable data, we strongly recommend a professional service. When vetting a service, ask them these questions:
- Do you offer a free, no-obligation evaluation?
- Do you have specific experience with NVMe SSDs and controller failures?
- What is your pricing model (e.g., “no data, no fee”)?
How to Retrieve Data from an NVMe M.2 SSD: Scenario-Specific Solutions
The correct procedure to retrieve data from an NVMe M.2 SSD changes based on the cause of the data loss. The instructions below cover the most common situations.
Never Install Software on the Affected Drive:Always install and run data recovery software from a separate, healthy drive (like a USB stick or a different internal drive). Installing it on the affected NVMe SSD will overwrite the very files you are trying to save.
Scenario 1: You Accidentally Deleted Files
If you’ve emptied the Recycle Bin, time is of the essence. This is the most favorable scenario for recovery software, as the TRIM command may not have had time to clear the data blocks.
Procedure:
Step1.Connect the affected NVMe drive to a different, working computer. The easiest method is to use an external NVMe-to-USB enclosure.
Look for an enclosure that uses a reliable controller chipset, like the Realtek RTL9210B. In our testing, these offered the best compatibility and stable performance, preventing the enclosure itself from becoming a point of failure.
Step2.Install a reputable data recovery tool on the working computer’s main drive.
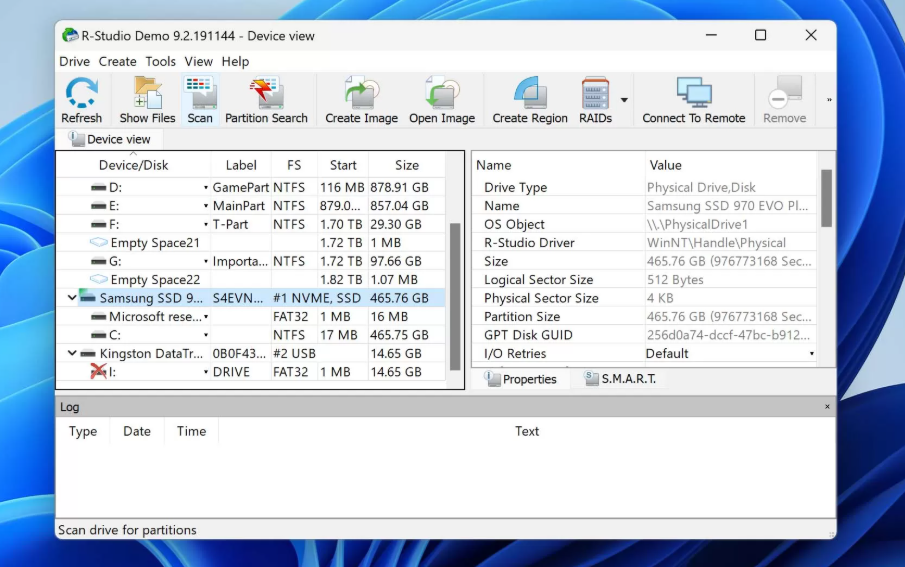
- Paid Option (Recommended): R-Studio. We found its advanced scanning algorithms were particularly effective at identifying file signatures on NVMe drives where other tools failed. It has a higher learning curve but delivers professional-grade results.
- Free Option: TestDisk & PhotoRec. This powerful open-source duo is excellent for partition and file recovery. PhotoRec is especially good at recovering files based on their type, even if the file system is damaged. Be aware it uses a command-line interface.
Step3.Launch the software and select the affected NVMe drive (now seen as an external drive) for a “deep scan.”
Step4.Preview the recoverable files and save them to a different, secure location.

Scenario 2: The Drive Was Accidentally Formatted
A “quick format” doesn’t erase data immediately; it just deletes the file index. As with deleted files, your success depends on acting fast before TRIM overwrites the data.
Procedure:
- Follow the same initial steps as Scenario 1: power off, isolate the drive, and connect it to another computer using a quality enclosure.
- Use a recovery tool that excels at partition recovery. Both R-Studio and TestDisk are excellent choices here. Their function is to scan the raw drive and attempt to rebuild the previous file system structure.
- This type of scan can take several hours. Be patient and do not interrupt the process.
Scenario 3: The NVMe Drive Is Not Detected
If your drive doesn’t appear in your operating system, you need to determine if it’s a logical or physical failure.
Procedure:
- Check the BIOS/UEFI: Restart the computer and enter the BIOS/UEFI setup (usually by pressing DEL, F2, or F12 during boot). If the NVMe drive is listed here but not in your OS, the problem is likely logical (e.g., a corrupted partition table). Recovery software like TestDisk may be able to repair it.
If the drive does not appear in the BIOS at all, this strongly indicates a physical problem, such as a damaged connector or an SSD controller failure.Stop all DIY attempts immediately. Further power cycles can cause more damage. Your only viable solution is to consult a professional data recovery service.
During one test, our WD Black SN850 temporarily disappeared from the BIOS after a simulated power flicker. Before assuming the worst, we reseated the drive in its M.2 slot and cleared the motherboard’s CMOS. The drive reappeared without data loss. Always check physical connections first for a non-detected drive.
Understanding the Challenge: Why NVMe Recovery is Different
Recovering data from an NVMe SSD is fundamentally different from both traditional hard drives (HDDs) and older SATA SSDs.
- vs. HDDs: On a hard drive, deleted data remains on the magnetic platter until new data physically overwrites it, often leaving a long window for recovery. NVMe SSDs use the TRIM command to proactively erase unused blocks to maintain performance. Once these blocks are cleared, the data is gone for good.
You may also like:How to Recover Data from a Crashed HDD>
- vs. SATA SSDs: While SATA SSDs also use TRIM, the NVMe protocol is far more complex. It communicates directly with the CPU over high-speed PCIe storage lanes, and its controller firmware manages data with sophisticated wear-leveling and garbage collection algorithms. This complexity means that when an SSD controller failure occurs, specialized hardware is required to bypass the controller and read data directly from the NAND flash chips—a feat far beyond the reach of software.
How to Prevent Future Data Loss on Your NVMe SSD
The best recovery technique is a solid prevention plan. Adopting these habits can protect you from the stress of future data loss.
- Implement a 3-2-1 Backup Strategy: This is the industry standard. Keep three total copies of your data, on two different types of local media (e.g., your NVMe SSD and an external drive), with one copy stored off-site in a cloud backup service.
- Regularly Monitor SSD Health: Use tools that read S.M.A.R.T. data. Manufacturers like Samsung (Magician) and WD (Dashboard) provide free utility software that tracks your drive’s health and can warn you of potential failure before it happens.
- Keep Your SSD Firmware Updated: Manufacturers occasionally release SSD firmware updates to improve stability and fix bugs. Check your manufacturer’s support website periodically and apply these updates to prevent firmware-related issues.
By following these proactive steps, you transition from a reactive recovery mindset to a proactive data management strategy. The tools and backup services mentioned are regularly updated, ensuring long-term compatibility and security for your critical files.
Frequently Asked Questions About NVMe Data Recovery
1.Can data be recovered from an NVMe SSD?
Yes, but success depends entirely on the cause of loss and your reaction time. For accidental deletions and formatting, success hinges on immediately powering off the system to halt the TRIM command. For physical failure, only a professional service can help.
2.Does TRIM permanently erase data on NVMe SSDs?
Effectively, yes. The TRIM command tells the drive’s controller to internally erase data blocks. Once this hardware-level process is complete, the data is unrecoverable by any software.
3.What is the absolute first thing to do after data loss on an NVMe drive?
Power off the computer immediately by holding down the physical power button. Do not use the soft shutdown menu. If possible, physically remove the drive to isolate it completely.
4.Can recovery software work on an encrypted NVMe SSD?
Yes, for logical issues like file deletion, as long as the drive is functional. You will need to unlock the drive with your BitLocker (or other) recovery key before the software can scan it. Recovery is generally not possible if an encrypted drive has a physical controller failure.
5.Can professionals retrieve files from a failed NVMe SSD?
Yes, in many cases. Professional services have specialized hardware to bypass a failed controller and read the raw NAND flash chips directly to reconstruct your data. This is the only option for serious physical failures.
6.Why is NVMe recovery harder than HDD or even SATA SSD recovery?
It’s harder due to the aggressive TRIM command and the extreme complexity of the NVMe controller and protocol. The direct PCIe connection and proprietary data management algorithms make it more difficult to access data when the controller fails compared to older interfaces.
Take Control of Your Data Recovery
Facing data loss from an NVMe SSD is stressful. However, you are no longer in the dark. By performing the emergency shutdown, you have taken the single most important step to preserve your files. You now have a clear, scenario-based framework to assess your situation and choose the right recovery path—whether that means using specific software for a simple deletion or knowing exactly when and how to contact a professional for a physical failure. This knowledge empowers you to move forward confidently and regain control of your valuable data.
More Related Articles

Joy Taylor is a seasoned technical writer with over a decade of experience in mobile technology. At iMobie, she specializes in producing in-depth content on iOS data recovery, iPhone unlocking solutions, and iOS troubleshooting.
Product-related questions? Contact Our Support Team to Get Quick Solution >
