Facing a massive Stardust fee just to swap Pokémon with a friend can be incredibly frustrating. Many players struggle to understand trade rules, daily limits, and strict distance requirements. I still remember the heartbreak of a major mistake shared by Ethan, a newer trainer in our local community: he excitedly traded away a perfect 4-star Machop, hoping it would stay strong for gym battles, only to watch its stats reroll into a disappointing 1-star after the trade. The same kind of disappointment can happen when trading rare favorites or collection targets like Shiny Eevee Evolutions, especially if you do not fully understand how IV rerolls work.
If you feel stuck wasting hard-earned resources or accidentally ruining great catches, this guide addresses your concerns directly. The biggest mistake most players make is treating all exchanges the same. In practice, the system is a highly strategic resource-management economy. The most valuable trades are the ones that improve Pokédex completion, unlock Lucky outcomes, reduce evolution costs, and generate XL Candy. By learning exactly how to manage these mechanics, you can preserve your Stardust and ensure every exchange builds a stronger battle team.
Table of ContentsHide
Decision-Making: Strategic Solutions vs. Casual Swapping
A common obstacle for beginners is deciding when an exchange justifies the Stardust cost. Uncoordinated local swapping often results in depleted resources and low-stat creatures. A strategic approach treats every swap as a long-term investment. You should reserve your resources for shinies, legendaries, regionals, and meta-relevant Pokémon.
Applying a strategic decision framework ensures your efforts translate into actual in-game power. Unplanned swaps of common catches rarely offer a return on your Stardust investment. We can compare these two approaches based on critical criteria to help you determine the best routine for your account:
| Criteria | Casual Swapping | Strategic Planning Solution |
|---|---|---|
| Success Rate | Low probability of producing high IVs due to random stat rerolls. | Yields guaranteed minimum IV floors by exclusively executing Lucky Trades. |
| Time Cost | Consumes hours of randomly sorting storage without a clear goal. | Requires minimal time by focusing purely on reduced-Stardust event windows. |
| Technical Skill | Requires zero knowledge of game mechanics. | Requires a moderate understanding of trade evolutions, IV floors, and resource management. |
| Safety Risk | High risk of stat drops when swapping your best catches. | Zero risk of losing high-tier assets because you only transfer carefully selected duplicates. |
Trade Requirements, Local Coordination, and Friendship Levels
Understanding the basic requirements is essential for completing a successful transfer. The core rules demand that you and your partner be at least Trainer Level 10 and physically located within 100 meters of each other.
Telling players they must be within 100 meters is often the biggest hurdle, but there are practical ways to solve this proximity frustration. To coordinate local meetups safely and efficiently, you should use Niantic’s Campfire app. This integrated social tool allows you to find local player hubs, light flares at gyms, and message trainers nearby. Joining local Discord servers or dedicated Facebook groups is another excellent way to find players who have the specific Pokédex entries you are missing. Coordinating through these local channels turns the 100-meter limitation into a fun community meetup.

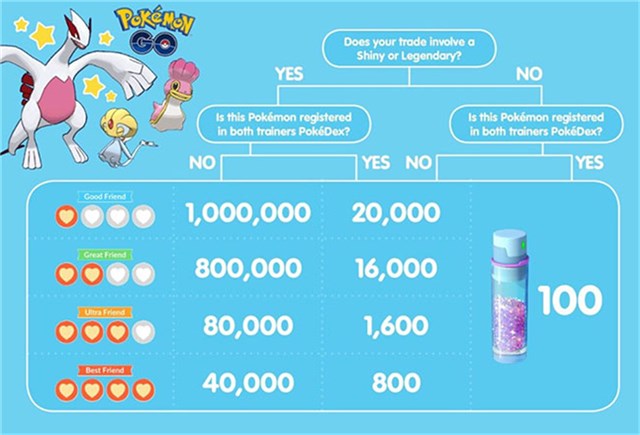
Ethan’s secondary moment of frustration occurred when he saw a one-million Stardust price tag for a new Legendary creature. His major realization happened upon discovering that actively leveling up friends drastically reduces these prohibitive costs. Engaging in daily interactions—such as opening gifts, battling together, or raiding—increases your friendship tiers. At the Best Friend tier, players receive a massive 96% discount on the Stardust cost for special exchanges. You must coordinate and build these friendship levels consistently to make expensive, unregistered transfers viable.
Standard Trade Costs vs. Special Trade Costs
Beginners are often terrified by charts showing million-Stardust price tags. It is crucial to know that a standard trade for a regular Pokémon already registered in both players’ Pokédexes costs only 100 Stardust, regardless of your friendship level! The massive, intimidating costs only apply to Special Trades (unregistered species, shinies, and legendaries).
Special Trade Costs by Friendship Level (Unregistered Legendary/Shiny)
- Good Friend: 1,000,000 Stardust
- Great Friend: 800,000 Stardust
- Ultra Friend: 80,000 Stardust
- Best Friend: 40,000 Stardust
Need More Flexibility for Local Trade Distance?
For many players, the 100-meter trade requirement is the most difficult part of Pokémon GO trading. Campfire, Discord, and local Facebook groups are still the safest and most community-friendly ways to coordinate trades. However, not every player can easily meet nearby friends in person—especially if they live in a rural area, have a busy schedule, or want to test location-based features before a planned meetup.
If you need more control over your phone’s GPS location, Fonelora Location Changer can be a useful desktop-based option. It allows iPhone and Android users to change their device location from a computer without jailbreak or root access. Instead of relying on unstable mobile GPS apps, FLC lets you select a location on the map, simulate movement, and manage your GPS position more precisely.
This can be helpful when you want to plan local trading routes, test whether location-based apps are reading your GPS correctly, or manage your virtual movement more smoothly. Since Pokémon GO has strict fair-play rules, always use location tools responsibly and understand that abnormal location changes may carry account risks.
Pokémon GO trading is designed around local interaction. If your goal is normal gameplay, local meetups through Campfire and trusted community groups should come first. Use Fonelora Location Changer only when you need controlled GPS testing or location management, and avoid unrealistic jumps that may trigger risk signals.
How to Use Fonelora Location Changer for Pokémon GO
If you decide to use FLC to manage your phone GPS location, follow these steps carefully:
- Step 1. Launch Fonelora Location Changer. Install and open FLC on your Windows or Mac computer, then choose the location-changing mode that fits your need.
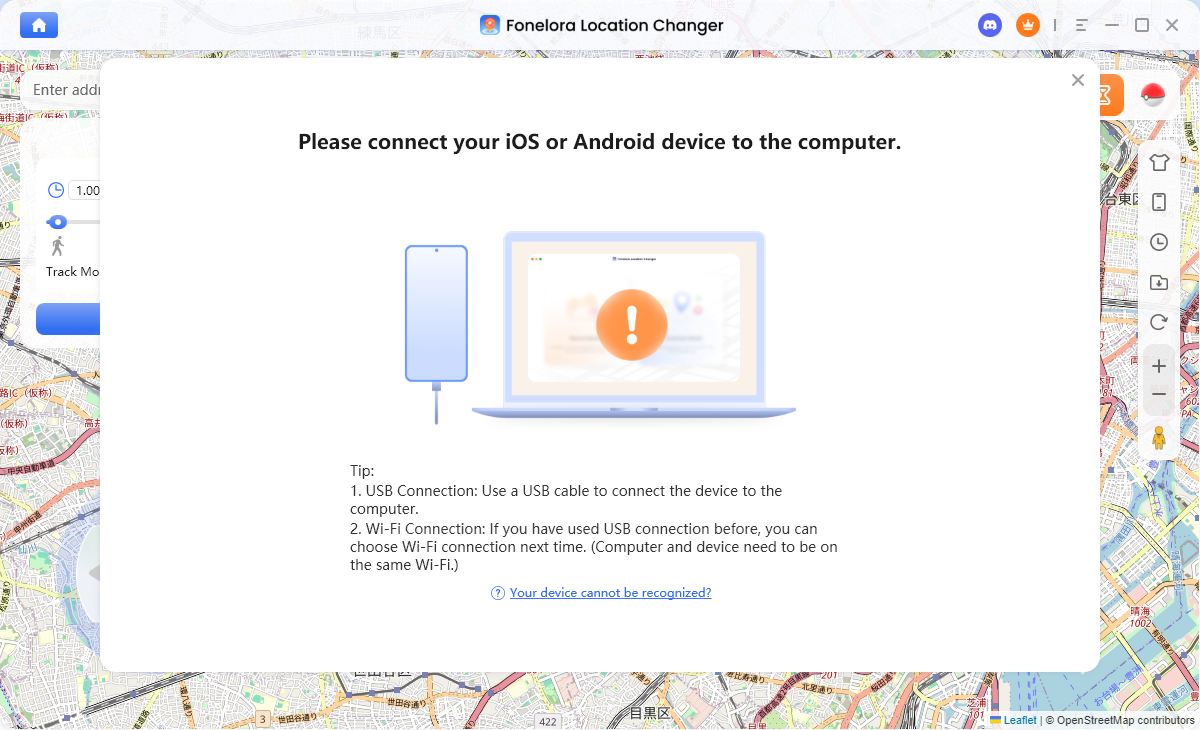
- Step 2. Connect your iPhone or Android device. Use a USB cable or supported connection method. Follow the on-screen instructions to trust the computer and let the program recognize your device.
- Step 3. Choose a target location on the map. Search for the area where you want your phone GPS to appear. You can enter a city, address, landmark, or drag the pin manually.

- Step 4. Apply the virtual GPS location. Confirm the selected point in Fonelora Location Changer. Your connected phone will start reporting the new GPS position.
- Step 5. Open Pokémon GO and check the map. Launch the game after the location is applied and verify whether your avatar appears in the selected area.
- Step 6. Use route or joystick mode if needed. If you need movement simulation, choose a route mode or joystick-style movement instead of jumping between distant locations too quickly.
- Step 7. Restore your real location when finished. Use the reset option in FLC or restart your device to return your phone to its actual GPS position.
Optimizing for Candy XL and Distance Bonuses
Efficiency players often focus entirely on optimizing for Candy XL, a rare resource required to power up Pokémon past level 40. Every time you swap a Pokémon, you receive standard candy. However, if the two Pokémon were caught at least 100 kilometers apart from each other, both players are guaranteed to receive one Candy XL for the Pokémon they traded away.
You can easily achieve this 100-kilometer distance requirement by hatching 7km eggs received from gifts sent by international friends. Trading a locally caught Pokémon for a Pokémon hatched from an international egg guarantees that highly coveted Candy XL. You can check the catch location at the very bottom of any Pokémon’s summary screen to verify the distance before confirming the transfer.
Always pay close attention to seasonal bonuses. Specific seasons, such as the Season of Shared Skies, often feature built-in bonuses like guaranteed Candy XL for every trade, regardless of the distance between catch locations. Community Days also frequently feature bonuses that halve Stardust costs and grant extra Special Trades. Timing your mass-swapping sessions during these specific events is the ultimate efficiency tactic for building resources quickly.
Managing Special Trades and Stardust Costs
A Special Trade is heavily restricted and involves Legendaries, Purified Pokémon, Shinies, Ultra Beasts, or any species not currently registered in your Pokédex. This includes alternative forms like different Unown letters or specific costumed Pikachu variants. Under normal circumstances, you are strictly limited to one Special Trade per day.
Instead of completing a high-cost Special Trade on a random Tuesday, you should wait for specific community days or seasonal events that offer flat Stardust discounts or allow multiple Special Trades per day. Proper timing solves the high cost problem and maximizes your daily limits. Treating the system as a resource economy prevents you from bankrupting your account over a single cosmetic character.
The Stat Reroll Warning and IV Floors
A poorly planned swap almost always results in significant resource loss. Because stats completely reroll during every standard exchange, a frequent oversight is swapping a high-IV Pokémon in hopes that it will retain its strength for the recipient.
IVs are completely rolled over upon trading. Never trade a 3-star or 4-star Pokémon unless it is a guaranteed Lucky Trade. Once traded, a Pokémon is permanently locked to the new account and cannot be traded again.
To fully understand the risk of dropping stats, you must understand IV floors. The game sets a minimum stat limit based on your friendship level. If you are only Good Friends, the stat floor is a dismal 1/1/1 out of 15.
Minimum IV Floors by Friendship Level:
- Good Friend: 1/1/1 IV Floor
- Great Friend: 2/2/2 IV Floor
- Ultra Friend: 3/3/3 IV Floor
- Best Friend: 5/5/5 IV Floor
Even as Best Friends, a 5/5/5 floor means a perfect Pokémon is highly likely to drop in power. High-IV catches should always remain in your own storage. Conversely, low-IV, high-CP catches are the ideal candidates for a standard exchange, as their stats can only improve or remain negligible. By understanding this random reroll mechanic, you prevent the accidental destruction of valuable battle assets. Treat standard swaps strictly as a method to reroll poor stats, trigger free trade evolutions, or acquire extra Candy XL.
Securing a Lucky Trade and Free Evolutions
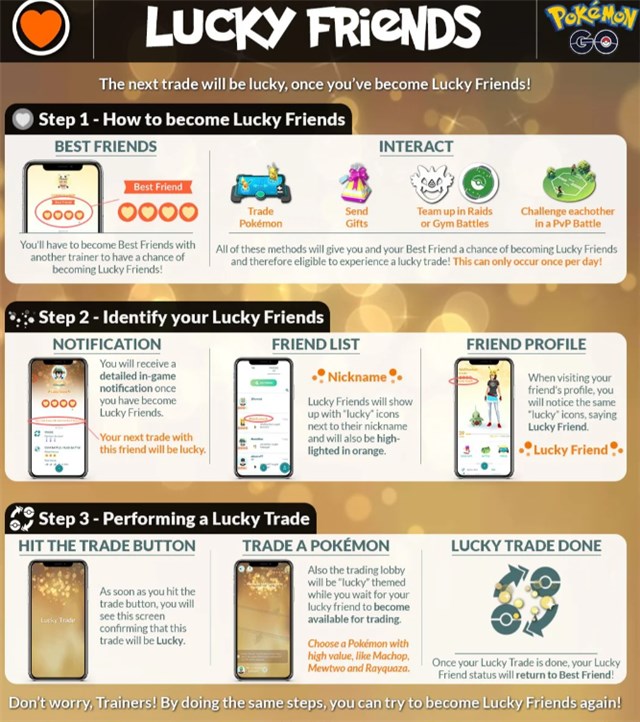
The most efficient players focus their efforts entirely on securing a Lucky Trade. When an exchange results in Lucky Pokemon, both creatures receive guaranteed high stats—a minimum IV floor of 12/12/12—and require 50% less Stardust to power up.
To guarantee this outcome, you must become Lucky Friends. After reaching Best Friend status, your first daily interaction has a small chance to trigger Lucky Friend status, ensuring your very next exchange with that specific person is automatically Lucky. This completely resolves the anxiety about stats declining. You should always save your rarest Shinies and most powerful Legendaries for these guaranteed interactions.
Additionally, certain species benefit from trade evolutions. When you trade Pokémon like Machoke, Haunter, Phantump, Gurdurr, Shelmet, or Karrablast, their next evolution costs zero candy. Pairing these trade evolutions with guaranteed Lucky trades is one of the smartest ways to save resources, especially for players building teams for raids or checking targets through a Pokémon Go Raid Finder. This strategy helps you get high-stat, low-investment attackers faster, so you can prepare stronger battle-ready teams for raids and competitive play without spending the usual 100 to 200 candy.
Frequently Asked Questions
Navigating the mechanics requires clear, straightforward answers. Below is a detailed summary addressing how to trade and resolving common uncertainties.
- How do you trade in Pokémon Go?
- Open your Trainer profile, navigate to the Friends tab, select a friend within 100 meters, and tap the Trade button to start the screen.
-
- What level do you need to be to trade?
<li class=”faq-a”
Both players must reach at least Trainer Level 10 to unlock the exchange tool.
- What counts as a Special Trade?
- A Special Trade is a restricted exchange involving Legendaries, Shinies, Purified Pokémon, Ultra Beasts, or any unregistered Pokémon or form (like a new costumed Pikachu). These are usually limited to one transaction per day.
- Why do some trades cost so much Stardust?
- Costs scale based on the rarity of the creature and your current friendship tier. An unregistered Shiny at the lowest friendship tier costs 1,000,000 Stardust. However, standard trades for regular, registered Pokémon always cost just 100 Stardust.
Conclusion
Mastering the local exchange system removes much of the frustration around high Stardust costs, Special Trades, and daily limits. By using a smarter resource-management approach, you can avoid costly mistakes, make better decisions about Candy XL and free evolutions, and keep stronger Pokémon for the battles that matter most, including attempts to beat Giovanni. Instead of guessing which catches are worth trading, you can plan for Lucky outcomes with confidence, strengthen your roster efficiently, and use tools like the Campfire app to connect with local players before the next major Community Day meetup.
If you also need more flexible GPS control for location-based app testing or route planning, Fonelora Location Changer can help you manage your phone’s virtual location from desktop. Use it responsibly and always consider account safety before making location changes.


Hot Topics
