How to Recover a Deleted Note on iPad in 5 Ways
Want to recover deleted notes on iPad but don’t know how? Read this guide to see how to recover deleted a note on iPad 2/3/4, iPad mini 2/3/4, iPad Pro or iPad Air 2, evern without any backup.
As we all know, a quick swipe or an accidental tap on an iPad could have caused the deletion. Have you deleted a note unintentionally on your iPad? No need to be concerned, losing data does not always mean that it is forever lost. There are still many ways to recover deleted files on iOS devices. In this article, we share 5 solutions for how to recover a deleted note on iPad to grab your notes back easily.
Is Deleted Note Recovery from iPad Possible?
In most cases, you can recover a deleted note from your iPad. The “Recently Deleted” folder is a feature in Apple’s Notes app that allows users to recover deleted notes within 30 days. Moreover, if you have activated the iCloud sync or have carried out backups, you can still find the erased notes from a copy that has been saved before. Some third-party recovery software can also provide more opportunities to recover your permanently deleted data.
Recover a Deleted Note on iPad Without Backup [Easiest]
One of the most effective ways to recover deleted notes from your iPad is PhoneRescue for iOS. Developed by iMobie, this tool supports restoring lost data from iPhone/iPad without backup, including notes, photos, contacts, etc. Unlike traditional iTunes or iCloud backup methods, this approach allows you to preview the lost notes before recovery and selectively restore the ones you want. With its intuitive interface, the tool makes note recovery on iPad quick and easy, regardless of your technical experience.
Key Features of PhoneRescue for iOS:
- Supports recovering lost notes on iPad without iTunes/iCloud backups.
- Allows selective recovery to avoid overwriting existing data.
- Recovering iPhone data of up to 31 types, which include Notes, Photos, Contacts, and more.
- Fast scan and instant data recovery with no tech skills required.
Free Download * 100% Clean & Safe
How to recover a deleted note on iPad using PhoneRescue for iOS:
Step 1. Download PhoneRescue for iOS from the iMobie website. Connect your iPad to the computer. Choose Recover from iOS Device mode.
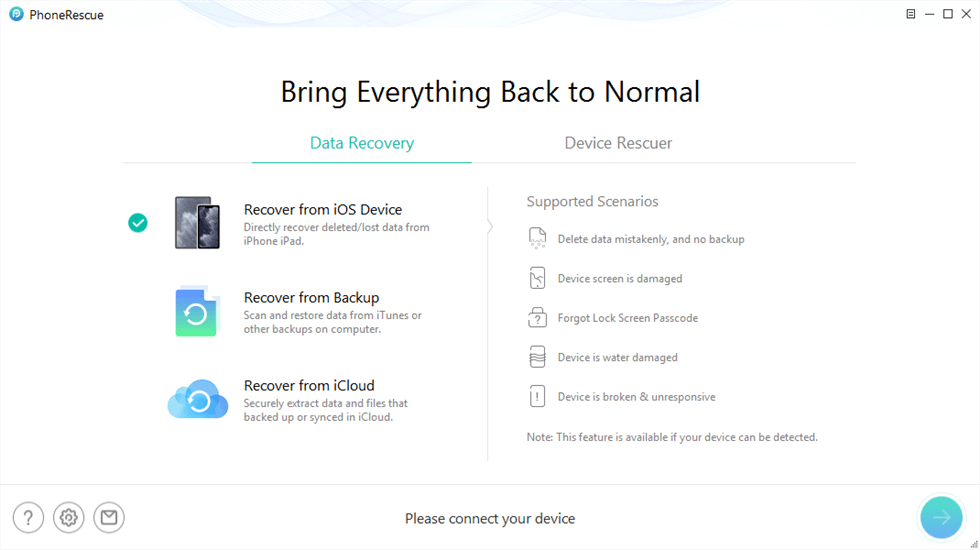
Choose Recover from iOS Device
Step 2. Once connected, tap the arrow button to begin scanning. Choose Notes.
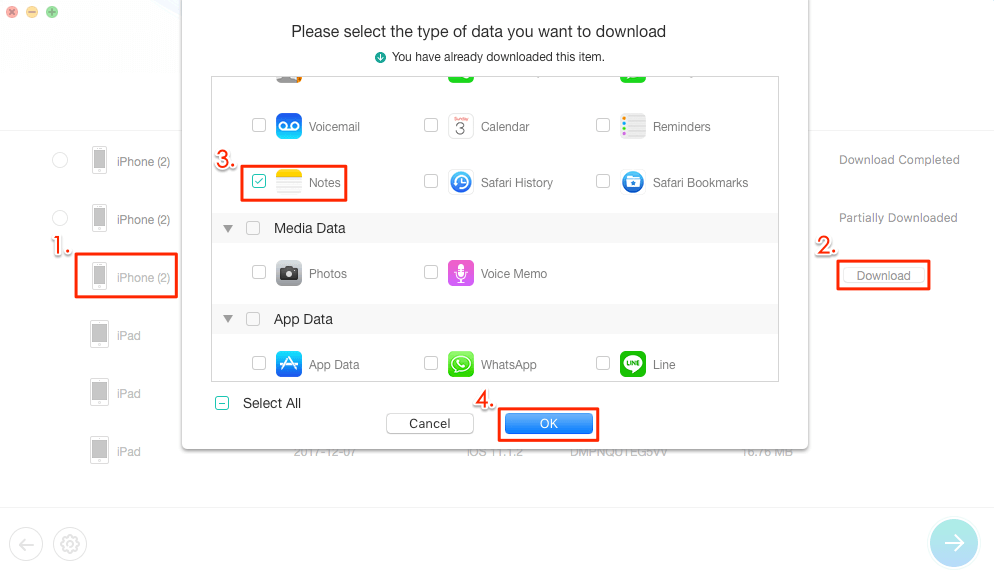
Choose Notes and Click OK to Continue
Step 3. Once scanning is finished, ensure the deleted notes are visible during the preview phase. The filter Only list deleted will help you to find them fast.
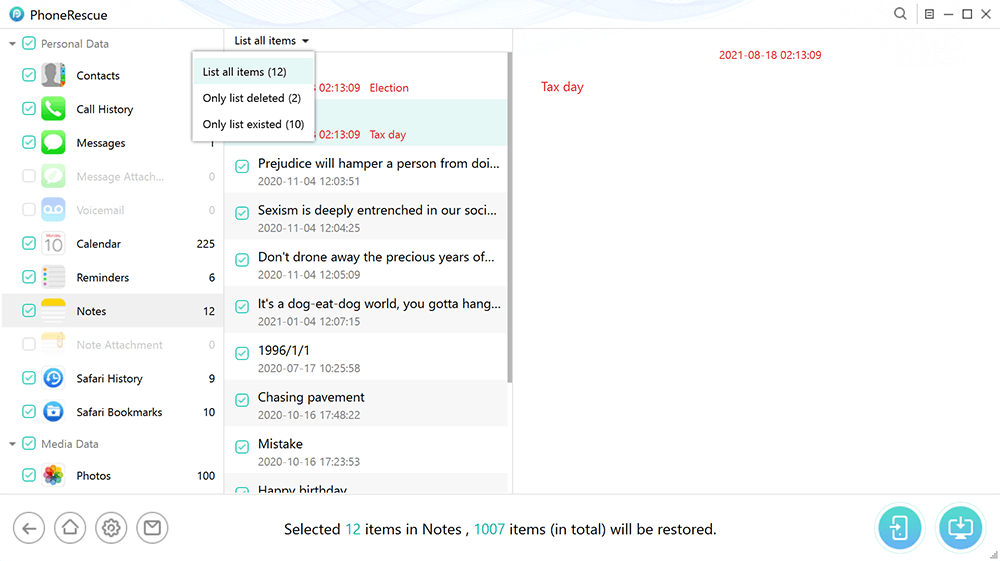
Find Notes to Recover
Step 4. Pick the notes you want to recover and click Restore to Device. After the process, you have successfully recovered your lost notes on your iPad without a backup.
How to Recover Recently Deleted Notes on iPad
If you have erased a note mistakenly, you can try to go to the Recently Deleted folder in the Notes application to retrieve it. Deleted notes on the Notes app of your iPad will be saved in the device for another 30 days before they are deleted permanently. Before that, we can get the deleted notes back directly from the device.
Steps to get back recently deleted notes:
Step 1. Launch the Notes app and go to Folders.
Step 2. Then, tap Recently Deleted. Click on Edit at the top-right.
Step 3. After selecting a folder, tap Move To to place the notes in the folder you have chosen.
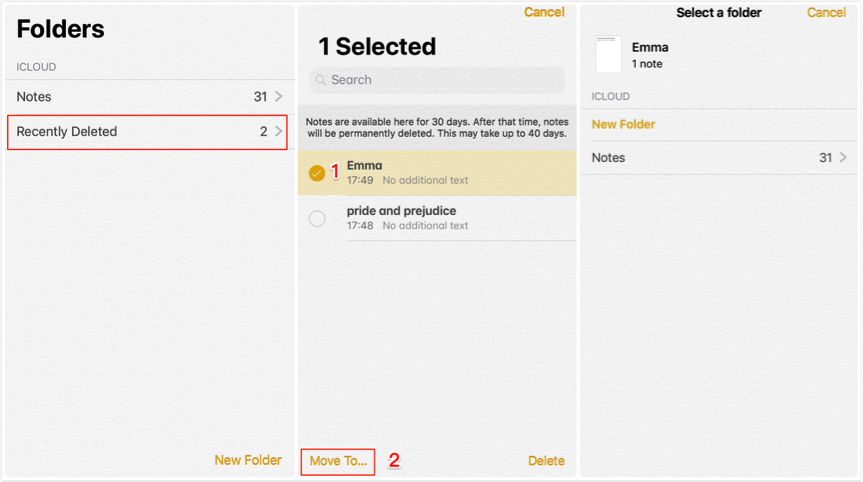
How to Recover Deleted Notes on iPad via Recently Deleted Folder
How to Recover a Deleted Note on iPad Using Email
In case your iPad’s Notes app has email service synchronization, such as Gmail, Yahoo, or Outlook, it is highly likely that a deleted note can still be found in your account. Linking Notes to your email saves deleted notes in your email’s Trash or All Mail folder, even after they’re removed from your iPad.
Steps to discover a deleted note through email:
Step 1. Open your Mail app or go to your email account.
Step 2. Look for the words in your deleted note or browse through Trash, Bin, or All Mail folders.
Step 3. In case you get the deleted note, duplicate the whole text and then type it by hand into a new note in the Notes app on your iPad.
How to Retrieve Deleted Notes on iPad with iTunes Backup
iTunes backup can help you recover deleted notes by restoring a previous backup, as long as you’ve backed up your iPad using iTunes. This method is suitable for cases where the notes have already been removed from the “Recently Deleted” folder, and you have not utilized iCloud sync.
Steps to retrieve deleted notes using iTunes backup:
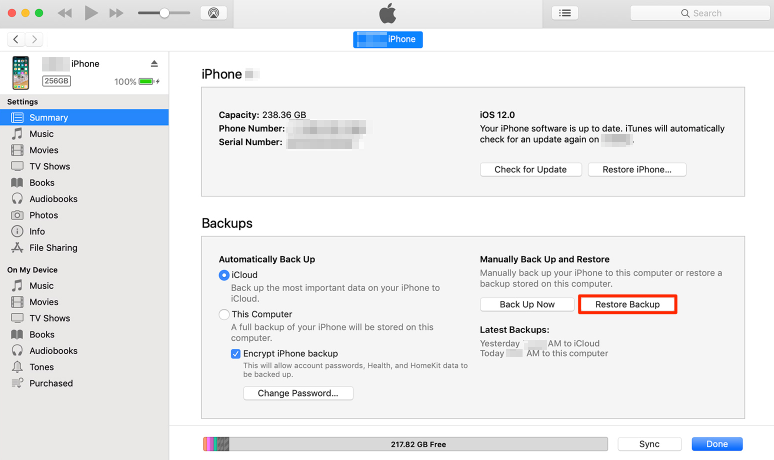
Step 1. Connect your iPad to your computer.
Step 2. Click the “Restore Backup” button and then choose the most suitable backup date.
How to Recover Deleted Notes on iPad with iTunes
Step 3. Press the Restore button. Once the process is complete, your iPad will be recharged with the selected backup, new notes included.
How to Recover a Deleted Note on iPad with iCloud Backup
In case your iPad is saved to iCloud, you might retrieve erased notes by installing an older backup on your device, which has the notes. Similar to iTunes, this method involves a complete device reset; therefore, it is advisable to back up your current data before restoring it.
Steps to recover a deleted note using iCloud backup:
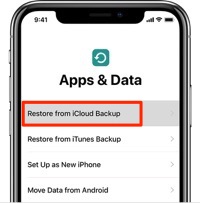
Step 1. Go to Settings > General > Transfer or Reset iPad > Erase All Content and Settings to reset your device.
Step 2. Once your iPad restarts, follow the setup instructions and choose “Restore from iCloud Backup” when prompted.
How to Recover Deleted Notes on iPad with iCloud
Step 3. Sign in with your Apple ID, select a backup created before the note was deleted, and complete the restoration process.
FAQs about Deleted Note Recovery from iPad
Q1: Can I Retrieve a Deleted Note on My iPad?
In most cases, it is possible to get a deleted note from your iPad. That is, if the note was deleted within the last 30 days. The Recently Deleted folder, iCloud or iTunes backups, or recovery utilities such as PhoneRescue can be used for this purpose.
Q2: Are Notes on iPad Backed Up?
Yes, notes on iPad are backed up if you’ve enabled iCloud sync or regularly back up your device via iCloud or iTunes/Finder. This ensures your notes can be restored if deleted or lost.
Q3: Is There Any Way to View Deleted Notes in Apple?
The erased notes have just been relocated to the Recently Deleted folder within 30 days. After that, you can recover them only through iCloud/iTunes backups or third-party software.
Conclusion
Losing an important note does not mean that you have lost all your notes. This article provides 5 effective solutions for how to recover a deleted note on iPad, including the Recently Deleted feature, iCloud, or iTunes. Also, PhoneRescue for iOS can make deleted note recovery an easy task even without any backup. It can also help you fix iPhone notes disappeared after an update. Get PhoneRescue now and enjoy your iPad data recovery with ease!
Free Download * 100% Clean & Safe

Senior writer of the iMobie team as well as an Apple fan, love to help more users solve various types of iOS & Android-related issues.
Product-related questions? Contact Our Support Team to Get Quick Solution >
