3 Methods to Transfer Photos from iPhone X/XS (Max)/XR to Flash Drive
If you want to transfer photos from your iPhone X/XS/XS Max/XR onto a flash drive, there are a few ways to do it. You cannot move pictures straight onto a flash drive as iPhones do not support the formatting that’s needed. This article explores three methods that enable you to quickly and effectively transfer your photos.
How to transfer photos from iPad to flash drive? Here you can refer to this guide and know several methods to transfer photos from iPhone/iPad to flash drive.
AnyTrans – iPhone Photos Management Tool
Free download AnyTrans on your computer firstly, so that you can get a quick start to transfer photos from iPhone X/XS (Max)/XR to flash drive. All kinds of iPhone photos can be transferred.
If your iPhone storage gets full, you won’t be able to download any more apps or other media. One of the ways you can free up space is by deleting some of your personal media: photos, videos and music. If you want to move your photos to a separate space, to keep them safe or share them with other people, a flash drive is a good option.
We will give you three ways to move iPhone X/XS/XS Max/XR photos onto a flash drive: via Image capture for Mac, via Windows Explorer for PC and by AnyTrans.
Method 1. Transfer Photos from iPhone X/XS (Max)/XR to Flash Drive via Image Capture (For Mac)
A quick and easy way to get your photos off your iPhone and onto an external hard drive for safekeeping. But you need to know that Image Capture only allows you to transfer the photos in Camera Roll, the others photos like Photo Stream photos, synced photos from computer are not in the supported list. If you want to transfer all the photos from iPhone to flash Drive, please move to Method 3 part.
Step 1 Connect your hard drive to your Mac via USB. Make sure it is formatted to work properly with your computer, and then plug your iPhone into your Mac via USB.
Step 2 Go to Spotlight Search to Open Image Capture – it will already be installed in your Mac.
Step 3 On the left side of the screen, you’ll see your iPhone with its list of images. Select the images you want to import.
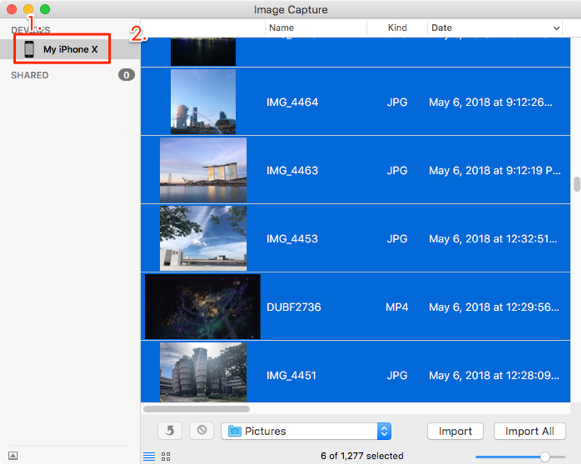
How to Transfer Photos from iPhone X/XS/XS Max/XR to Flash Drive – Step 3
Step 4 Allocate the destination folder of your imports (The default folder will be ‘Pictures’; instead, choose ‘Other’ from the drop-down menu and then select your Flash Drive.
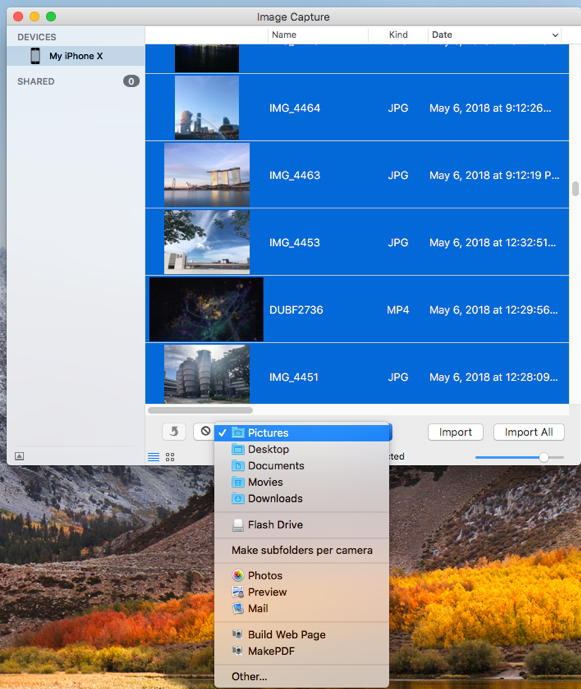
How to Transfer Photos from iPhone X/XS/XS Max/XR to Flash Drive – Step 4
Step 5 Click Import or Import All and wait a minute or two for the transfer to be completed.
Method 2: Transfer Photos from iPhone X/XS (Max)/XR to Flash Drive via Windows Explorer (For PC)
If you’re using a PC, Windows Explorer makes it quick and easy to transfer photos to a flash drive. And this method only allows you to transfer the photos in your iPhone’s Camera Roll, if you also have some photos have been synced to iCloud, or have some synced photos from computer, you can move to Method 3 to export all of them to flash drive.
Step 1 Plug in your flash drive and make sure it has enough room for all your photo files. Look under ‘My Computer’ for the flash drive, and then plug your iPhone into the USB port of your computer.
Step 2 Access the photos in your iPhone and choose the ones you want to transfer > Right click on your selection > Select “Import pictures and Videos”.
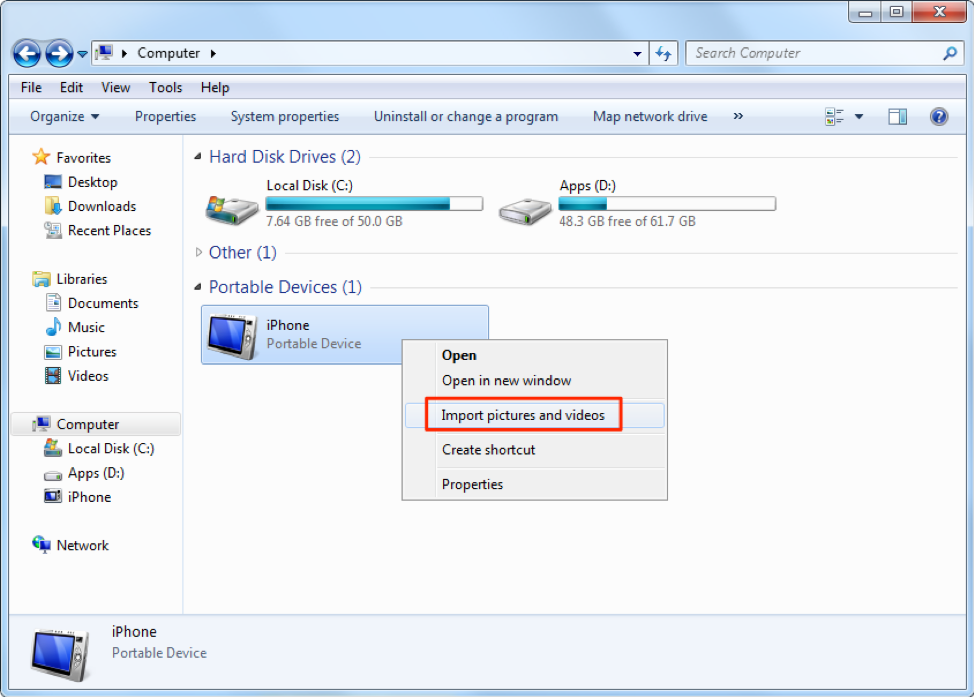
How to Transfer Photos from iPhone X/XS/XS Max/XR to Flash Drive via Windows Explorer – Step 2
Step 3 Then you’ll get a pop up window, which reminds you to tag the pictures and videos. Click Import Settings on this window > Click Browse in Import Images to Column to pick up the output folder > Select the flash drive you want to transfer iPhone photos to > Click OK to transfer. The transfer process will be begin and your iPhone will have more space.
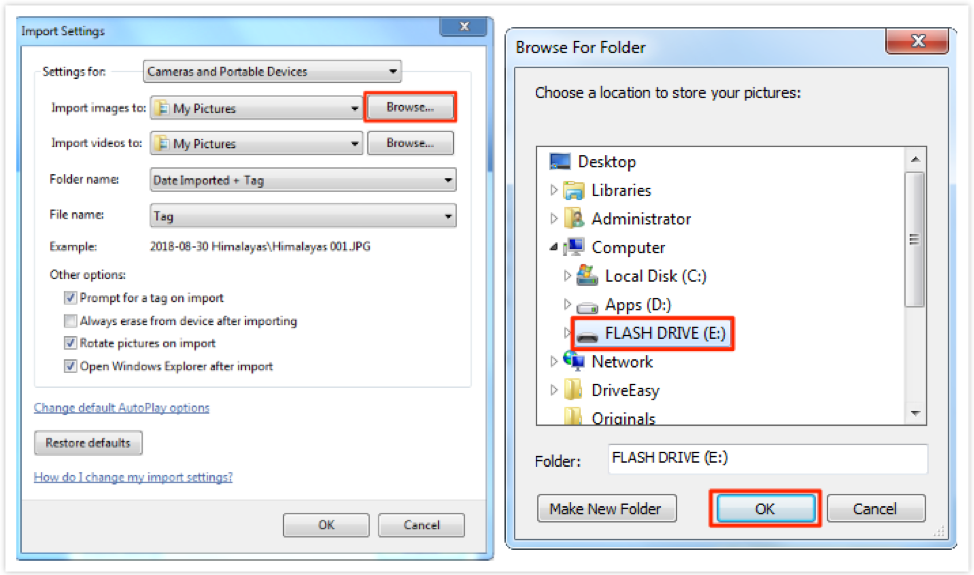
How to Transfer Photos from iPhone X/XS/XS Max/XR to Flash Drive via Windows Explorer – Step 3
Method 3: Transfer Photos from iPhone X/XS (Max)/XR to Flash Drive with AnyTrans (For Mac & PC)
Our final solution that will help you transfer pictures from iPhone to flash drive is AnyTrans. AnyTrans is a slick and easy-to-use tool that makes sharing files between your iPhone and your computer, as well as between devices, very easy and secure. The most important is that AnyTrans allows you to transfer all the photos from iPhone to flash drive, including Camera Roll photos, iCloud photos and photos synced from computer, etc. And it also works for both Mac and PC users.
Next, follow us to transfer all photos from iPhone to flash drive with AnyTrans.
Step 1 Download and install AnyTrans and run it on your computer, and then plug your iPhone into your computer via USB.
Free Download * 100% Clean & Safe
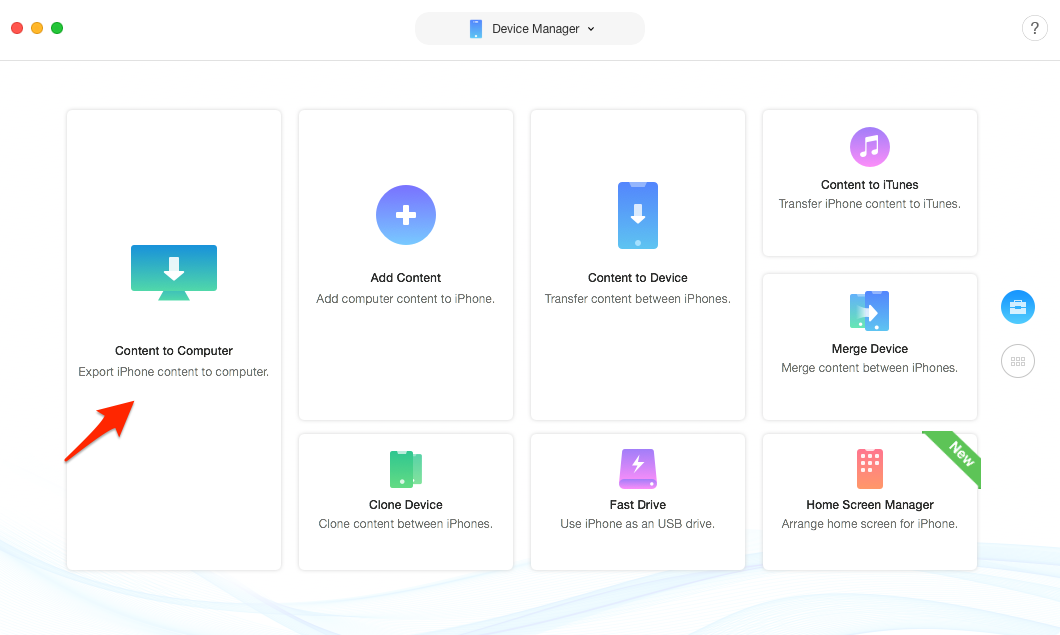
Step 2 On Homepage of AnyTrans, click “Content to Computer” button.
How to Transfer Photos from iPhone X/XS/XS Max/XR to Flash Drive with AnyTrans – Step 2
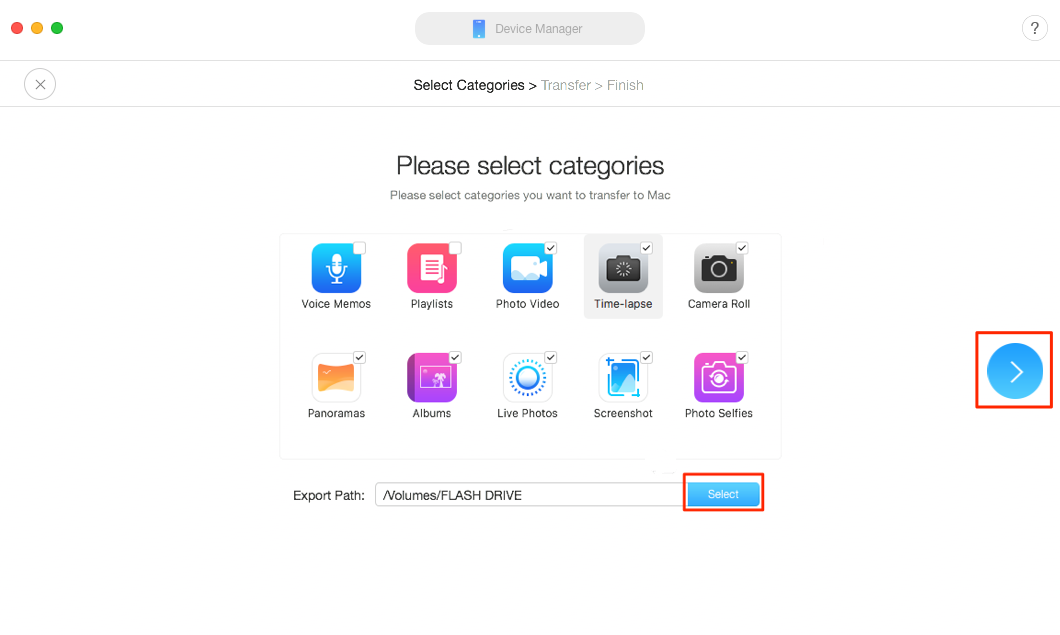
Step 3 Select the albums with photos you want to transfer to flash drive, like Camera Roll, Panoramas, Albums, Live Photos, Screenshots, Photo Selfies, etc., > Click “Select” to pick up your flash drive as output folder > Click “>” button to export photos from iPhone to flash drive.
How to Transfer Pictures from iPhone X/XS/XS Max/XR to Flash Drive with AnyTrans – Step 3
AnyTrans makes it very quick and simple to move content from your iOS device to other places, without the hassle or the risk of losing your data through iTunes.
The Bottom Line
Using a flash drive is a sensible option for keeping your photos safe when clearing out your iPhone. As you can see, there are a few solutions available if you want to transfer your photos across safely – our personal favorite is AnyTrans, as this is one of the most user-friendly systems for the job, and it keeps your data safe and secure. Free download AnyTrans and have a try now >


Member of iMobie Inc., is also a more than 3-year user of iPhone, iPad and iMac, like to fix all kinds of iOS and Mac OS problems.
Product-related questions? Contact Our Support Team to Get Quick Solution >