How to Transfer Photos from iPad to External Hard Drive Easily
Do not know how to transfer photos from iPad to external hard drive? This guide will tell you one easy method to help you backup iPad photos to external hard drive. Just take 5 minutes to get it.
iPad Transfer Tips
- iPhone/iPad Calendar Not Syncing
- iPhone Notes Not Syncing with iPad
- Sync iPhone Calendars to iPad
- Sync Samsung Photos to iPad
- Sync Android Files to iPad
- Sync Computer Photos to iPad
- Sync iPad Files to PC
- iPad Photos to External Hard Drive
- Transfer Photos from iPad to iPad
- Transfer Data from iPad to iPad
We can always take wonderful photos with an iPhone or iPad because of the amazing built-in camera. It is one easy way for us to record memorable moments in everyday life. However, as time goes by, the crowded photos can take up plenty of storage space on your device. So you may tend to download some photos to external hard as backup and then delete the photos from your device to free up space.
We have already talked about transferring iPhone iPad photos to USB flash drives before. Here in this guide, we will show you how to transfer photos from an iPad to an external hard drive with/without a computer
How to Transfer Photos from iPad to External Hard Drive in 1 Click
If you fail to connect your iPad to an external hard drive with a Lighting-to-USB adapter, you can also transfer photos from iPad to an external hard drive with one professional iOS data transfer tool named AnyTrans as long as you have a computer. Let’s first take a brief look at this powerful tool.
Free Download* 100% Clean & Safe
AnyTrans is one easy-to-use iOS data manager that can let you have full control of your iPhone/iPad/iPod contents.
- It can help you transfer photos from the iPad to an external hard drive easily. You can also preview and select the photos you want to transfer.
- It allows you to transfer selected pictures from an external hard drive or computer to your iPad instead of iTunes full sync, so you will never lose any existing data on your device.
- Besides photos, AnyTrans also supports managing music, videos, books, iTunes U, apps, etc.
Step 1. Download and install AnyTrans on a computer. Open AnyTrans > Connect your iPad to computer > Plug in your external hard drive, then the interface will be displayed as below > Tap Device Manager and click on Photos in the category box.
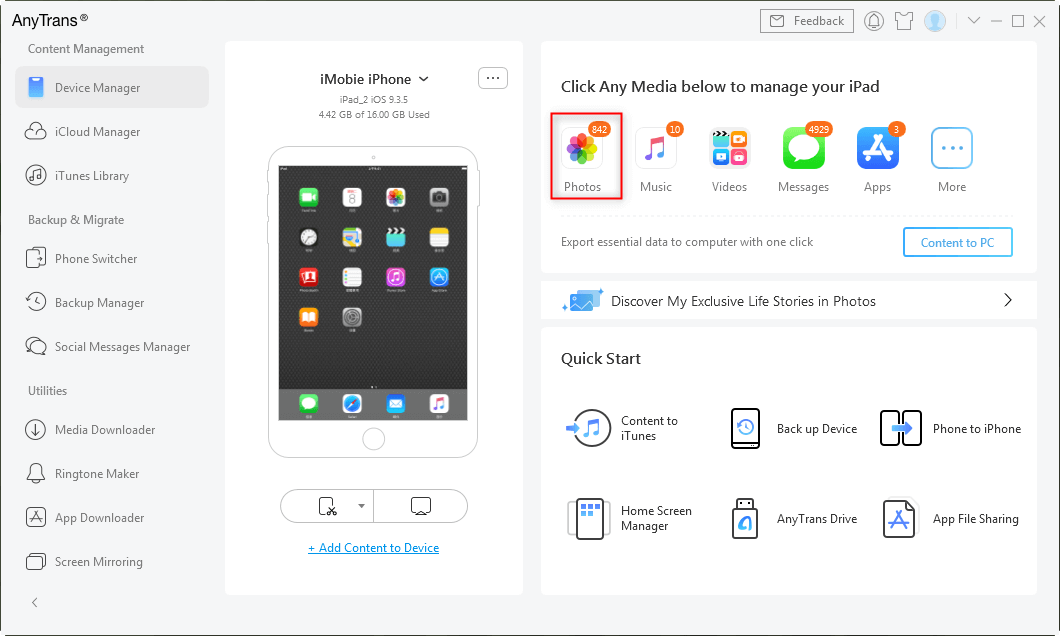
Connect iPad to the Computer and Choose Photos
Step 2. Click on My Photos > Choose the photos as per your needs > Tap the To PC button. Also, you can choose photos of Places, People, Photo Videos, and more.
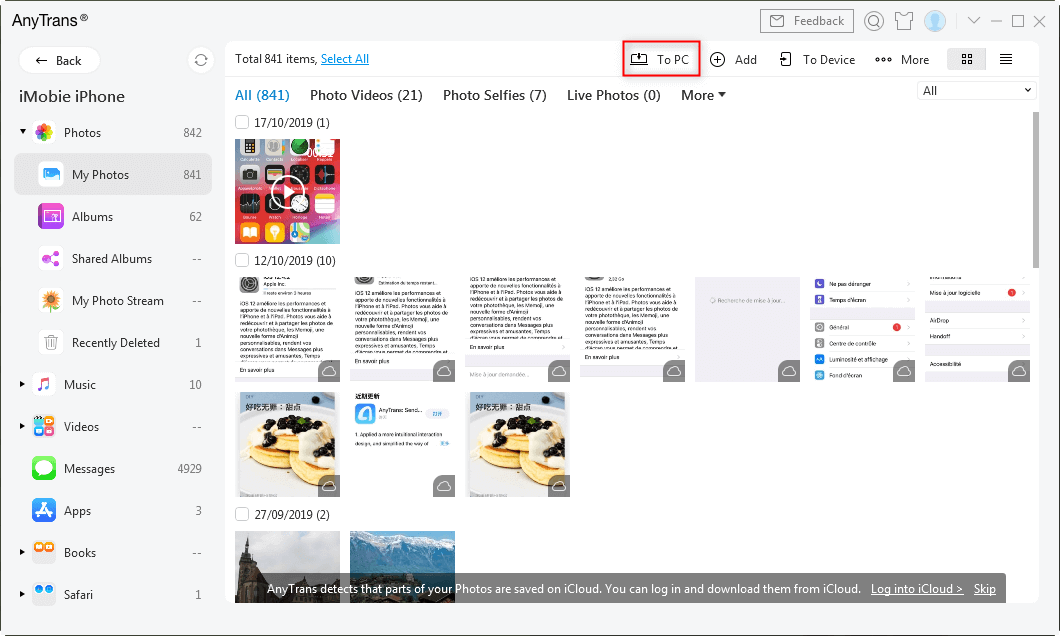
Choose Photos and Click Send to PC
Step 3. After tap the To PC button, you need to choose your external hard drive as destination > Click on Save, transferring starts.
Choose Your External Hard Drive as Destination
Step 4. After the transfer, you can click view files to check transferred photos. Or go to your external hard drive and find AnyTrans – Export folder to have a look.
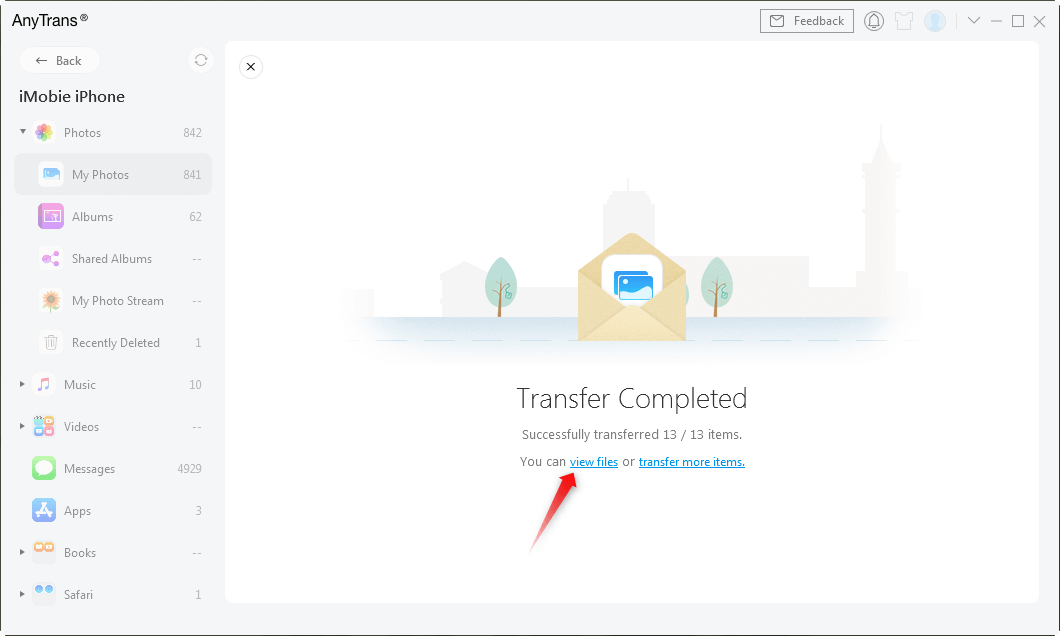
Transferring Completed Page
Step 5. Here are the photos transferred successfully.
View files on Computer
AnyTrans can easily help you transfer all types of photos to the computer, including the HEIC photo, which is created from iOS 11. So you can view HEIC files on the computer after transferred. If you want to convert them to JPG directly, iMobie HEIC Converter works for you. This tool enables you to convert any HEIC photos to JPG, JPEG, PNG, and GIF.
[Video Tutorial] How To Transfer Photos from iPhone to External Hard Drive
Free Download * 100% Clean & Safe
How to Transfer Photos from iPad to External Hard Drive without Computer
This method would be the best to transfer photos from an iPad to an external hard drive if you don’t have a computer around. You can connect your iPad to an external hard drive but you need to prepare an effective Apple’s Lightning-to-USB or Lightning-to-USB adapter. The following steps will lead you to a clear tutorial on how to transfer photos from iPad to external hard drive.
1. Connect your iPad and the external hard drive with the Lightning-to-USB adapters. You should check if the iPad has successfully connected to the external hard drive.
2. Go to the Files on iPad(or Files Explore), Browse. If both of them are successfully connected, you can see the hard drive.
3. Go to the Photos app and choose what you want to transfer.
4. Choose the photos you want to save from iPad to an external hard drive, and click on the Share button, then go on choosing the external hard drive to save the pics you want to back up.
5. Save the photos from the iPad to the external hard drive.
The Bottom Line
As you can see, both of the 2 methods would help transfer photos from iPad to an external hard drive. It can easily tell that Anytran can be much more helpful which means you can pick up all the pics you want at one time and also be much more labor-saving. You can free try AnyTrans right now.
Free Download * 100% Clean & Safe

Member of iMobie team as well as an Apple fan, love to help more users solve various types of iOS & Android related issues.
Product-related questions? Contact Our Support Team to Get Quick Solution >
