5 Best Ways to Fix Blue Screen Error on iPad [Updated]
iPad is a handy gadget. The widescreen of the iPad gives you a better experience when playing games, watching movies, reading books, writing notes, and looking at pictures. Sometimes, users encounter the screen turning blue. You can resolve it with the following hacks.
iPad is convenient and versatile. Whether you’re dealing with a task, working on a project, or playing a vivid game, the iPad is the best. Its widescreen makes reading books and viewing photos and videos more fun. iPad is used at work, at schools, at universities, and for entertainment. However, you may face problems.
Most of them can be resolved by simple hacks. Just like any device, the iPad can also have some problems. One of those problems is it the screen turns blue. There are solutions to resolve this problem. In the next section, let’s find out why you have faced this problem.
To fix black screen on iPad, you need this guide: iPad/iPad Pro Black Screen of Death >
Why Has My iPad Screen Turned Blue?
Sometimes, the iPad screen becomes blue. When it happens, it is due to software or hardware malfunctioning. It becomes problematic if you use an iPad daily at work, for education, or for entertainment.
There can be many reasons for it. Some of them are:
- Specific applications on iPad like FaceTime, Safari, or even the camera can cause this issue.
- A software update can be a reason due to related bugs or mistakes.
- Multi-tasking can cause this problem.
- iPad blue screen issues could be a consequence of equipment mistakes.
Fix iPad Blue Screen with Hard Reset
One of the solutions for the iPad screen turning blue is to hard reset the device. To do so, follow the following step-by-step.
For an iPad with a home button:
- Press and quickly release the Volume Up button.
- Do the same with the Volume Down button.
- Press and hold the top button.
- Let go of the button as soon as the Apple logo appears.
For iPad that have a home button:
- Press and hold the Power button and the Home button at the same time.
- When the Apple logo appears, release both buttons.

Restart Your iPad
Fix iPad Blue Screen by Slapping iPad Back
Sometimes, the problem of the iPad screen turning blue is resolved by slapping its back. For some individuals, hitting their device is the first reaction to any situation.
Once in a while, the iPad blue screen of death is an eventual outcome of you dropping the gadget. This might be because of an equipment issue. For example, the LCD link could have become free or strayed from its generally expected position.
Fix iPad Blue Screen without Data Loss
If you cannot fix the blue screen with any of the hacks. It might be because of some system problems. Then you will have to use a professional iOS system repair tool to get rid of these issues. As there are too many tools on the market, we have tested and reviewed the most popular ones and concluded that PhoneRescue for iOS is the most convenient and recommended tool to help you fix iOS system errors. And compared with other tools, PhoneRescue will not wipe your precious data on your device, always putting your data safety in the first place. Here are some of its features you may want to know.
Free Download * 100% Clean & Safe
- One-click repair system – PhoneRescue simplifies the process of system repair as much as possible, so that you can easily get rid of system errors by just clicking a button. It can even be done at home.
- Two repair modes – Standard and Advanced repair for you to choose, satisfying the repair of most system problems such as black screen, frozen screen, stuck in recovery mode, etc.
- Support no-data-loss repair – This tool allows you to keep data in your device while fixing system issues. So once the problem is solved, your phone will be the same as before.
- Support iOS 16 and iPadOS 16 – Whether your iPad is running the old system or the latest iPadOS 16, you can use PhoneRescue with confidence.
What’s more, if you want to get back data lost due to a broken screen, system errors, or other factors, PhoneRescue can also help you find them back from your device or backups with ease.
Download and install the latest version of PhoneRescue for Windows/Mac from here. Let’s find out how to fix iPad blue screen with PhoneRescue.
Step 1. Launch PhoneRescue for iOS on your Windows/Mac computer. Choose Repair iOS System mode.

Choose the Repair iOS System Mode
Step 2. Connect your iPad to your computer. Your device will show up on the screen. You will have to choose from two modes, Standard mode, and Advanced mode. To avoid data loss, just choose Advanced mode.
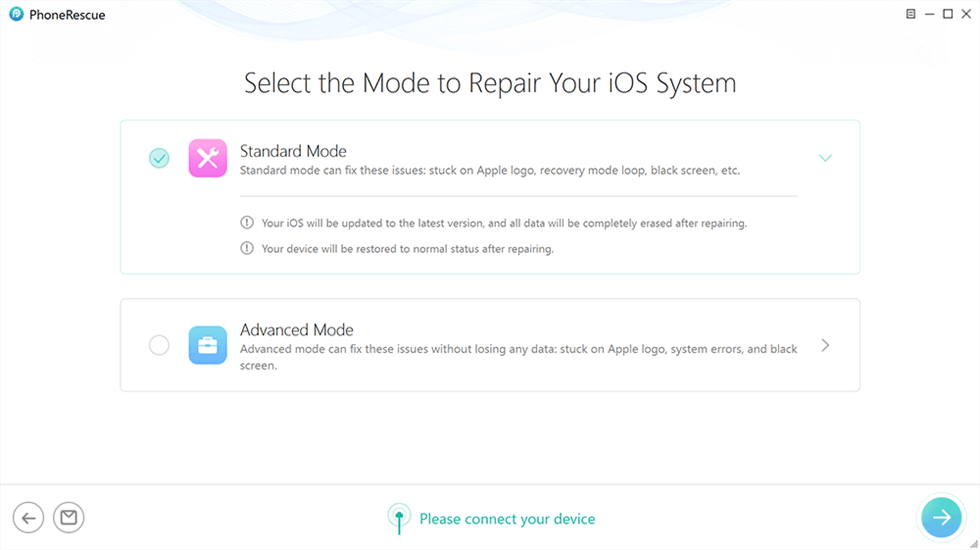
Choose Advanced Mode
Step 3. Put your device in recovery mode. If you complete, click on Download. It will download the package, which will fix your device.
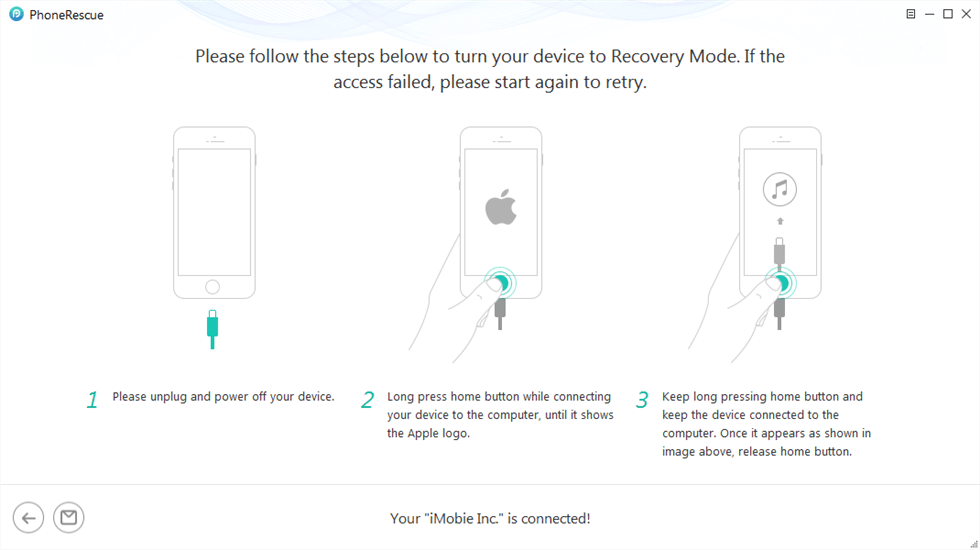
Enter Recovery Mode
Step 4. After the package is downloaded, PhoneRescue will start repairing your device. Wait till it’s done. You will see ‘iOS repairing completed,’ when the process is completed.

iOS Repairing Completed
Fix iPad Blue Screen with iTunes
You will have to connect it to iTunes if you cannot resolve the problem by back-slapping or hard resetting. To do so, follow these steps.
Step 1. Connect the iPad to a computer with a USB cable. And open iTunes on your computer.
Step 2. Click on the device icon and then choose the Restore Backup option on the screen.
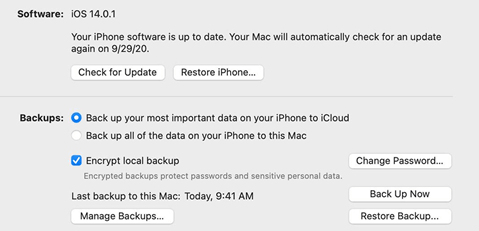
Choose Restore Backup Option
Step 3. Click the Restore button to start the restoring process.
Disconnect your iPad until the backup is complete. You will find the iPad blue screen issue has been fixed effectively.
Fix iPad Blue Screen with Factory Reset
If you failed with the above ways, the final method you can try is to reset your iPad to the factory settings. To factory reset your device, follow these steps:
Step 1. Go to Settings and tap General. Tap Transfer or Reset. Then tap Erase All Content and Settings.
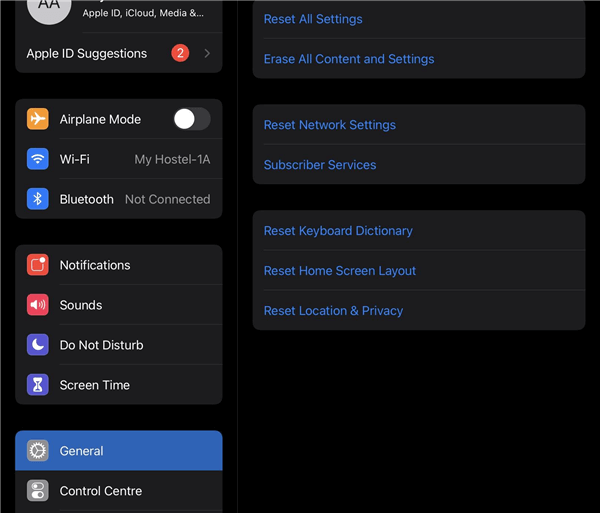
Tap Erase All Content and Settings on iPad
Step 2. Tap Back Up and Then Erase. Wait for the backup to be completed.
Step 3. Enter your passcode and then tap Erase. And tap it again to confirm your behavior. Wait for your device to erase. It can take a few minutes to erase your data.
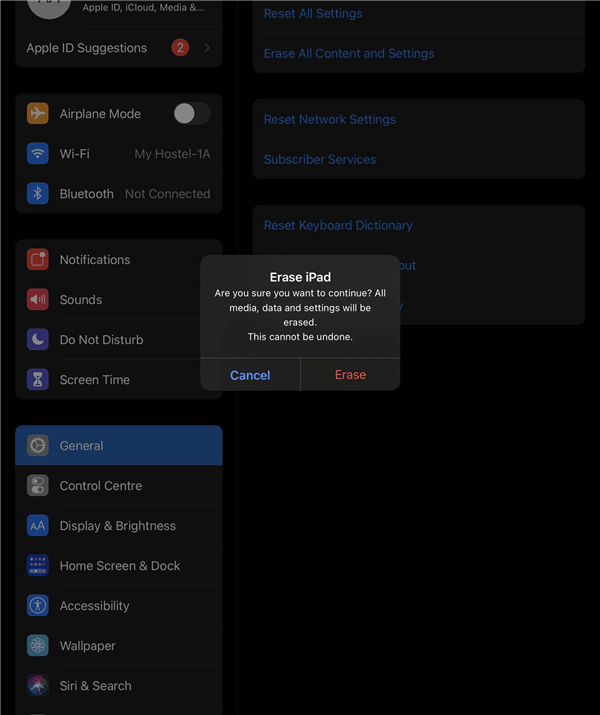
Enter Passcode and Tap on Erase on iPad
The Bottom Line
Users of all kinds use iPad. Its widescreen makes the experience more fun. One of the problems encountered is the blue screen issue. You can resolve it by the steps mentioned above. While other common methods will wipe your data on your iPad, we suggest you try PhoneRescue for free first, because all your data will be kept intact even after system repair. But if the above-mentioned solutions don’t resolve it, then its hardware malfunctions. You will have to get it repaired.
Free Download * 100% Clean & Safe

Senior writer of the iMobie team as well as an Apple fan, love to help more users solve various types of iOS & Android-related issues.
Product-related questions? Contact Our Support Team to Get Quick Solution >
