How to Solve Erase iPhone Verification Failed Problem [Full Guide]
Looking for a complete guide on how to solve the Erase iPhone Verification Failed problem? Look no further! Our guide covers all the basic ways to get your iPhone erased successfully.
Do you want to reset your iPhone? Are you facing this “Erase iPhone Verification Failed” problem? If yes, then you are not alone. This is becoming a common issue among iOS users. Many iPhone and iPad users encounter this issue, and there are various factors that can cause it.
But don’t worry! We have got you covered. In this article, we will provide a simple solution to reset your iPhone without an Apple ID. We will also walk through some basic troubleshooting steps to help you fix this problem. So, let’s get started and solve this issue together.
Why Erase iPhone Verification Failed
The “Erase iPhone Verification Failed” error usually occurs when the verification process fails while resetting the iPhone. It can be due to one of the following reasons:
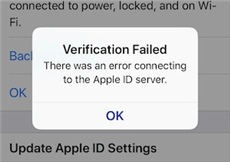
Erase iPhone Verification Failed
- You have a poor internet connection. So, when you try to reset your iPhone, ensure to have a good internet connection.
- Another one is the wrong Apple ID details. Which means the Apple ID credentials you are entering are incorrect.
- If restrictions are enabled, such as screen time restrictions. Make sure to turn off all the restrictions before erasing your iPhone.
- There might be a software issue that is causing this error. Restart your iPhone or Update your iPhone to the latest version, if any.
- If you have an activation lock, you need to enter your iCloud credentials. Incorrect details can cause this error to happen.
Now that we know about the reasons that can cause this error. Let’s move towards the best and hassle-free solution.
Best Way to Fix Erase iPhone Verification Failed
If you enter the wrong Apple ID information, you will also get the “erase iPhone verification failed” message. Forgetting your Apple ID credentials may leave you helpless. It can be a frustrating experience, and people have no clue what they should do in this situation. Fortunately, the best iPhone unlocker – AnyUnlock comes in to get your back. It allows you to unlock Apple ID even without password. And if you need, you can also use it to find your Apple ID.
And this powerful tool offers other simple yet effective solutions to your iOS problems. Whether unlocking the screen time code, removing iOS screen lock, unlocking iCloud lock, etc., AnyUnlock is the one-stop solution. Now, you don’t have to rely on mobile operators for these kinds of problems. Below are some highlights of AnyUnlock.
Free Download * 100% Clean & Safe
- Unlock Apple ID without account or password – You don’t have to worry about forgetting Apple ID account and password anymore, because AnyUnlock can help you unlock it even without this information.
- Just click to unlock – There is no difficulty in operation. You only need to click the buttons to unlock your Apple ID easily.
- No need to wait – The whole unlocking process only takes a few minutes. Save your precious time as much as possible.
- Cover all iOS versions and devices – Whether it is iPhone or iPad, whether it is the old or the latest iOS version, AnyUnlock supports them all.
Before starting, free download and install AnyUnlock on your computer. Then follow the instructions given below to fix the erase iPhone verification failed issue.
Step 1. Launch AnyUnlock on your PC or Mac and select Unlock Apple ID mode. Then, click the Start Now button to proceed.
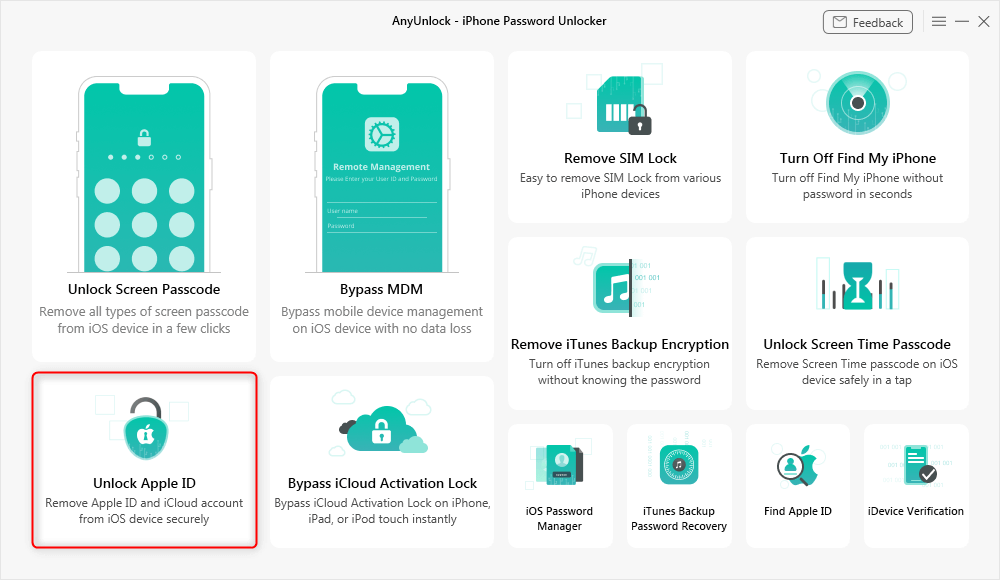
Click Unlock Apple ID from the Homepage
Step 2. Now, connect your iPhone to your computer via a USB cable. Then click Unlock Now to proceed.
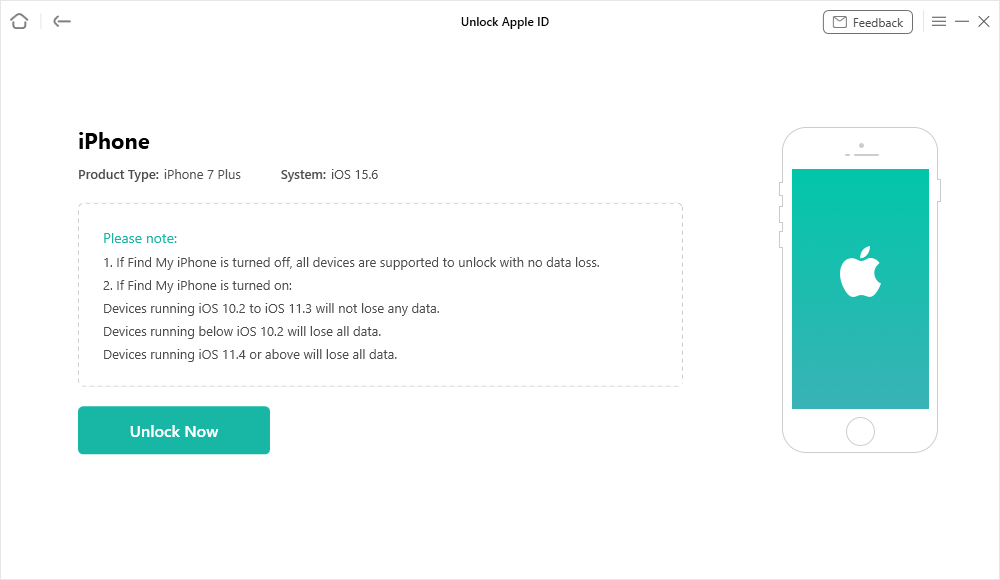
Click Unlock Now Button
Step 3. Now, AnyUnlock will start unlocking the Apple ID. Once the process is completed, you will see the below interface.
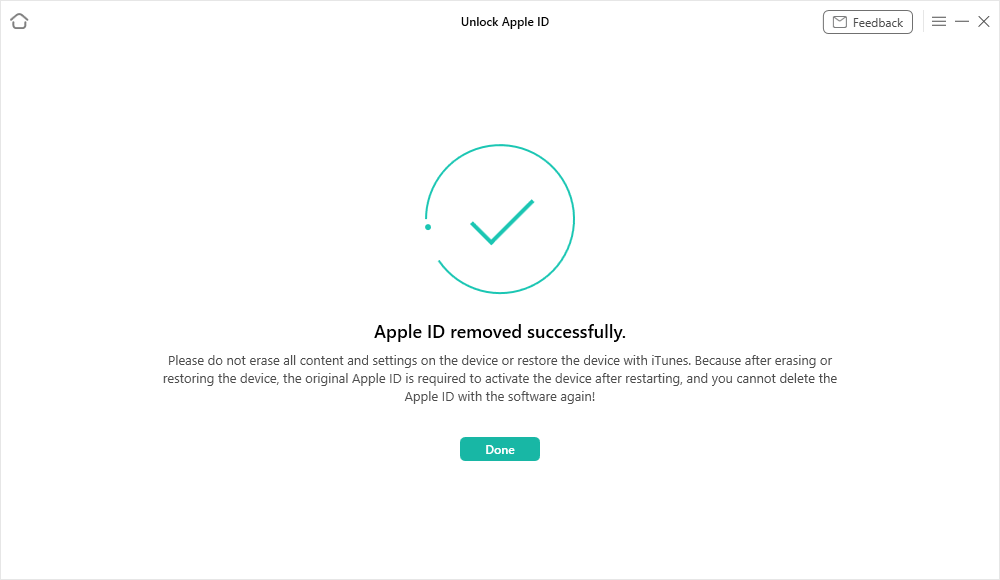
Apple ID Removed Successfully
The steps differ if you have enabled Find My iPhone or Two-factor authentication. If you want to solve the issue with any of them enabled, you can follow the Part 2 and 3 instructions in AnyUnlock’s guide.
Basic Ways to Fix Erase iPhone Verification Failed
There are some troubleshooting ways that you can try to resolve the issue. These ways aim to identify the common problems preventing iPhone from erasing. These solutions involve checking for common problems like network or software issues. However, they are simple, easy to follow, and may solve your issue. You can give any of them a try to fix Erase iPhone Verification Failed error.
Way 1. Check Your Network
If you are still using an iPhone with the older version, you will notice that the Wi-Fi network keeps disconnecting automatically. This poor connection may cause the “Erase iPhone Verification Failed” error to occur. You can fix this issue by forgetting your Wi-Fi network and rejoining it. Many iPhone users claim that this method can fix the error. To do that, follow the steps given below:
Step 1. Open the Settings menu on your iPhone, then open WLAN.
Step 2. Tap the info icon right next to the Wi-Fi name and tap Forget This Network.
Step 3. A pop-up will appear. Tap Forget.
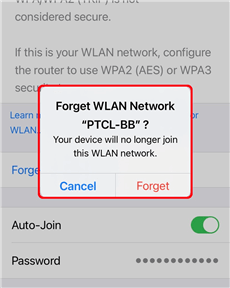
Tap Forget Button
Step 4. Now turn your Wi-Fi off, and after a few seconds, turn it on.
Step 5. Join the network by entering the password and try erasing iPhone again.
If it doesn’t help fix the issue, try the next way.
Way 2. Reset Network Settings
This error can also occur if your Network Settings are incompatible. Sometimes iOS users make changes in the Network Settings, which ends up affecting it. To fix this issue, you are supposed to clear your Network Settings. By doing so, there are high chance that you won’t get that error again. To do so, follow the steps given below:
- Open Settings > General.
- Scroll down and tap Transfer or Reset iPhone.

Tap Transfer or Reset iPhone
- Then Reset > Reset Network Settings.
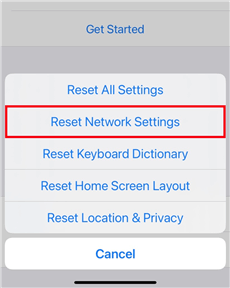
Select Reset Network Settings
- Now you will be asked to enter the Passcode.
- Wait until the process is complete. Restart your iPhone and check if the problem is fixed.
Way 3. Check System Status Page for Apple
If you have tried various methods and are still facing the “Erase iPhone Verification Failed” problem. You can check Apple System Status Page to see if there is any issue going on with relevant services.
You will get to know if any service is under maintenance that is preventing the verification from completing. If Apple’s System Status shows that all the services are running normally, you can contact Apple support. But keep it for the last. There are still some ways left.
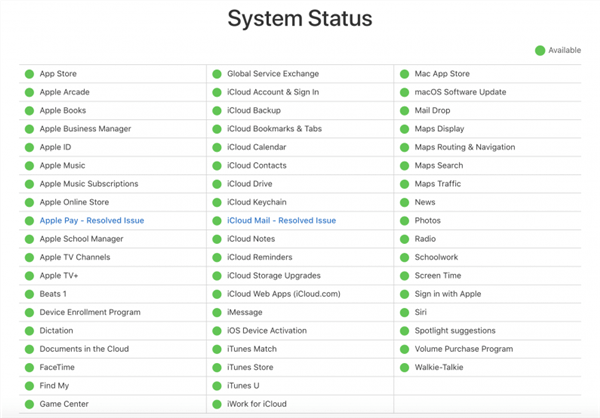
Check the Apple System Status
Way 4. Turn off Find My iPhone
If Find My iPhone is turned on, it enables an Activation Lock on your device. This lock requires entering your Apple ID and password to erase your device. If there is an issue with the Find My iPhone service, it can prevent your device from being verified and erased successfully. So, before erasing your iPhone, make sure to turn off the Find My iPhone service. Follow the steps given below:
Step 1. Go to Settings on your iPhone.
Step 2. Tap on your name at the top of the screen.
Step 3. Scroll down and select Find My.
Step 4. Tap on Find My iPhone.
Step 5. Toggle off the switch for Find My iPhone.
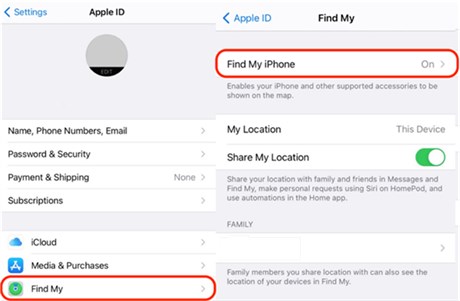
Turn off Find My iPhone
Way 5. Erase iPhone via iCloud
Erasing iPhone via iCloud can fix the “Erase iPhone Verification Failed” error. It will erase all data and settings available on the device, including corrupted data that may be causing the issue.
But to perform this method, you must know your Apple ID credentials. It will take some time to erase the data depending on the size of the data you have on your phone. Once the reset process is completed, your iPhone will be restored to its default settings. Follow the steps given below:
Step 1. Open the browser, go to iCloud official website, then sign in with your Apple ID credentials.
Step 2. Click on Find iPhone. Click All Devices and select the iPhone you want to erase.
Step 3. Click on Erase iPhone and confirm the action.
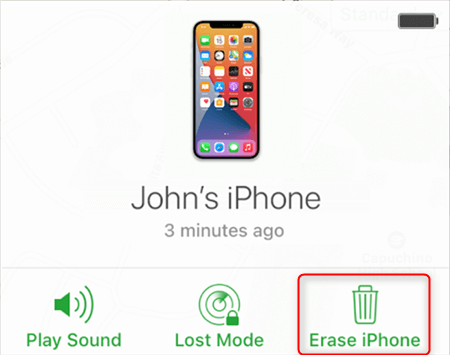
Tap on the Erase iPhone icon
Hopefully, this method will solve the problem. If not, you can try another way.
Way 6. Update iOS
Updating your iPhone to the latest version of iOS can fix many problems. This is because the latest iOS updates include bug fixes and performance improvements. It can help resolve issues with the device’s operating system. To update your iPhone, follow the steps given below:
- Go to Settings on your iPhone.
- Tap on General.
- Tap on Software Update.
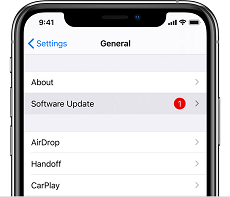
Software Updates on iPhone
- If you see any latest update available, tap on Download and Install.
- Follow the instructions on the iPhone to complete the update process.
The Bottom Line
Facing the “Erase iPhone Verification Failed” error can be frustrating for iPhone users. But there are various ways that can help you solve this problem. If you are sure that this problem is caused by the wrong Apple ID information, AnyUnlock is the best solution that lets you fix this issue in just a few clicks, even without Apple ID and its password. It is a one-stop solution for various iPhone-related problems. So, if you want to avoid relying on phone operators for these problems, free download AnyUnlock now.
Free Download * 100% Clean & Safe
Mobile Phone Unlocking
Necessary for iPhone Unlocking

Senior writer of the iMobie team as well as an Apple fan, love to help more users solve various types of iOS & Android-related issues.
Product-related questions? Contact Our Support Team to Get Quick Solution >
