We tested the latest Instagram app on iPhone and Android devices to verify how location permissions behave across modern versions of iOS and Android.
If you want to stop Instagram from accessing your location, you must change the permission directly in your phone’s settings. Instagram cannot track your precise GPS location after location permissions are disabled on iPhone or Android.
Many users worry that Instagram continuously tracks their whereabouts in the background, but in reality, the app relies largely on the permissions granted by your device.
In this guide, you’ll learn:
- How to turn off Instagram location access on iPhone and Android
- Whether Instagram can track your exact location
- How to remove location tags from existing posts and Stories
- Why Instagram may still suggest nearby cities even after GPS is disabled

Table of ContentsHide
Can Instagram Track Your Exact Location?
Not if location permissions are disabled. Many users believe Instagram constantly tracks their real-time movements, but the app cannot bypass the location settings configured on your iPhone or Android device.
When location access is set to “Never” on iPhone or “Don’t Allow” on Android, Instagram can no longer access your precise GPS coordinates.
However, the platform may still estimate your general region using your internet connection and IP address. This is why some users continue seeing nearby city suggestions even after GPS access has been turned off.
How to Stop Instagram from Tracking Your Location (iPhone & Android)
For users experiencing privacy concerns, the biggest hurdle is realizing that you cannot fix this inside the application itself. Because Instagram does not feature a dedicated internal privacy switch for GPS, you must revoke the app’s permissions directly through your phone’s operating system.
By adjusting this access at the system level, you effectively build an impenetrable wall between your phone’s physical GPS hardware and the application. Here are the exact, tested procedures to manage your privacy settings for both major mobile platforms.
How to Turn Off Location on Instagram for iPhone
If you are using an Apple device, managing your system settings is the most reliable method for stopping GPS data collection. Here is how to lock it down on iOS:
Step1. Open your iPhone’s native Settings application.
Step2. Scroll down the menu and tap on Privacy & Security.
Step3. Select Location Services at the very top of the screen.
Step4. Scroll through your alphabetical list of installed apps and tap on Instagram.
Step5. Under the “Allow Location Access” menu, tap Never to completely block the app from requesting GPS data.
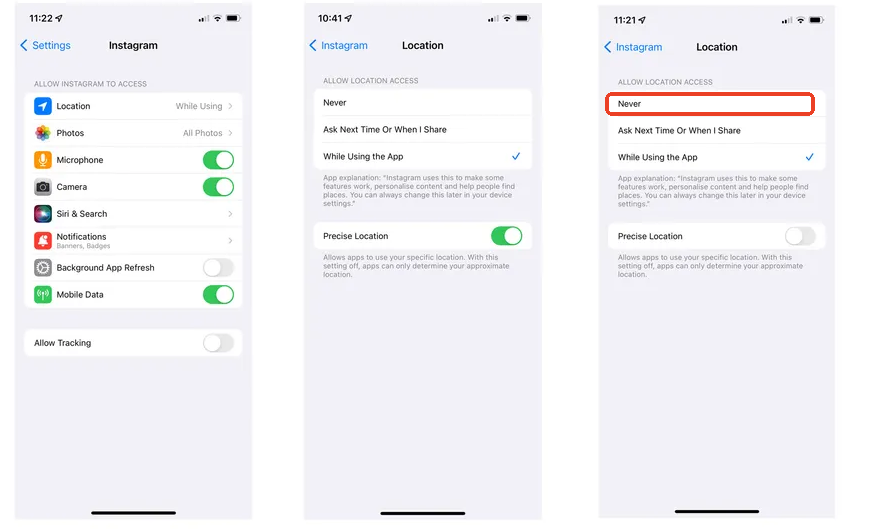
If you prefer to allow occasional check-ins (like tagging a broad city) without sharing your exact street coordinates, leave the permission on “While Using the App,” but toggle off the Precise Location switch.
How to Turn Off Location on Instagram for Android
Android menus can look vastly different depending on the manufacturer of your phone. To successfully revoke permissions, you need to know exactly where your specific brand hides its app settings. Here is the breakdown:
Step1. Open your Android device’s Settings menu.
Step2. Navigate to your application list.
- For Samsung Galaxy users: Tap on Apps.
- For Google Pixel users: Tap on Apps & Notifications (or App Management).
Step3. Scroll down or use the search bar to select Instagram from the list.
Step4. Tap on Permissions, and then select Location.
Step5. Choose Don’t allow to revoke all mapping access from the application.
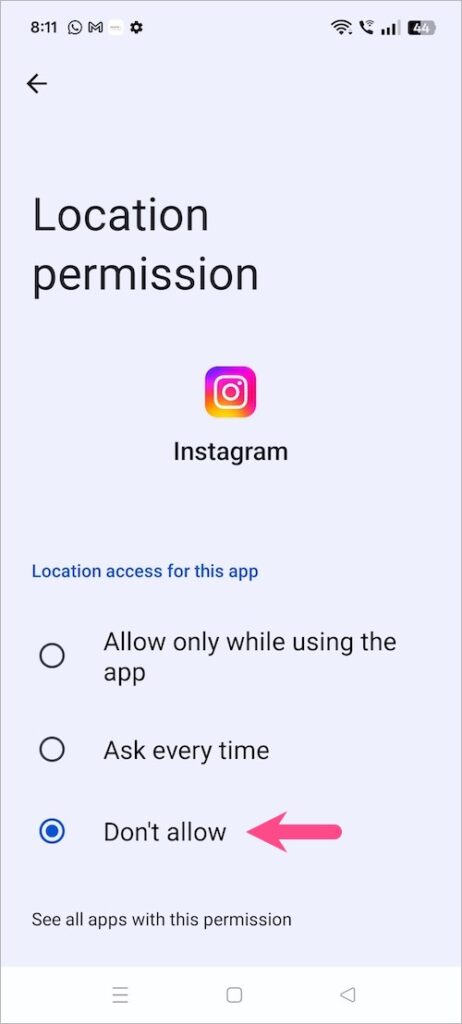
Similar to the iPhone, Android allows a middle ground. You can toggle off the Use precise location switch while keeping approximate regional access enabled if you still want to tag general cities in your posts.
You May Also Like: How to Change Instagram Location Easily: A Tested Guide>
Location Tagging vs Location Tracking: What’s the Difference?
One of the biggest misconceptions about Instagram privacy is that location tagging and location tracking are the same thing. Here is a critical fact that clarifies the confusion: many users assume Instagram continuously tracks their GPS whereabouts 24/7. However, in most cases, the app only accesses your coordinates when you actively add a location tag, search for nearby places, or if you explicitly granted “Always” permissions through your device settings.
This distinction busts the viral social media myths regarding continuous, malicious background tracking. The application primarily relies on two distinct methods:
- Active Tagging: This occurs when you manually choose to broadcast your whereabouts by adding a Story sticker or a grid post geotag. The system temporarily pings your device’s GPS to populate the list of nearby venues for you to choose from.
- Passive Tracking: This refers to the app collecting data while you simply scroll. Unless you have explicitly granted background permissions in your device settings, modern builds of the application do not continuously log your exact street-level coordinates.
Understanding this difference empowers you to use the platform confidently. Instagram isn’t secretly bypassing your phone’s GPS settings; it is simply reacting to the permissions you provide.
You May Also Like: How to Find Someone’s Location on Instagram: A Realistic Guide>
How to Remove Location from Instagram Posts, Stories, and Highlights
A major pain point for privacy-conscious users is realizing how much historical data they have already shared. If you accidentally added your whereabouts to a post or a Story and want to clean up your digital footprint, you must edit your existing content.
Removing Geotags from Grid Posts
Step1. Depending on your specific version of the app, the button to remove a location from a grid post might look a bit different. Here is the most current method:
Step2. Open the application and navigate to your main profile grid.
Step3. Tap on the specific post you want to alter.
Step4. Tap the three-dot icon (the options menu) located in the top right corner of your post.
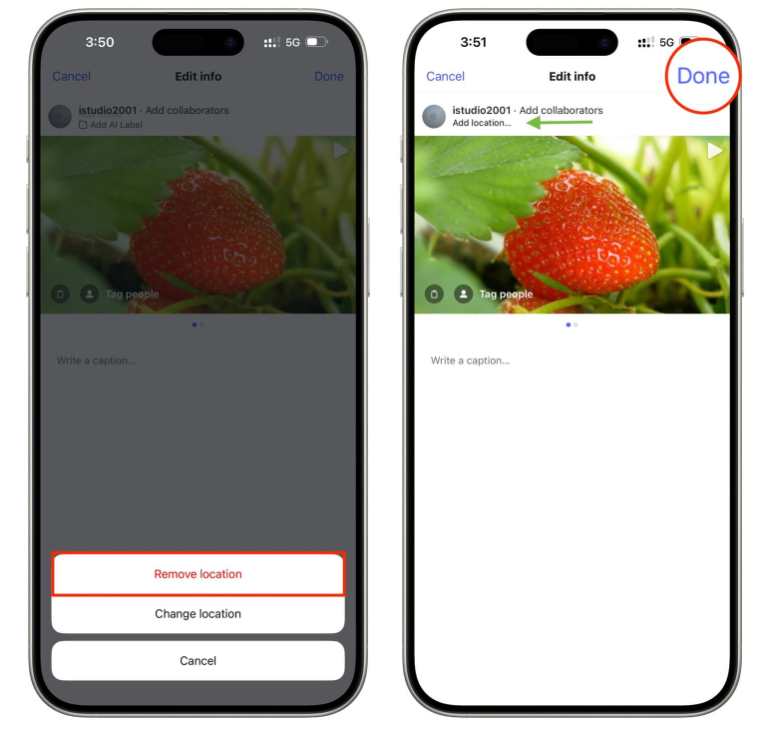
Step5. Select Edit from the pop-up menu.
Step6. Tap directly on the blue location name displayed beneath your username.
Step7. A “Select a Location” screen will pop up. From here, you can either search for a new, vague location (like a whole country), tap Remove Location, or tap the small ‘X’ icon in the top corner (depending on your software version) to clear the data entirely.
Step8. Tap Done (or the blue checkmark) to save your newly secured post.
Handling the 24-Hour Story Sticker
Unlike standard grid posts, Stories cannot be edited once they are uploaded. If you realize you used a location sticker and want to hide it, the only method is to delete the active Story entirely. You must then re-upload the original photo or video from your camera roll without applying the sticker. To maintain control, it is best practice to avoid applying the sticker altogether while you are still physically at that venue—wait until you are home to post about your day.
How to Remove Location from Profile Highlights
This is a step many guides completely miss, leaving users with historical data sitting right on their public profiles for months. Highlights are simply saved collections of your past Stories. Because you cannot edit a “burned-in” sticker off a Story, you cannot edit it off a Highlight. Here is how you handle it:
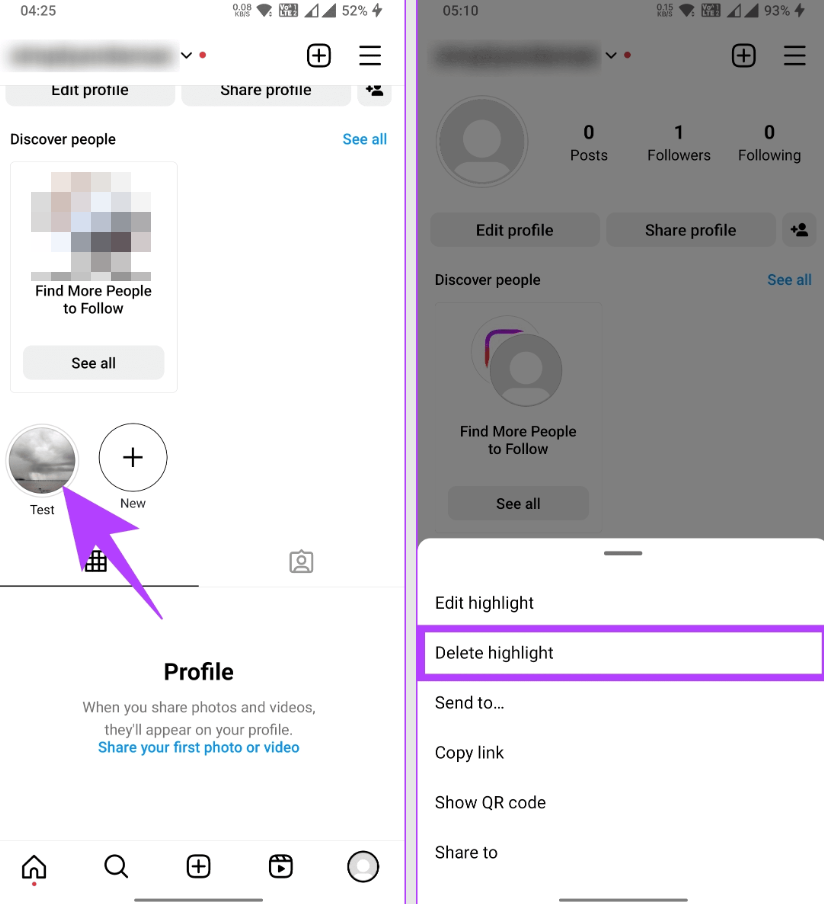
Step1. Go to your profile and tap on the Highlight bubble containing the tagged Story.
Step2. Tap the three-dot icon (More) in the bottom right corner of the screen.
Step3. Select Edit Highlight.
Step4. In the “Selected” tab, find the specific Story slide that contains the location sticker.
Step5. Uncheck that specific Story to remove it from the public Highlight reel, then tap Done.
Alternative: If you want the photo in your Highlight but without the tag, you must find the original un-tagged photo in your phone’s camera roll, post it as a brand new 24-hour Story, and then add that new Story to your Highlight.
PRIVACY WARNING: GPS vs. IP Tracking
Successfully turning off your GPS via native phone settings stops the app from knowing your precise street address. However, it does not prevent the platform from approximating your general region. Every time your phone connects to Wi-Fi or cellular data, it is assigned an IP address. This IP address inherently broadcasts your general regional data (like your city or state). If you demand absolute anonymity and want to mask your IP address entirely, you would need to route your internet connection through a reputable, third-party Virtual Private Network (VPN).
Why Instagram Still Suggests Nearby Cities After GPS Is Disabled
Even after disabling GPS permissions, Instagram may still suggest nearby cities or locations. This usually happens because Instagram can estimate your general area using your IP address.
Your IP address can reveal a rough region, such as your city or state, but it cannot provide your exact street-level location. Seeing local city suggestions does not mean Instagram is bypassing your GPS settings.
Essential Privacy FAQs
To ensure you have complete control over your social media footprint, here are clear answers to a few lingering questions that aren’t solved by flipping a switch in your settings.
- Can my followers track my real-time movements?
- Absolutely not. Other users can only see the locations that you manually, intentionally tag in your published posts or Stories. The platform never broadcasts your live, real-time GPS coordinates to your followers or the public.
- Will turning off location services affect my algorithm or feed?
- Your feed may become slightly less localized. Because the app uses location data to serve you geographically relevant ads and suggest local creators, restricting this data means you will see broader, more generalized content. However, it will not negatively impact your follower reach or your ability to use the app normally.
- Does Instagram notify someone if I remove a location tag from an old post?
- No. When you edit a historical grid post to remove a geotag, or when you delete a Story from your Highlights, Instagram does not send a notification to your followers or to the business/location you originally tagged. You can scrub your historical data completely under the radar.
Conclusion
Turning off Instagram location access is the most effective way to stop the app from accessing your GPS data. Once location permissions are disabled through your iPhone or Android settings, Instagram can no longer access your precise real-time location.
You can further improve your privacy by removing old geotags from posts, Stories, and Highlights. With the correct settings in place, you can continue using Instagram while maintaining greater control over your personal location data.


Hot Topics
