2 Ways to Delete Videos from iPad
Deleting videos/movies from iPad is a good way to reclaim space. If you are an Apple product newbie and don’t know how to remove videos from iPad, there are 2 available ways for you.
iPad Tips & Issue Fixes
iPad Issues Fixed
iPad Music & Video Tips
I can’t delete some movies I bought on iTunes to make room for more on my iPad Air 2. How do I delete it? I tried tapping and holding on to the video, and I tried swiping. Please help!
— A User from Apple Support Communities
The movies on iPad can be purchased from the iTunes Store or synced from your computer, and most iPad users would like to save some wonderful movies for enjoyment. What’s more, with the built-in iSight camera, people are fond of shooting videos using iPad. However, due to the limited storage space of iPad (especially for 16GB iPad users), you may need to delete some movies or recorded videos to free up the storage space. Keep reading and try the following two methods to delete videos from your iPad.
Method 1. How to Delete Videos from iPad Directly from the Device
For movies you bought or synced from computer: Go to Videos app > Find the video you want to remove > And swipe to the left > Then tap Delete.
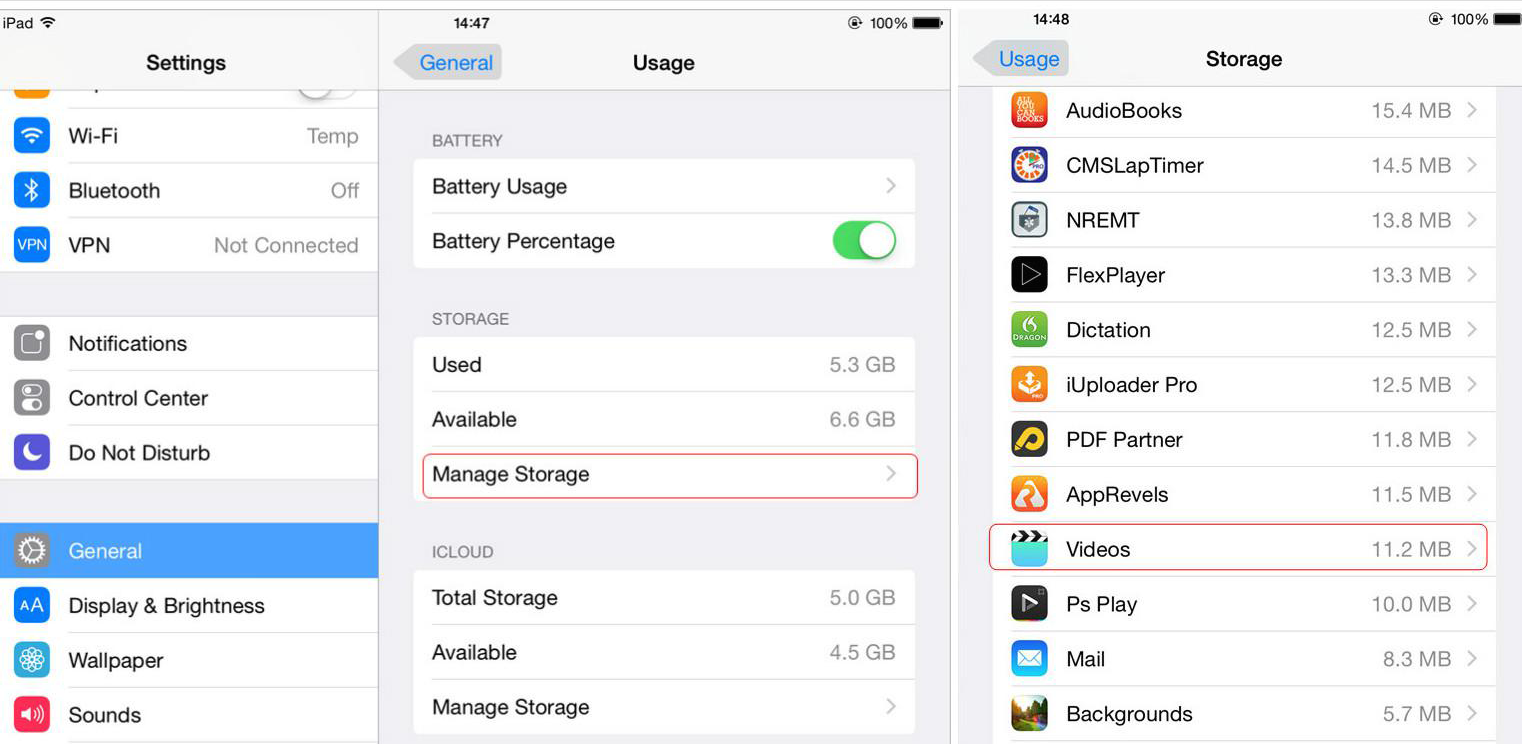
For iPad running iOS 8: Settings > General > Usage > Manage Storage > Videos. Find the video/movie you want to delete, swipe it to left, and then tap the red “Delete” button.
For iPad running iOS 9 and higher: Settings > General > Storage & iCloud Storage > Manage Storage under Storage > Videos. Select the video you want to remove, swipe it to left, and then tap the red “Delete” button to delete the videos from your iPad.
As for your recorded videos: Go to “Photos” app on your iPad > Touch the “Albums” icon at the bottom of the screen > Select the Videos option > Tap the “Select” button at the top-right of the screen > Choose the recorded video that you want to delete > Tap the trashcan icon. Touch the “Delete Video” button to remove the video.
How to Delete Videos from iPad in Settings App
Note:
1. If you feel Method 1 is kind of complicated, you can refer to Method 2 to easily delete movies from your iPad.
2. Before you delete the videos from your iPad with Method 1, you’d better transfer them to your computer as a backup especially the videos you are taking by yourself which might record the sweet memories of your life. So, in the next part, I will introduce to you an iOS management tool that allows you to delete and backup videos on your iPad.
Method 2. How to Delete Movies/Video from iPad with AnyTrans
AnyTrans is an iOS management tool that allows you to export, import, and delete videos from iPhone, iPad, and iPod touch with ease:
AnyTrans – iPad Videos Manager
- Extract videos from your iPad and classified them according to folders.
- Allow deleting movies, videos, TV Shows, and more from iPad.
- Before deleting videos, transfer them to computer or iTunes as a backup.
- Put videos on iPad without erasing, and transfer from iPad to iPad/iPhone.
Free Download100% Clean & Safe
Free Download100% Clean & Safe
Free Download * 100% Clean & Safe
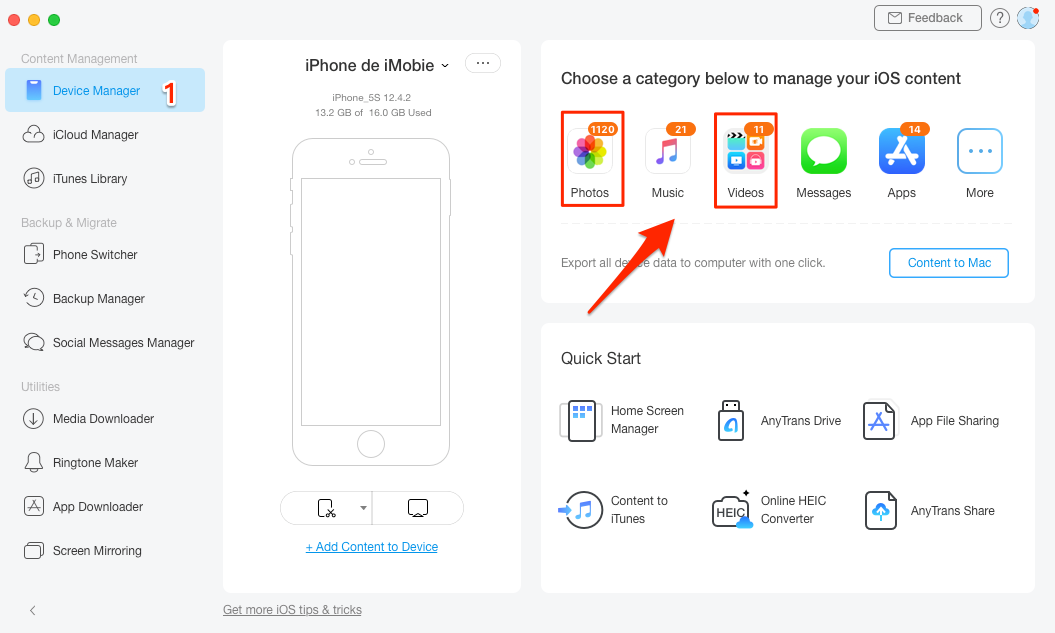
Step 1. Download AnyTrans and install it on your computer. Run it and connect your iPad (here we take the iPhone as an example) to your computer. AnyTrans will show you the device info and content.
Step 2. Click the Videos tab on the main interface to start managing your iPad videos. Or, Photos will also save some videos.
Delete Videos from iPhone with AnyTrans
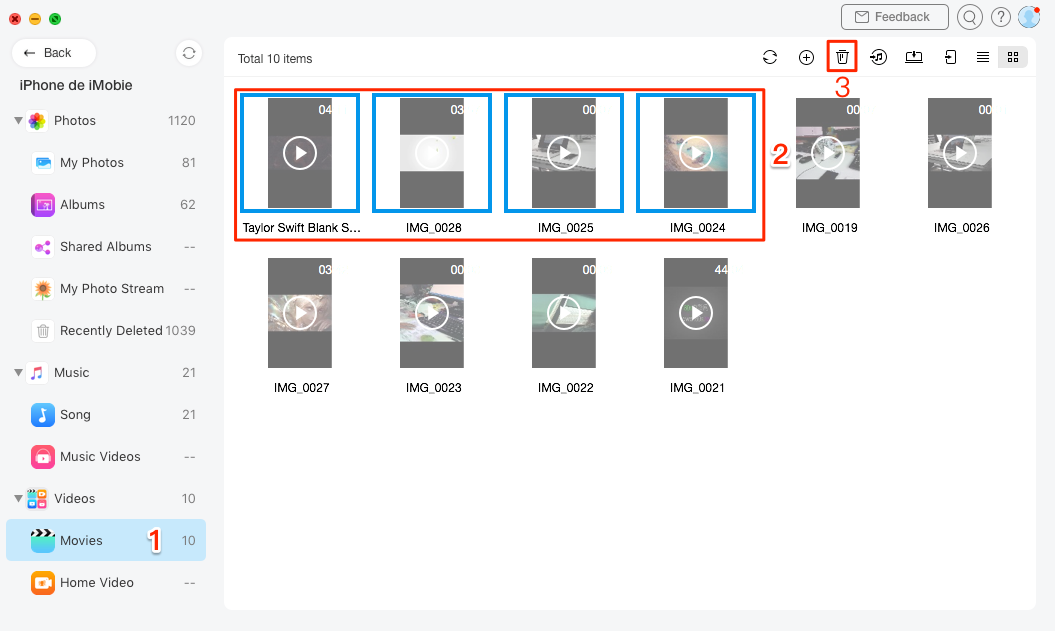
Step 3. Choose which types of videos you want to delete from your iPad. AnyTrans supports you to manage Movies, Home videos, TV Shows, and Music Videos on your iPad. Here we take Movies as an example, choose the video you want to delete and click the trash bin icon on the top-right to delete the videos.
Delete Movies from iPhone with AnyTrans
You May Like: How to Delete Music from iPad in 3 Ways >
The Bottom Line
Compare the above two methods, both of which could help you get rid of your iPad videos. Downloading the free trial of AnyTrans to have a try is highly welcomed. Besides deleting iPad videos, you can also try the function of downloading videos to your iPad with a URL. Be free to let us know if you have any questions on this guide or AnyTrans. At the same time, don’t forget to share this guide with your friends.

Senior writer of the iMobie team as well as an Apple fan, love to help more users solve various types of iOS & Android-related issues.
Product-related questions? Contact Our Support Team to Get Quick Solution >
