Redmi Note 8 FRP Bypass: Unlock Tool & No-PC Methods
Redmi Note 8 FRP methods vary by Android version and security patch. Learn when Google Assistant, ADB, and no-PC APK routes may work, and when a guided FRP unlock tool is the better fallback.
Redmi Note 8 FRP bypass usually becomes a problem after a factory reset, when the setup screen still asks for the Google account that was previously synced on the phone. Some older Redmi Note 8 methods still mention Google Assistant, ADB, APK files, or Share Me, but whether they work depends on the Android version, MIUI build, and security patch installed on the device.
This guide helps you choose a realistic Redmi Note 8 FRP bypass path: recover the original Google account first, try manual no-PC routes only when the screens still match, understand the limits of ADB, or use a guided Redmi Note 8 FRP unlock tool when manual methods fail.
⚠ Legal Notice: Use these methods only on a Redmi Note 8 you own or are authorized to unlock. Bypassing FRP on a lost, stolen, or unauthorized device may be illegal. Some methods may erase data from the phone.
Table of ContentsHide
Quick Answer: Which Redmi Note 8 FRP Bypass Method Should You Use?
Choose the Right Redmi Note 8 FRP Bypass Method
Need More Redmi FRP Methods?
What Is FRP on Redmi Note 8?
Method 1: Redmi Note 8 FRP Unlock Tool with DroidKit
Method 2: Bypass FRP on Redmi Note 8 via Google Assistant
Method 3: Bypass Redmi Note 8 FRP with ADB Commands
Method 4: Redmi Note 8 FRP Bypass Without PC via APK / Share Me
What If Redmi Note 8 FRP Bypass Does Not Work?
How to Avoid Triggering FRP Lock Again
Redmi Note 8 FRP Bypass FAQs
Conclusion: Best Path for Redmi Note 8 FRP
Quick Answer: Which Redmi Note 8 FRP Bypass Method Should You Use?
The best Redmi Note 8 FRP bypass method depends on whether you still have the previous Google account, whether manual setup routes are open, and whether USB debugging was already enabled before the reset.
- Have access to the old Google account? Use Google Account Recovery first. It is the safest official route.
- Need a Redmi Note 8 FRP unlock tool? Use a guided PC-based workflow such as DroidKit when manual routes do not match your screen.
- Want a no-PC method? Google Assistant or APK / Share Me routes may work only on some older MIUI builds.
- Trying ADB? ADB usually works only if USB debugging was already enabled and your computer was authorized before lockout.
If Google Assistant, ADB, or APK routes do not match your Redmi Note 8 screen, stop repeating the same path and move to a guided PC-based FRP workflow.
Choose the Right Redmi Note 8 FRP Bypass Method
Use this table to decide which method fits your situation before trying long steps or downloading APK files.
| Method | PC Needed? | Best For | Main Limitation |
| Google Account Recovery | No | Users who can recover the original Google account | Requires recovery email, phone number, or account proof |
| DroidKit FRP Bypass | Yes | Users who want a guided Redmi Note 8 FRP unlock tool | Requires a Windows or Mac computer |
| Google Assistant / Accessibility | No | Older MIUI builds where setup shortcuts still open Settings | Often patched on newer security updates |
| ADB Commands | Yes | Advanced users with USB debugging already enabled | Does not work if debugging was not enabled before lockout |
| APK / Share Me / Activity Launcher | No | Users trying a no-PC method on older firmware | APK source and compatibility risks |
If Your Redmi Note 8 Method Looks Different
Redmi Note 8 guides often depend on older MIUI screens, especially Google Assistant, ADB, APK, or Share Me routes. If your phone skips a menu, blocks an app shortcut, or shows a newer verification flow, check the main Redmi FRP bypass guide for Redmi-wide method changes before repeating the same steps.
What Is FRP on Redmi Note 8?
FRP means Factory Reset Protection. On Redmi Note 8, it is triggered when a Google account was synced on the phone before a reset. After the reset, the phone may ask you to sign in with that same Google account before setup can continue.
FRP can appear in these situations:
- You forgot the Google account or password used on the Redmi Note 8.
- You bought a second-hand Redmi Note 8 and the previous owner did not remove the Google account.
- You reset the phone from Recovery Mode before removing the Google account from Settings.
- You recently changed the Google password and Google temporarily blocks verification on the reset device.
Before trying a bypass method, use Google Account Recovery whenever possible. If the previous owner is available, ask them to remove the Google account from the device or from their Google account settings.
Method 1: Redmi Note 8 FRP Unlock Tool with DroidKit
If manual methods are blocked or too technical, DroidKit FRP Bypass provides a guided PC-based workflow for supported Android FRP scenarios. It can be useful when your Redmi Note 8 is stuck on Google verification and Google Assistant, ADB, or APK methods do not work.
Use DroidKit if:
- You need a guided Redmi Note 8 FRP unlock tool.
- Google Assistant does not open Settings or Help & Feedback.
- USB debugging was not enabled before the reset, so ADB cannot detect the phone.
- APK installation is blocked or you do not want to install unknown APK files.
- You have a Windows PC or Mac and a stable USB cable.
You can also compare more best FRP bypass tools before choosing a tool.
Free Download * 100% Clean & Safe
Steps to Bypass Redmi Note 8 FRP with DroidKit
Step 1. Download, install, and launch DroidKit on your PC or Mac. Choose FRP Bypass from the main interface.
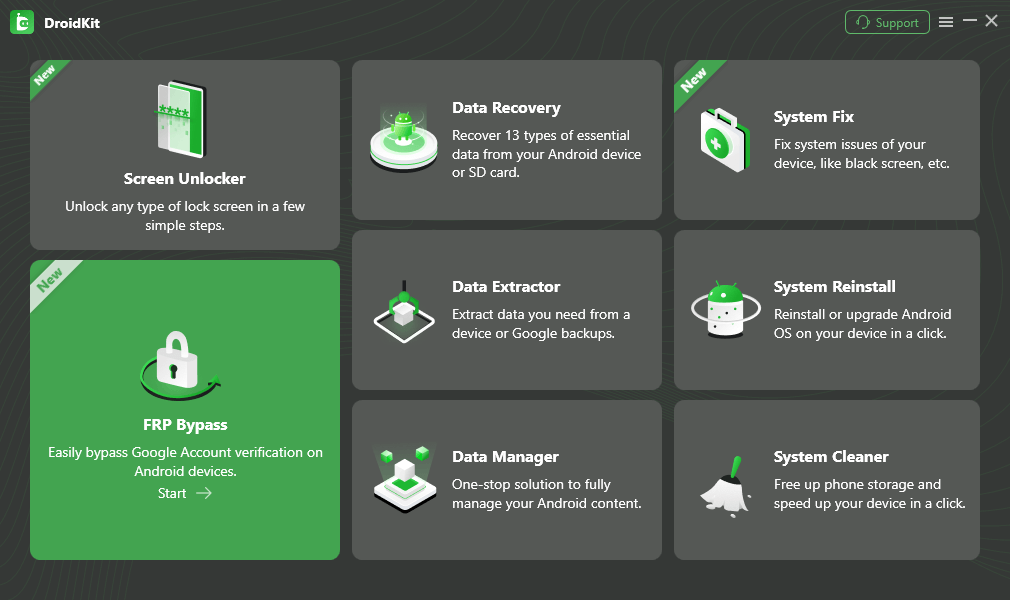
Choose FRP Bypass Mode
Step 2. Connect your Redmi Note 8 to the computer with a USB cable, then click Start.
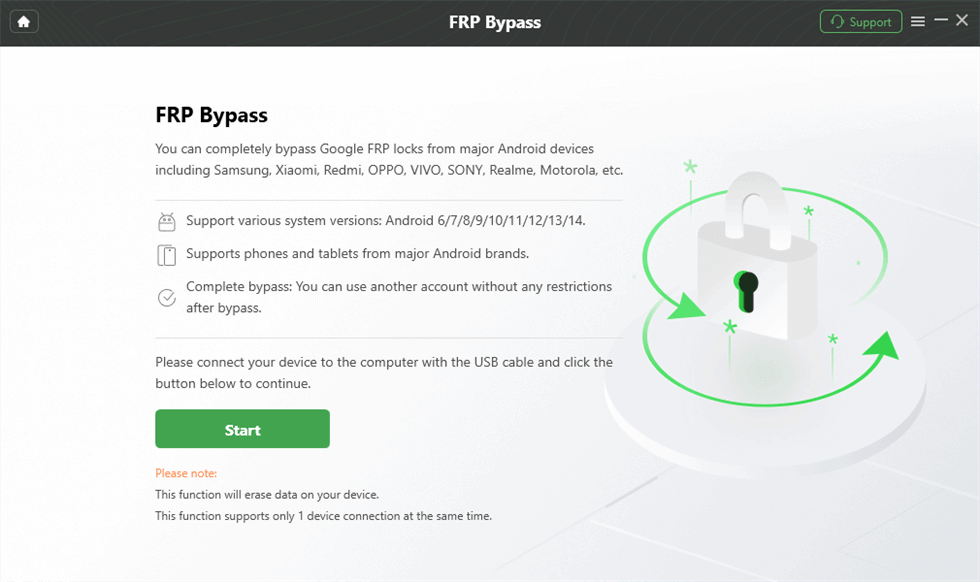
Connect Device and Click Start
Step 3. Select the device brand when DroidKit asks for it. Choose the Redmi / Xiaomi option shown in the interface.
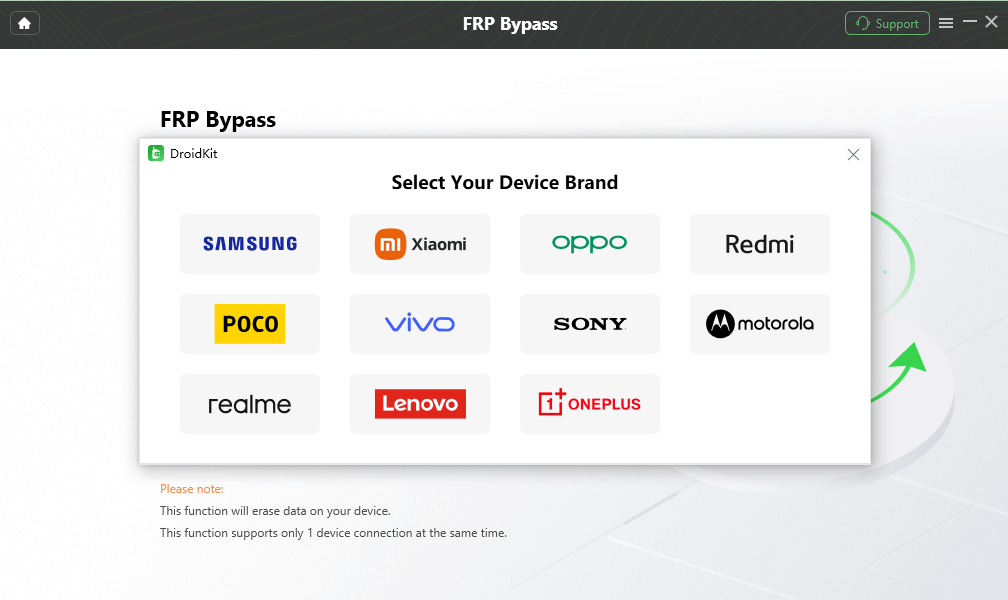
Choose Device Brand
Step 4. Wait while DroidKit prepares the configuration file for your device. When it is ready, click Start to Bypass.
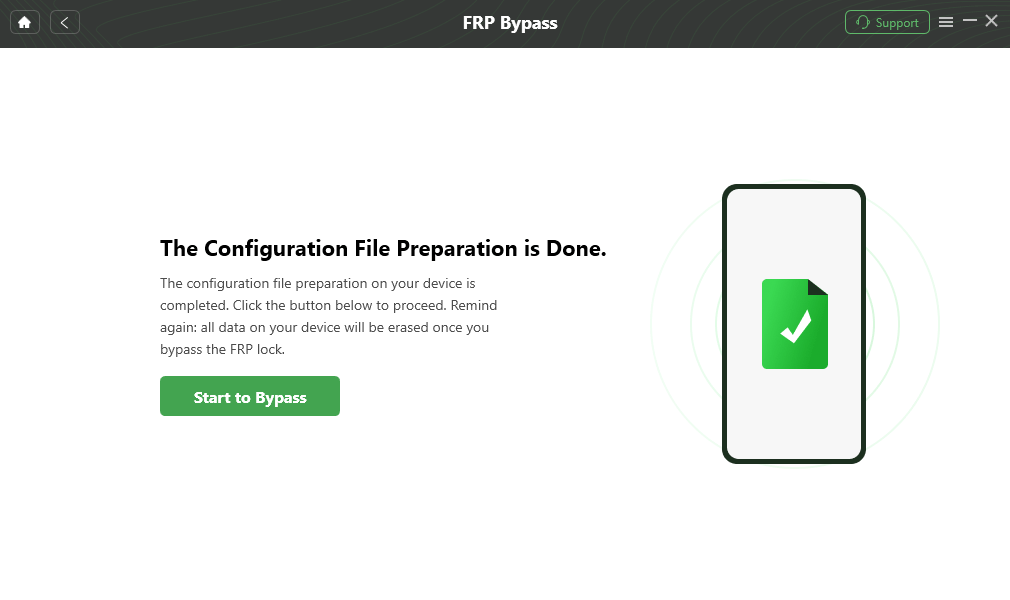
Click Start to Bypass
Step 5. Select the system version according to the on-screen prompt, then click Next.
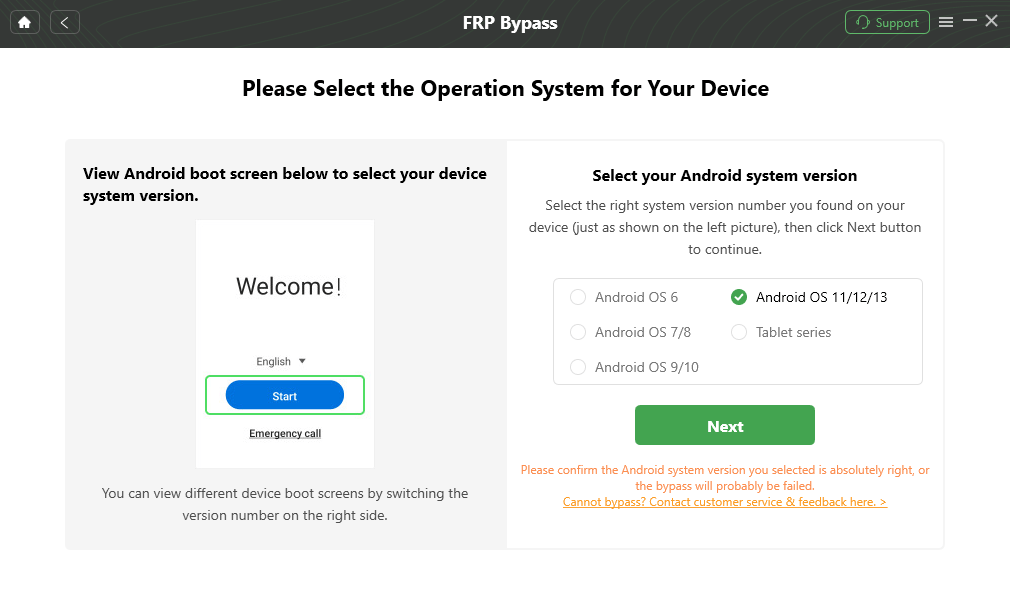
Choose System Version
Tip: Different Android versions may require different steps. Make sure the system version you select matches your device as closely as possible.
Step 6. Follow the on-screen instructions to complete the required settings. When the interface asks you to reset in the required mode, click Reset.
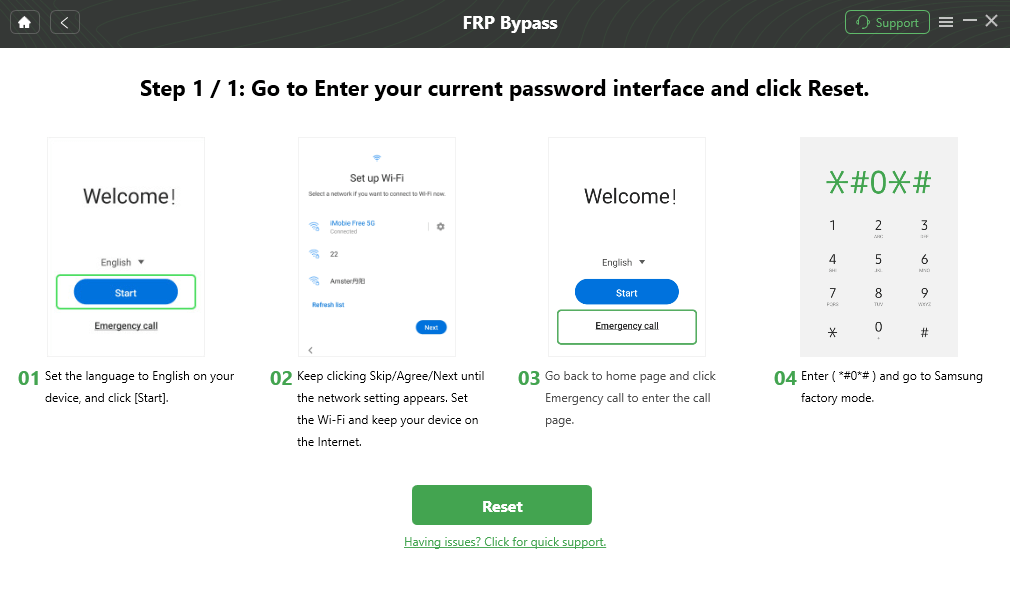
Complete Corresponding Settings
Step 7. Wait for the process to finish. Your Redmi Note 8 may restart, and you can continue setup after the FRP process completes.
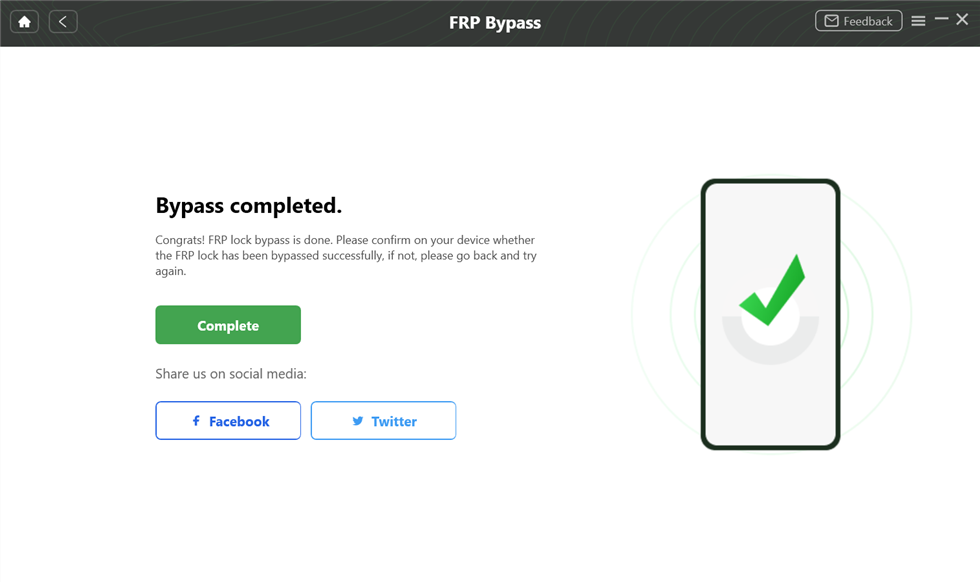
FRP Bypass Complete
Method 2: Bypass FRP on Redmi Note 8 via Google Assistant
The Google Assistant / Accessibility method is a no-PC route that may work on some older Redmi Note 8 builds. It tries to open app settings, accessibility options, or Google-related pages from the setup screen.
Compatibility Note: This method is often patched on newer MIUI or HyperOS builds. If the menus do not match your screen, skip repeated attempts.
Step 1. Go to the network settings screen and tap Add Network.
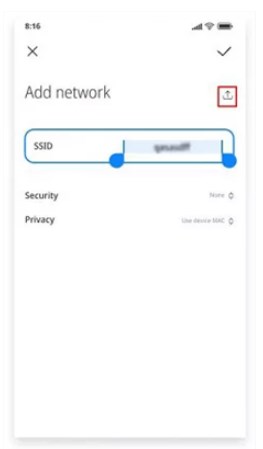
Add Network
Step 2. In the SSID field, type any text. Long-press the text and check whether the share option appears.
Step 3. Try to send the shared text to a Gmail or messaging path if your build still allows it.
Step 4. Open Notifications > Additional Settings. Tap the three-dot icon and choose Help & Feedback if it appears.
Step 5. Search for Delete and disable apps on Android, then try to open Application Settings.
Step 6. Go to Settings > Additional Settings > Accessibility > Accessibility Menu, then enable the shortcut if available.
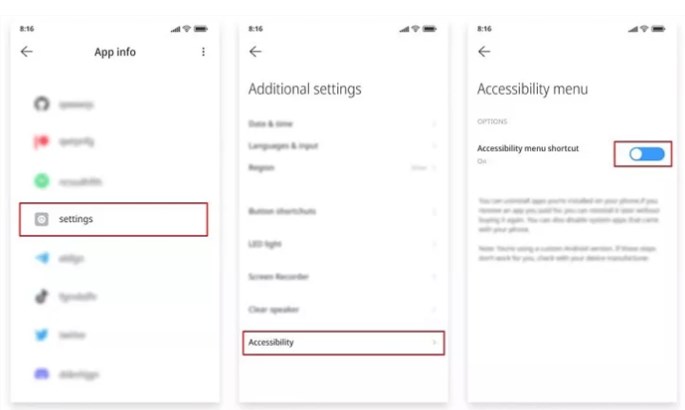
Activate the Accessibility Menu Shortcut
Step 7. Return to app information, tap More, then choose Show System. If the screen allows it, open Android Setup, then try disabling or force-stopping it.
Step 8. Return to the setup process and check whether you can continue past the Google verification screen.
This method does not work on every Redmi Note 8. If Help & Feedback, Application Settings, or Accessibility Menu is missing, this route is likely blocked on your firmware.
Method 3: Bypass Redmi Note 8 FRP with ADB Commands
ADB stands for Android Debug Bridge. It can communicate with an Android device from a computer, but it is not a universal FRP bypass method.
Important: ADB usually works only if USB debugging was already enabled before the phone became locked and the computer was already authorized. If your Redmi Note 8 is already locked and USB debugging was never enabled, ADB will usually not help.
Step 1. Install Android platform tools or a trusted ADB setup package on your computer.
Step 2. Connect your Redmi Note 8 to the computer with a USB cable.
Step 3. Open Command Prompt or Terminal in the ADB folder.
Step 4. Run the following command to check whether the device is detected:
adb devices
Step 5. If the device is detected and authorized, advanced users may try model-appropriate ADB commands only when they understand the risk.
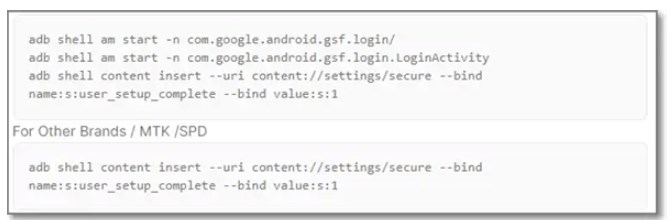
ADB Command Example
If the device shows as unauthorized, not detected, or permission denied, stop using ADB and choose another method.
Method 4: Redmi Note 8 FRP Bypass Without PC via APK / Share Me
The no-PC APK / Share Me method is more complicated and less predictable. It may work on some older Redmi Note 8 builds where browser access, Share Me, Activity Launcher, and setup transfer paths are still available.
Security Warning: Do not download FRP APK files from random short links, comments, or unknown websites. Unknown APK files may contain malware, fail to install, or stop working after security updates.
Step 1. Factory reset your Redmi Note 8, turn it on, and connect to Wi-Fi.
Step 2. On the Google verification screen, open the keyboard options and check whether you can reach a privacy policy, browser, or share path.
Step 3. If a privacy policy page opens, try to launch a messaging or browser route from the visible links.
Step 4. If YouTube opens, go to Settings > About > YouTube Terms of Service to check whether Chrome or another browser opens.
Step 5. If browser access is available, use only trusted sources. Avoid unknown FRP APK collections or bundled files.
Step 6. On another Android phone, install Share Me and Activity Launcher from a trusted source. Use Share Me to transfer only the app needed for the method.
Step 7. On the locked Redmi Note 8, open Activity Launcher if it transfers successfully. Try to find a system activity related to Android Setup or account setup.
Step 8. If the method reaches account setup, sign in with your own Google account and finish setup.
If APK installation is blocked, Share Me cannot connect, Activity Launcher cannot open system activities, or Google verification remains, this no-PC route is not suitable for your firmware.
What If Redmi Note 8 FRP Bypass Does Not Work?
If one method fails, do not repeat it many times. Use the table below to find the likely reason and next step.
| Problem | Likely Reason | What to Try Next |
| Google Assistant or Help & Feedback does not open | Setup shortcut is patched | Try Google recovery or a guided PC method |
| Accessibility Menu is missing | MIUI / HyperOS blocks setup access | Stop repeating the Google Assistant route |
| ADB does not detect the phone | USB debugging was not enabled or computer was not authorized | ADB will not work in this case |
| APK file will not install | Unknown source access or APK compatibility is blocked | Avoid unsafe APKs and switch methods |
| Phone still asks for the old Google account | FRP is still active after reset | Recover the account or use a supported FRP workflow |
If USB debugging was not enabled or APK installation is blocked, a PC-based Redmi FRP unlock tool may be the safer next step.
How to Avoid Triggering FRP Lock Again
After you regain access to your Redmi Note 8, remove the Google account before performing another factory reset. This reduces the chance of being locked out again.
Step 1. Open Settings on your Redmi Note 8.
Step 2. Go to Accounts & Sync or Passwords & accounts, depending on your MIUI version.
Step 3. Tap the Google account connected to the phone.
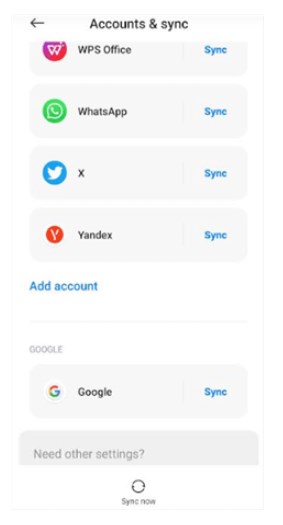
Tap the Google Account
Step 4. Choose Remove account if the option is available.
Step 5. After removing the Google account, perform a factory reset only when you are sure the account has been removed.
Redmi Note 8 FRP Bypass FAQs
How do I know if my Redmi Note 8 is locked by FRP?
If your Redmi Note 8 shows a Google account verification screen after a factory reset, it is likely locked by FRP. The phone expects the Google account previously synced on the device.
What is the best Redmi Note 8 FRP unlock tool?
The best tool depends on your Android version and security patch. DroidKit FRP Bypass is a guided PC-based option when Google Assistant, ADB, or APK methods do not work.
Can I bypass Redmi Note 8 FRP without PC?
Sometimes. No-PC methods such as Google Assistant or APK / Share Me routes may work on older MIUI builds, but they often fail on updated firmware.
Does ADB work for Redmi Note 8 FRP bypass?
Only in limited cases. USB debugging must already be enabled and the computer must already be authorized. If the phone is already locked and ADB was not set up before, this method usually will not work.
Can I bypass FRP by simply resetting Redmi Note 8 again?
No. Another factory reset usually does not remove FRP. If the Google account was not removed before reset, the phone may still ask for that account during setup.
Does this guide also apply to Redmi 8?
Some ideas may be similar, but Redmi 8 and Redmi Note 8 can have different firmware and setup screens. Use a model-specific guide whenever possible.
Will Redmi Note 8 FRP bypass erase data?
Some FRP bypass methods may erase data or require reset steps. If the phone was already factory reset, most local data may already be unavailable.
Conclusion: Best Path for Redmi Note 8 FRP
Redmi Note 8 FRP bypass depends on your Android version, MIUI patch, and whether the old setup shortcuts still work. Start with Google Account Recovery if you can access the original account. Try Google Assistant, ADB, or no-PC APK methods only when the screens match your device and you understand the risks.
If Google Assistant is patched, ADB cannot detect the phone, or APK installation is blocked, stop repeating the same path. A guided PC-based workflow such as DroidKit is usually the more practical fallback for supported Redmi Note 8 FRP scenarios.
Free Download * 100% Clean & Safe
More Related Articles

Joy Taylor is a seasoned technical writer with over a decade of experience in mobile technology. At iMobie, she specializes in producing in-depth content on iOS data recovery, iPhone unlocking solutions, and iOS troubleshooting.
Product-related questions? Contact Our Support Team to Get Quick Solution >
