[Solved] How to Fix Your SIM Sent a Text Message Issue on iPhone
There may be an issue between your iPhone and your cellular provider if your iPhone implies that Your SIM sent a text message but you’re unsure of why. In order to fix the problem, we will outline what to do in this article if you get this message on your iPhone.
Is your iPhone repeatedly showing a notification that primary Your SIM sent a text message, and you’re not sure about this? There seem to be instances when you are doing something and are disturbed by unforeseen events. Sometimes you question why and how this occurs. Kind of like when your smartphone just notifies you with such an alert notification, which really is inconvenient. This is what most iPhone owners have experienced, who are perplexed as to what they’re suddenly receiving a notification stating, “Your SIM sent a text message?” If it just occurs once, it shouldn’t be an issue, however, the popup prompt recurs, making it really upsetting.
Despite the fact that the iPhone offers tremendous speed and power, customers all over the world choose them because of the iOS user interface. This does not, however, mean that iPhones cannot occasionally have faults and failures. In this article, we will demonstrate a few alternative approaches about what to do when you get this message on your iPhone so that you can solve that problem perpetually.
Also Read: How to Change Text Message to iMessage on iPhone/iPad >
Why Does iPhone Say Your SIM Sent a Text Message?
The iPhone is attempting to notify you of a SIM card operation whenever it keeps informing you that your SIM card got a text message. Your network service operator is involved, to some extent. This might also occur if your SIM card needs to be updated along with a few carrier settings. Your iPhone is trying to let you know what’s happening and is probably waiting for a reaction from you. What other options do you have in this situation to stop this warning notification from showing up on your screen?
Since you just have a few options to think considering your carrier or network provider is most likely to blame before getting in touch with customer care and standing in line.
Also Read: How to Bypass iPhone SIM Not Supported Issue >
How to Fix Your SIM Sent a Text Message Issue on iPhone?
In this part, we’ll go through several ways for stopping your SIM card from sending these text messages to your iPhone.
Way 1. Restart Your iPhone
Your iPhone somehow doesn’t restart once the carrier preferences have been updated, in contrast to previous upgrades and resets. After you’ve already updated the carrier configuration on your iPhone, your SIM card may occasionally become stuck messaging your cellular provider repeatedly. The constant cycle of messaging by your SIM card may indeed be broken by switching your iPhone off then and back on to make a fresh start.
Step 1. Hold the power button down till the “Slide to power off” option appears on the screen to turn off your iPhone. Swipe the red power icon on your iPhone from left to right to switch it off.

Slide to Power Off
Step 2. To reboot your iPhone, let it off for approximately 30 seconds and wait before pressing and holding the same power switch once again.
Way 2. Repair iOS System in One Click
iOS system issues can also cause this pop-up notification problem. In this case, you need to use a professional system repair tool, AnyFix – iOS System Repair, to help you solve this problem. The following are the specific features of AnyFix.
Free Download * 100% Clean & Safe
- Supports 150+ iOS system problem repair, such as your SIM sent a text message, Stuck on Apple Logo, Frozen Screen, etc.
- AnyFix has 3 repair modes to meet your different needs and maximize the success rate of system repair.
- No matter how complicated the problem is, AnyFix can help you fix it with one click.
- iTunes-related issues, such as iTunes can’t recognize iPhone and iTunes won’t sync with iPhone, can also be solved by AnyFix.
Now download AnyFix on your computer and follow the detailed instructions below to fix your SIM sent a text message issue.
Step 1. Launch AnyFix – iOS System Recovery software on your computer, followed by clicking on the System Repair option. Then, using a USB cable, connect your iPhone.
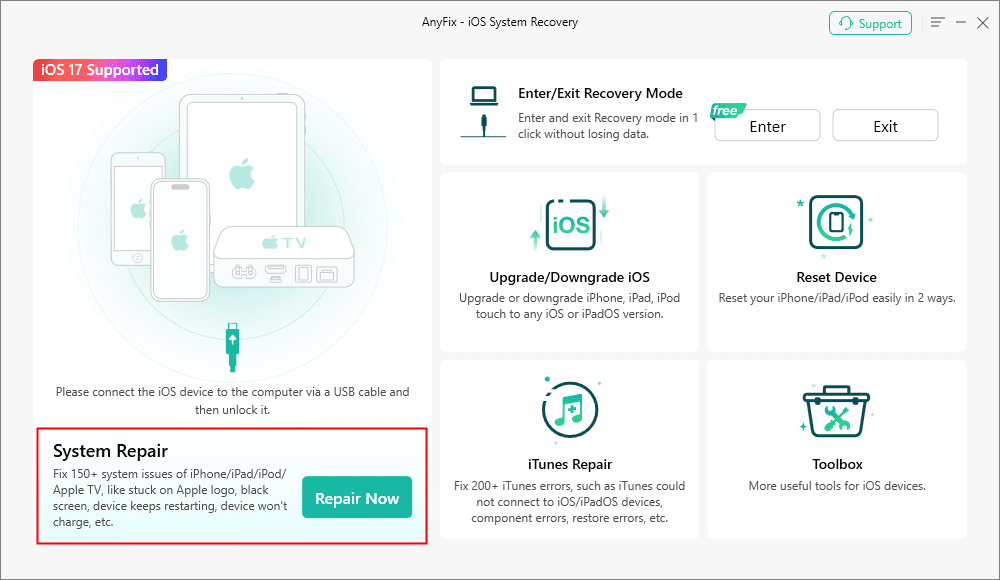
AnyFix System Repair Option
Step 2. Then select iOS Mode Stuck and tap on the Start Now button.
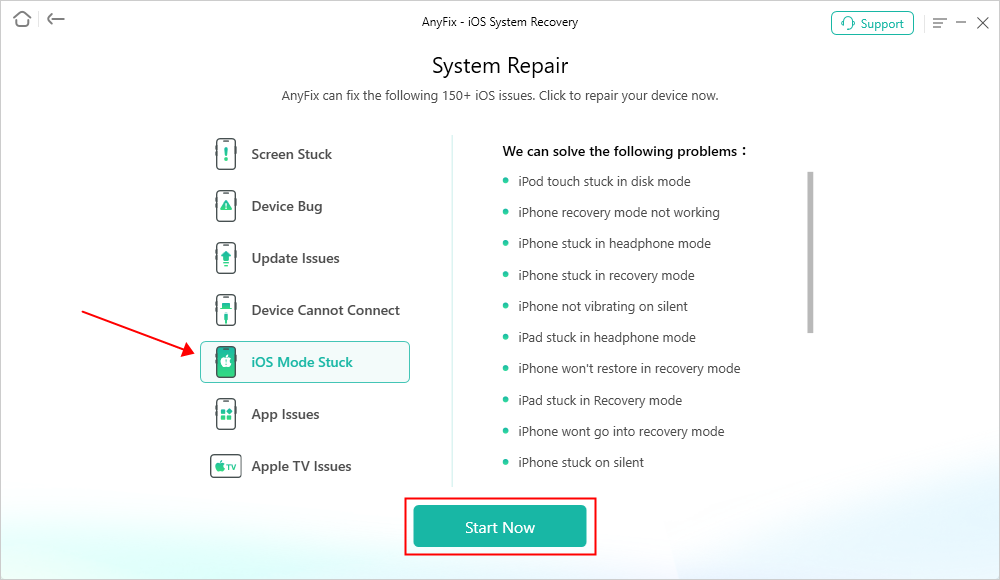
AnyFix System Repair iOS Mode Stuck
Step 3. After detecting the specific issue, AnyFix will provide you with the 3 different repair options. In this part, you need to choose Standard Repair mode.
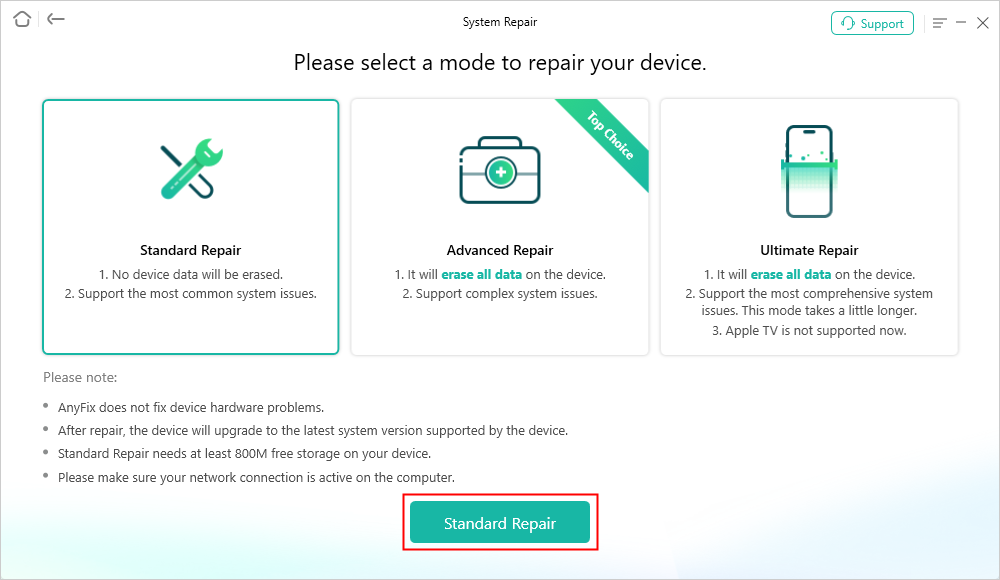
AnyFix Standard Repair
Step 4. Kindly validate your device’s information again after starting recovery mode. Then, simply click the Download button to get the firmware for your iPhone. Click the Fix Now button after downloading the firmware file.
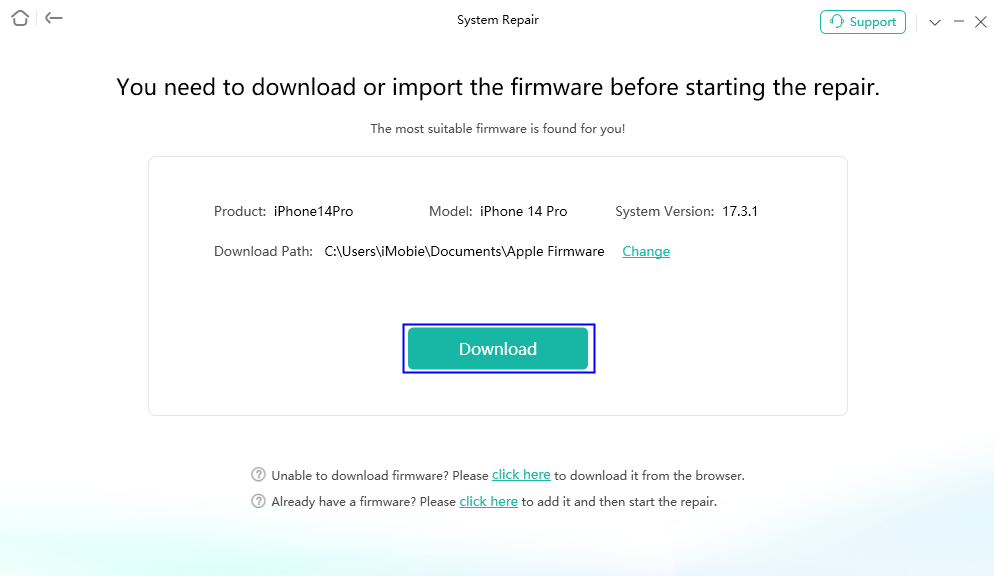
AnyFix System Repair Firmware Download
Step 5. Whenever the repair procedure is finished, you will view the finished page.
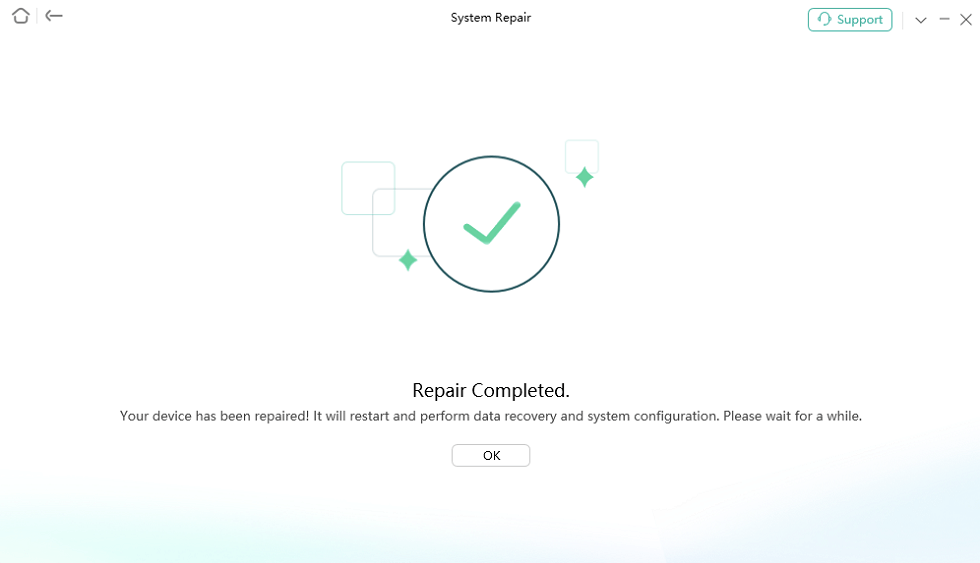
Repair Is Completed
Way 3. Check for Carrier Settings Update
You must be informed that your wireless provider will release a carrier setting update to enhance the functionality of your iPhone’s mobile network connection. Additionally, Apple transmits the carrier settings update but will do it in a completely different way whereby the SIM card doesn’t have to send messages in order to update promptly. Look out whether you have had any recently launched updates for your provider settings, and if you do, install them as described in the following:
Step 1. Go to your iPhone’s Settings and choose “General”. Then simply select “About.”
Step 2. In the next step, you need to click on the message that states “Carrier Settings Update”.
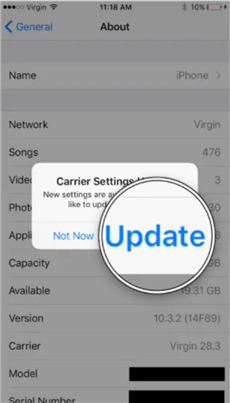
Carrier Settings Update
Step 3. Wait until it finishes updating the revised carrier settings before restarting your iPhone.
Way 4. Reset Network Settings
Most of your iPhone’s stored Bluetooth, Wi-Fi, VPN, and cellular configurations will be restored to their factory defaults when you reset the network configuration on your device. This might resolve a bug that may be enabling your SIM to send SMS to your cellular provider continuously. To fix the issue, you need to follow the steps below:
Step 1. Select “General” in the Settings app on your iPhone.
Step 2. Scroll down and choose “Reset” in this step.
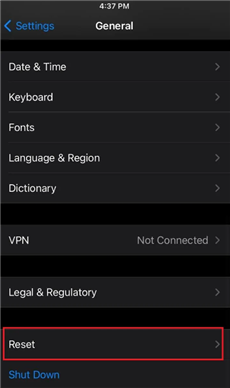
Click Reset in General Interface
Step 3. When prompted, select “Reset Network Settings” and provide your password.
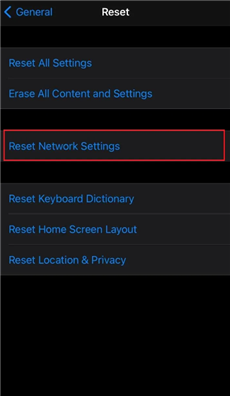
Choose Reset Network Settings
Step 4. Your iPhone will reset all of its network settings after you verify your decision in the popup.
Way 5. Re-insert SIM Card
In most circumstances, removing and reinserting the SIM card in your iPhone would just give your device a fresh start and allow it to rapidly reconnect to the wireless mobile network. Most iPhones feature a SIM tray on the left side, next to the power button.
To remove your SIM card, insert the SIM card ejector tool or a tiny paper slip through the little hole that appears at the bottom of the SIM tray. You must first remove the tray and then simply replace it.
Also Read: How to Transfer SIM Card to New iPhone >
Way 6. Contact Your Service Provider
After you’ve completed the above steps, verify to see whether the message popup indicating that your SIM sent another push notification is still displayed on your iPhone. If this is the case, the problem might be with the network provider. Consult your SIM wireless carrier to figure out what went wrong as well as how to solve it.
Bonus Tip. Unlock Sim Card on iPhone without Data Loss
If your SIM card is locked, you cannot use your device with another network carrier. So, if you have bought a network-locked iPhone and want to switch your carrier, we would offer a bonus tip to help you unlock your SIM card, that is to use AnyUnlock – iPhone Password Unlocker. As a complete iOS password unlocker, AnyUnlock allows you to unlock your SIM card in only a few minutes with simple clicks. And more importantly, all of your data and information will not be lost or leaked, so you can just unlock your device with confidence. And if you need to remove Activation Lock on your iPhone, find your iCloud email, unlock iPhone passcode, and remove Apple ID, AnyUnlock can also satisfy your demands.
Free Download * 100% Clean & Safe
The steps to show you how to unlock your SIM card with AnyUnlock are as follows:
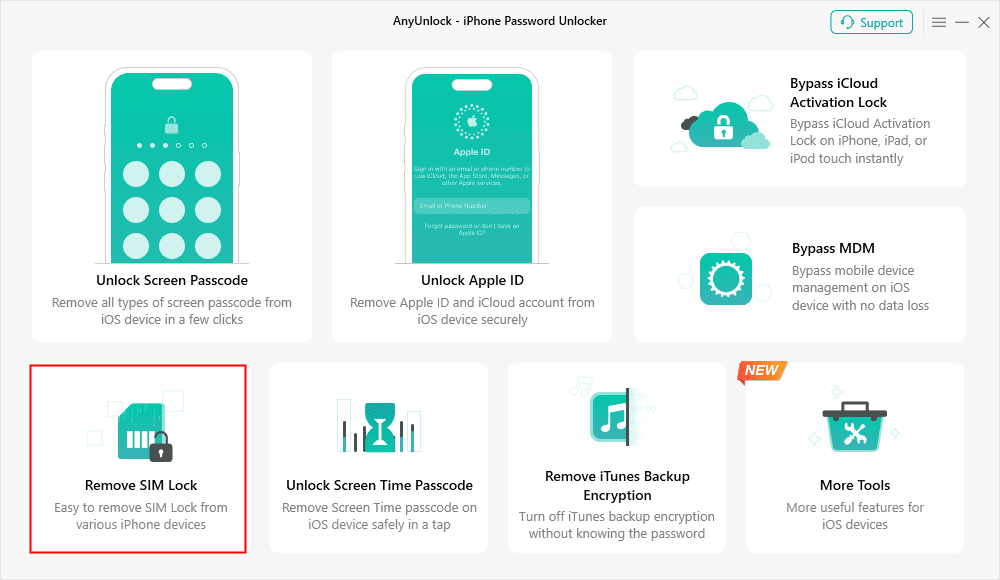
Step 1. On your computer, download and install AnyUnlock. Choose Remove SIM Lock from the left side.
Choose Remove SIM Lock
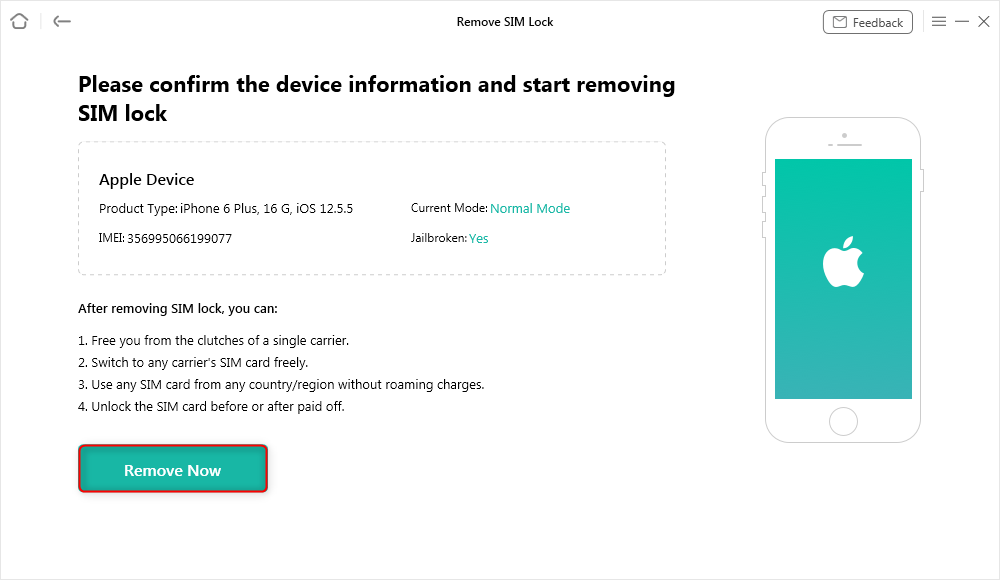
Step 2. Connect your iPhone to your computer and make sure it has been jailbroken. If not, just click the Jailbreak Tutorial on the screen. No data will be erased after jailbreaking. After that, press Remove Now to continue.
Click Remove Now
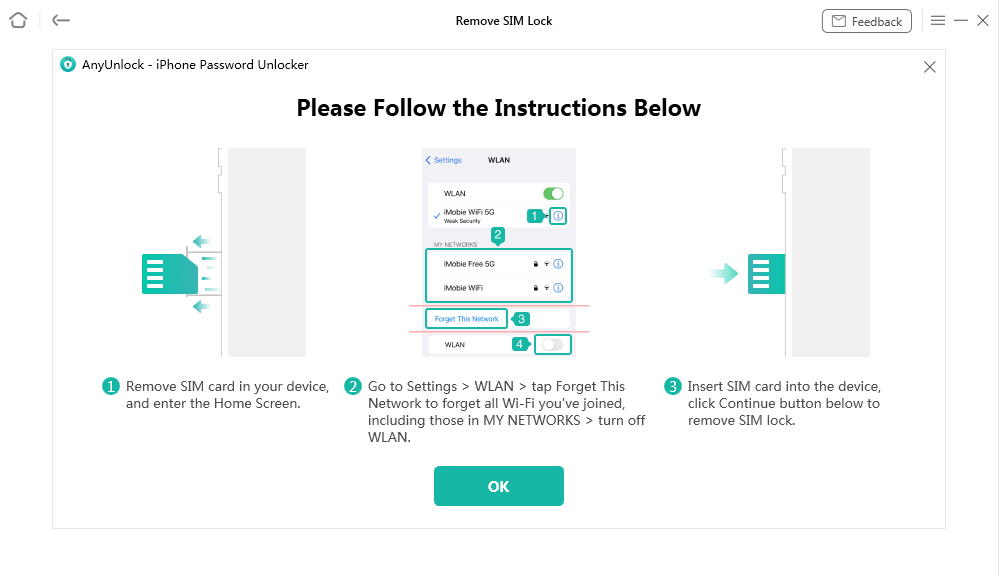
Step 3. To forget the Network on your iPhone, follow the on-screen directions. And you also need to reinsert your SIM card.
Pull Out of SIM Card and Disconnect the Internet
Step 4. Then, AnyUnlock will begin removing the SIM lock. The success page will appear after the SIM card has been unlocked.

SIM Lock Removed Successfully
The Bottom Line
In conclusion, we’ve shown you several key approaches to fix the Your SIM Sent a Text Message iPhone problem on your iPhone. And after testing all these solutions, AnyFix is among the best solutions you may use to quickly remove this pop-up message. We really hope that this in-depth explanation of what it means when it indicates your SIM sent a text message and the solutions it offered has helped you understand. Additionally, if you need to unlock your SIM card, don’t forget to try AnyUnlock.
Free Download * 100% Clean & Safe

Senior writer of the iMobie team as well as an Apple fan, love to help more users solve various types of iOS & Android-related issues.
Product-related questions? Contact Our Support Team to Get Quick Solution >
